User Manual - Automatic Related Products
- Installing M2 Automatic Related Products
- Uninstalling M2 Automatic Related Products
- Compatibility
- Introducing M2 Automatic Related Products
- Getting Around
- Creating Related Products Rules
- Overriding Automatic Related Products
- General Settings
- AJAX Cart Pro Integration
- Custom Block Position
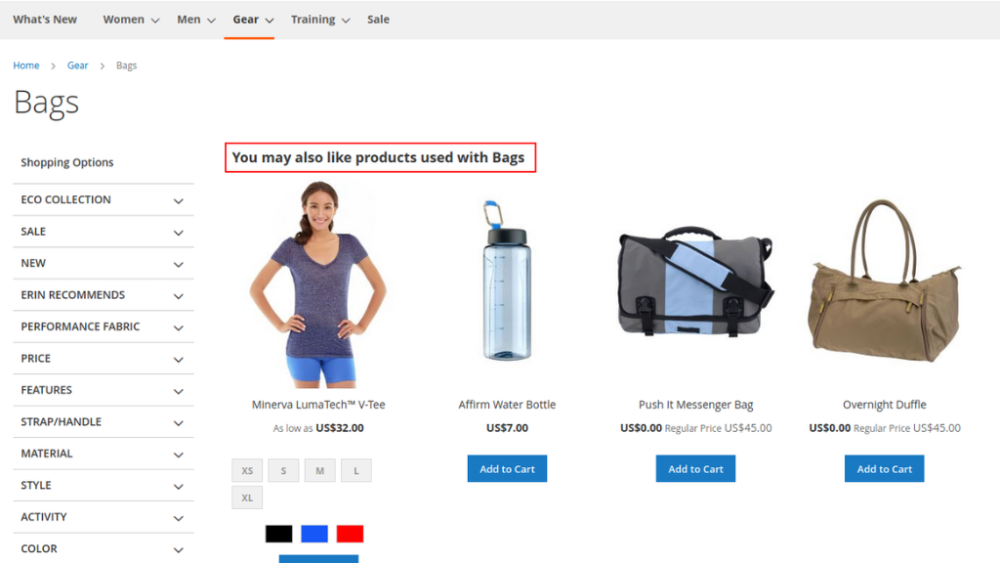
Magento 2 Automatic Related Products adds related product blocks to website pages. Products in blocks are displayed in accordance with specific rules regarding block position, name, priority, the pages where the block should be shown, the items to be included in it, the block's look. Automatic product suggestions can be disabled for individual products.
API documentation link
Installing M2 Automatic Related Products
Command Line Installation
- Backup your web directory and store database
- Download the Add Free Product to Cart installation package
- Upload the contents of the Add Free Product to Cart installation package to your store root directory
- In the SSH console of your server, navigate to your store root folder:
cd path_to_the_store_root_folder |
run the following command:
php bin/magento module:enable Aheadworks_Autorelated |
then:
php bin/magento setup:upgrade |
after:
php bin/magento setup:static-content:deploy -f |
5. Flush store cache; log out from the backend and log in again
|
Make sure the installation is done from the FTP Administrator account. Otherwise, set 775 permissions to the store root directory after the extension is deployed. |
Composer Installation
- If you are installing an extension from Aheadworks for the first time, you need to add our composer repository to your Magento store:
Login to your ssh console and navigate to your store folder:
cd path_to_the_store_root_folder |
Run the following command:
composer config repositories.aheadworks composer https://dist.aheadworks.com/ |
On successful execution of the command you will be able to use the composer to install the extensions.
To install the extension:
2. Login to your ssh console and navigate to your store folder:
cd path_to_the_store_root_folder |
3. Run the following command to install the latest version of the extension:
composer require aheadworks/module-automatic-related-products |
if you need to install a specific version, run this command:
composer require aheadworks/module-automatic-related-products:<version> |
|
Specify the version of the extension in <version> |
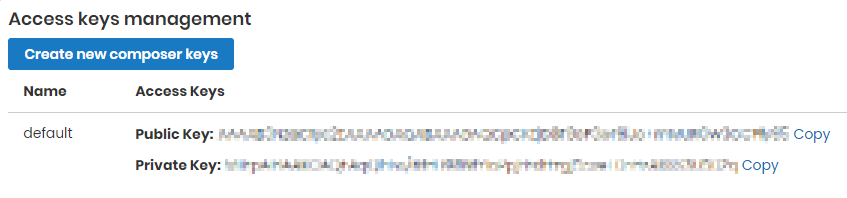
When prompted, enter Public Key (Username) and Private Key (Password):
.png?version=1&modificationDate=1613403631808&cacheVersion=1&api=v2&width=450)
Both Public Key (Username) and Private Key (Password) can be found in My Projects and Licenses in your personal account on our site:
4. Enable the extension:
php -f bin/magento module:enable <Module_Name> |
|
Add the product name in <Module_Name> |
Next, register the extension:
bin/magento setup:upgrade |
Recompile your Magento store if you are in the Production mode:
bin/magento setup:di:compile |
To verify that the extension is enabled, run this command:
bin/magento module:status |
Clean store cache, by running the following command:
bin/magento cache:clean |
Log out and Log in the backend again.
|
Want to use the Hyvä theme module? To install the Hyvä theme module, you need to install the module via composer using command: composer require hyva-themes/magento2-aheadworks-automatic-related-products
|
To upgrade the extension:
5. To update or upgrade an extension:
Download the updated extension file. Take note of the module-name and version. Export the contents to your Magento root.
If a composer package exists for the extension, run one of the following.
Update per module name:
composer update aheadworks/module-automatic-related-products |
Updater per version:
composer require aheadworks/module-automatic-related-products:<version> |
Run the following commands to upgrade, deploy, and clean the cache.
php bin/magento setup:upgrade --keep-generated
|
Uninstalling M2 Automatic Related Products
Since Magento introduced declarative Database you need to be very carefull when uninstalling or disabling the module.
|
NOTE: Please be very careful when uninstalling/disabling this module. This module uses a declarative DB scheme. Once the module is uninstalled the DB tables will be lost. |
Manual Removal
1. Disable the module by executing the following commands:
php bin/magento module:disable Aheadworks_Autorelated |
2. Remove the extension files from the following folder:
app/code/Aheadworks/Autorelated |
Automatic Removal (via Composer)
1. Disable the module by executing the following commands:
php bin/magento module:uninstall Aheadworks_Autorelated |
Compatibility
|
Module Version |
Magento Version |
PHP |
|
1.8.4 and earlier versions |
2.3.Х - 2.3.6 2.4.0 - 2.4.3 |
7.4 and earlier versions |
|
As of version 1.8.5 |
2.3.7-p3+ 2.4.0 - 2.4.4 |
7.4, 8.1 |
|
As of version 1.9.0 |
2.3.7-p3+ 2.4.0 - 2.4.5 |
7.4, 8.1 |
|
As of version 2.2.0 |
2.4.4 - 2.4.5 |
8.1 |
|
As of version 2.2.1 |
2.4.4 - 2.4.6 |
8.1 |
Introducing M2 Automatic Related Products
The Automatic Related Products (ARP) module introduces a powerful set of features to manage related product offers:
- Flexible rules quickly define which items to display as related and on which pages to display a related product block itself;
- Rule overriding with the native Magento related products (for individual products);
- Custom block on-page position;
- Grid (per-row) and slider block layout options.
Integrations
- Customer Segmentation (v. 1.1.0 or newer)
- AJAX Cart Pro
What's New?
The latest versions of the extension (2.5.0) enable the following:
- An option to use variables within the title of Automatic Related Products block
- Numeric attribute value-based rules
- An option to exclude products from Who Bought This Also Bought rules
Getting Around
The Automatic Related Products extension comes ready for work right after the installation.
Manage Rules
The first place to start is the 'Manage Rules' section available right from the backend navigation menu (Marketing → Automatic Related Products by aheadworks → Manage Rules).
This is the section where all the Automatic Related Products rule management takes place.
Here you are provided with rule short descriptions and performance stats:
- Views - displays the number of customer visits to the pages with the ARP block;
- Clicks - displays the number of clicks on the products displayed in the ARP block (both product clicks and add to cart actions are counted);
- CTR (Click-through rate) - represents the View-to-Click ratio.
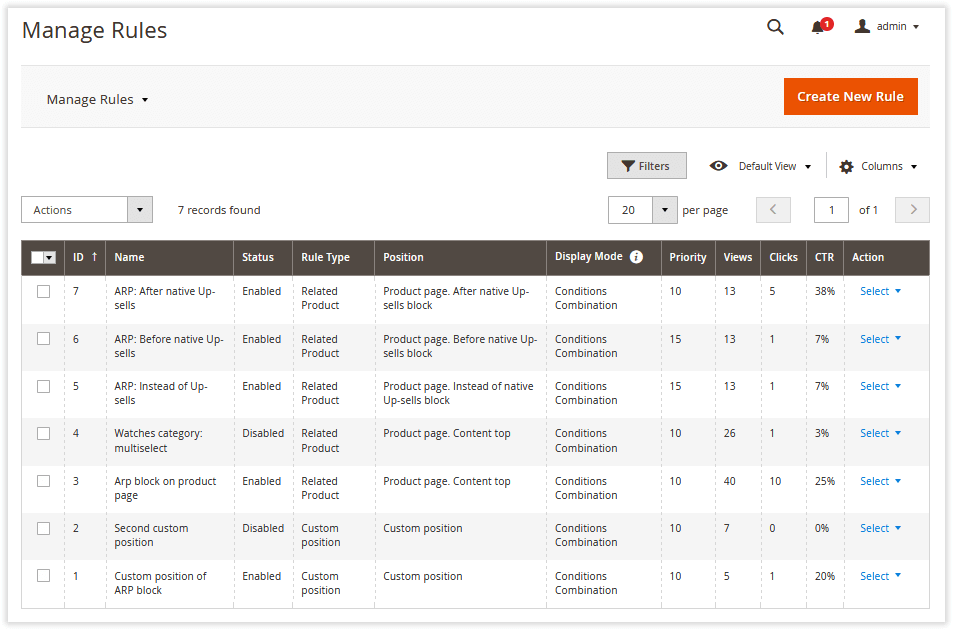
If you already have one or several rules created, this section provides the following opportunities:
- The Create New Rule button navigates you to the 'New Rule' screen where you are suggested to create new related product rules;
- Clicking a rule name navigates you to the 'Edit Rule' page where you can adjust the created rule settings;
- Enable and Disable quickly enable/disable the created rules;
- Trash box deletes a rule.
Additionally, the grid displays related product rule priorities and display modes. The rules with higher priority (10 is considered to be higher than 20) are executed first. The 'Display Mode' column shows the 'What to Display' display logic applied to a particular rule (described below).
Creating Related Products Rules
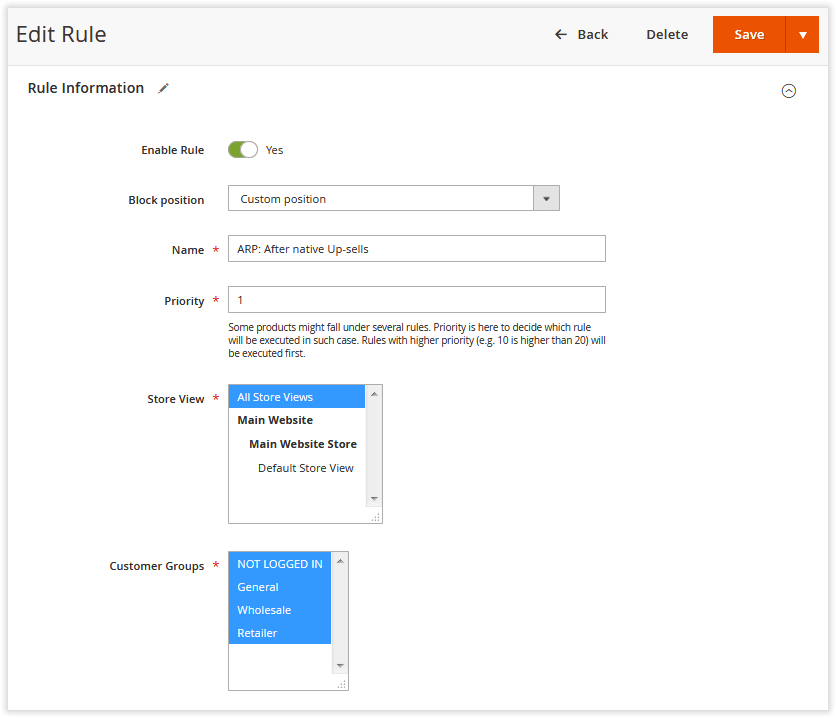
The new ARP rules can be created from the 'Manage Rules' section. To create a new rule, follow the steps below:
Step 1
Click on the Create New Rule button. You are now being navigated to the 'New Rule' page.
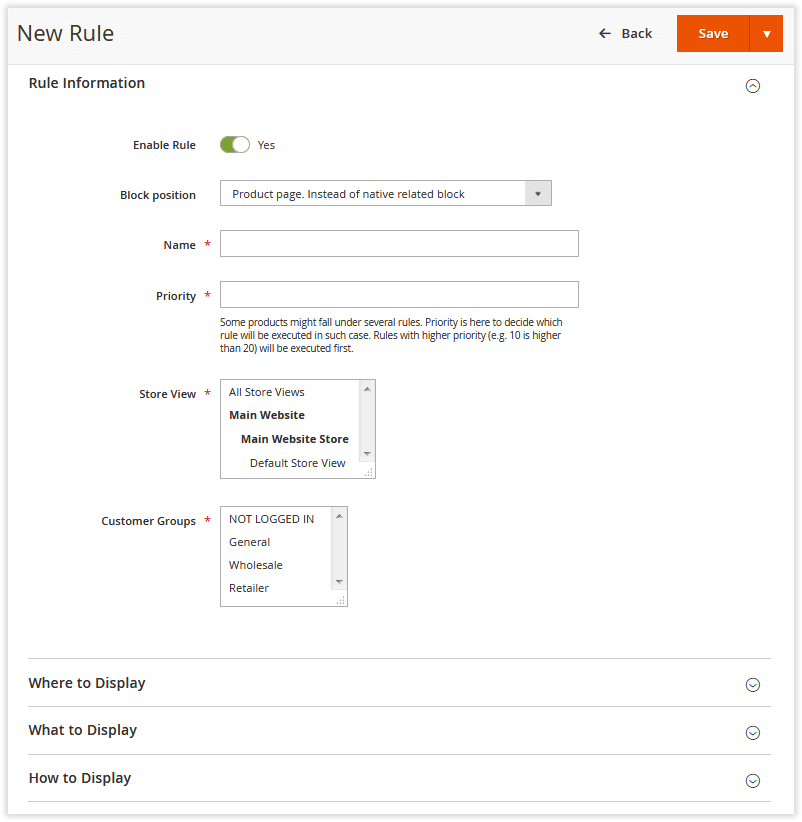
Step 2
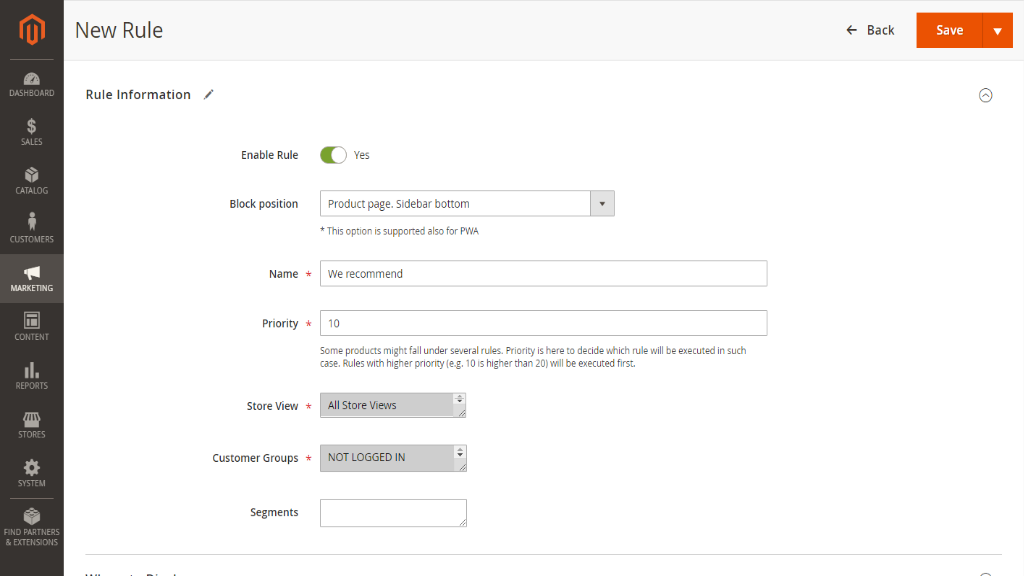
In the 'Rule Information' section, decide on the following:
- Enable/disable the rule;
- Choose the ARP block's position in the 'Block Position' field. Currently, there are eleven product page block positions, five shopping cart page positions, two catalog page positions, and the custom position option;
- Decide on the ARP rule name and type it in the 'Name' field (the name is used for internal identification purposes);
- Set the ARP block's Priority.
|
The ARP block's priority comes into play when there are several ARP blocks with the conditions intersected. For example, if you have two ARP blocks with the same block on-page position, only the ARP block with the highest priority will be displayed (when the Show more than one block in one position option is disabled). If these two blocks have the same priority value set, the block created earlier will have priority over the other. |
- Select the Store View the ARP block is to be displayed on;
- Select Customer Groups the ARP block is to be displayed to;
- Select Customer Segments the ARP block is to be displayed to.
|
If Customer Segmentation is installed, enable the "Compatibility with frontend extensions" option in Stores → Configuration → Aheadworks → Customer Segmentation for correct integration with the present extension. |
Once done with the above settings, navigate to the 'Where to Display' section.
Step 3
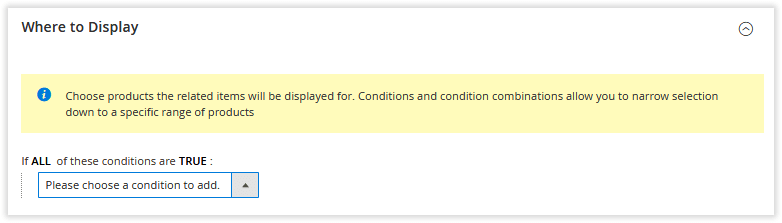
In the 'Where to Display' section, you are suggested to specify the product attributes or attribute combinations defining on which pages the ARP block should be displayed. The module uses the native Magento rules.
Depending on your requirements, you can either:
1) Define a particular set of product pages that will display the ARP block (Example 1);
2) Display the ARP block on all product pages excluding a particular set of product pages (Example 2).
|
Example 1:
Here we specified the product pages where ARP block should be displayed upon adding a category condition. In this case, the ARP block will be displayed ONLY on the product pages that belong to the 'Sale' category. |
.png?version=1&modificationDate=1555679591509&cacheVersion=1&api=v2&width=262)
|
Example 2:
Here we specified the product pages where the ARP block should NOT be displayed by adding the 'SKU' and 'Color' -based conditions. In this case, the ARP block will be displayed on ALL product pages of your store except for the ones that fall under the conditions set, namely: products with SKU 1, 2, or 3, and all products of the 'Red' color. |
.png?version=1&modificationDate=1555679699998&cacheVersion=1&api=v2&width=264)
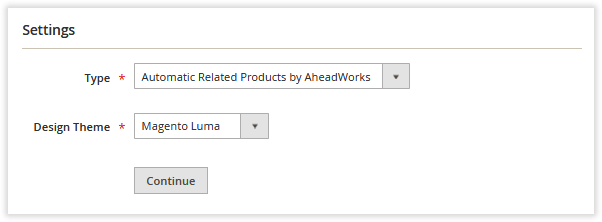
When you are done setting up the display location conditions, navigate to the 'What to Display'section:
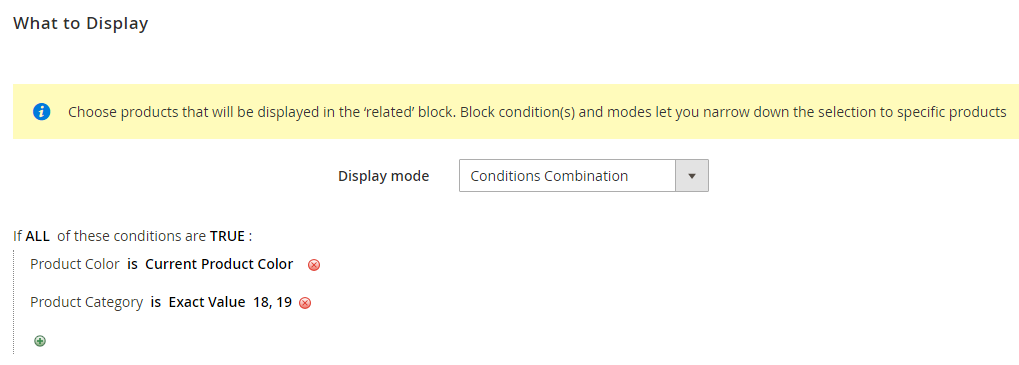
Step 4
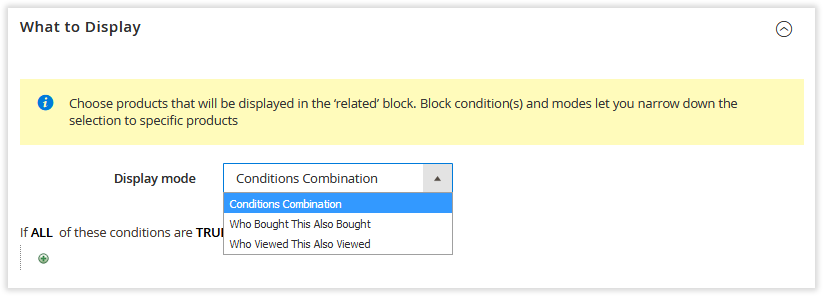
In the 'What to Display' section you are suggested to choose among the three display options:
- Conditions Combination;
- Who Bought This Also Bought (WBTAB);
- Who Viewed This Also Viewed (WVTAV).
|
The Who Bought This Also Bought and Who Viewed This Also Viewed display options are only available for the product and shopping cart pages. |
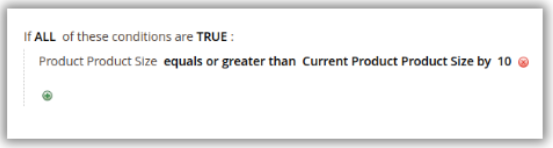
The 'Conditions Combination' option specifies the product attributes or attribute combinations defining the products to be displayed in the ARP block.
The process behind specifying the products is the same as in Step 3. Depending on your requirements, you either include or exclude products.
Additionally, you can choose to display related products with numeric attribute values greater or less than current product attributes.
|
Example:
Here, we've set the ARP block to include products with a size equal to or greater than the current product size by 10 units (like cm or any other relative value).
|
With the 'Who Bought This Also Bought' display option, you can select the related products that are frequently bought together with the current product.
|
The ‘current product’ is either the product displayed on the current product page or the most expensive product displayed on the shopping cart page. The same logic is applied to the 'Who Viewed This Also Viewed' option. |
To exclude free products from the 'Who Bought This Also Bought' block, toggle the 'Don’t Show Free Products' option to Yes.
This setting ensures that items with a price of 0 (including product price, special price, or catalog price rule) won't appear. The products discounted to 0 via promotions like cart price rules, coupons, or points will still be visible in the block.
|
Who Bought This Also Bought orders should have Complete status and then make reindex. |
If enabled in the extension settings, the 'Who Viewed This Also Viewed' option selects the products that are frequently viewed together with the current product (consider the above note) within a single browser session.
This display option can be further configured in order to filter particular products from the above selection.
|
The Who Viewed This Also Viewed option works if the native functionality is enabled: Stores → Configuration → General → Reports → General Options: Enable Reports = Yes and Enable "Product View" Report = Yes. |
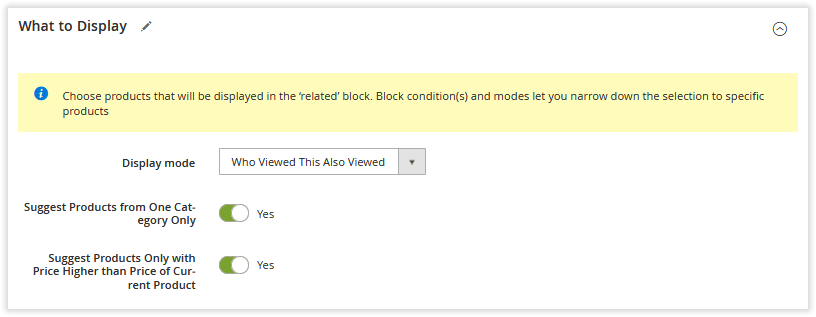
With the enabled 'Suggest Products from One Category Only' toggle switch button, the extension considers only the items that belong to the category of the current product.
The 'Suggest Products Only with Price Higher than Price of Current Product' option, accordingly, selects only the items with higher prices.
And the combination of these two filters even further narrows down the list of available related products. Suitable for big stores handling numerous visits and sessions.
When you are done with specifying the products you want to be displayed in the ARP block, navigate to the final 'How to Display' section.
Step 5
How to Display
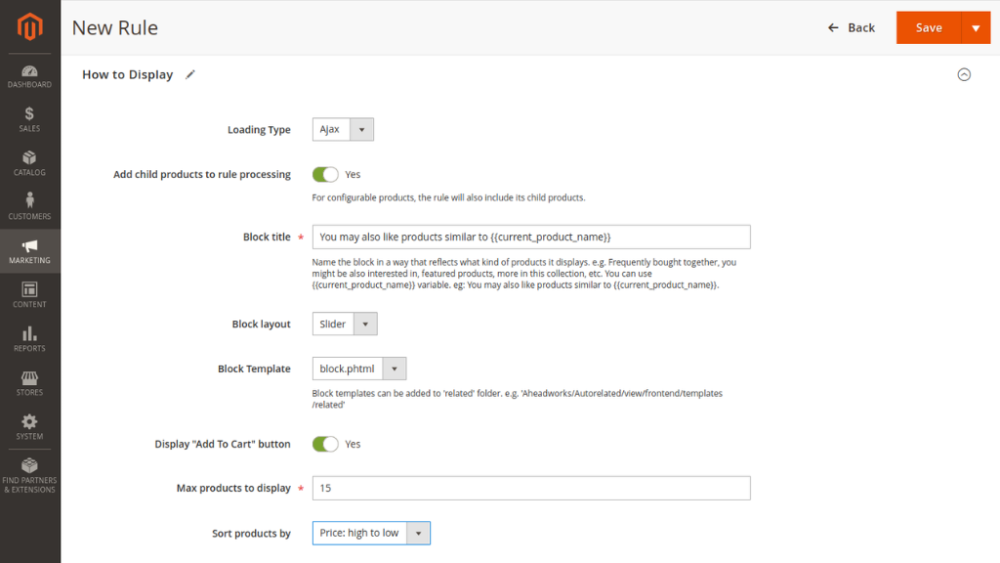
In the 'How to Display' section you are suggested to adjust the ARP block look's and feel:
- Select Ajax or Html loading type;
- Add child products to rule processing - the option allows validation by attributes of the selected child product to display in the ARP block (for configurable products);
The 'Add child products to rule processing' option is displayed under the following conditions:
1) In the “Rule Information” tab, Block position = Product page or Shopping cart;
2) In the “What to Display” tab, Display mode = Conditions Combination;
3) In the “How to Display” tab, Loading Type = Ajax.
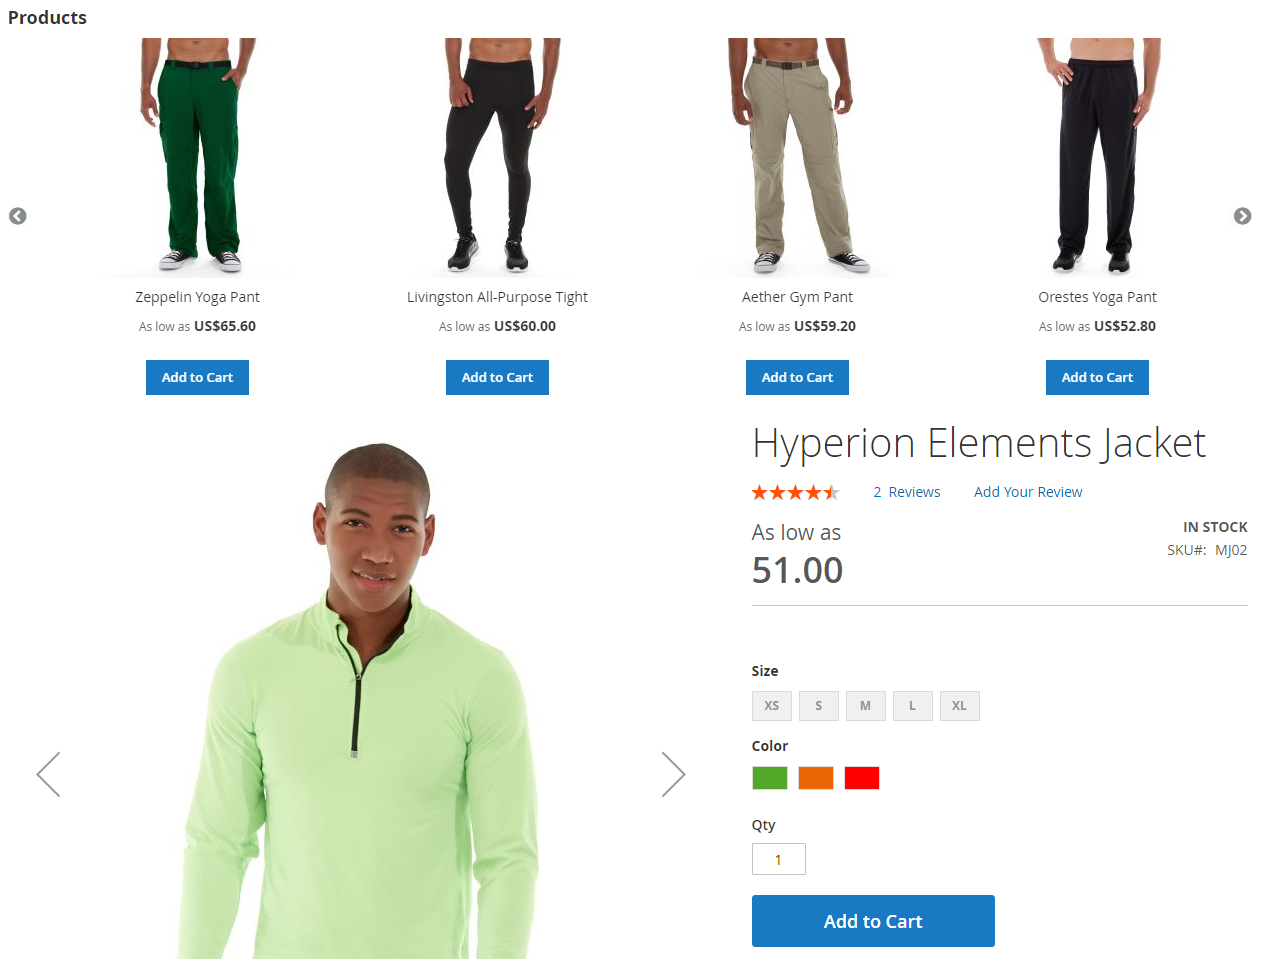
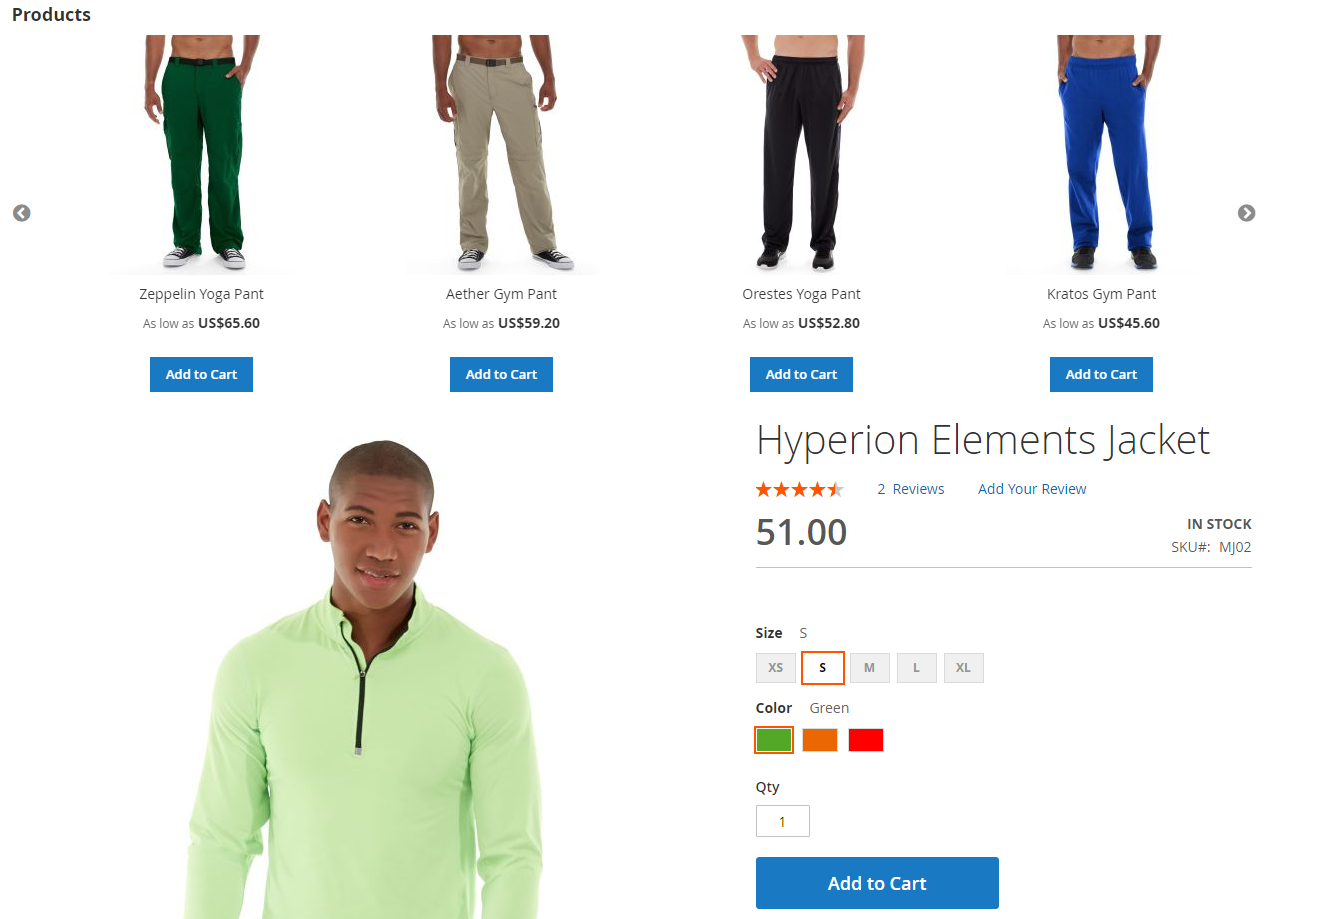
Only if all these conditions are matched, the 'Add child products to rule processing' switch can be enabled. The displayed product types are simple and configurable.
|
Example:
In this case, the ARP block will display products with the same colors as the product itself (if at least one color matches):
With the enabled ‘Add child products to rule processing’ option:
|
- Set the name of the ARP block that will be displayed to the store customers in the 'Block title' field. For blocks on product or category pages, consider adding keywords or variables for better SEO and more cross-selling opportunities:
- Decide on how the ARP block will look like in the 'Block layout' field: grid or slider;
- If you select the grid block layout option, it will be suggested to specify the number of rows in the block grid;
- Specify if you want 'Add to cart' to display under every product in the ARP block with the 'Display "Add To Cart" button' selector;
- Set the maximum number of products displayed in the ARP block in the 'Max products to display' field;
- Decide on how you want the related products to be sorted in the ARP block, for example, by bestsellers, low to high prices, the newest, etc.
|
The sorting orders for the WBTAB and WVTAV display modes are defined by default, by Order Counts and View Counts, accordingly. In the case of the enabled Override Option in the "Related Products, Up-Sells, and Cross-Sells " tab of the backend product editing form the related product blocks using the WBTAB and WVTAV display modes and containing native related products will be sorted by the product positions specified in the corresponding editing form. |
|
If you sort products by newest, users will see the recently added products first (not the recently modified ones). |
Once done with the 'How to Display' settings, click the 'Save' button. That's it, the rule is now configured.
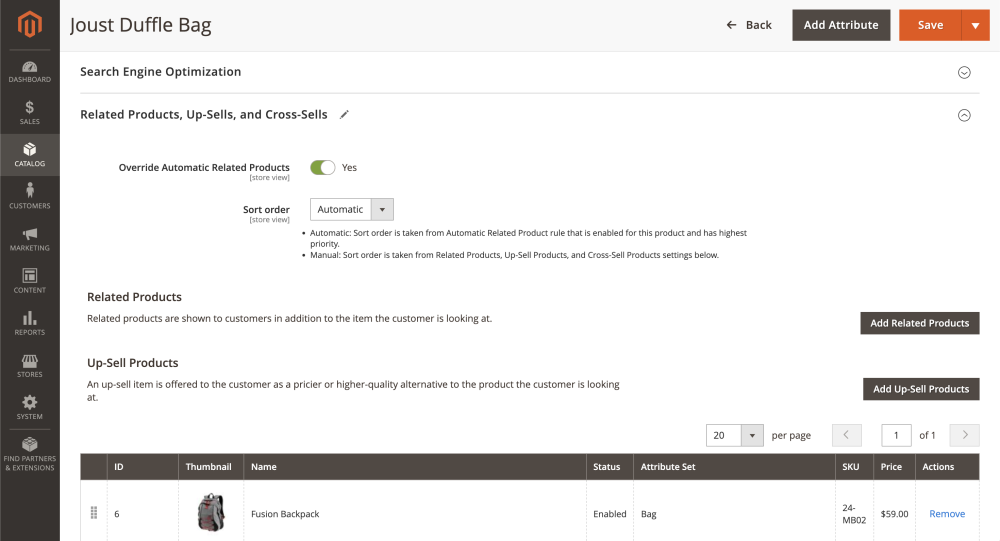
Overriding Automatic Related Products
The ARP block can be overridden with native Magento-related products on the product level. To do this, navigate to Catalog → Products, select the product you want to override with the native Magento rules, and expand the 'Related Products, Up-Sells, and Cross-Sells' section.
Sort Оrder - select the sorting order for the related products: Automatic or Manual.
Automatic: Sort order is taken from the Automatic Related Product rule enabled for this product and has the highest priority.
Manual: Sort order is taken from Related Products, Up-Sell Products, and Cross-Sell Products settings.
General Settings
The 'General Settings' section is available under Stores → Configuration → AHEADWORKS EXTENSIONS → Automatic Related Products
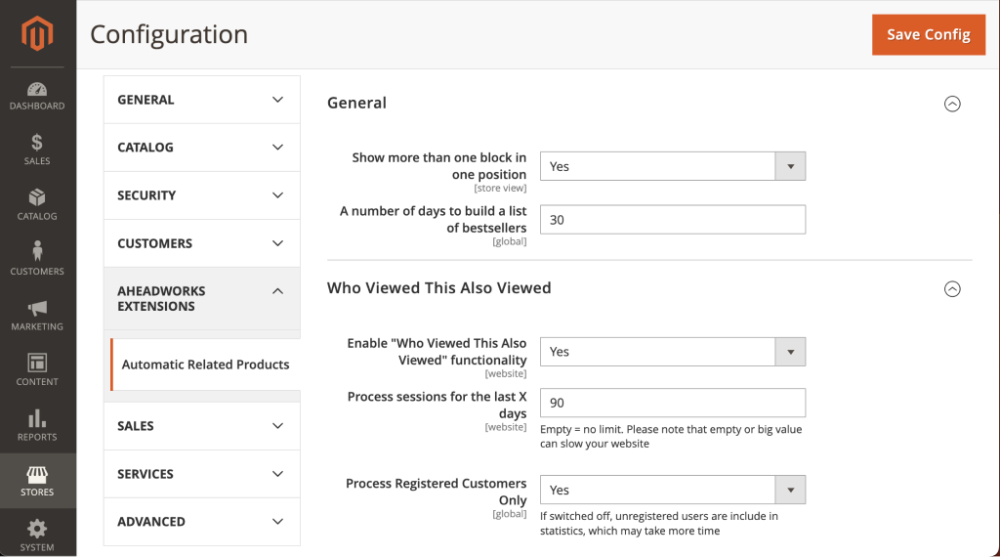
The section contains the two setting blocks:
General. In this block you can:
- prioritize multiple related product blocks taking the same position (for example, between the blocks with Priority 1 and Priority 5 the extension will display the first one);
- define the number of days during which the module will process the data on the best-selling products.
Who Viewed This Also Viewed. The setting block enables the ‘Who Viewed This Also Viewed’ display mode and determines the period of processed sessions (e.g. ‘Empty’ means no limitations, which might slow down your website). The 'Process registered customers only' option enables processing only registered customers for statistics.
Note: If the WVTAV functionality is enabled, the module starts an additional cron job once in 24h updating the related product blocks working under the WVTAV display mode.
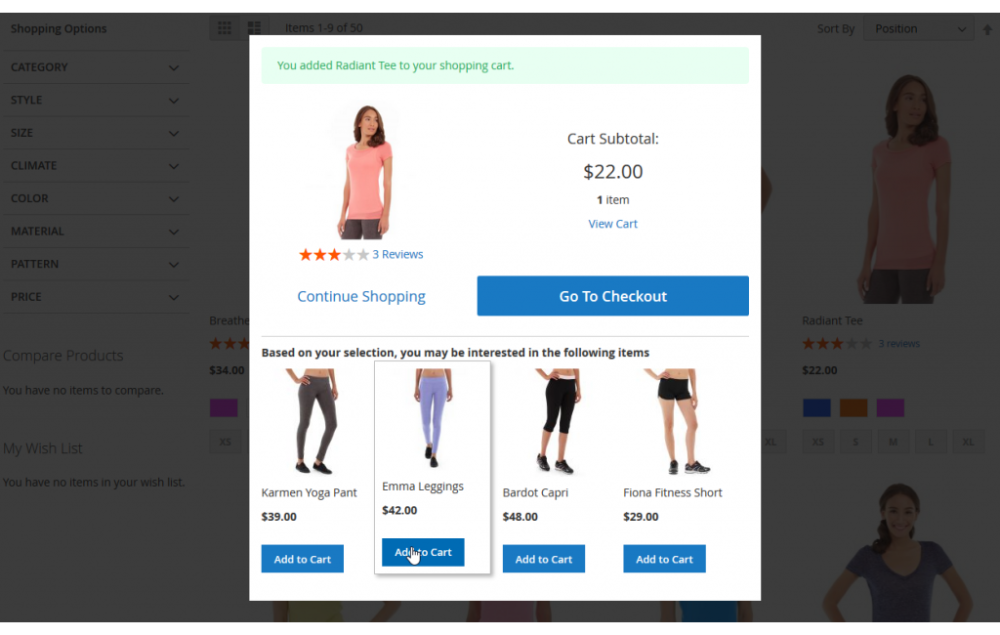
AJAX Cart Pro Integration
Additional promotional opportunity can be gained with help of the AJAX Cart Pro extension.
In order to display related products in the AJAX Cart Pro pop-up window, follow the next steps:
-
If AJAX Cart Pro is installed, navigate to Stores → Configuration → Aheadworks → AJAX Cart Pro → Additional Settings;
-
In the 'Display Related Products' field, set to 'Yes, Automatic Related Products by Aheadworks' ;
-
Create a Related Products Rule in your settings:
-
Rule Information Tab: Select the 'Product page. Instead of native related block' in the 'Block Position' field;
-
How To Display Tab: Select Ajax in the 'Loading Type' field.
By following these steps, you'll enable the display of related products in the AJAX pop-up window.
Custom Block Position
Automatic Related Products blocks can be displayed in a custom position with the help of the Magento widget. To display a block in a custom position, follow these steps:
Step 1
Create the ARP rule and set the 'Block position' setting to the Custom position.
Configure the rest of the settings as you need. Note that you can use the same block for different store views.
Step 2
Create a widget at Content → Elements → Widgets and set the widget type to Automatic Related Products by Aheadworks.
|
Besides custom positioning, you can place the related product block instead of the native related and upsell blocks. |
Continue to the widget settings. Set layout updates and other widget attributes. Don't forget to navigate to the 'Widget Options' tab and select the required ARP rule.
Step 3
Click on the 'Save' button. Now you can proceed to the store frontend and see the widget in the specified position.
|
You can duplicate the rule by expanding the box next to the 'Save' button and choosing the 'Save & Duplicate' option.
, where X in the 'setRuleId' method stands for the ID of the rule that supports custom positioning. |
![]()
Already used our product?
We would appreciate your feedback. Please, leave a review.