
- Exact email address (case-insensitive):
/test@example\.com/im
- All emails from a certain domain (for headers, case-insensitive):
/[\w.\-]+@example\.com/im
- Contains the word "abracadabra" (case-insensitive):
/abracadabra/im
- Auto-submitted header:
/((auto-submitted)[\w:\-\r\t\s]+)(?!no)/i
- X-Spam-Flag header set to YES:
/x-spam-flag: yes/mi
- X-Spam header:
/^x-spam: (?!not detected).*$/im
- Contains http://site.com/ or https://site.com/:
/https?:\/\/site\.com\//im
- Catches an email if there is at least 1 Chinese character*:
/\p{Han}+/u - Catches an email if there is at least 1 Cyrillic character*
/\p{Cyrillic}+/u - Catches the emails which have 3 different substrings "[#ABC-12345] Ticket Created: " in their subject:
/(\[\#[A-Z]{3}\-[\d]{5}\]\sTicket created:\s){3}/im
User Manual - Help Desk Ultimate
- Installing M2 Help Desk Ultimate 2
- Migrating tickets from M1 Help Desk Ultimate (version 1.*.*) for Magento 2
- Migrating from M2 Help Desk Ultimate (version 1.*.*) for Magento 2 (version 2.*.*)
- Setting up cron
- Uninstalling M2 Help Desk Ultimate
- Compatibility
- Introducing M2 Help Desk Ultimate 2
- Glossary
- On Frontend
- Enabling Agent's Card on Frontend
- On Backend
- Reports
- Integrations
- Troubleshoot
Magento 2 Help Desk Ultimate 2 effectively arranges operations with customer tickets. Tickets can be submitted by customers from the My Account area, contact form, email, or by the admins from the Back-end by assigning tickets to individual departments or support agents. Additionally, the module automates recurring tasks, including those of changing ticket status, reassigning the agent/department, adding tags to tickets and more.
API documentation link
Installing M2 Help Desk Ultimate 2
|
NOTE: To proceed with the installation of our additional modules, it is essential to first have the Help Desk Ultimate module installed. Kindly refrain from installing additional modules if the Help Desk Ultimate module is not yet installed. |
|
Make sure that to use Help Desk Ultimate 2 the BUP module is to be installed as well. When using Composer to install Help Desk, BUP is installed automatically, otherwise make sure you enable BUP as an extension on its own. |
Command Line Installation
- Backup your web directory and store database
- Download the Help Desk Ultimate 2 installation package
- Upload contents of the Help Desk Ultimate 2 installation package to your store root directory
- In SSH console of your server navigate to your store root folder:
cd path_to_the_store_root_folder |
run the following commands:
php bin/magento module:enable Aheadworks_Bup |
then:
php bin/magento setup:upgrade |
after:
php bin/magento setup:static-content:deploy -f |
5. Flush store cache; log out from the backend and log in again
|
Make sure the installation is done from the FTP administrator account. Otherwise, set 775 permissions to the store root directory after the extension is deployed. |
Composer Installation
If you are installing an extension from Aheadworks for the first time, you need to add our composer repository to your Magento store:
1. Login to your ssh console and navigate to your store folder:
cd path_to_the_store_root_folder |
Run the following command:
composer config repositories.aheadworks composer https://dist.aheadworks.com/ |
After the command was executed successfully, you can use the composer to install the products.
To install the extension:
2. Login to your ssh console and navigate to your store folder:
cd path_to_the_store_root_folder |
3. Run the following command to install the latest version of the extension:
composer require aheadworks/module-helpdesk |
if you need to install a specific version, run this command:
composer require aheadworks/module-helpdesk:<version> |
|
Specify the version of the extension in <version> |
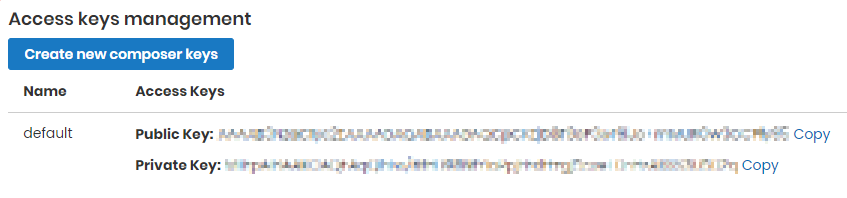
When prompted, enter Public Key (Username) and Private Key (Password):

Both Public Key (Username) and Private Key (Password) can be found in My Projects and Licenses in your personal account on our site:
Run the following command to install Help Desk GraphQl:
composer require aheadworks/module-helpdesk-graph-ql |
4. Enable the extension:
php -f bin/magento module:enable Aheadworks_Bup |
Next, register the extension:
bin/magento setup:upgrade |
Recompile your Magento store if you are in the Production mode:
bin/magento setup:di:compile |
To verify that the extension is enabled, run the following command:
bin/magento module:status |
Next, clean the store cache:
bin/magento cache:clean |
On the Back-end: log out and then log in.
|
Want to use the Hyvä theme module? To install the Hyvä theme module, you need to install the module via composer using command: composer require hyva-themes/magento2-aheadworks-helpdesk2
|
To upgrade the extension:
5. To update or upgrade an extension:
Download the file of the updated extension. Take note of the module-name and version. Export the contents to your Magento root.
If a composer package exists for the extension, run one of the following.
Update per module name:
composer update aheadworks/module-helpdesk |
Updater per version:
composer require aheadworks/module-helpdesk:<version> |
Run the following commands to upgrade, deploy, and clean the cache.
php bin/magento setup:upgrade --keep-generated |
Migrating tickets from M1 Help Desk Ultimate (version 1.*.*) for Magento 2
|
Get Data Migration Tool by clicking on the following links: https://media.aheadworks.com/migration-tools/HDU/helpdesk-data-migration-tool-2.1.x.zip https://media.aheadworks.com/migration-tools/HDU/helpdesk-data-migration-tool-2.2.x.zip |
|
Read carefully and consider this information of top priority. Otherwise, it might result in an accident data loss. |
The version 1.2.0 of Help Desk Ultimate for Magento 2 introduces the ticket migration tool. The tickets accumulated with Help Desk Ultimate for Magento 1 can be flawlessly migrated to Magento 2.
To migrate the tickets, follow the steps below:
- Magento Data Migration Tool is required to be installed prior to starting the migration.
The migration script relies heavily on the Magento Data Migration tool. Understanding how it works will be useful during the migration process. - Backup the Magento 2 databases before the migration to have an opportunity to revert any changes.
Ticket migration might involve rewriting database tables, backup is advised. - Tickets can only be migrated from the M1 Help Desk Ultimate 3.x.x version. If you have the previous versions installed, do not attempt migrating tickets on your own.
- Department website is defined by the Magento 1 extension settings. Store and Website IDs should concur.
If departments are set to all store views, then they will be assigned to all Magento 2 store views. - Department gateway password cannot be migrated.
- Ticket statuses are migrated according to the following pattern:
New + Open > Open;
Closed > Solved;
Waiting for a customer > Pending. - Ticket priorities are migrated according to the following pattern:
Urgent + ASAP > High;
To do > Normal;
If Time > Low. - Order information related to the ticket will only be migrated if there is an order with the same increment_id in the Magento 2 database.
- Help Desk agents in the migrated tickets are identified by an email address. If there are no admin users created with the same Magento 2 email address, then the migrated tickets will have the name of the Help Desk agent. However, these tickets will not be assigned to an agent.
- Customer information is migrated in full, except for the cases when there are no customers with the same email address on the Magento 2 store.
- Help Desk Ultimate for Magento 1 tickets can contain HTML tags that will be deleted upon migration.
- Tickets deleted from Magento 1 cannot be transferred to Magento 2.
|
1. Install the Data Migration Tool following the instructions. |
|
2. Copy the contents of the data-migration-tool 2.1.x/ folder in the installation package of Help Desk Ultimate to the vendor/magento/data-migration-tool/ folder if you work with version 2.1 of Magento. Transfer the contents of the data-migration-tool 2.2.x/ folder to the vendor/magento/data-migration-tool/ folder if your store is based on Magento 2.2.x., do relevant operations for Magento 2.3.x. |
|
3. Navigate to vendor/magento/data-migration-tool/etc/aw_hdu3/ and open config.xml for edit. More information on tag values can be found in the Magento Data Migration Tool configuration instructions.
<source> - the database from which you will migrate tickets.
<destination> - the database to which you will migrate tickets.
|
|
4. Copy the media/aw_hdu3/ folder with ticket attachments of Help Desk Ultimate for Magento 1 to the pub/media/tmp/aw_hdu3/ folder of Help Desk Ultimate for Magento 2 If there are no attachments, create an empty pub/media/tmp/aw_hdu3/ folder. If there is no pub/media/tmp/aw_hdu3/ folder, the migration process will be canceled with a warning message "Attachments folder does not exist!" |
|
5. Run the migration process from the console: bin/magento migrate:data -r vendor/magento/data-migration-tool/etc/aw_hdu3/config.xml |
|
6. Ticket migration is completed. |
Migrating from M2 Help Desk Ultimate (version 1.*.*) for Magento 2 (version 2.*.*)
Migration can be performed by this command:
bin/magento aw-helpdesk2:run-migration |
Possible options:
--limit (-l) [number] - limit number of tickets migrated in one running (default value is 1000) |
Examples:
1)
bin/magento aw-helpdesk2:run-migration -c |
Perform migration (1000 tickets by default) with database clean up.
2)
bin/magento aw-helpdesk2:run-migration -c -l 500 |
Perform migration (500 tickets) with database clean up.
In order to migrate next bulk of tickets, run command again (without -c option)
in/magento aw-helpdesk2:run-migration -l 500 |
Setting up cron
The Help Desk Ultimate 2 extension uses cron to insert emails from the gateway into tickets and to send notification emails to customers.
If you have already configured cron jobs for your Magento installation, then you can skip this step, otherwise refer to the instructions below:
In the SSH console of your server, run the following command:
crontab -e |
And insert the following line:
*/3 * * * * php -c <ini-file-path> <your Magento install dir>/bin/magento cron:run |
Confirm the Save request on exit.
More on setting up cron job for a Magento store: Magento user guide.
Uninstalling M2 Help Desk Ultimate
Since Magento introduced declarative Database you need to be very carefull when uninstalling or disabling the module.
|
NOTE: Please be very careful when uninstalling/disabling this module. This module uses a declarative DB scheme. Once the module is uninstalled the DB tables will be lost. |
Manual Removal
-
Run command:
|
It will remove data patches including sample data so you can install it again in future
-
Disable extension:
|
-
Run setup upgrade:
|
It will remove module related tables from the system
-
Remove module files manually:
|
Automatic Removal (via Composer)
1. Disable the module by executing the following commands:
php bin/magento module:uninstall Aheadworks_Helpdesk2 |
Compatibility
|
Module Version |
Magento Version |
PHP |
|
2.2.3 and earlier versions |
2.3.Х - 2.3.6 2.4.0 - 2.4.3 |
7.4 and earlier versions |
|
As of version 2.2.4 |
2.3.7-p3+ 2.4.0 - 2.4.4 |
7.4, 8.1 |
|
As of version 2.3.0 |
2.3.7-p3+ 2.4.0 - 2.4.5 |
7.4, 8.1 |
|
As of version 2.5.0 |
2.4.3 - 2.4.5 |
7.4, 8.1 |
|
As of version 2.5.1 |
2.4.4 - 2.4.6 |
8.1 |
Introducing M2 Help Desk Ultimate 2
The Help Desk Ultimate 2 extension for Magento 2 helps arrange a customer support center in a web store and facilitate communication between customers and the Support team over the issues about the products and services.
Customers can submit issues via email or Contact form, support tickets with files, indicate CC contacts, communicate with agents and rate their performance. Help desk agents interact with customers in a similar way. Furthermore, the module allows the following:
- Configuring ticket automation
- Arranging canned responses
- Specifying patterns to ensure that spam emails are not converted into tickets
- Updating ticket status and priority
- Automatic rating of ticket priority weight
- Reassigning tickets to other agents and departments
- Configuring ticket escalation
- Adding fields to Contact form to require additional information on tickets
- Leaving internal notes to tickets
- Employing additional customer attributes to make notes about the customer/ticket (integration with M2 Customer Attributes)
- GraphQL support (included in the package)
Integrations:
Glossary
- Automation - a scheme with a set of conditions that dictates how the extension should behave on certain occasions;
- Email gateway - an email address associated with the Help Desk Ultimate 2 extension, used to receive customer inquiries and send emails to both customers and administrators.
- Email template - a predefined email message;
- Canned response - a prearranged generic response to an issue, available as a quick reply to a ticket, due alterations made.
- Help desk agent - an admin user eligible to reply to help desk tickets;
- Ticket - a customer inquiry submitted via the contact form, the 'Help Desk Ultimate' section, or direct email to the extension's gateway;
- Ticket thread - a block containing all customer and help desk agent messages regarding the ticket;
- Ticket escalation - a procedure that results from the pre-established set of parameters that moves a customer's complaint, challenge or concern to either a more senior representative or one that initiates a related process;
- Email Rejection Pattern - a pattern of a string to filter the email into SPAM when found in the header (body or footer) of the email.
On Frontend
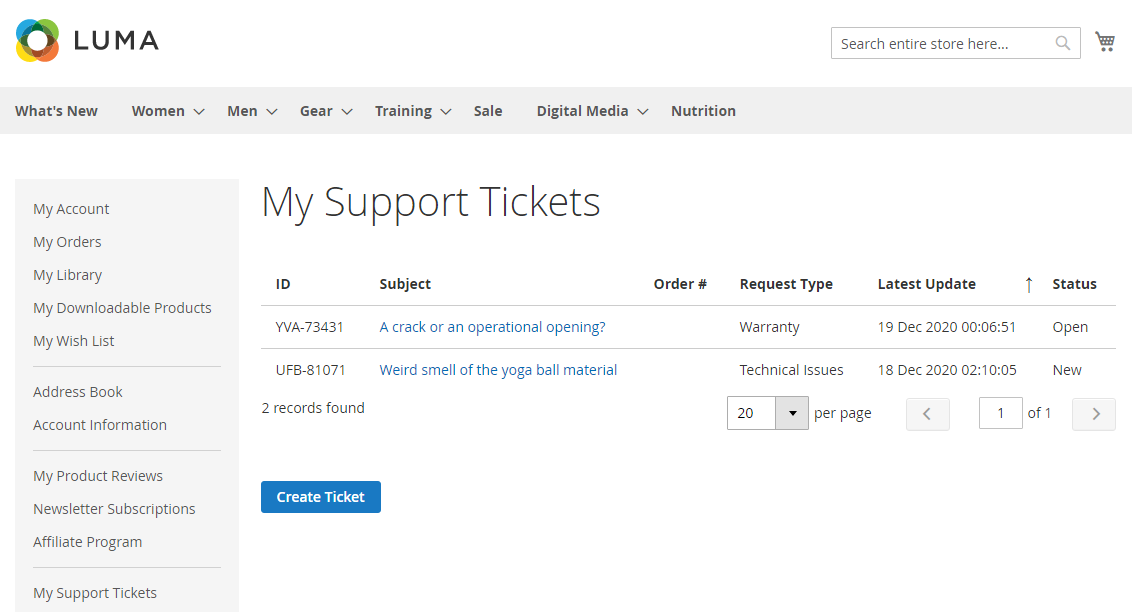
My Support Tickets
To submit a ticket from the Storefront, go to My Account → My Support Tickets.
This is where customers can browse tickets and created new ones. The page shows a grid with the following columns:
- ID - the identification number of the ticket (assigned automatically)
- Subject - the subject of the ticket, active link to the Ticket page
- Order - the ID of the order the ticket relates to, active link to the Order # page (can also be accessed from My Orders)
- Request Type - the type of the request (Storefront Department label)
- Latest Update - the date of the latest update to the ticket status
- Status - the status of the ticket:
- Waiting for a customer - waiting for the customer's reply
- Open - waiting for the administrator's reply
- Closed - the ticket issue was resolved
- New - the ticket is created
Click on the subject of a ticket, to access the Ticket page.
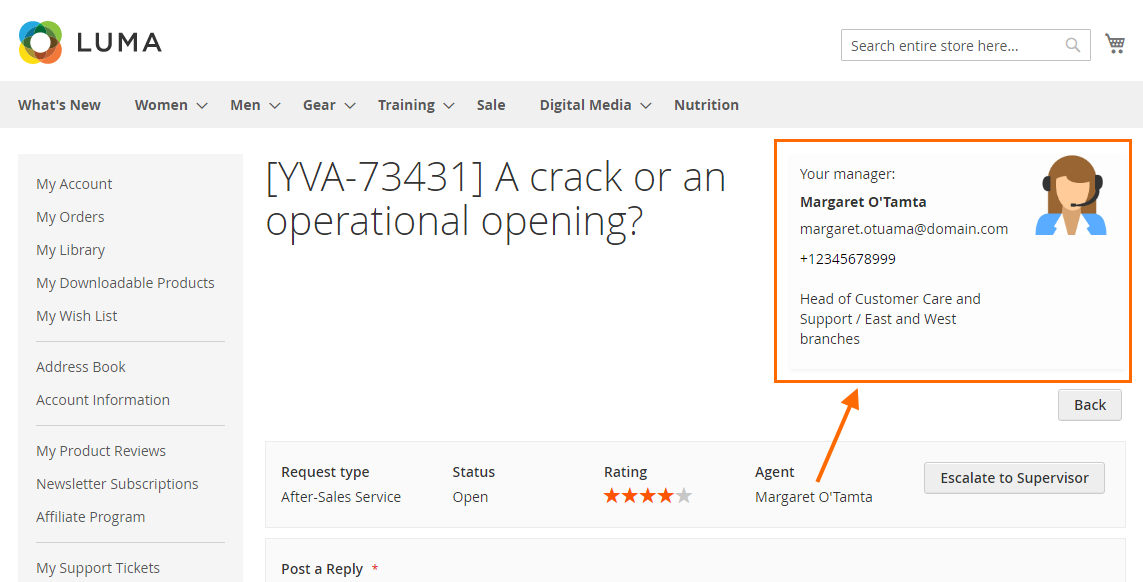
Ticket Page on Storefront
This is where customers can read the ticket thread, send replies from, close the ticket, rate the performance of the Agent and Escalate the ticket to the Supervisor.
The page is made of three sections: Ticket Controls, Ticket Message, Ticket Thread.
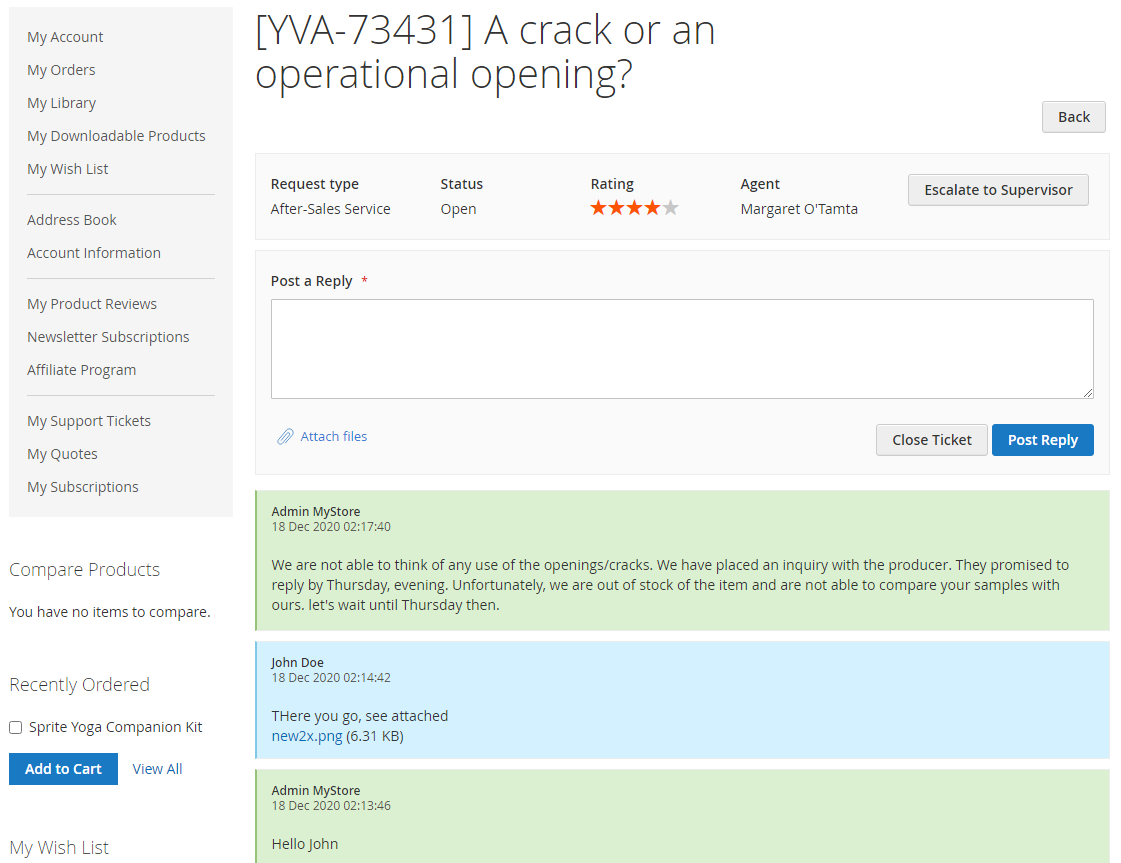
Ticket Controls
The Ticket Controls section notifies the Customer of the following:
- Request Type
- Status
- Rating
- Agent
Rating allows customers to assess the performance of the Agent towards the resolution of the issue in the ticket. Rating can be updated anytime until the ticket is closed.
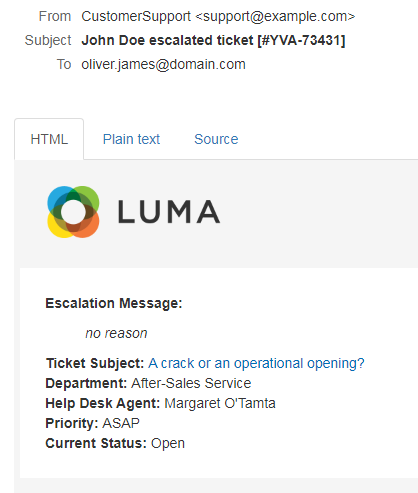
When the Customer is not satisfied with the quality of support he/she can escalate the ticket to the Head Agent (Supervisor). To do so, they click on the Escalate to Supervisor button. A popup will emerge prompting the Customer to explain why he/she is not satisfied with the support service and submit the request. Alternatively, the Customer can cancel the request and close the popup.

On successful escalation of a ticket, a corresponding message is added to the ticket thread, both on the Front- and Back-end. Furthermore, an email is sent to the Head Agent (Supervisor), notifying of the escalation and providing information on the ticket. The subject of the ticket in the email is an active link to the Ticket View page on Back-end. The ticket, when escalated, has its priority weight increased noticeably. These tickets are moved to the top of the Tickets grid on Back-end.
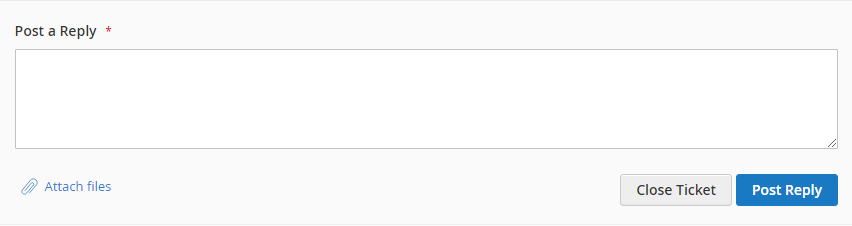
Ticket Message
The Ticket Message section allows the Customer to post replies to the Agent. To support a reply with a file, the Customer clicks on the Attach Files active icon in the left corner of the section. To submit the reply or to close the ticket, the Customer uses the Post Reply and Close Ticket buttons respectively.
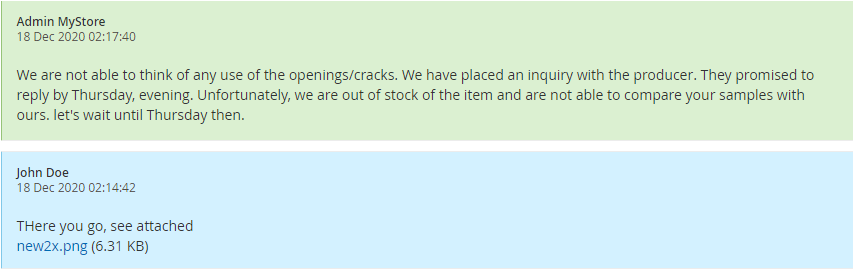
Ticket Thread
The Ticket Thread lists all messages as written by the Customer and Agent with respect to the given ticket. The messages are arranged by the date of sending (in descending order). Attached files appear as file names, active links to the files.
|
Help Desk Ultimate 2 allows the Customer to reopen tickets. This ensures that he/she does not have to submit multiple tickets on the same problem. Reopening is initiated in the following two ways:
|
Submitting a Ticket
Help Desk Ultimate 2 for Magento 2 introduces three ways of submitting tickets by the Customer: via email, Contact form and Create New Ticket form.
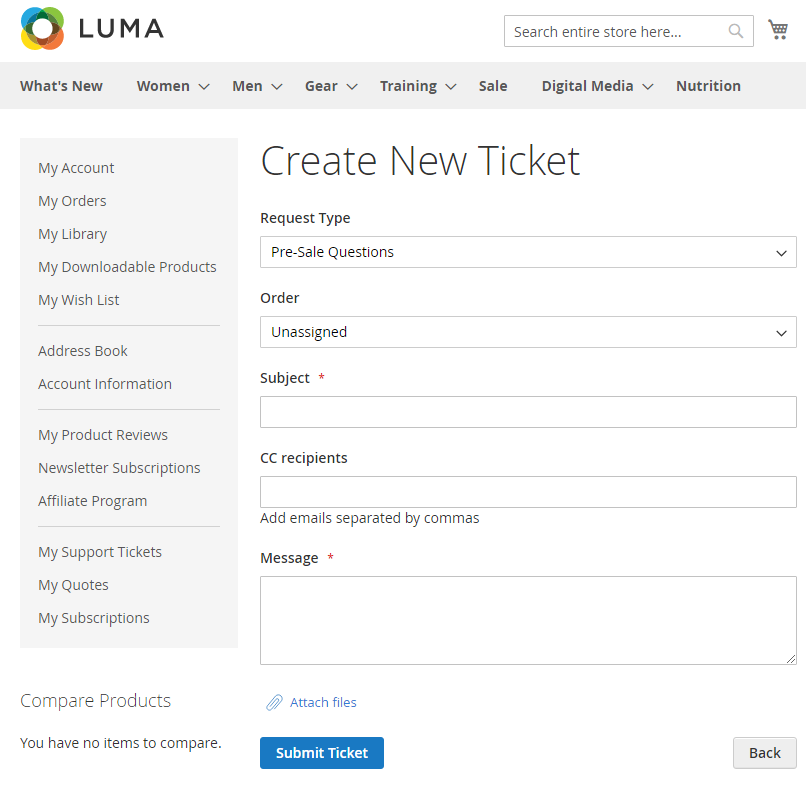
Create New Ticket form
To create a ticket on the Front-end, the Customer goes to My Account → My Support Tickets and clicks on the blue Create Ticket button below the grid. The Customer is redirected to the Create New Ticket page.
The Create New Ticket page prompts the Customer to enter the following information:
- Request Type - the type of the issue (the drop-box contains the names of the departments as they are assigned to the store-front)
- Order - the ID of the order to relate to the issues (the drop-box contains orders previously created by the Customer)
- Subject - the subject of the ticket to identify the issue
- CC recipients - the emails of the people to receive a copy of the ticket (multiple emails can be indicated, separated with comma)
- Message - the text of the issue
- Attachments (optionally) - files to support the issue (Add file active link)
On completing the fields, the Customer click on the Submit Ticket button to submit the ticket. Alternatively, the Back button takes the Customer to the My Support Tickets page and erases the data from the form.
The Customer can access the Create New Ticket page from the Order # page. The Customer does that by clicking on the Submit Ticket active link next to the Reorder link. The Create New Ticket page will get opened in the new browser tab. The Order field will have the number of the corresponding order.

Contact Us Form
Another option for a customer to submit a ticket is the native Magento Contact Us form. The extension fetches all the messages customers leave in the Contact Us form and inserts them into tickets.
|
When integration with the native Magento Contact Us form is enabled, the Help Desk Ultimate 2 extension disables native Magento notifications sent to the Store Administrator when the Customer leaves a message in the Contact Us form. Instead, all messages left via the Contact Us form are inserted into tickets, and notifications are sent in compliance with the automation settings of the extension. |
The Contact Us form comes with the same fields as the Create New Ticket form, though the Order drop-down is hidden from guest customers.
Direct Email
Additionally, the Customer can submit tickets by emailing messages directly to the Help Desk Ultimate 2 gateway(s).
If a message is sent from the address, used on registration of the account, Help Desk Ultimate 2 will 'recognize' the customer and automatically associate the message with the ticket within the given customer account.
If automatic notifications are enabled, customers can directly reply to notification emails sent by the Admin.
|
The logic behind associating email replies and tickets is the following:
|
Enabling Agent's Card on Frontend
|
It is essential, the BUP module be installed on the store alongside Help Desk Ultimate 2. Unless you are using Composer to install Help Desk, make sure you install and enable BUP as an extension on its own. |
The BUP (Backend User Profile) module, which comes as part of the Help Desk Ultimate 2 pack, allows enabling the Agent's Card on the Frontend and in emails to customers.
The module adds the Additional User Information tab to the User Information block in System → All Users → User/Add New User. The tab shows the following configuration options:
- User Status - set to Active to enable the Agent's Card on Front-end and in emails.
- Sort Order - the order of the Agent's Card on the list of cards, if multiple agents are assigned to the Customer/Department
- Display Name - the name of the Agent to be displayed to the Customer in the Agent's Card
- Email - the email of the Agent to be displayed to the Customer in the Agent's Card
- Phone Number - the phone number of the Agent to be displayed to the Customer in the Agent's Card
- Image - the photo of the Agent to be displayed to the Customer in the Agent's Card
- Additional Information - any further information on the Agent to be displayed to the Customer in the Agent's Card
|
User Status is displayed next to the name of the user on the Back-end where need be as per the logic of Help Desk Ultimate 2. Thereby, the line "[User Name] (Inactive)" does not mean the user is inactive, but rather that the Agent's Card (aka Additional User Information) is disabled on the Front-end and in emails to customers. |

Agents' cards appear on Ticket pages (on the Front-end), and in email notifications which are sent to the Customer as part of the communication about tickets.
On Backend
Configuring Help Desk Ultimate 2
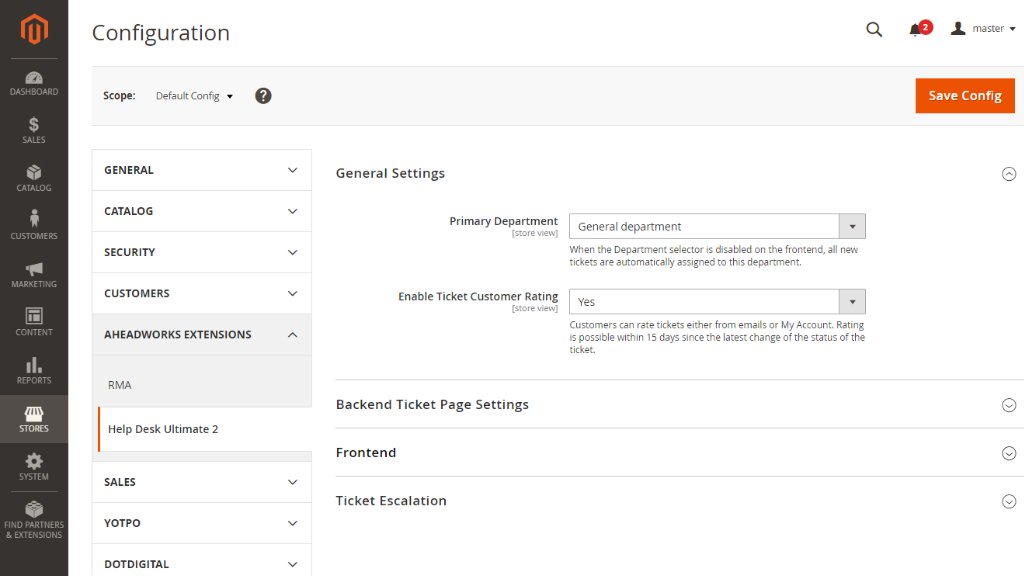
To configure the extension, go to Stores → Configuration → AHEADWORKS EXTENSIONS → Help Desk 2.
General Settings
Two parameters are available here:
- Primary Department - set the Primary department. When the Department selector is disabled on the Front-end, all new tickets are automatically assigned to the Primary department.
- Enable Ticket Customer Rating - set to Yes to allow customers to rate tickets either from emails or My Account. Rating is possible within 15 days since the latest change of the status of the ticket.
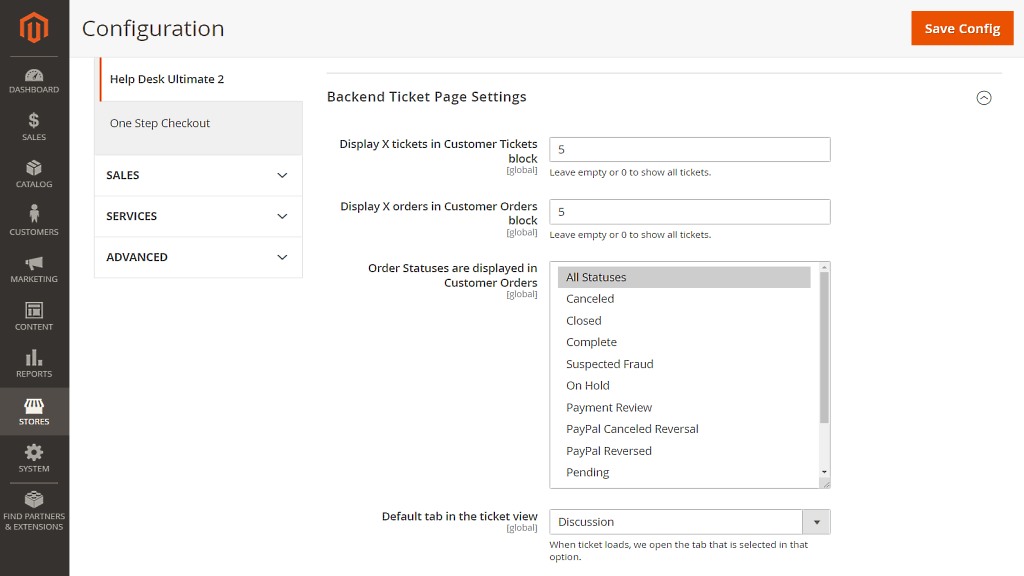
Backend Ticket Page Settings
Tweak how much of information on tickets and orders of a customer the Admin is to find within the two blocks of the Ticket View page on the Back-end:
- Display X tickets in Customer Tickets block * - the number of tickets to be displayed in the Customer Tickets block (5, by default)
- Display X orders in Customer Orders block * - the number of orders to be displayed in the Customer Orders block (5, by default)
- Order Statuses are displayed in Customer Orders - select the statuses of orders to appear in the Customer Orders block (All Statuses, by default)
- Default tab in the ticket view - select the preferred tab as the default in the ticket view: All, Discussion, Notes or History
|
Leave empty or 0 to show all tickets. |
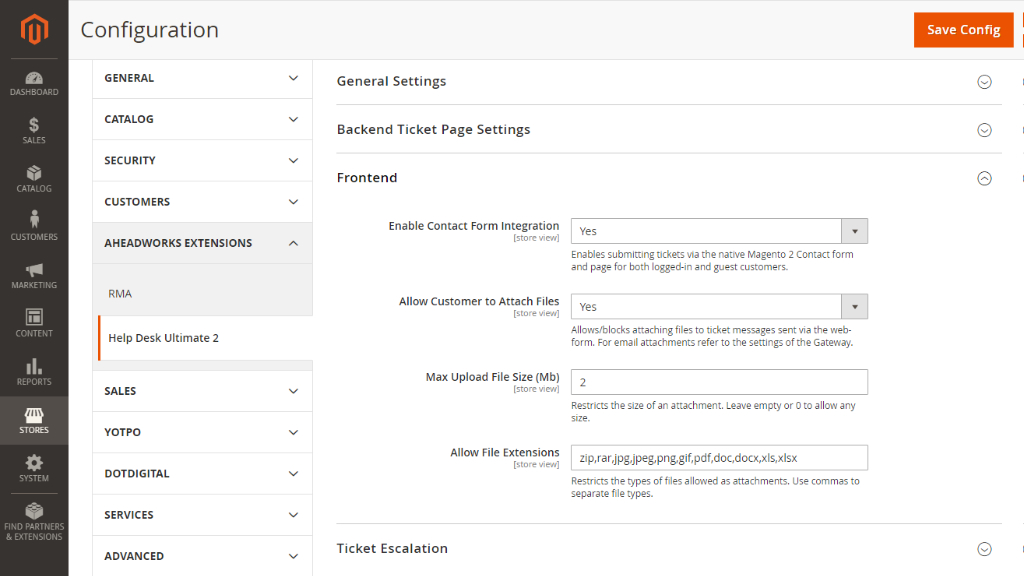
Frontend
The configuration options here primarily consider file attachments and submitting tickets via the native Magento 2 Contact form.
- Enable Contact Form Integration - set to Yes to enable submitting tickets via the native Magento 2 Contact form and page both for logged-in and guest customers.
- Allow Customer to Attach Files - set to Yes to allow customers to attach files to ticket messages sent via the web-form (for email attachments refer to the settings of the Gateway).
- Max Upload File Size (Mb) - indicate the maximum file size of an attachment. Leave empty or 0 to allow uploading files of any size.
- Allow File Extensions - specify the types of files to be allowed as attachments to ticket messages. Use commas to separate file types.
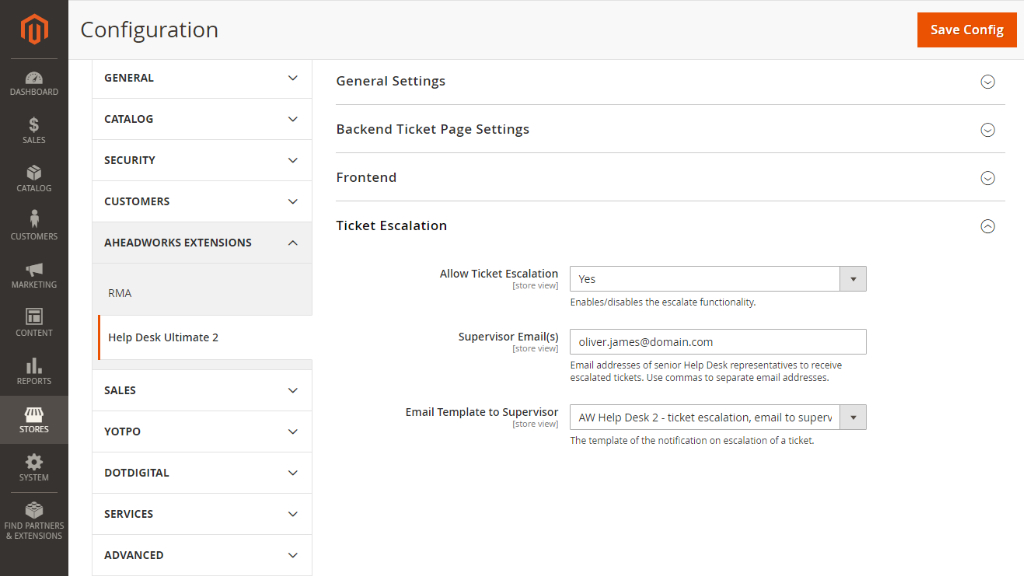
Ticket Escalation
Set up how ticket escalation is to take place:
- Allow Ticket Escalation - set to Yes to enable ticket escalation
- Supervisor Email(s) - indicate the email address of a senior Help Desk representative to receive escalated tickets (multiple addresses are separated with commas)
- Email Template to Supervisor - select the template of a ticket escalation notification
Managing Departments
Here you can organize departments to sort the flow of tickets according to the issue in focus, and thereby optimize the work of the Help Desk team. Departments may have different agents and managers. The Admin can further set-up permissions for various user-roles to access and edit tickets in the departments.
When installed, by default, Help Desk Ultimate 2 shows only the General Issues department. This department will be used to store all tickets submitted to the Help Desk until other departments are created and the General Issues department is reconfigured.
Departments are created and managed in Customers → Help Desk 2 → Departments.
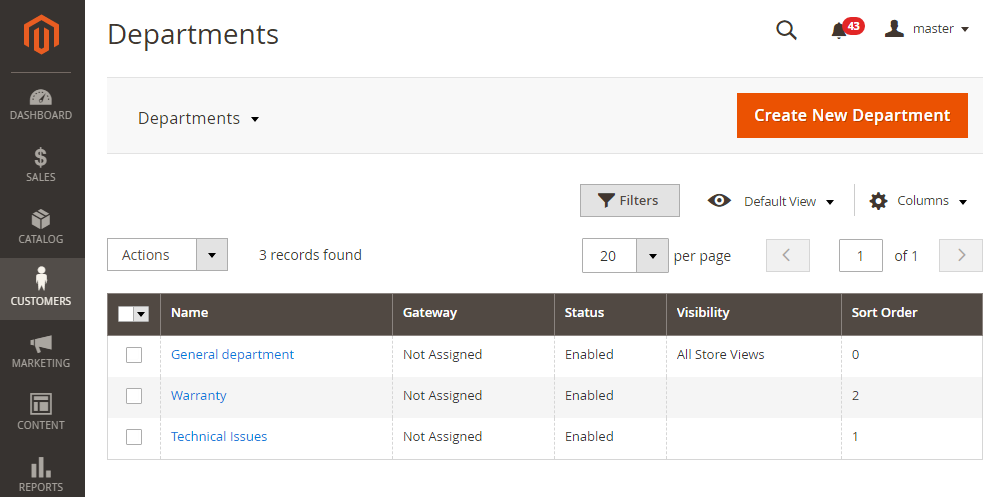
Departments Grid
The Departments grid accumulates departments into a grid of the following columns:
- Name - the name of the department (active link to the Edit [Department Name] Department page);
- Gateway - the email address to fetch messages from for the given department
- Status - the status of the department (Enabled, Disabled);
- Visibility - the store view the department is visible on;
- Sort Order - the order of the department on the list of departments as it will appear on the Storefront
|
Admins are able to edit the statuses of the departments individually or in bulk with the help of the Actions dropbox below the grid. |
Create/Edit Department
To edit a department, click on its name in the Departments grid. To create a new department, click on the Create New Department button in the top right of the page. You will get redirected to the Edit/New Department Page, which has six sections of configuration options: General, Storefront Labels, Gateway, Help Desk Agent, Storefront Required Information and Permissions.
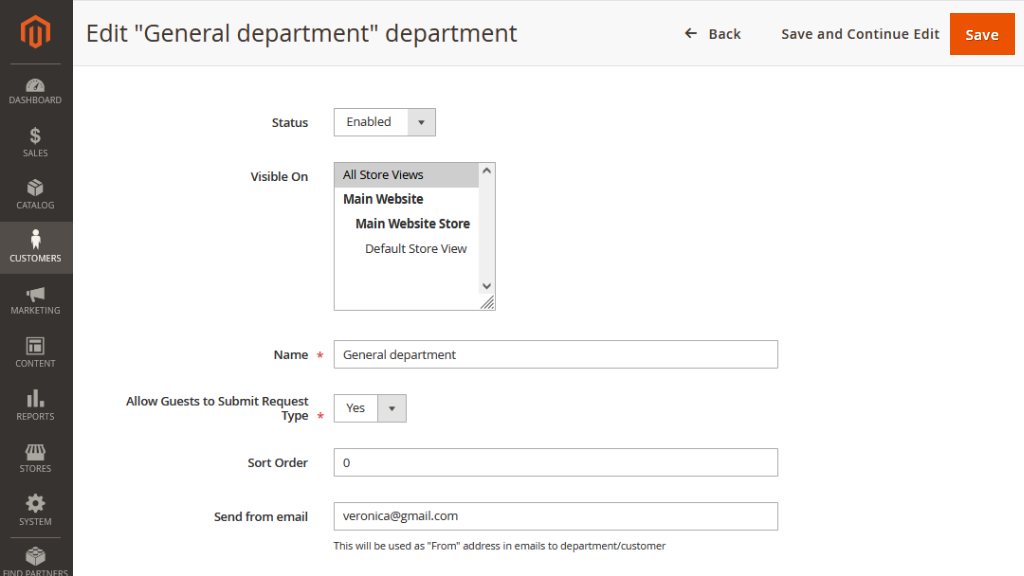
General Settings
The general section allows specifying the basic attributes of a department:
- Status - set to Enabled to enable the department on the storefront
- Visible on - select the store views for the department to be displayed on
- Name - suggest the name for the department (for internal identification purposes);
- Allow Guests to Submit Request Type - set to Yes to allow guest-users to submit tickets to the department (when No is selected guest-customers see the “Please, log in to submit this request type” message on selecting the given department in the Contact Us form)
- Sort Order - indicate the whole numeric to define the order of the department on the list of departments on the Storefront
- Send from email - define the specified email (sender) of the email notifications.
|
Setting the Allow Guests to Submit Request Type option to No helps avoid inappropriate requests to the department and thereby optimizes the work of the Help Desk team. |
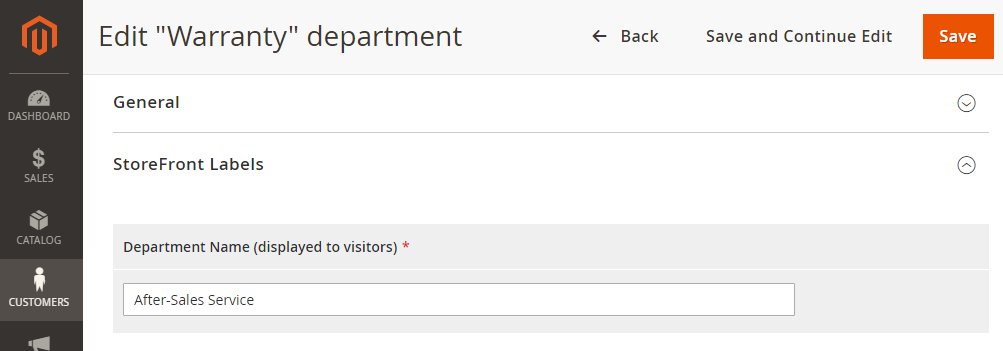
Storefront Labels
The Storefront Labels section allows setting up a name of the department to be displayed on the Storefront. Only one name can be assigned per store view.
|
It is suggested you name the departments the way customers can easily identify them with the issues they have. This will save their time on submitting tickets and will optimize the work of the Held Desk team since they will not have to sort out tickets with inappropriate issues. |
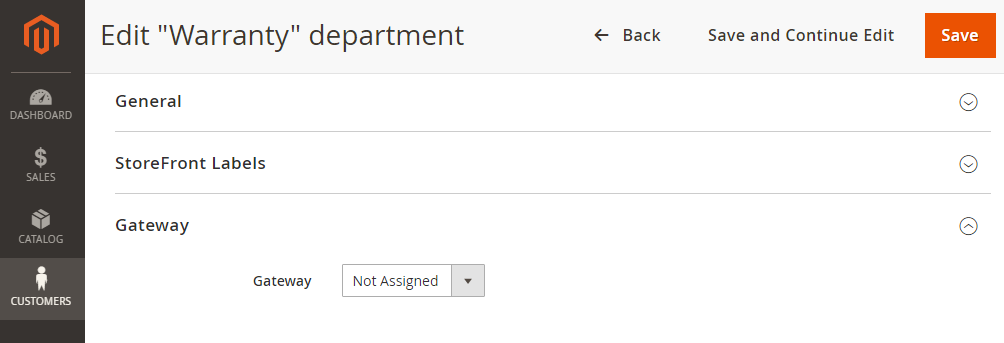
Gateway Settings
The Gateway section has only one configuration option Gateway. This is where you can select an email gateway for the department. The assigned email gateway will be used to send ticket-related notifications to customers and convert all the incoming emails into tickets.
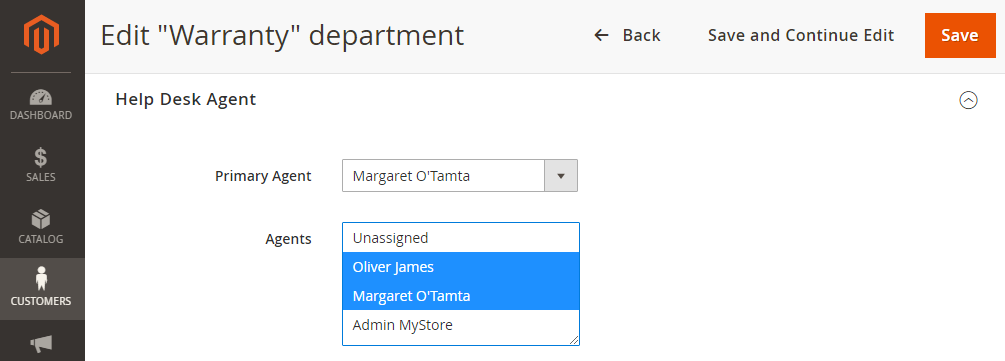
Help Desk Agent
Specify the store users to make up the staff of the department:
- Primary Agent - select the agent to be assigned tickets by default (Unassigned by default)
- Agents - assign the agents to the department (Unassigned by default)
|
The agents specified herein will appear in the Agents dropdown on the Ticket View page. The default value of the dropdown will be the name of the primary agent as set herein. If no primary agent and agents are selected herein, Unassigned will be displayed by default in Agents on the Create Ticket page. |
The agents here are users of the store. Learn more on creating users in a Magento 2 store in the Official Magento 2 Manual.
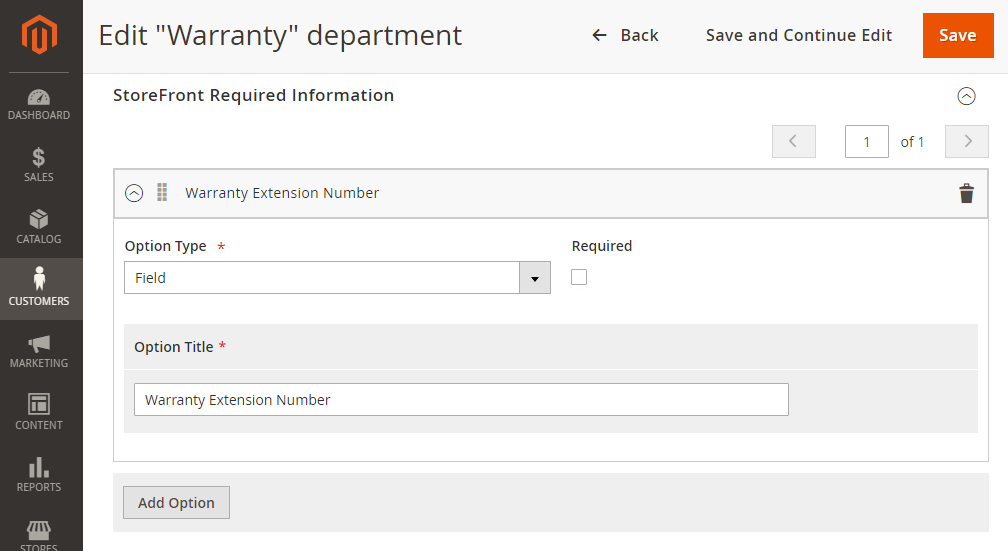
Storefront Required Information
Add more fields to the ticket submission form to inquire for more information specific to the issues the department is to solve.
The section shows a list of extra fields. The Admin can shuffle the list, add, delete and edit query fields. To add a field, click on the Add Option button at the bottom of the section. To delete a field, click on the bucket icon next to the field name. To edit a field, click on the name of the field on the list. The following configuration options will get available:
- Option Type - select the type of the field: Text/Field or Select/Dropdown
- Required - tick if the field is mandatory
- Option Title - the name of the field
Permission Settings
The Permissions section allows bringing user roles to conformity with their to their responsibilities within a department:
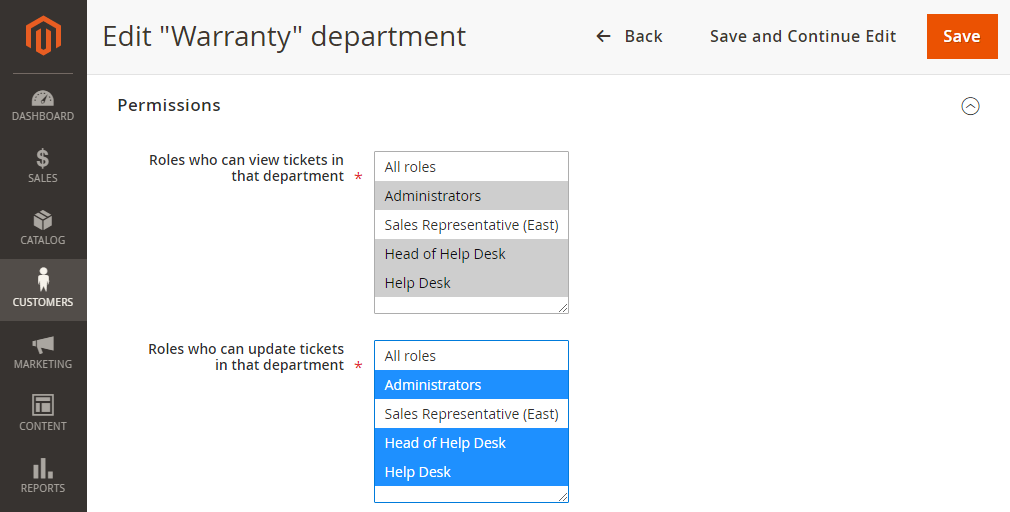
|
Whatever are the settings you have configured herein, the native Magento role permissions will also stay in operation when it comes to accessing tickets and departments:
|
Learn more on creating and assigning user roles in a Magento 2 store - User Roles / Official Magento 2 Manual.
Gateways
This is where you can browse, delete, create and configure email gateways/webhook gmail gateways for use within the extension.
An email gateway/webhook gmail gateway can be used to:
- Send email notifications and ticket updates to both customers and Help Desk agents;
- Collect and insert all the incoming emails into the tickets. Instead of using the contact form, customers can create tickets right from the emails sent to the email gateway.
Thus, an email gateway is an email address used by the extension to receive and send messages. It can be a simple Gmail account or a company email. If you are not sure about your email gateway settings, contact your email provider.
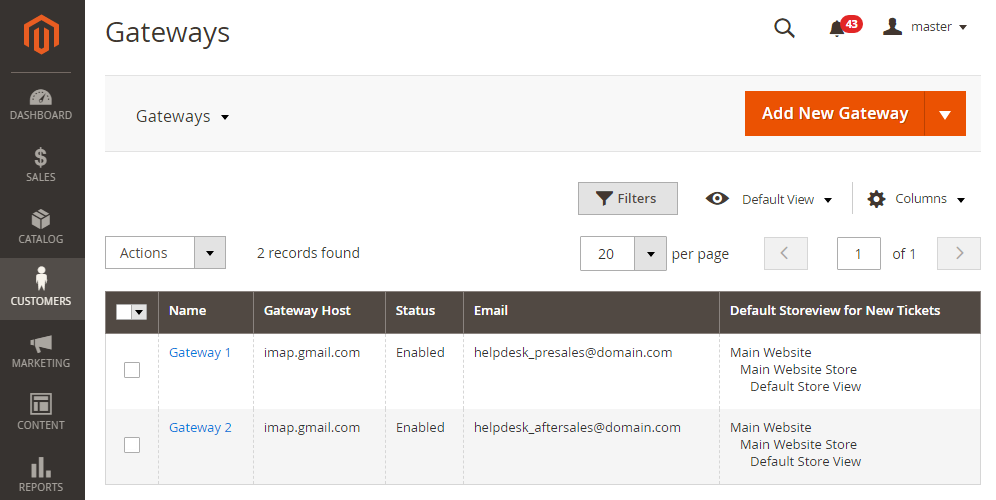
Gateways Grid
The Gateways grid accumulates information on the gateways into the following columns:
- Name - the name of the gateway, active link to the Edit Gateway page
- Gateway Host - the email server through which every incoming or outgoing email passes
- Status - the status of the gateway: Enabled or Disabled
- Email - the email address from which the emails are to be fetched into tickets
- Default Storeview for New Tickets - the store view to receive tickets from the gateway
|
Edit the statuses of the gateways individually or in bulk with the help of the Actions dropbox above the grid. |
Create/Edit Gateway
To add a new gateway, click on the Add New Gateway button in the top right and choose either Email Gateway or Webhook Gmail Gateway. To edit a gateway, click on the name of the gateway in the Gateways grid.
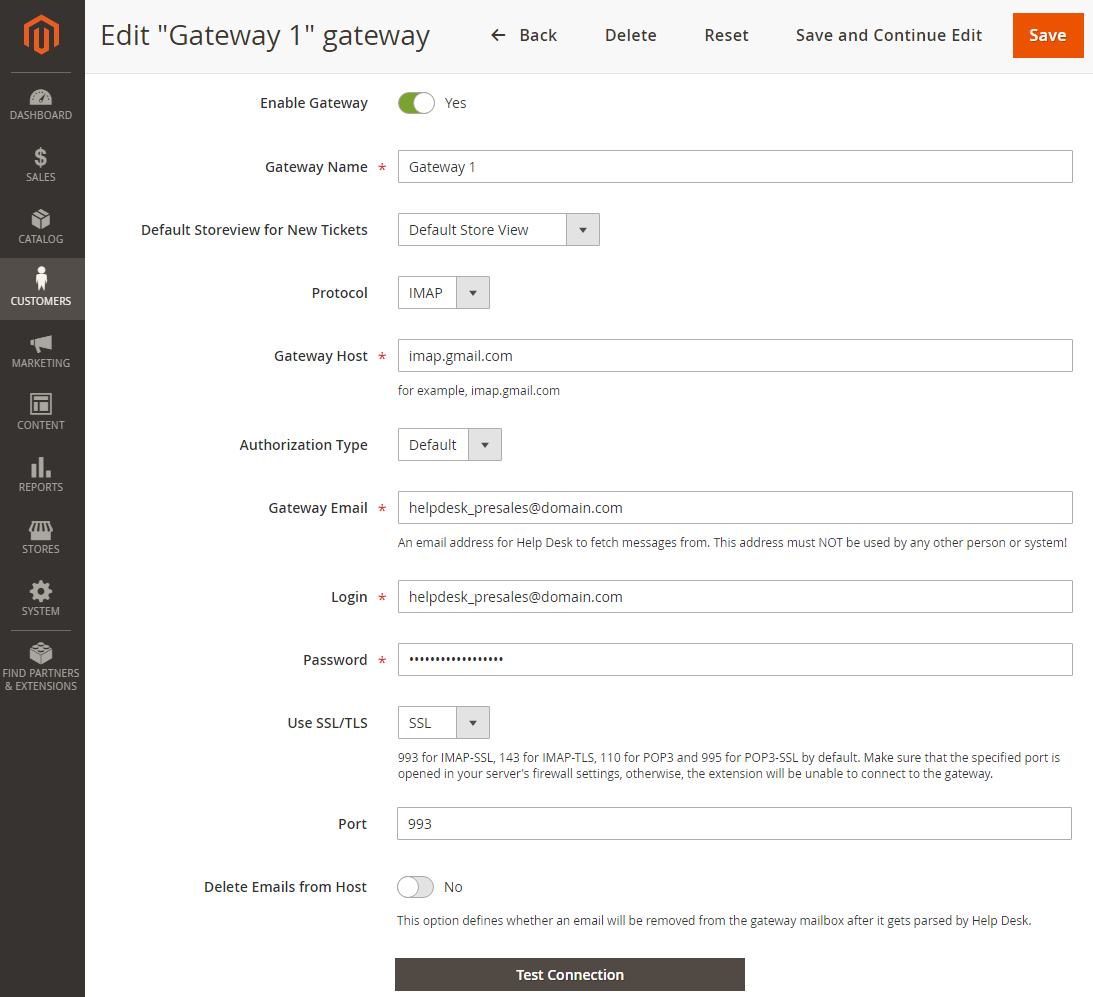
The following configuration options are available on the Create/Edit Gateway page:
- Enable Gateway - set to Yes to enable the gateway (the status of the gateway will then be Enabled)
- Gateway Name - the name of the gateway (for internal needs)
- Default Storeview for New Tickets - select the store view to welcome by default the tickets fetched from the gateway
- Protocol - select the protocol of the gateway: IMAP or POP3
- Gateway Host - suggest the address of the server of the gateway
- Authorization Type* - select the authorization protocol: Default, Google or Microsoft
- Gateway Email - indicate the email address to be the source of the tickets
- Login - provide the login to the gateway email
- Password- provide the password to the gateway email
- Topic Name - provide the Topic Name to the gateway email from https://console.cloud.google.com/ (only for Webhook Gmail Gateway)
- Use SSL/TLS - select the security protocol to connect to the email gateway
- Port - indicate the port to connect to the email gateway (depending on the security protocol selected)
- Delete Emails from Host - set to Yes to have customer emails from which the tickets were created deleted from the store. Pay close attention to this setting if you have limited email gateway storage!
|
What port can I indicate for the gateway? 993 for IMAP-SSL, 143 for IMAP-TLS, 110 for POP3 and 995 for POP3-SSL by default. Make sure that the specified port is opened in your server's firewall settings, otherwise, the extension will be unable to connect to the gateway. |
If the Default type of authorization is selected for Authorization Type, the Test Connection button at the bottom of the page allows checking the connection to the newly-configured gateway. The Test Connection button is not available if the Google or Microsoft authorization type is chosen.
* When Google is selected as Authorization Type (OAuth authorization to Google Suite applications), the following two fields substitute the Login and Password fields:
- Client ID - set the identification number of a client as it was generated for your gateway app in the Google Developers Console;
- Client Secret - set the number of a client secret as it was generated for your gateway app in the Google Developers Console.
Refer to the official Google user guide to learn more on how to create a Google Client ID and Secret.
When Google is selected, you can test the connection and verify your Google Account with the Verify Google Account found at the bottom of the page. The button becomes active when the Department is saved. The Verify Google Account button is not available when the Default type of authorization is selected.
|
The following library is to be installed to enable gateways with Authorization Type = Google composer require google/apiclient:"^2.0" |
|
Please note, that the Redirect URL should be the following: https://store_name/admin/aw_helpdesk2/gateway_google/verify/ |
|
Please make sure you have familiarized yourself with the following tips on the use of gateways:
|
Click on the Save button in the top right of the New/Edit Gateway page to confirm and save the settings. Upon the subsequent cron launch, first emails (if there are any) will be added to tickets.
Microsoft as Authorization Type
|
NOTE: To create an OAuth2 application in Azure follow the official Microsoft User Guide. |
Redirect URL for Microsoft Azure - https://storename/admin/aw_helpdesk2/gateway_microsoft/verify/
* When Microsoft is selected as Authorization Type, the following three fields substitute the Login and Password fields:
- Client ID - set the identification number of a client as it was generated for your gateway app in the Microsoft Azure (Overview > Essentials);
- Client Secret - set the number of a client secret as it was generated for your gateway app in the Microsoft Azure (Certificates & secrets > New client secret). Client Secret must be copied to a safe place before leaving the page because you cannot copy it twice.
- Tenant ID - set the Tenant ID of a client as it was generated for your gateway app in the Microsoft Azure (Overview > Essentials).
Save your configurations before testing.
When Microsoft is selected, you can test the connection and verify your Microsoft Account with the Verify Microsoft Account found at the bottom of the page. The button becomes active when the Department is saved. The Verify Microsoft Account button is not available when the Default type of authorization is selected.
In order to use Microsoft authentication you need to install OAuth client:
composer require league/oauth2-client
|
Topic Name Configuration (for Webhook Gmail Gateway)
To determine the Topic Name, follow the next steps:
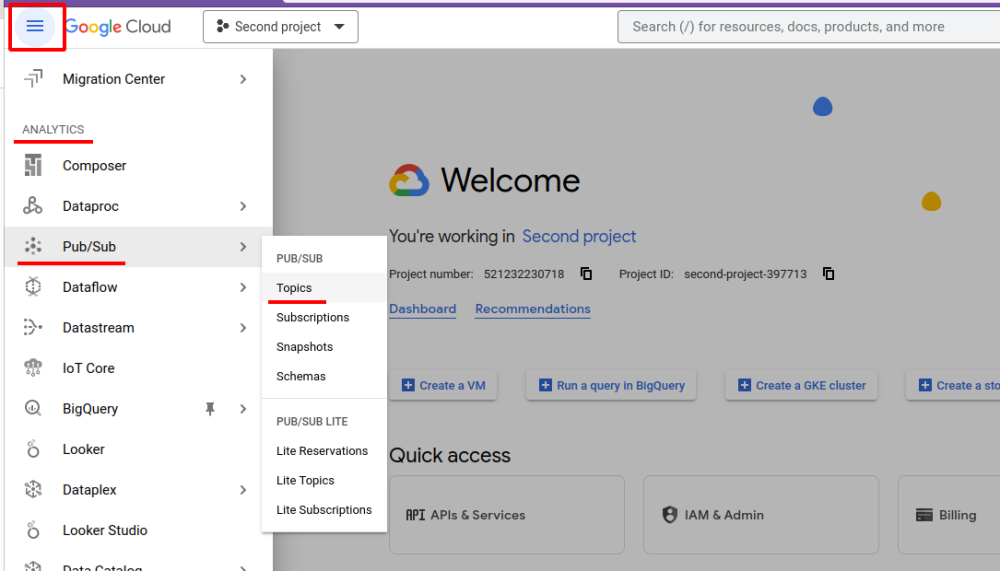
1. Go to Console Google Cloud > More products > Analytics > Pub/Sub > Topics
2. On the Topics page, click the Create Topic button
3. Fill in the Topic ID field and then click the Create button
4. Go to Console Google Cloud > More products > Analytics > Pub/Sub > Subscriptions
5. Click on the Subscription ID active link
6. Within the Subscription page, navigate to the Edit tab.
7. On the editing page, choose the following options:
-
Delivery type = Push
-
Enter the Endpoint URL in the specified format:
|
YOUR_BASE_URL/aw_helpdesk2/webhook_gmail/receive/ |
8. Afterward, proceed to set up permissions for the Gmail API.
Go to Console Google Cloud > APIs & Services > Library > Google Workspace > Gmail API
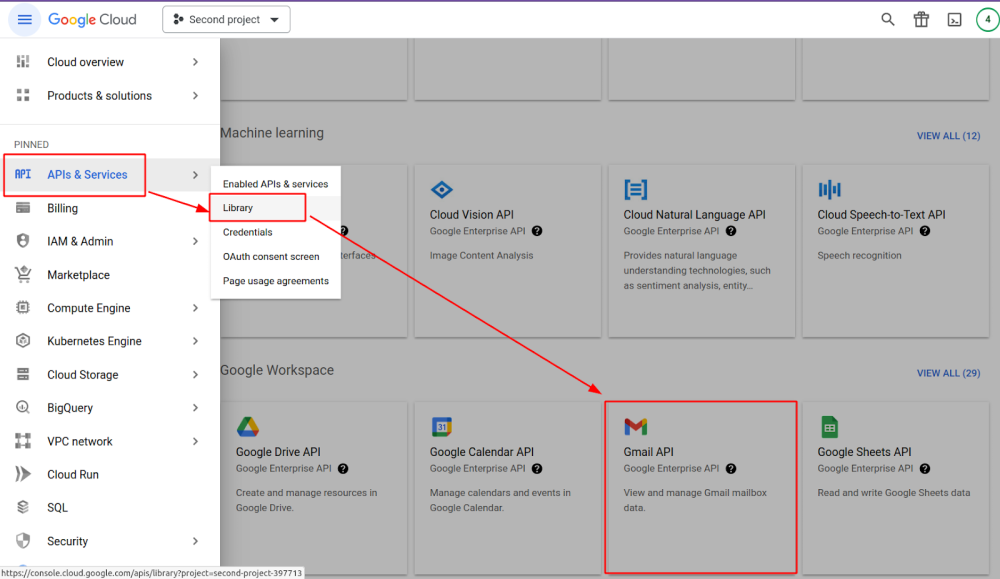
9. On the Gmail API page, click the Enable button
10. To set up permissions, go to Console Google Cloud > More products > Analytics > Pub/Sub > Topics
11. For the specified topic, click the View permissions button from More Actions menu
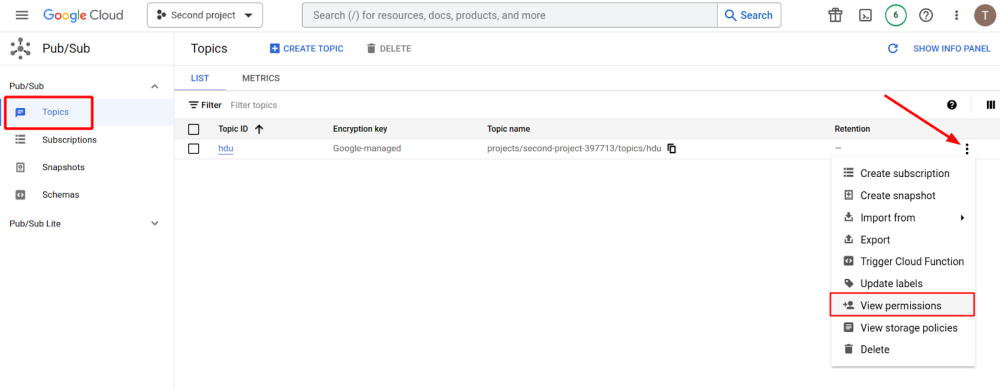
12. On the Permissions tab, click the ADD PRINCIPAL button
13. Within the opened window, configure the necessary permissions. Ensure the following permissions are applied to the gateway email:
-
Editor
-
Owner
-
Pub/Sub Admin
-
Pub/Sub Editor
-
Pub/Sub Publisher
-
Pub/Sub Subscriber
-
Pub/Sub Viewer
Additionally, you need to set the Pub/Sub Publisher role for the email - [email protected] (you can read more about this here)
14. Go to Console Google Cloud > More products > Analytics > Pub/Sub > Topics. The Topic Name value will be needed when creating a gateway in the admin panel.
Quick Responses
Help Desk Ultimate 2 for Magento 2 enables agents with canned responses, that is prearranged replies to some generic pre- or after-sales issues. Go to Customers → Help Desk 2 → Quick Responses to browse, add, delete and edit quick responses.
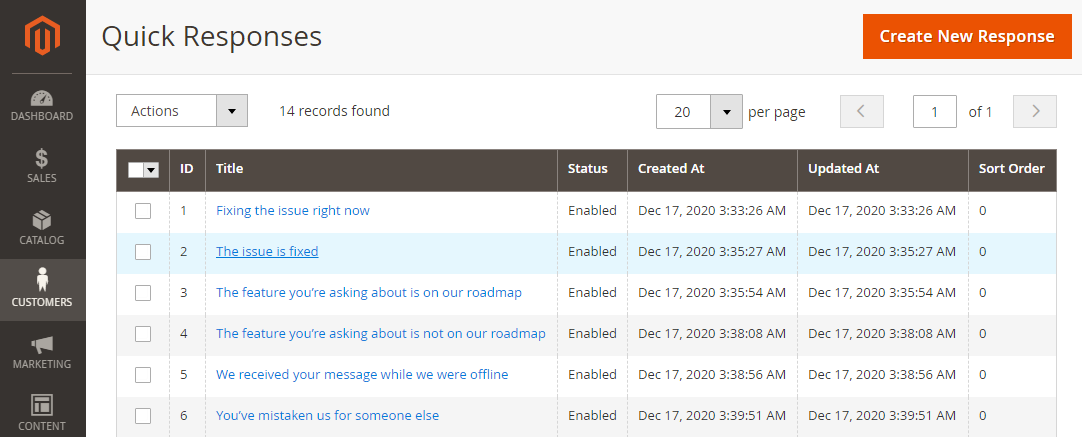
Quick Responses Grid
The Quick Responses page features a grid with the following columns:
- ID - the identification number of the response;
- Title - the name of the response, active link to the Edit Quick Response page;
- Status - the status of the response (enabled/disabled);
- Created On / Updated On - the dates of creation / last modification of the response;
- Sort Order - the order in which the responses will feature in the dropbox on the Ticket View page.
|
Edit the statuses of the responses individually or in bulk with the help of the Actions dropbox above the grid. |
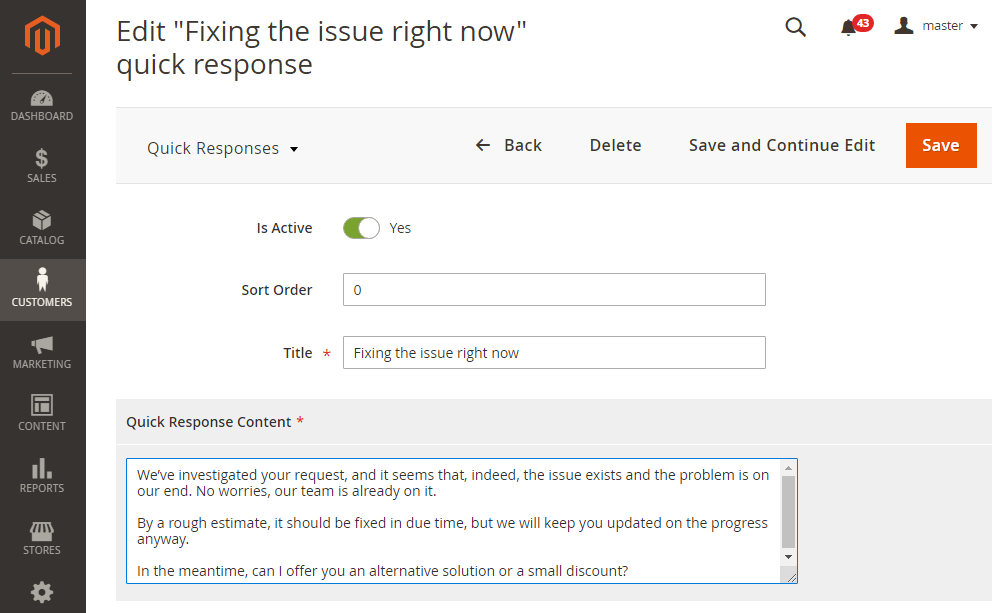
Create/Edit Quick Response
To edit a response, click on the title of the response. To start a new response, click on the Add Quick Response button in the top right of the page. You will be redirected to the Create/Edit Quick Response page.
The following configuration options are available on the page:
- Is Active - set to Yes to enable the quick response for use
- Sort Order - indicate a whole numeric to tell the order of the response in the dropbox on the Ticket View page
- Title - provide the response with a title
- Quick Response Content - write down the text of the response
|
It is suggested you name quick responses to clearly tell the occasions of their use. This will ensure disambiguation and will help save time when a longer list of quick responses is browsed through by the agents. |
Once done, click Save in the top right or Save and Continue Edit to return to composing the response without page reload.
Automations
Automations are Help Desk rules which regulate the use of automatic actions against some pre-set conditions. Automations are meant to save time on routine ticket management operations, including those if changing ticket status, sending email notifications, and operating ticket updates. Automations take place on cron launch.
Go to Customers → Help Desk 2 → Automations to browse, add, delete, and automations.
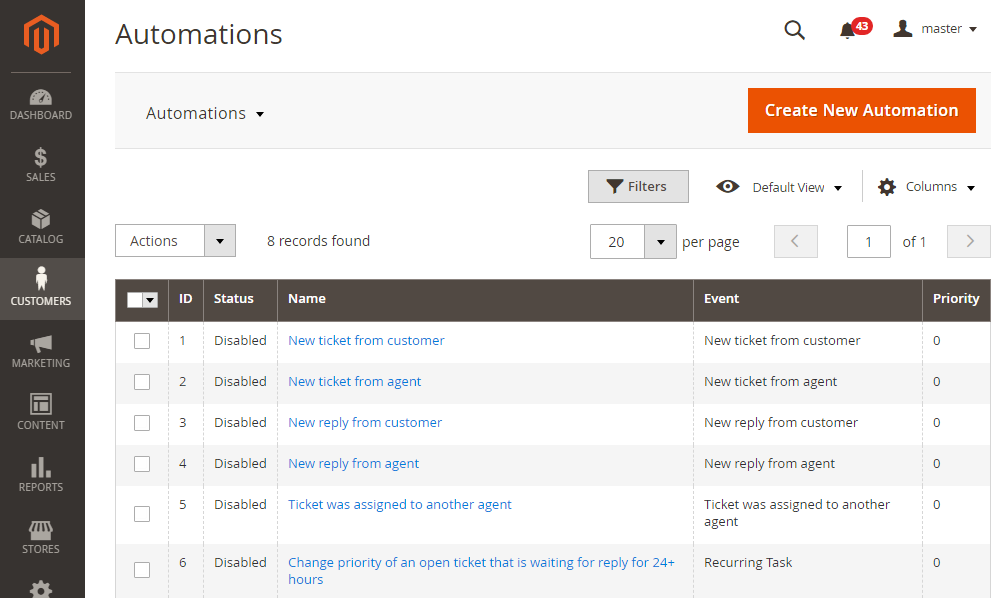
Automations Grid
By default, the Automations grid lists eight rules. These rules are built against a ticketing event each and define automatic emailing of notifications upon reaching a certain event. These automations help mark out those tickets which need prompt replies, and instantly notify customers once the issue is reported.
The grid shows data within the following columns:
- ID - the identification number of the automation
- Status - the status of the automation (Enabled / Disabled)
- Name - (active link) the name of the automation
- Event - the trigger event for the automation
- Priority - the priority (0 is the highest one) of execution of automations in case of overlapping conditions thereof
|
Edit the statuses of the automations individually or in bulk with the help of the Actions dropbox above the grid. |
Automation rules work in compliance with the following pattern:
1) Cron prompts the event and launches the rules of automation;
2) The extension checks if any of the tickets match the conditions of the event;
a) If the conditions of the event are met, the extension launches the action of automation;
b) If the conditions of the event are not met, the extension stops executing the automation and does not trigger it up until the next cron launch.
3) The extension stops executing the rule and does not trigger it up until the next cron launch
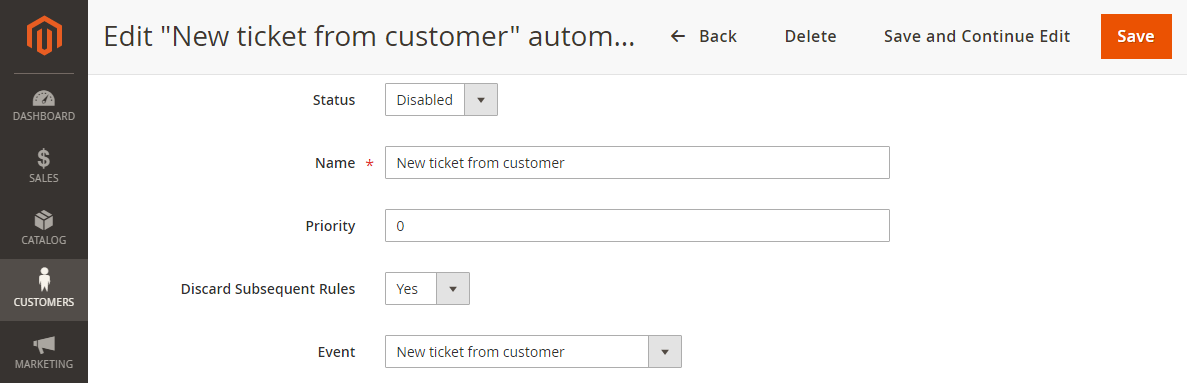
Create/Edit Automation
To edit automation, click on the name of thereof in the grid. To create an automation rule, click the Create New Automation button. You will be redirected to the Create/Edit Automation page.
The Create New Automation page comes in three blocks as follows:
The initial block of configuration options:
- Status - set to Enabled to enable the automation for operation
- Name - suggest the name of the operation
- Priority - indicate a whole numeric value to tell the priority of the automation (for situations when conditions of multiple automations overlap)
- Discard Subsequent Rules - set to Yes to discard the execution of any subsequent rules on execution of the present automation
- Event - select an event to trigger the automation. The following events are available for choice:
- New ticket from customer - the Customer submits a new ticket;
- New ticket from agent - the Agent creates a ticket for a customer;
- New reply from customer - the Customer replies to the ticket;
- New reply from agent - the agent replies to a ticket;
- Ticket was assigned to another agent - the ticket is assigned to another agent;
- Recurring Task - a recurring task that will be executed by the extension upon every cron launch;
- Order Status Change - the order has its status changed;
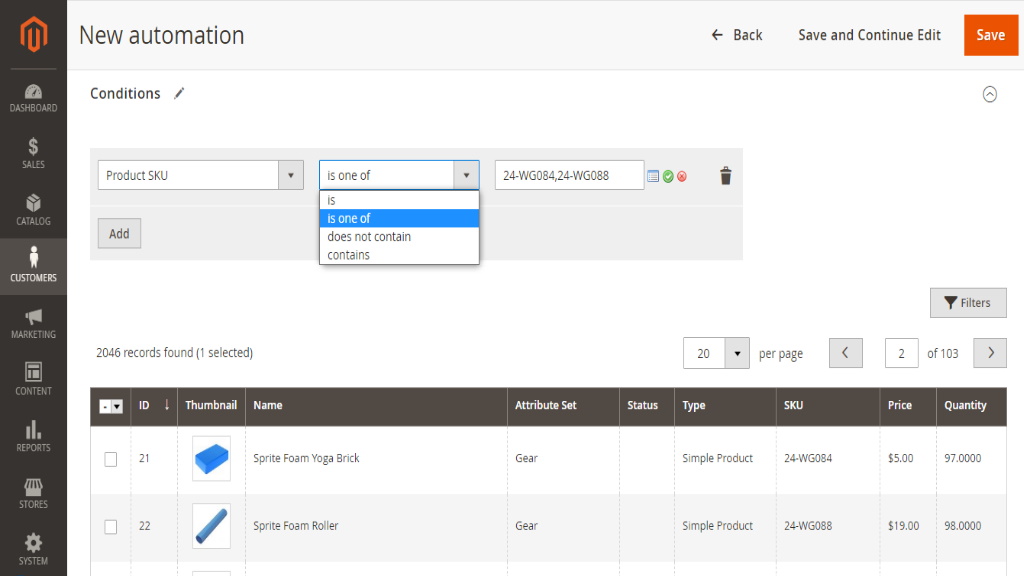
- Order is created - the order contains specified in the Conditions tab Order Status and Product SKU;
- Ticket Status Change - the event triggers when the status of the ticket is changed;
- Conditions: New Ticket Status - is one of, is not - New, Open, Waiting for Customer, Closed; Ticket Rating - is one of, is not - None, 1 star, 2 stars, 3 stars, 4 stars, 5 stars;
- Ticket Was Rated - the event triggers when the ticket was rated by the customer (from My Account or by email).
- Conditions: Tickets Status - is one of, is not - multi-select: New, Open, Waiting for Customer, Closed; Ticket Rating - is one of, is not - multi select: 1 star, 2 stars, 3 stars, 4 stars, 5 stars.
|
Automation when a certain SKU is purchased In the Conditions tab click on the Add new button and choose one of two conditions: Order status, Product SKU. Connectives dropdown for product SKU contains: is, is one of, does not contain, contains. In the third tab select product(s), after a new order is created, emails with certain products will send to customers.
|
|
The Recurring Task events are different from other events. Recurring Tasks serve as reminders. For example, if a ticket has not been replied to for more than 24 hours, Recurring Task can increase the priority of the ticket and send a notification to the Help Desk agent, responsible for the resolution of the ticket. |
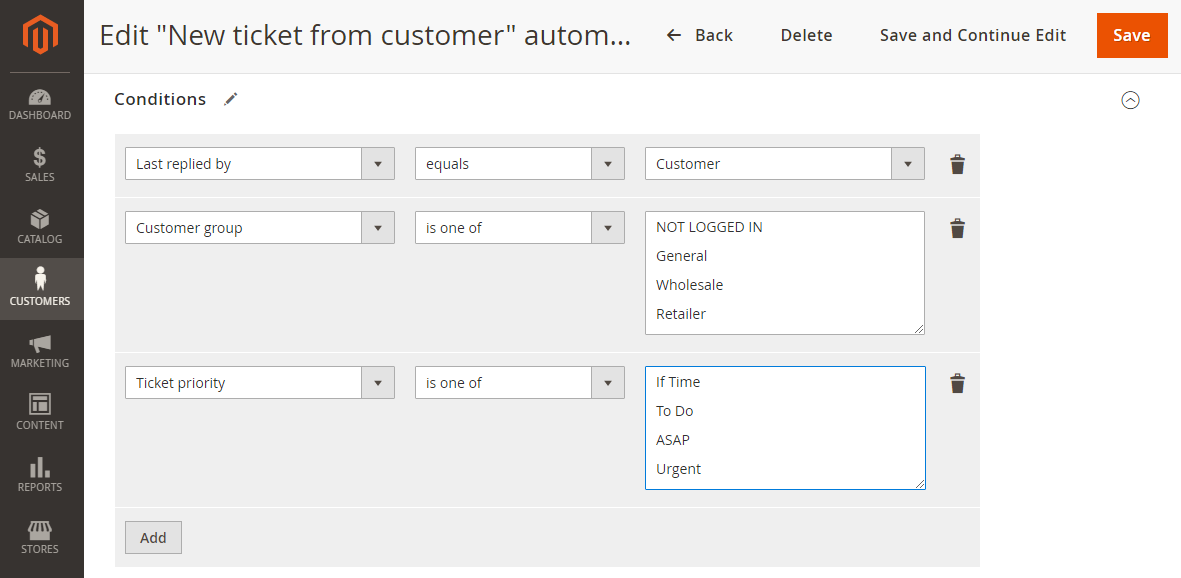
The Conditions block prompts to specify the conditions for the event to call for the automation. A condition herein is the following pattern:
If VARIABLE + LOGICAL CONNECTIVE + VALUE then... |
Each event comes with a specific set of variables, meaningful for the event. Various variables fetch various logical connectives and values, meaningful for the variable.
The connectives are: is / is one of / equals / is equal to / less than / greater than / equals or less than / equals or greater than etc.
Most of the variables are ticket-related. At the same time, there are customer-, customer-group- and order-related variables.
To add a condition, click on the Add button (multiple conditions can be added). To complete the condition, refer to the dropbox on the left hand side and opt for a variable first. The dropboxes of connectives and values will get updated. Complete the condition by connecting the variable with its value.
To delete a condition, click on the Bucket icon on the right to the value drop box.
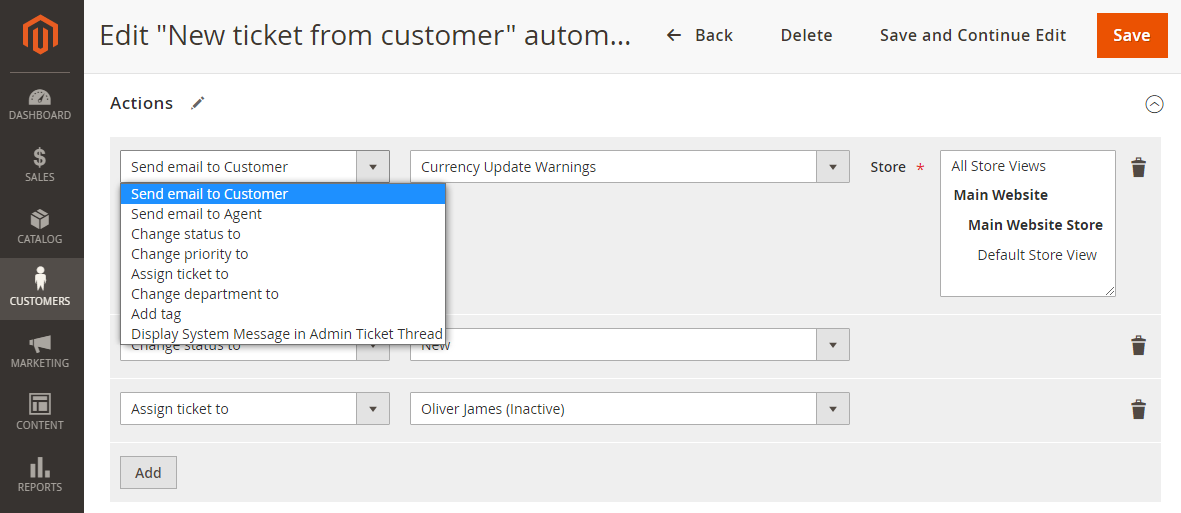
In the Actions section, specify which actions are to be taken upon meeting the specified condition(s).
Each event comes with a specific set of actions. Each action fetches a specific set of objects of action.
Actions include sending email notifications to both the Customer and Agent, changing ticket status and its priority, assigning tickets to the Agent, adding tags to tickets, changing department, displaying system message in the System thread and etc.
To add an action, click on the Add button (multiple actions can be added). To complete the action, refer to the dropbox on the left hand side and opt for an action first. The dropbox(es) of action objects will get updated. Complete the action by selecting an object.
To delete an action, click on the Bucket icon on the right to the action object drop box.
|
Store View can be selected for action Send Email to Customer only. |
|
Automation to reopen a solved ticket will not work when a customer updated the ticket via email. Instead, the extension will create a new ticket with a reference to the previous one. |
Once done, click Save in the top right or Save and Continue Edit to return to configuring the automation without page reload.
Automation Use Cases
| Requirement |
Resolution and Configuration |
| As a customer, I want to receive a notification when my order is placed On Hold. This can help me acknowledge the reason for the case, as well as to allocate time to resolute the issue. |
A new ticket is to be created automatically once the status of the order is changed to On-Hold (by the Anti-Fraud system, for instance). Automation configuration: Event: Order Status Change Condition: Order Status → is one of → On Hold Action: Send Email to Customer → AW Help Desk 2 - order status changed, email to customer |
| As an admin, the Head of the Help Desk team, I want to track the progress of my subordinates in replying to tickets. |
A system message is to be displayed on every reply of an agent to a ticket. Automation configuration: Event: Recurring Tasks Condition: Last replied by → equals → Agent Action: Display System Message in Admin Ticket Thread → the message * * On successful execution of the automation, the message is displayed as follows:
|
| As an admin, I want to send follow-up emails to customers to check if they require any further assistance should 48 hours elapse since their last reply. |
An email is to be sent to the Customer, inquiring if any assistance is needed. Automation configuration: Event: Recurring Tasks Conditions: Ticket Status → is one of → Waiting for a customer // Last replied X hours ago → equals or greater than → 48 Action: Send email to Customer → AW Help Desk 2 - automatic follow-up email to customer → All Store Views |
|
As a customer, I want urgent attention to my ticket if I have left a few messages to it and received no reply from the agents. |
Ticket priority status is to get Urgent priority Automation configuration: Event: Recurring Tasks Conditions: Ticket Status → is one of → Open // Total agent's messages → equals → 0 // Total customer's messages → equals or greater than → 3 Action: Change Priority to → Urgent |
| As a customer, I want prompt attention to my ticket within 24 hours. |
Ticket priority is to get ASAP status, if the ticket is open and has been waiting for a reply for more than 24 hours. Automation configuration: Event: Recurring Tasks Conditions: Ticket Status → is one of → Open // Last replied X hours ago –> Equals or greater than → 24 // Last replied by → equals → Customer Action: Change Priority to → ASAP |
| As an admin, I want tickets to receive the "product flaw" tag automatically, should the initial message contain words indicating a product flaw. |
"Product flaw" tag is to be added to new tickets from customers, should they contain words relating to "product flaw". Automation configuration: Event: New Ticket from Customer Conditions: First message → contains → defect, broken, scratched, scratch, flaw, jam damage, chip, split, dirt Action: Add tag → product flaw |
|
As an admin, I want tickets to be created automatically on purchase of a product and a message be sent to customers prompting them to submit authorization data. |
An email is to be sent to the Customer on purchase of a product. Automation configuration: Event: Order Status Changed Conditions: Order status → is one of → Complete Action: Send email to Customer → your email |
|
As an Admin, I want to ask customers, who highly rated the ticket, to leave us a review. So that we have more reviews on our website. |
Ticket status is changed to Closed. Automation settings: Event: Ticket Was Rated; Conditions: Tickets Rating → is one of - 4 stars, 5 stars; Ticket Status: Closed; Action: Send email to customer |
|
As an Admin, I want to pay attention of an agent, that customer wasn't satisfied with the ticket, so that agent can analyze what was done wrong. |
Ticket status is changed to Closed. Automation settings: Event: Ticket Was Rated; Conditions: Tickets Rating → is one of - 1 stars, 2 stars; Ticket Status: Closed; Action: Send email to agent. |
|
As an Admin, I want to ask for a ticket review of customers, who closed the ticket and didn’t rate it. This way I can get some feedback on helpdesk teamwork. |
An email is sent to the Customer. Ticket status is changed to Closed. Automation configuration: Event: Ticket Status Change; Conditions: New Ticket Status → Closed. Ticket Rating: None; Action: Send an email to the Customer. |
|
As an Admin, I want to set the highest priority to open tickets with low rating, so that helpdesk agents will pay more attention to these tickets. |
Ticket priority is to get Urgent. Automation configuration: Event: Ticket Status Change; Conditions: New Ticket Status → Open, Waiting for Customer; Ticket Rating → 1 star, 2 stars; Action: Change priority to Urgent * If a customer replied to a ticket and after that, he rated it - automation won’t work in this case, because ticket status change took place when the ticket hadn’t been rated yet. If a customer first rated the ticket and afterward he replied on it - automation will work. |
Managing Tickets
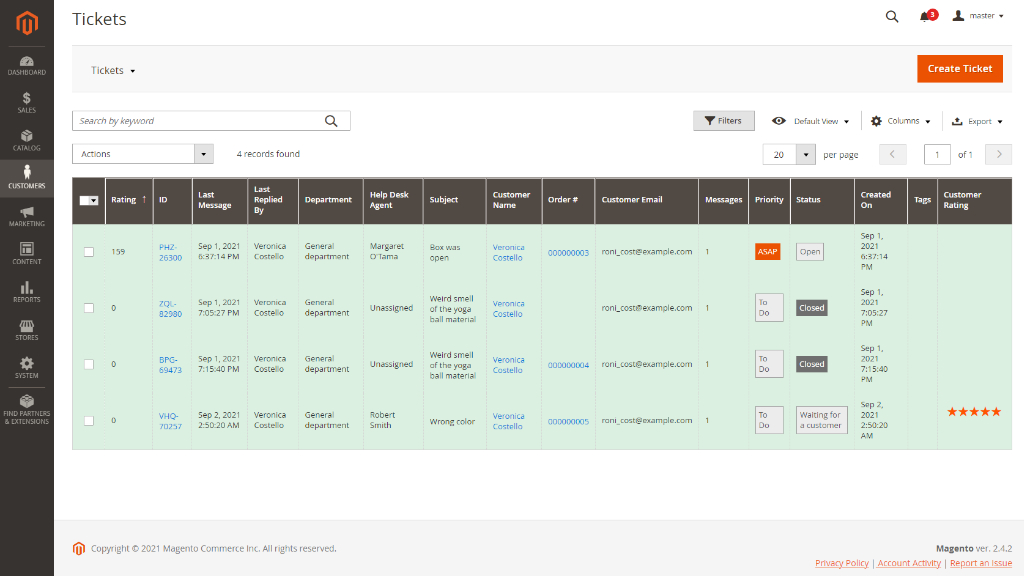
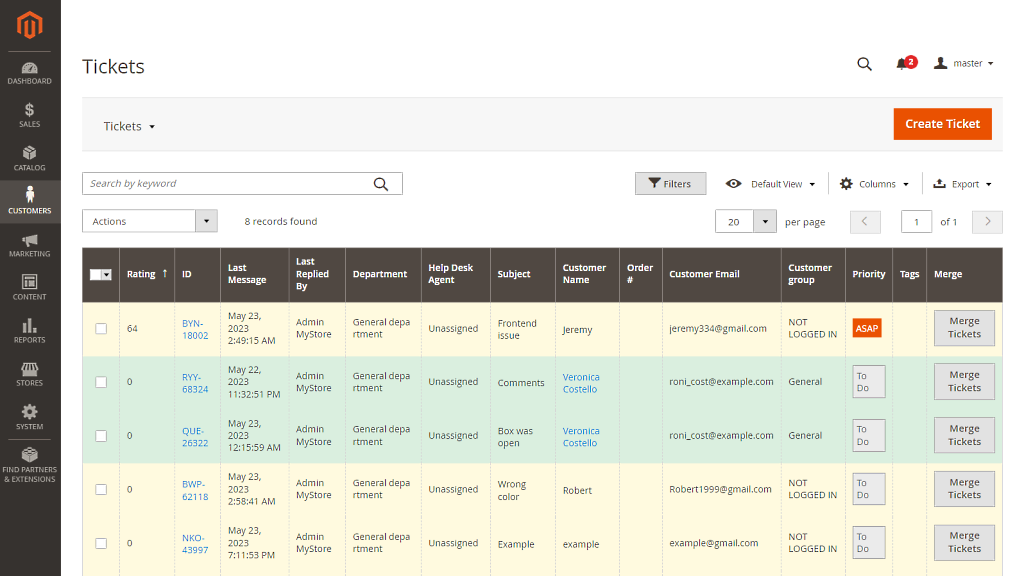
Tickets Grid
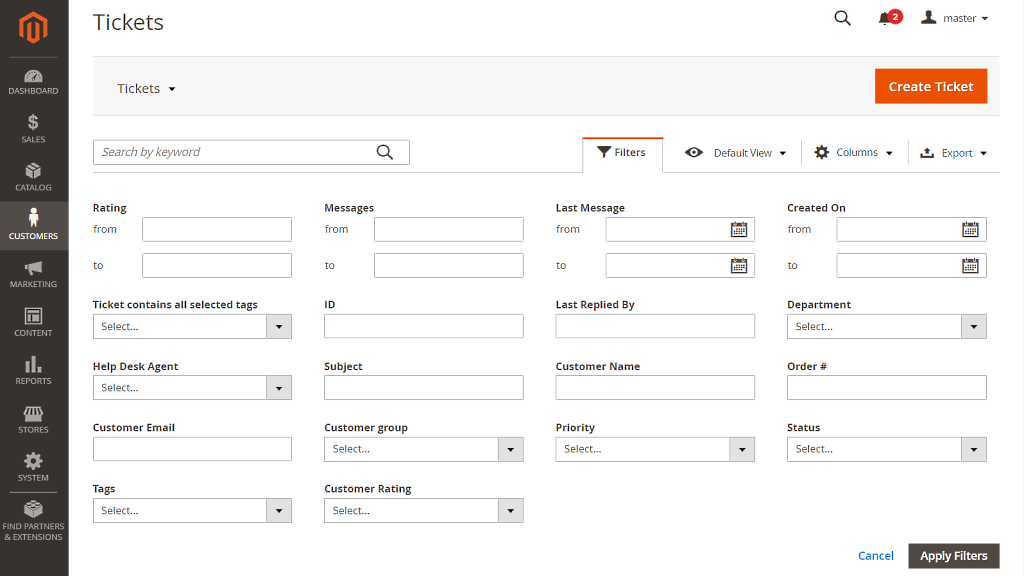
To browse and manage tickets, navigate to Customers → Help Desk 2 → Tickets. This is where you can find the Tickets grid. The grid supports sorting, filtering and pagination.
The Tickets grid contains explicit ticket-related information, brought into the following columns:
- Rating - the weight of the priority of the ticket (see the calculation rules below);
- ID - the identification number of the ticket, active link to the Ticket View page;
- Last Message - the date and time of the latest message within the ticket;
- Last Replied by - the name of the person who left the latest reply to the ticket;
- Department - the department responsible for the ticket;
- Help Desk Agent - the agent responsible for the ticket;
- Subject - the subject line of the ticket;
- Customer Name - the name of the customer, active link to the customer profile on Backend;
- Order # - the number of the order associated with the ticket, active link to the Order View page;
- Customer Email - the email address of the customer (contact person on the customer side);
- Customer Group - the affiliation of a customer with a particular group;
- Messages - the number of message in the ticket thread;
- Priority - the priority of the ticket;
- Status - the status of the ticket;
- Created On - the date and time when the ticket was created;
- Tags - tag words assigned to the ticket;
- Merge - the ability of combining multiple support tickets into a single unified ticket.
|
How to read the visual clues of the grid? Help Desk 2 for Magento 2 employs color mark-up to emphasize various aspects of tickets, both on the Tickets page and on the Ticket View page, namely: Grid rows
Ticket Priority
Ticket Status
Ticket Message
|
|
How to further prioritize tickets of the same priority status? Ticket rating is calculated for tickets with status New or Open. For tickets with status different to New or Open rating is 0. Ticket rating is recalculated on saving the ticket and on every cron launch (aw_helpdesk_update_ticket_rating). Calculation rules:
|
|
Hovering the cursor over the subject line of a ticket will open a bubble with a longer text of the ticket. |
|
Better filtering by tags On the Tickets grid page, you can use an additional filter Ticket contains all selected tags.
|
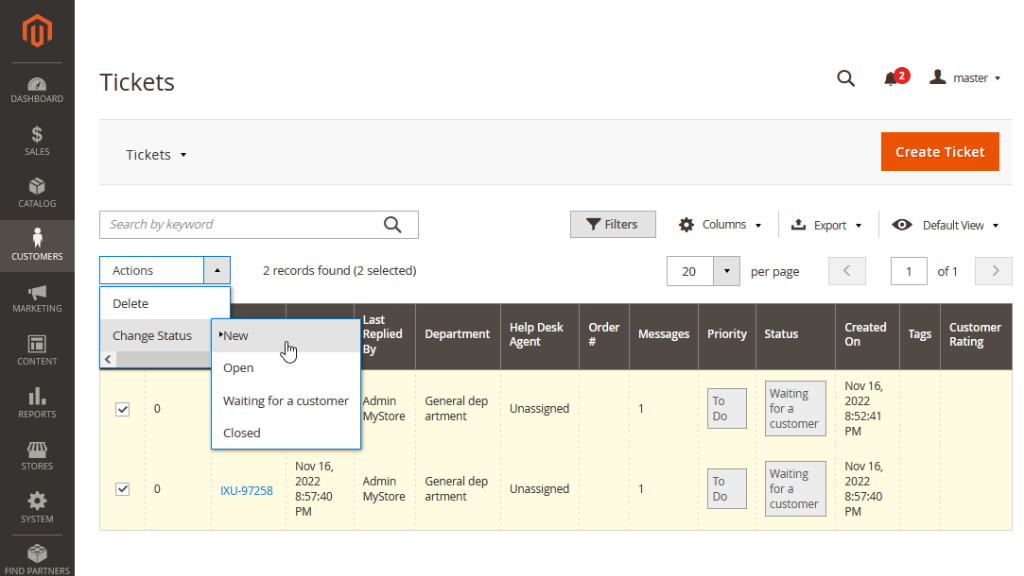
From the version 2.5.0 it becomes possible to change the status of tickets in bulk via mass-action.
|
Delete ticket rows individually or in bulk with the help of the Actions dropbox above the grid. |
Replying to Tickets
To reply to a ticket or see more information on it, click on the ticket ID in the Tickets grid. You will be redirected to the Ticket View page.
The Ticket View page is composed of the two areas: Ticket Details and Ticket Messaging.
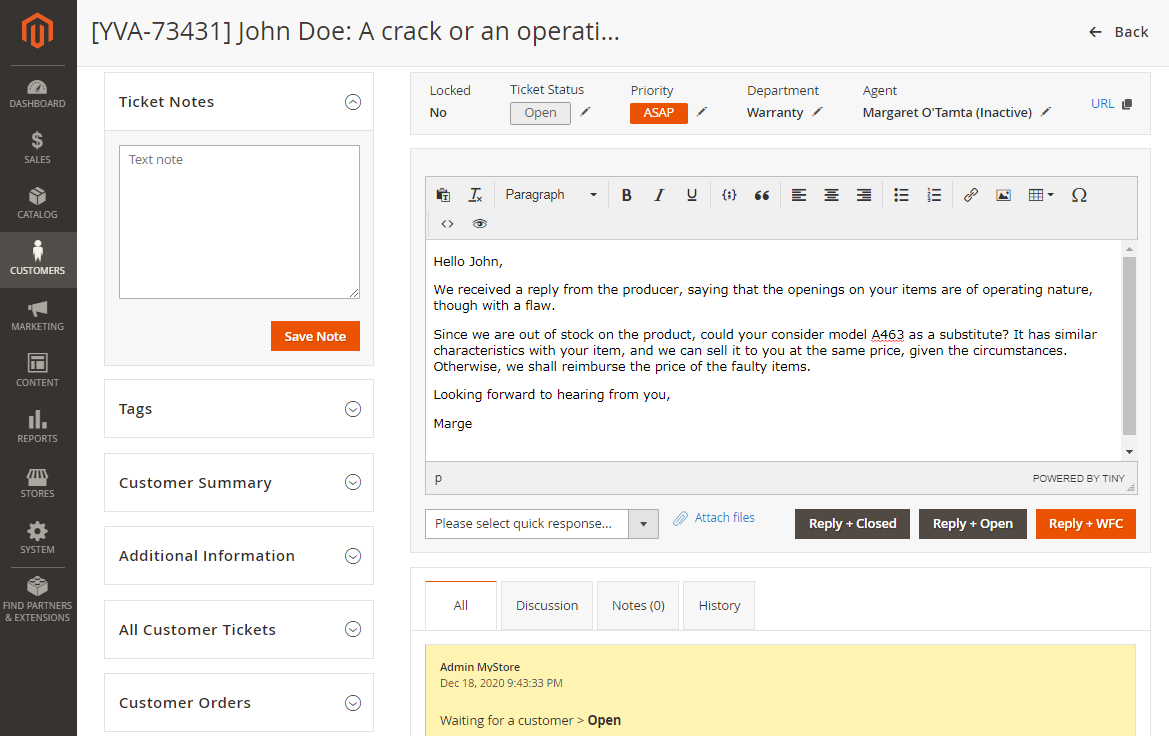
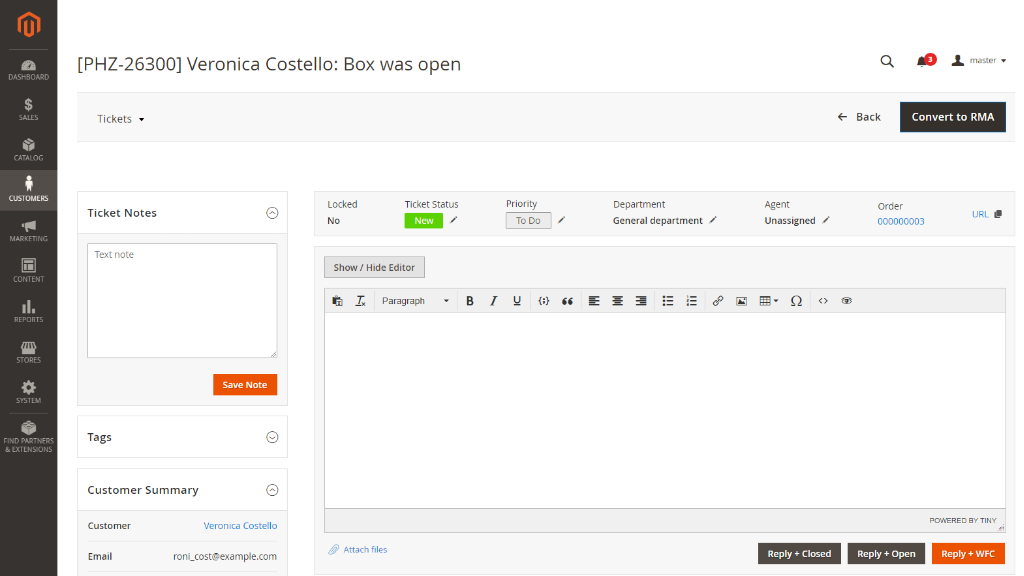
The Ticket Details area is on the left. It is made up the following tabs:
|
Ticket Notes Place notes to the ticket here. Click on the Save Note button when done. The note is saved in the Ticket Notes text field and is visible both during the work with the ticket, and on subsequent reload of the page. To leave another note, delete the text of the previous note in the Ticket Notes field and type in a new note. Notes are invisible for customers, but visible for any agents who browse the ticket.
The note is saved in the Ticket Notes text field, in the Notes tab in the Ticket Message area and in the ticket thread.
|
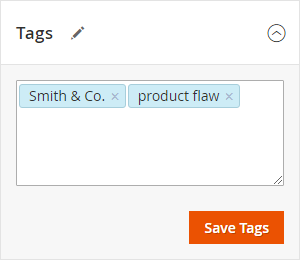
Tags Assign tags to the ticket with the Tags tab and box. A tag here is a word or phrase where words are separated with any punctuation mark, except comma ",". Multiple tags can be typed into the field in one go. To do so, separate tag phrases/words with a comma ",". Alternatively, hit the Enter key“. To save tags, click on the Save Tags button. Tags can be removed by clicking on the “cross” icon next to the tag phrase. When entering a few characters of a tag phrase, the autocomplete feature will suggest an ending. The latter are based on the previously saved tags (within other tickets too).
|
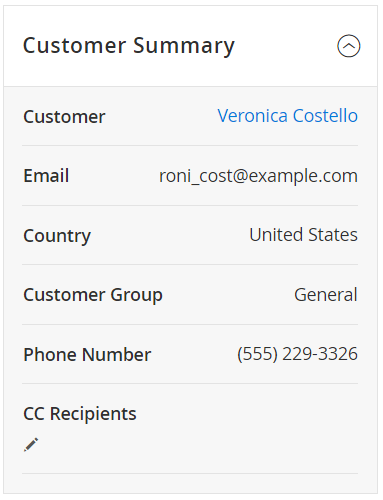
Customer Summary This is where you can get some quick information on the customer, associate with the ticket. The following information is available within the tab:
|
|
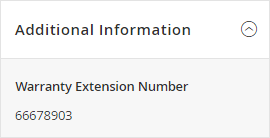
Additional Information Find here the data provided within the "Storefront Required Information" fields, if any.
|
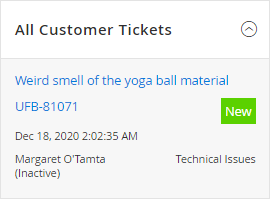
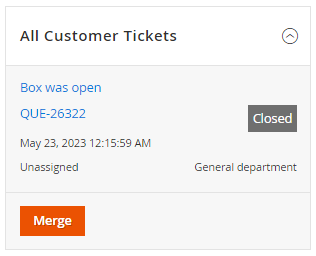
All Customer Tickets Find here the list of tickets submitted by/to the Customer. You will be able to understand the scope of the issues the Customer has inquired with, as well as to know the agents who was/is working with the Customer. The tab provides the following information:
Hovering the cursor over the subject line will open a bubble with a longer text of the ticket.
|
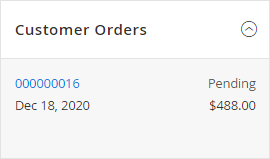
Customer Orders Find here orders placed by the Customer. Refer to Backend → Store configuration → AW Help Desk 2 → Backend Ticket View Settings to configure the tab and its content. The following information can be seen in the tab:
|
The Ticket View area is on the right. It is made up of the following three sections: Tickets Controls, Ticket Message, Ticket Thread.
Ticket Controls section
The following information is available within the section:
- Locked - the indicator of the locked ticket.
- Ticket Status - the status of the ticket. Click on the Pen icon to select a different status. By default, New is the status of the newly-created/submitted ticket.
- Priority - the priority status of the ticket. Click on the Pen icon to select a different priority status. By default, To Do is the priority status of the newly-created/submitted ticket.
- Department - the department the ticket is assigned to. Click on the Pen icon to select a different department.
- Agent - the agent assigned to the ticket. Click on the Pen icon to select a different agent. The dropdown will show only those agents who are assigned to the chosen department. By default, Primary Agent of the department is the agent of the ticket (if the ticket is created from the Front-end)
- External Link - the external URL to the ticket, generated automatically once the ticket is created. Can be copied and shared among the agents or with a third party. One can then view the ticket thread without logging into the system. The link opens a page, the elements of which are the same as those of the Ticket View page on the Front-end.
|
Department can be changed for the ticket by the Admin users only. |

The Ticket Locking feature is presented with the “lock” icon in the Ticket Controls section. When the ticket is not locked, the icon is substituted with the "No" text.
Click on the icon to lock the ticket. Only that Agent, who is currently assigned to the ticket, will then be able to respond to the ticket, and change its parameters (Priority, Status, etc).
|
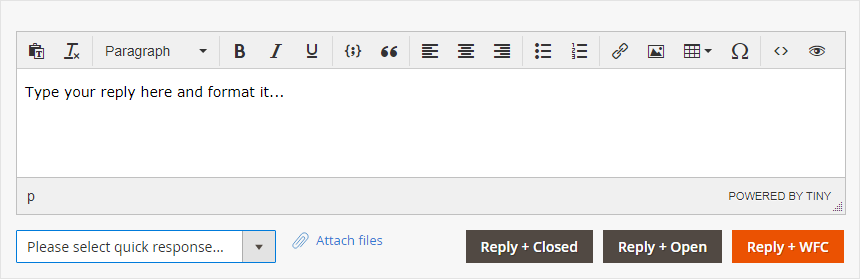
Ticket Message section
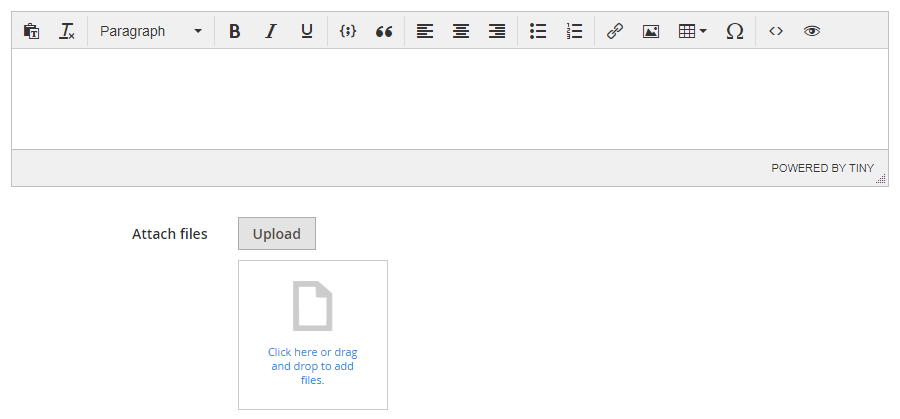
The Ticket Message section is where you are suggested to reply to the ticket.
The section has the following elements:
- WYSIWYG editor, to welcome a reply to the ticket and help format it.
- Canned Response dropdown, to select a quick (pre-arranged) response. All canned responses created on the Quick Responses Page will appear on the list herein. On picking up a response, its text will appear in the text field above.
- Attach Files active link, to attach files to the response. Unsupported special characters or hieroglyphs in the names of email attachments will get erased from the names. If the whole name is made of such characters, it will be substituted to "file".
- Reply + Closed button, to save the Agent's reply, move it to the Ticket Thread, send it to the Customer and close the ticket (Ticket Status → Closed).
- Reply + Open button, to save the Agent's reply, move it to the Ticket Thread, send it to the Customer and keep the ticket open, that is on the Agent's side (Ticket Status → Open).
- Reply + WFC, to save the Agent's reply, move it to the Ticket Thread, send it to the Customer and wait for the Customer's reply (Ticket Status → Waiting for Customer).
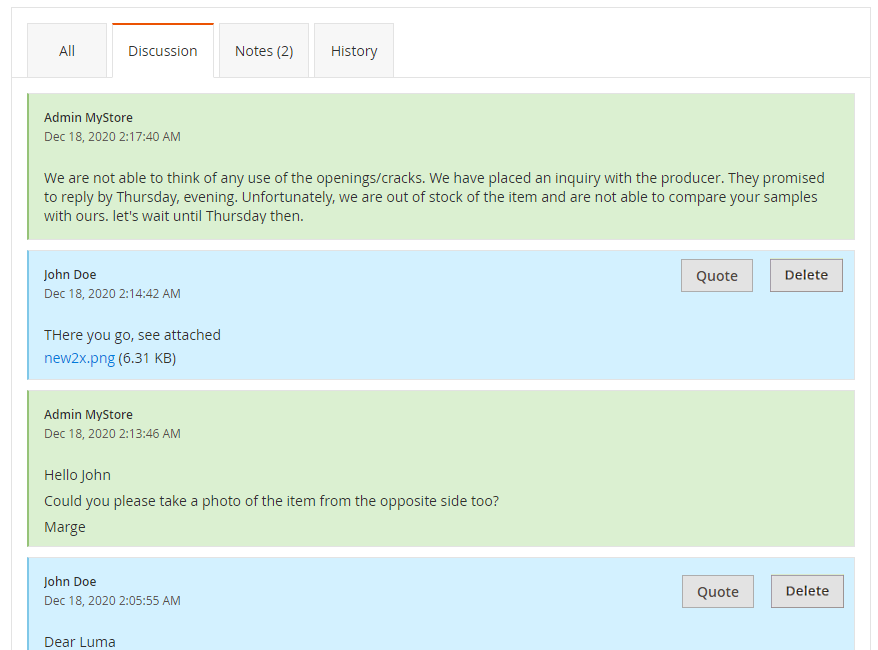
Ticket Thread section
Find here all the messages which were/are part of the ticket conversation.
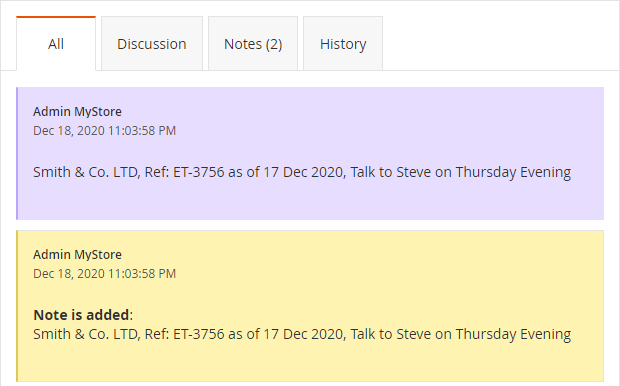
Messages are arranged within the four tabs: All, Discussion, Notes, History. The History tab contains system messages (on yellow background) meant to track every change to the ticket parameters (Status, Priority, Notes, Tags, etc). Notes collects internal notes (on purple background), meant to contain side information regarding the resolution of the ticket, for internal use. Discussion aggregates messages from both the Customer and the Agent(s). The All tab shows all of the above messages. Messages are sorted by the time of creation.
Every message displays the author of the message, the date and time of message creation and the text of the message.
|
Agents can add the text of the Customer's message to their reply, should the conversation evolve in a more complicated way than a linear sequence of questions and replies. Do that with the help of the Quote button. The button is located on every message from the Customer. |
Creating New Ticket
To create a new ticket from the Back-end, click on the Create Ticket button on the Tickets page (Customers → Help Desk 2 → Tickets). You will be redirected to the Create New Ticket page.
The Create New Ticket page contains the following configuration options:
- Subject - specify the issue in brief;
- Department - select the department to be responsible for the resolution of the issue;
- Agent - select the agent to be responsible for the resolution of the issue. Only active agents and Not Assigned are displayed in the Agent dropdown. Only agents, assigned to selected above department, are displayed in the Agent dropdown;
- Store View - select the store view to be associated with the ticket;
- Customer Email - type-in the email of the customer (autocomplete enabled on entering three characters);
- Customer Name - type-in the name of the customer (autocomplete enabled on entering three characters);
- CC recipient - suggest the email of the people to receive the copy of the ticket (and all other subsequent messages within the ticket conversation);
- Status - select the status of the ticket;
- Priority - select the priority of the ticket;
- Quick Response - select the quick response for the ticket while creating it from the backend. Canned Response dropdown, to select a quick (pre-arranged) response. All canned responses created on the Quick Responses Page will appear on the list herein. On picking up a response, its text will appear in the text field above.
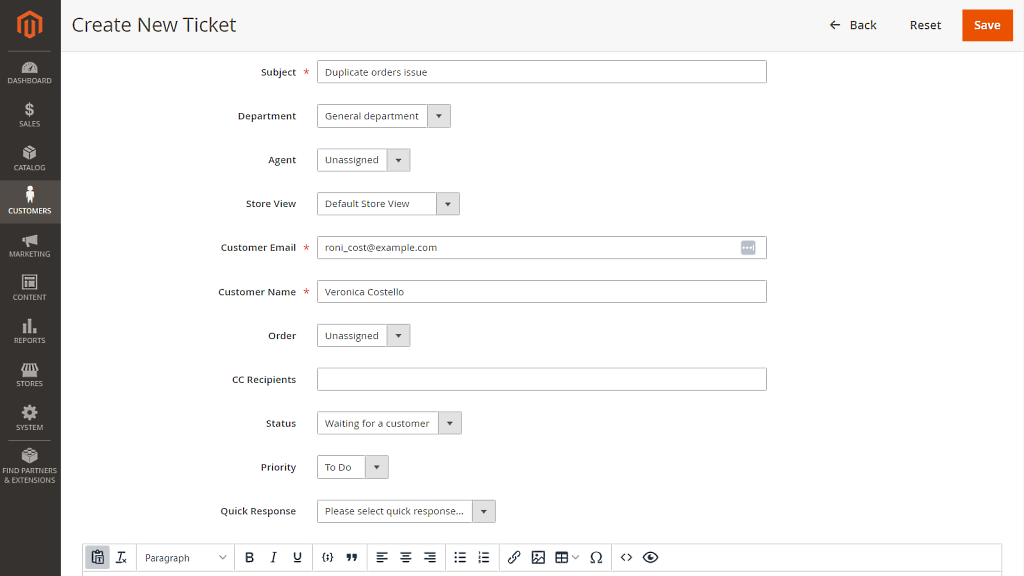
- Content - type in and format the text of the issue;
- Attach file - attach files to support the issue.
|
Unsupported special characters or hieroglyphs in the names of email attachments will get erased from the names. If the whole name is made of such characters, it will be substituted to "file". |
To send the ticket to the Customer and save it into the Tickets grid, click on the Save button at the top of the page. Click on Reset to clear the fields and start filling them in anew. Click Back to return to the Tickets page and erase the data in the fields.
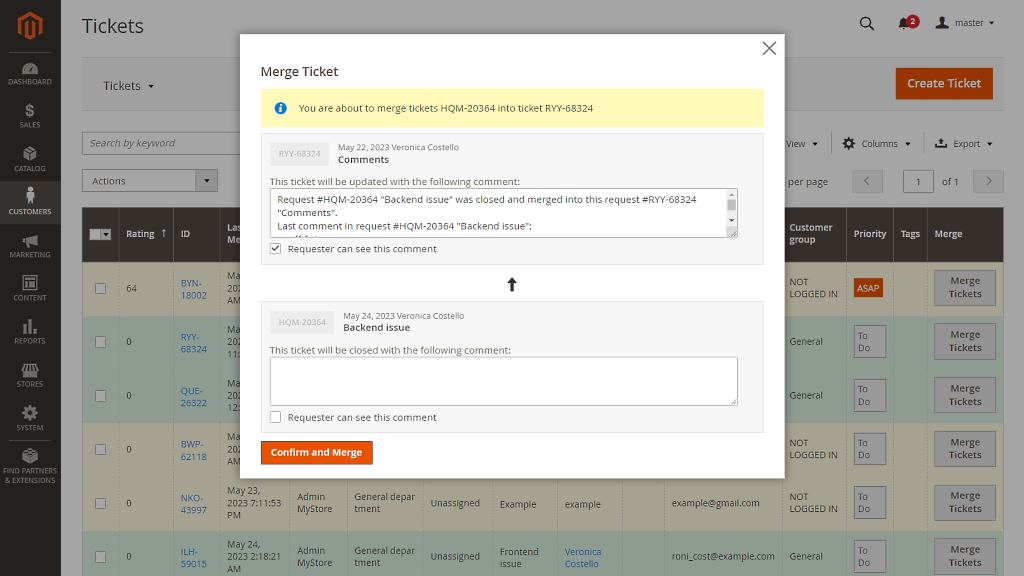
Merging Tickets
Merging tickets from the Ticket View page
Steps:
1. To combine the tickets click the "Merge" button in the All Customer Tickets block. Once clicked, the checkboxes will become visible;
2. Select the tickets and then click on the "Merge with the current ticket" button;
3. Click the "Confirm and Merge" button within the Merge ticket confirmation window.
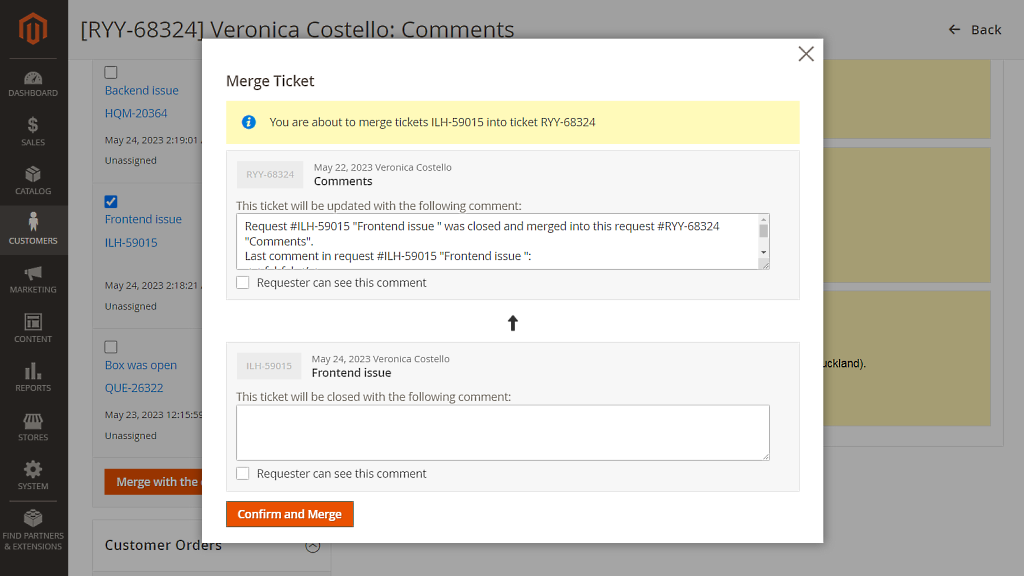
For successful merging, ensure that the tickets are in a status other than "Closed."
The customer of the ticket you close with the merge is added as a CC to the new ticket if it is not the same. If anyone was CC'd on an original ticket, they are also added as a CC on the merged ticket.
Merged tickets receive the status "Closed" and the status of the ticket they are merged into remains unchanged.
Merging tickets from the Tickets Grid page
Steps:
1. Upon clicking the "Merge Tickets" button, a popup will appear. Enter the ticket ID into the designated input field (or select one of the following tickets), and then proceed to click the "Merge" button;

2. Click the "Confirm and Merge" button within the Merge ticket confirmation window;
3. After merging, the merged ticket obtains “Closed“ status.
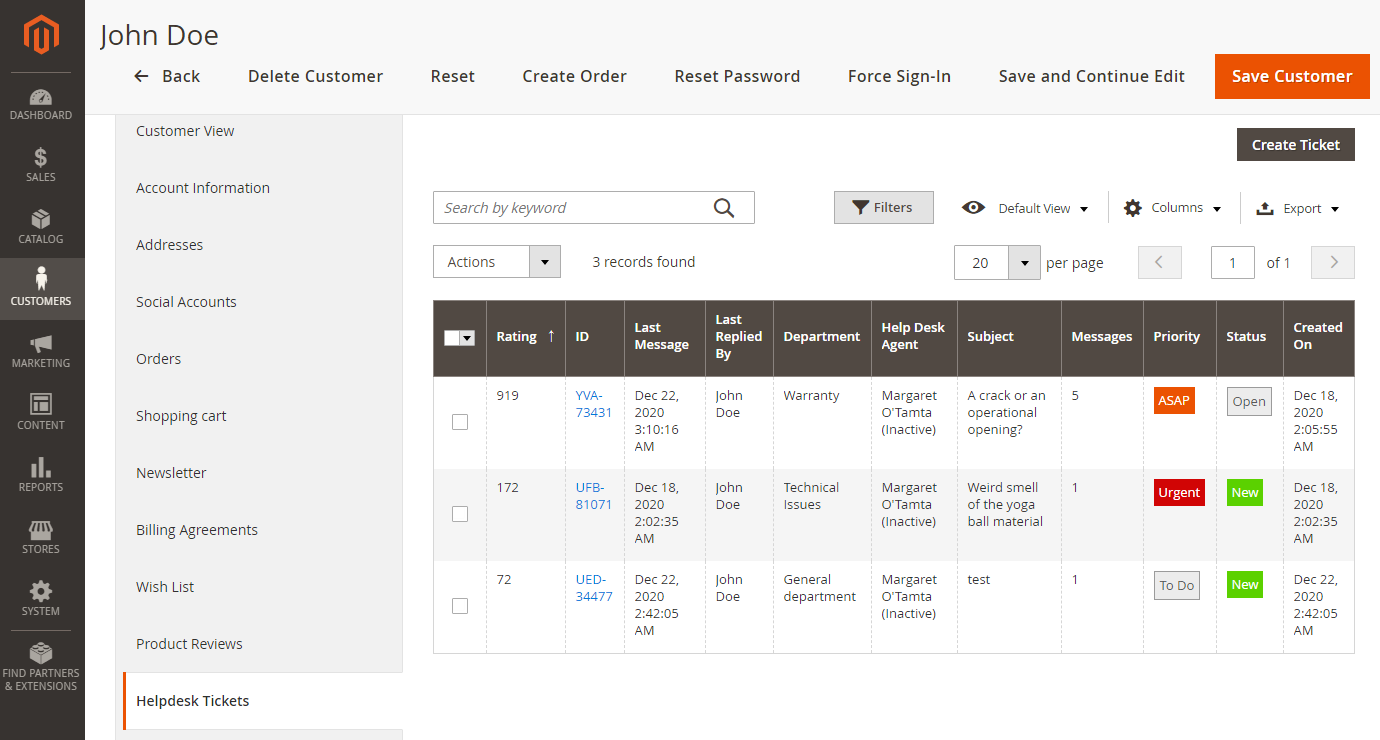
Tickets in Customer Profile
Go to Backend → All Customers → Customer → Help Desk Tickets to find the tickets submitted by (created for) the Customer. The tab will show the Tickets grid. This is where you can create a ticket for the Customer too.
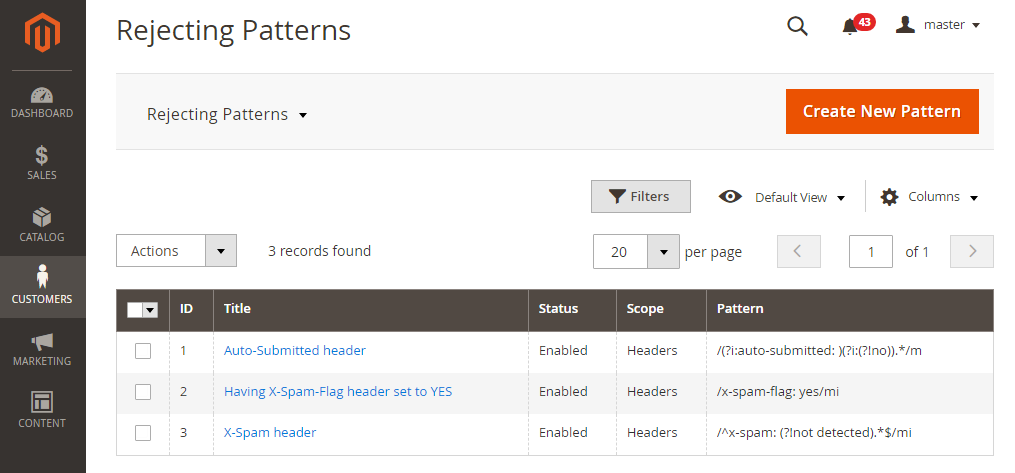
Rejecting Patterns
Avoid spam by applying Rejecting Patterns to the Contact Us form, emails, and messages. Rejecting Patterns are Perl regular expressions which define the strings to filter the emails into the Rejected Messages grid when found in the email/message.
To browse, add, delete and edit patterns, go to Customers → Help Desk 2 → Rejecting Patterns. The page features the Rejecting Patterns Grid and the Create New Pattern button.
Rejecting Patterns grid
The grid accumulates the information on the patterns within the following columns:
- ID - the identification number of the pattern (for internal purposes);
- Title - the name of the pattern, active link to the Edit Pattern page;
- Status - the status of the pattern: Enabled or Disabled;
- Scope - the part of the email/message the pattern belongs to;
- Pattern - the Perl Regular Expression to tell the pattern.
|
Make use of the Actions drop-box above the grid to delete patterns in bulk. This is how you can also change statuses of multiple patterns in a click. |
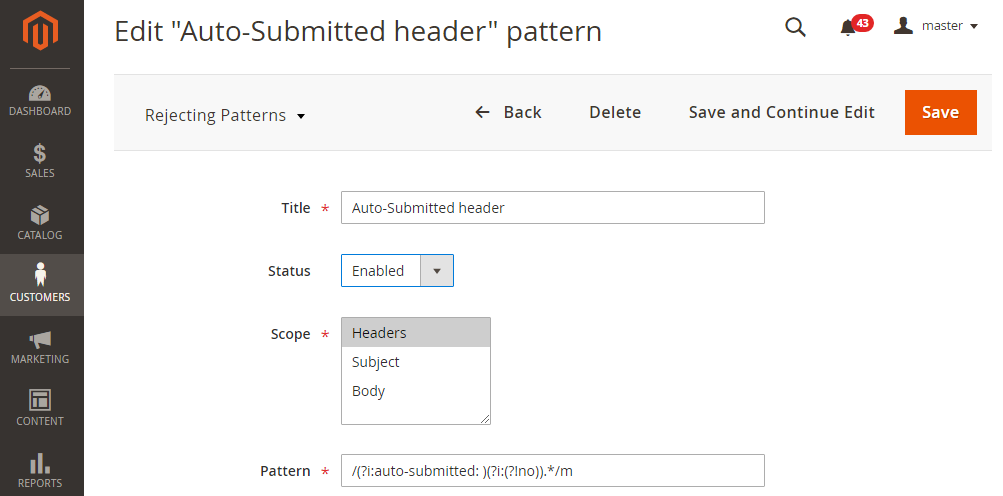
Create/Edit Pattern page
To create a pattern, click on the Create New Pattern button. You will be redirected to the Create/Edit Pattern page. Configure the following options to start a new pattern:
- Title - provide the title of the pattern as it will appear in the Rejecting Patterns grid
- Status - select the status of the pattern (Disabled by default)
- Scope - select the part of the email/message to contain the pattern (multiple parts can be selected) : Headers, Subject and Body
- Pattern - specify the pattern in Perl Regular Expressions syntax
|
Samples of anti-spam Regular Expressions Here are some examples of the most used anti-spam patterns: *These expressions will catch any email which contains at least one Cyrillic or Chinese character. Effectively, it means that they will also reject the emails from your real customers if their names or signatures contain such characters. There is also a number of sites where you can test your regular expressions. For example, Regex101.com or RegExr.com. More information on regular expressions can be found here: Regular-Expressions.info. |
Click on the Save button in the top right to finalize the configuration.
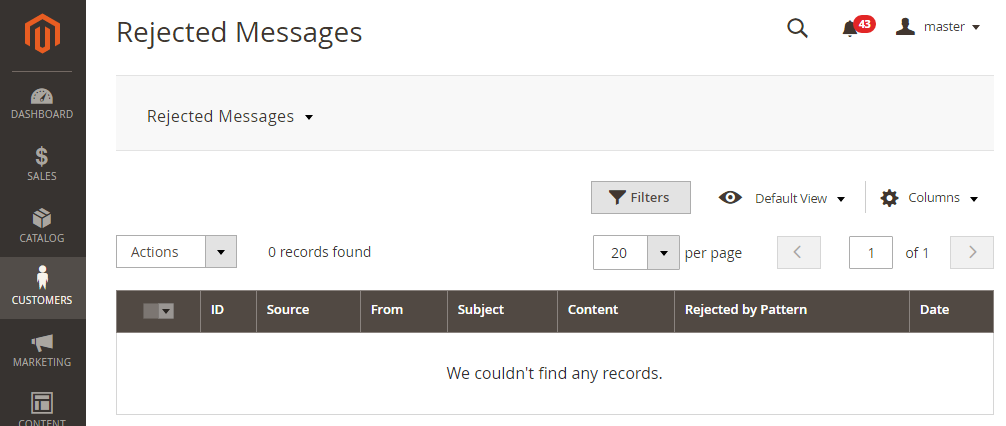
Rejected Messages
If a rejecting pattern is enabled and is found in the incoming email, this email is not converted into a ticket but appears in the Rejected Emails grid. To access the grid, go to Backend → Customers → Rejected Emails.
The grid has the following columns:
- ID - the identification number of the ticket (=Ticket ID from Tickets grid)
- Source - Email or the Contact Us form
- From - the Name, if specified, and Email of the addresser
- Subject - the subject of the email/message
- Rejected by Pattern - the title of the pattern which has filtered this email/message out
- Date - the date of the receipt of the rejected email/message
The grid can be sorted and filtered by columns. Pagination is supported.
|
Make use of the Actions drop-box above the grid to apply the following mass actions to the rejected emails:
|
Reports
From the Help Desk Ultimate module version 2.3.0 or new, when Advanced Reports for Magento 2 is installed on the store, it becomes possible to overview the statistics.
|
Note: Please, make sure you also install and enable module-helpdesk-report, which will provide the integration between Help Desk and Advanced Reports modules. To ensure the proper functioning of Reports, it is necessary to install a separate extension - Advanced Reports. If Advanced Reports is not installed, there is no need to install the module-helpdesk-report to avoid any potential errors. |
The extension offers analytical reports to provide you with some meaningful information on the performance of your business.
All Reports can be found under Reports > Help Desk Ultimate 2 by Aheadworks.
To enable Reports go to Stores > Configuration > Aheadworks Extensions > Help Desk 2 Report.
General Settings
The General Settings block allows tweaking Day Start, Day End and Work Days of the Agent, that will be displayed in the report.
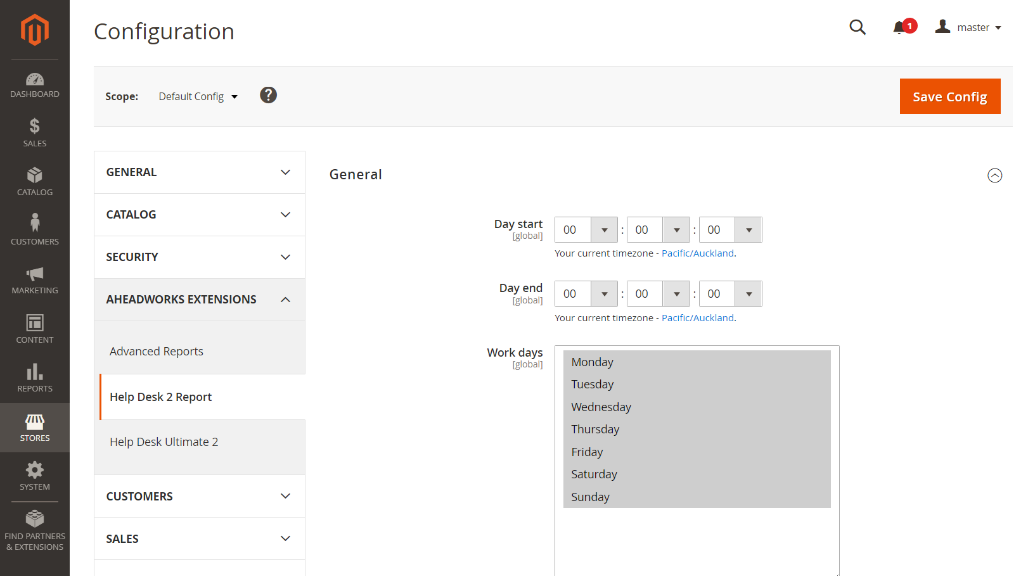
Once done, click Save Config in the top right of the page, or proceed to the next step.
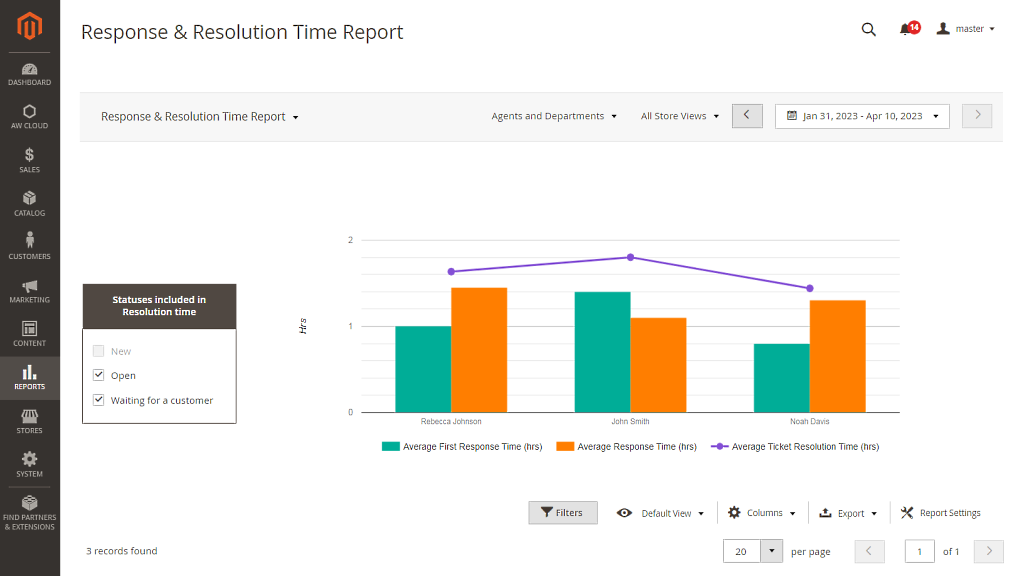
Response & Resolution Time Report
Report can be found under Reports > Help Desk Ultimate 2 by Aheadworks > Response & Resolution Time Report.
The Response & Resolution Time Report shows how much time it takes for an agent to reply on a new ticket.
This graph features data against such metrics as Average First Response Time, Average Overall Response Time, Average Ticket Resolution Time.
Average First Response Time - the total time taken by the agent to send the first response during the selected time period divided by the number of tickets whose first responses were sent in the selected time period.
First Response Time is counted since a new ticket is submitted and until it acquires the first response from a Help Desk agent. Automated responses and tickets created by agents are excluded from the calculation.
Average Overall Response Time - total time taken to respond during the selected time period divided by the number of responses in the selected time period.
Average Resolution Time is the ratio of Total Resolution Time for all tickets closed to the number of the closed tickets.
Total Resolution Time is calculated from the moment the ticket has been submitted and the most recent mark has been closed.
If a ticket is opened and closed multiple times during the specified time period, Total Resolution Time is the total time between the first message from the customer and the most recent time the ticket was closed.
For simple segmentation, the reports come with filtering options. Those include the store view and agent or department group filters.
The date range can be selected in the flexible calendar:
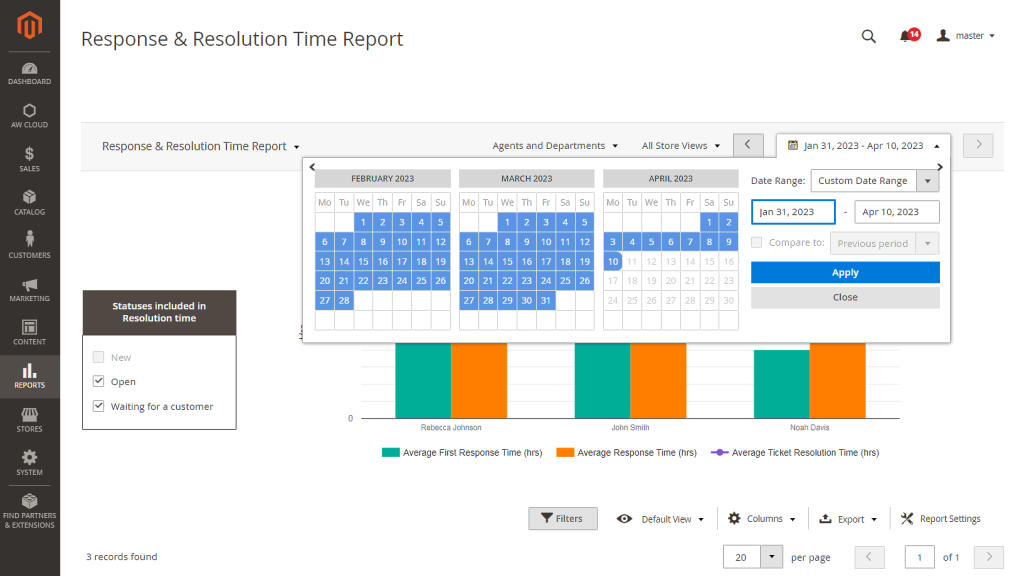
In the provided calendar, you can specify any date or date range either by clicking the required dates or by indicating the interval manually. Once the date has been selected, click Apply to refresh the report page.
Below the graph, you can see the reporting table providing metrics of each Agent. Last line of the table is the value for Average First Response Time, which is calculated as a median.
The values displayed on the table can be filtered by Average First Response Time, Average Overall Response Time and Average Ticket Resolution Time. You can also define which values should be displayed in the chart.

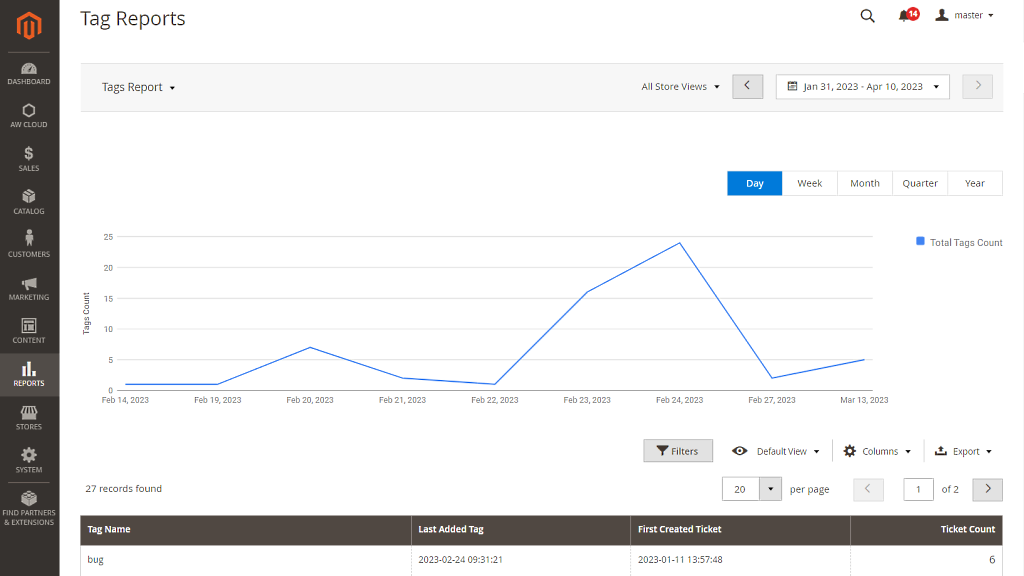
Tag Reports
Report can be found under Reports > Help Desk Ultimate 2 by Aheadworks > Tag Reports.
The Tag Report shows the graph of ticket types on the certain period. The date when the tickets get reflected in the graph is the date when tag was assigned to the ticket. When we consider a combination of several tags, we take the last date - when the last tag of the subselection was added.
For simple segmentation, the reports come with filtering options. This includes the store view filter.
The date range can be selected in the flexible calendar:
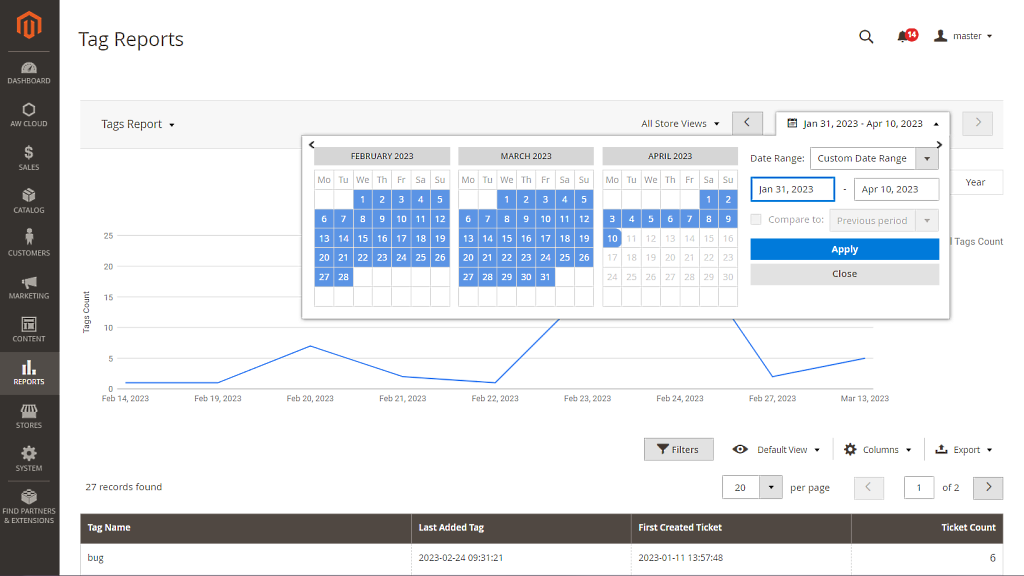
In the provided calendar, you can specify any date or date range either by clicking the required dates or by indicating the interval manually. Once the date has been selected, click Apply to refresh the report page.
By applying a Tag Name filter, the graph has the ability to display information regarding each tag individually.
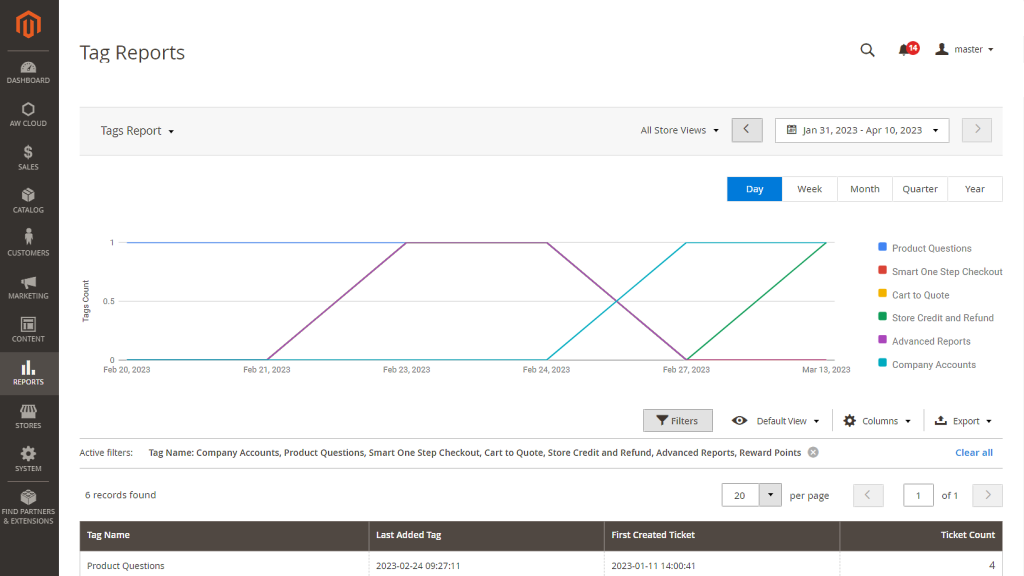
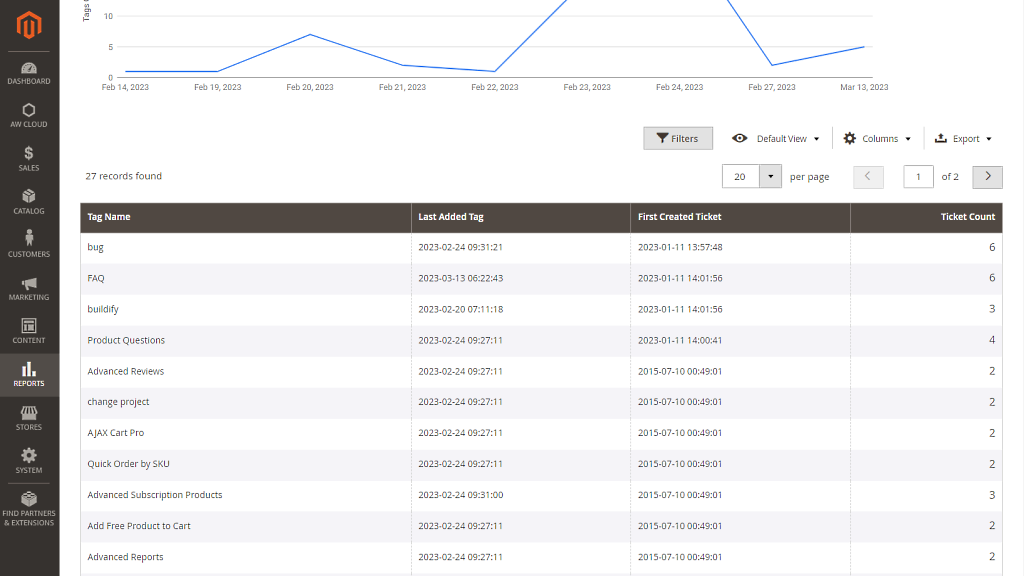
Below the graph, you can see the reporting table providing metrics of ticket types.
The values displayed on the table can be filtered by Period, Updated Ticket and Ticket Count. You can also define which values should be displayed in the table.
Integrations
- Aheadworks Customer Attributes
- Adobe Commerce Customer Attributes
- RMA
- Coupon Code Generator
Aheadworks Customer Attributes
If Admin Ticket View is selected, in Customers → Customer Attributes → Attribute → Storefront Properties → Display on Forms, the attribute is displayed on the Ticket View Page in a tab called Customer Attributes. The tab appears in the Ticket Information area.
The Admin can edit the values of the attribute, and thereby make notes about the customer or the issue.
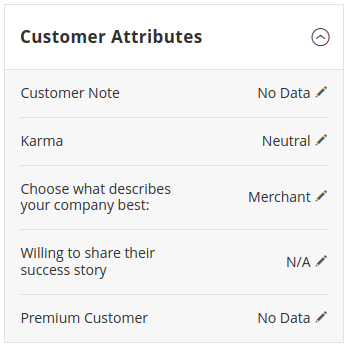
Adobe Commerce Customer Attributes
If Show in helpdesk ticket is selected, in Stores→ Attributes → Customer→ Attributes page → Storefront Properties → Forms to Use In, the attribute is displayed on the Ticket View Page in a tab called Customer Attributes. The tab appears in the Ticket Information area.
The Admin can edit the values of the attribute, and thereby make notes about the customer or the issue.
RMA
When RMA version 1.5.0 and later is installed on the store, it becomes possible to convert a ticket to RMA request.
When RMA extension is installed, there is a button Convert to RMA on a ticket page.
|
The button appears only on tickets with statuses Open, New or Waiting for Customer; the button appears only when the customer is attached to the ticket. |
If the following option Backend → Stores → Configuration: Close the Ticket When Converted to RMA is set to Yes: after RMA creation a ticket status can be set to Closed. If it’s set to No, after RMA creation ticket status will remain the same. When clicking the button, an RMA creation page is opened and a store admin can follow the same steps as for RMA creation.
Also when an RMA is created based on a ticket, it will be marked in the following way:
- On a Ticket Page in the messages thread, there is a new system message: The RMA {RMA ID} was created based on the ticket
- On RMA page in the messages thread, there is a new system message: The RMA was created based on ticket {ticket ID}
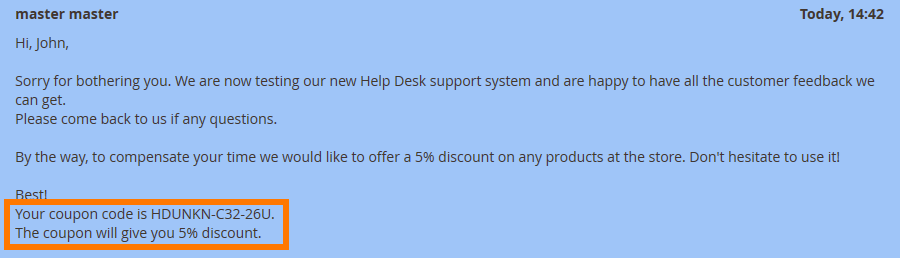
Coupon Code Generator
Coupon Code Generator extension, when installed along with Help Desk Ultimate by Aheadworks, allows help desk agents generate and send coupon codes directly from the ticket thread.
The extension adds its section to the ticket thread administrator menu. From here help desk agent can select the Coupon Code Generator rule created and reply to the ticket.
The coupon code will be generated automatically according to the rule conditions set and added below the ticket reply, indicating the discount customer gets.
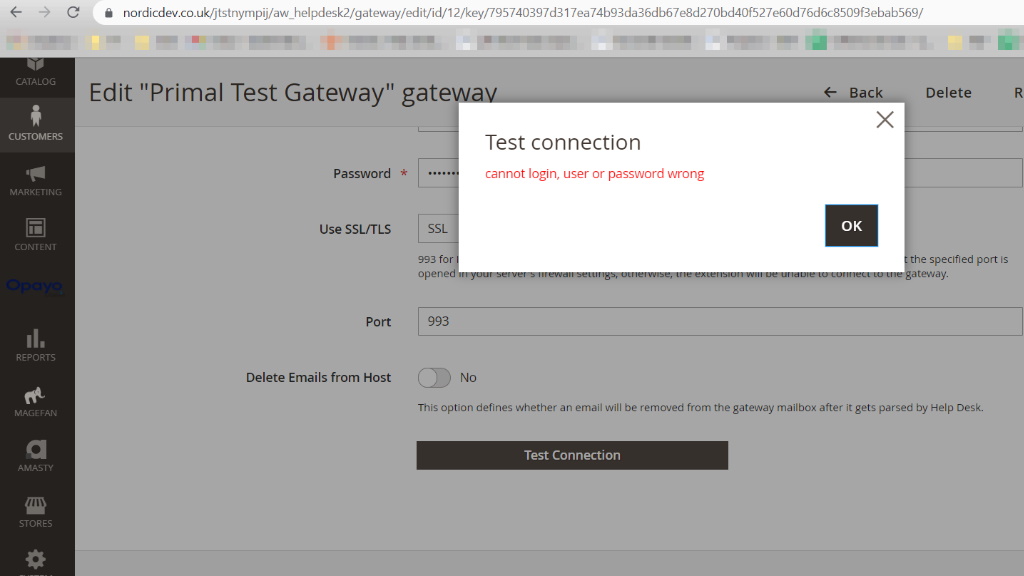
Troubleshoot
Configuring a gateway by using Gsuite (Gmail)
If you click ‘Test Connection’ in the gateway settings in the admin panel and it displays "Cannot login, user or password wrong", then you need to check/enable less secure apps: https://myaccount.google.com/lesssecureapps

Write Your Own Review
Already used our product?
We would appreciate your feedback. Please, leave a review.