User Manual - Purchase Order and Dropshipping
- Installing Purchase Order and Dropshipping extension
- Set up cron
- Uninstalling Purchase Order and Dropshipping extension
- Extension Compatibility
- Introducing Purchase Order and Dropshipping
- Extension Workflow: Brief Step-by-Step instructions
- Using Purchase Order and Dropshipping
- Integrations
The Magento 2 Purchase Order and Dropshipping extension introduces a comprehensive system for automating and managing dropshipping operations directly within the Magento admin panel. It enables store admins to easily connect products with multiple vendors, create purchase orders, and streamline communication with suppliers, all while ensuring accurate and efficient order fulfillment.
Installing Purchase Order and Dropshipping extension
Command Line Installation
- Backup your web directory and store database
- Download the Purchase Order and Dropshipping installation package
- Upload contents of the Purchase Order and Dropshipping installation package to your store root directory
- In SSH console of your server navigate to your store root folder:
cd path_to_the_store_root_folder |
run the following command: :
php bin/magento module:enable Aheadworks_Dvm |
then:
php bin/magento setup:upgrade |
after:
php bin/magento setup:static-content:deploy -f |
5. Flush store cache; log out from the backend and log in again
|
Make sure the installation is done from the FTP administrator account. Otherwise, set 775 permissions to the store root directory after the extension is deployed. |
Composer Installation
If you are installing an extension from Aheadworks for the first time, you need to add our composer repository to your Magento store:
1. Login to your ssh console and navigate to your store folder:
cd path_to_the_store_root_folder |
Run the following command:
composer config repositories.aheadworks composer https://dist.aheadworks.com/ |
After the command was executed successfully, you can use the composer to install the extension.
To install the extension:
2. Login to your ssh console and navigate to your store folder:
cd path_to_the_store_root_folder |
3. Run the following command to install the latest version of the extension:
composer require aheadworks/module-dvm |
if you need to install a specific version, run this command:
composer require aheadworks/module-dvm:<version> |
|
Specify the version of the extension in <version> |
When prompted, enter Public Key (Username) and Private Key (Password):

Both Public Key (Username) and Private Key (Password) can be found in My Projects and Licenses in your personal account on our site:
 |
To upgrade the extension:
To update or upgrade an extension:
Download the updated extension file. Take note of the module-name and version. Export the contents to your Magento root.
If a composer package exists for the extension, run one of the following.
Update per module name:
composer update aheadworks/module-dvm |
Updater per version:
composer require aheadworks/module-dvm:<version> |
Run the following commands to upgrade, deploy, and clean the cache.
php bin/magento setup:upgrade --keep-generated |
Add-ons that must be installed along the main module for the proper functioning of the Magento 2 Purchase Order and Dropshipping extension:
| Name | Composer command line | Description |
| Terms and Conditions module by Aheadworks | Composer require aheadworks/module-tac | Used to create custom purchase order terms and conditions |
| mPDF (PDF support library) | composer require mpdf/mpdf | Enables support for PDF format |
Set up cron
If you have already configured cron jobs for your Magento installation then you can skip this step. Read the following instructions on setting cron job for your Magento store: Magento user guide.
Generally, it would be enough to run in SSH console of your server:
crontab -e |
And insert the following line:
*/3 * * * * php -c <ini-file-path> <your Magento install dir>/bin/magento cron:run |
Remember to confirm the Save request when exiting the installation.
Uninstalling Purchase Order and Dropshipping extension
Since Magento introduced declarative Database you need to be very carefull when uninstalling or disabling the module.
|
NOTE: Please be very careful when uninstalling/disabling this module. This module uses a declarative DB scheme. Once the module is uninstalled the DB tables will be lost. |
Manual Removal
1. Disable the module by executing the following commands:
php bin/magento module:disable Aheadworks_Dvm |
2. Remove the extension files from the following folder:
app/code/Aheadworks/Dvm |
Automatic Removal (via Composer)
1. Disable the module by executing the following commands:
php bin/magento module:uninstall Aheadworks_Dvm |
Extension Compatibility
| Module Version | Magento Version |
| As of version 1.0.0 | 2.4.6 - 2.4.8 |
The PHP version depends on your current Magento version. Please, refer to your Magento version release notes.
Introducing Purchase Order and Dropshipping
Extension Overview
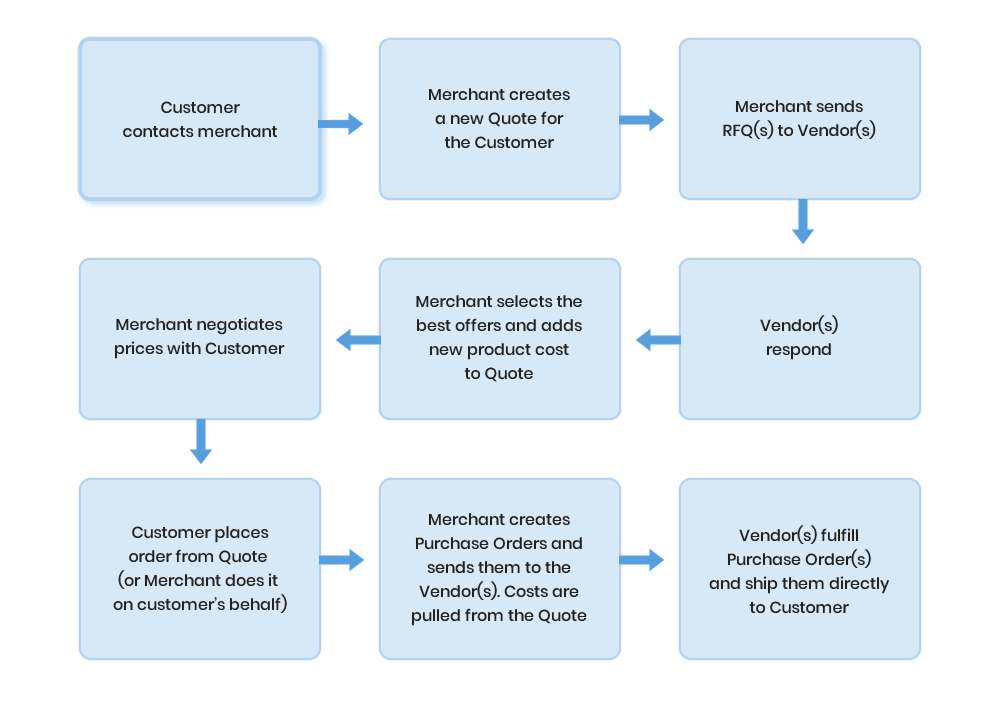
The Magento 2 Purchase Order and Dropshipping extension simplifies dropshipping operations by enabling store admins to assign products to vendors, create and manage Purchase Orders (POs), and automate communication with vendors.
When a customer places an order, the admin can generate POs directly from the Sales Order (SO) and send them to the vendors, who then ship products directly to the customer. Vendors confirm shipments and provide tracking details, automatically updating the order status in Magento admin. With support for flexible vendor settings, manual product or vendor substitutions, and centralized tracking via dedicated tables, this extension enables efficient, fully managed dropshipping workflows directly within your Magento store.
Business Workflow:
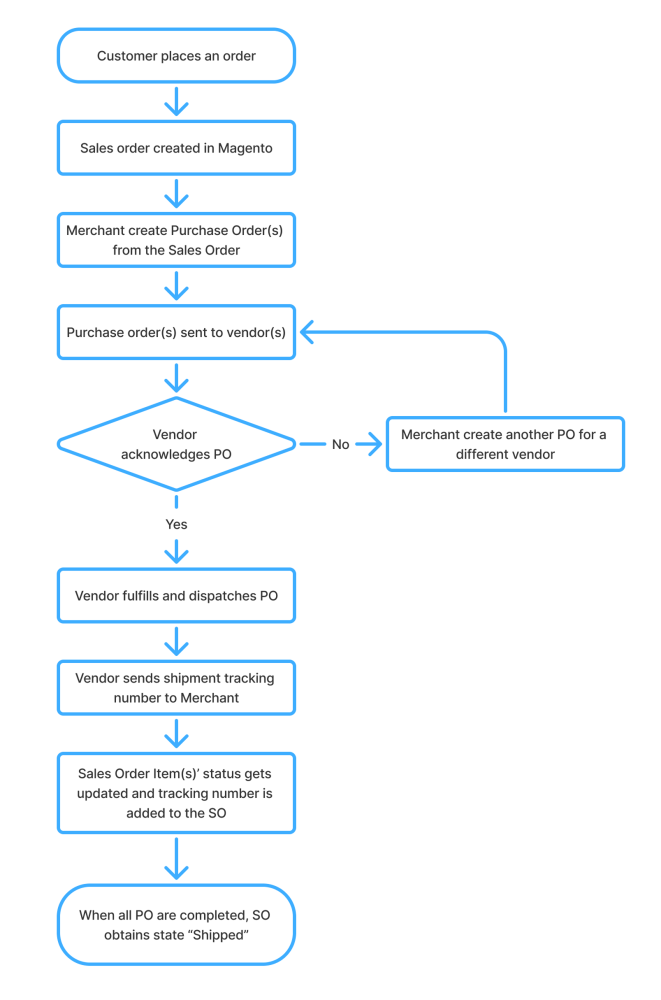
Key Features
- Purchase order sending and dropshipping workflow inside Magento;
- Multiple vendor assignment per product;
- Quick creation of Purchase Orders from Sales Orders;
- Flexible vendor-specific settings (handling fees, notes, instructions, etc);
- Easy substitution of vendors or products;
- Purchase Order status updates;
- Customizable Terms and Conditions per Purchase Order.
Extension Workflow: Brief Step-by-Step Instructions
Set up basic options for Purchase Orders (POs) and vendor communication. Go to Stores > Configuration > AHEADWORKS EXTENSIONS > Purchase Order and Dropshipping:
- Enable Purchase Order-Specific Terms and Conditions: Set to Yes;
- Notification Email Sender: Select which store contact sends purchase orders (POs);
- Send Purchase Order to Vendor Template: Choose template for vendor emails;
- Click Save Config.
Vendors must exist in the system before assigning them to products or sending POs. Go to Sales > Purchase Order and Dropshipping by AheadWorks > Vendors and click the Create New Vendor button.
- Fill in General Information;
- Fill in Address Information;
- Click Save.
| Note: To create new Vendor Attributes go to Stores > Attributes > Vendor > Add New Attribute. |
Connect vendors to products so they can be used for POs. Go to Catalog > Products and click Edit next to the required product.
- Scroll down to Vendor Management section;
- Select the Vendor from database, set the Vendor Cost (the price charged by the vendor for an item);
- Optionally enter Vendor Description (product-specific information from the vendor) and mark one vendor as Default;
- Click Save.
4. Create Custom Terms & Conditions
Create custom terms that can be attached to POs.
To create Term Categories go to Sales > Terms and Conditions by Aheadworks > Term Categories and click the Add New Category button.
- Fill in all necessary fields;
- Click Save
To create custom Terms go to Sales > Terms and Conditions by Aheadworks > Terms and click Add New Term button.
- Fill in all necessary fields;
- Click Save
5. Create and Send a Purchase Order (PO)
Generate a PO from a Sales Order. Go to Sales > Order, select required Sales Order and click View.
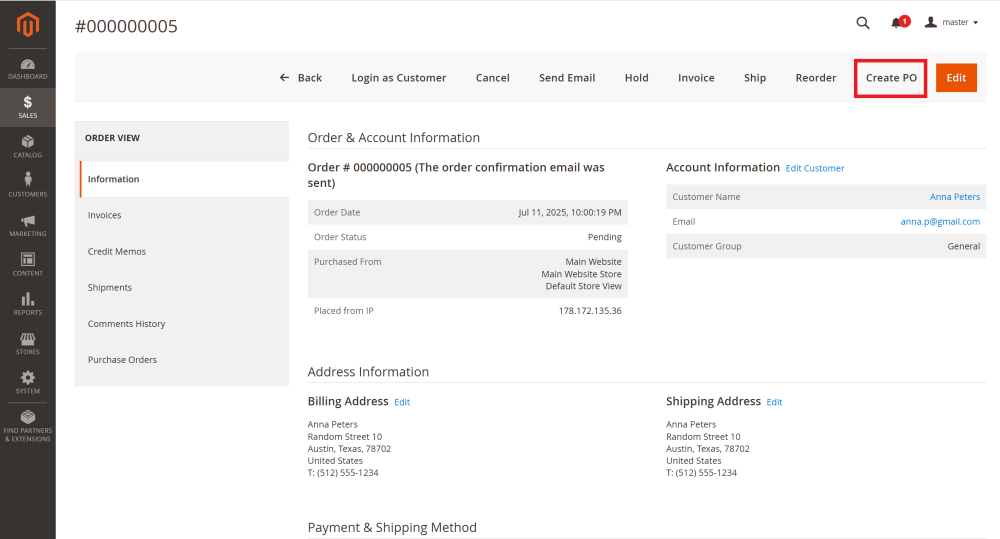
- On the top menu of the page click Create PO;
- Review order items and vendors;
- In the Products to be ordered section, select the vendor who will fulfill the order, adjust items details or add new vendor if needed;
- Fill in Shipping Details;
- In the Special Instructions section, add custom Terms & Conditions if necessary;
- Click Save. You will be redirected to PO page
- On the top menu, click Email PO ( the Packing Slip can also be included in the PO email, if necessary).
6. Purchase Order status update
To track and manage PO progress, go to Sales > Purchase Orders, select required PO and click View.
- Vendors can update via a secure link sent in the PO email;
- Alternatively, the store admin can manually update the PO status: In the Information section, use the Status dropdown menu to select the required status of the PO.
7. Managing an Existing Purchase Order
Access and maintain all created POs. Go to Sales > Purchase Orders, select required PO and click View.
Sections available:
- Information: view PO details, customer info, and ordered items; add special terms and conditions if necessary;
- Edit PO: Update vendor responsible for PO fulfilment, products and their quantities, or custom terms and conditions;
- History Log: Tracks all changes made to the PO;
- Shipments: View all related shipments.
| Note: If any changes are made to the PO, resend the updated PO email to the vendor. |
If a vendor declines the order, the store admin can replace the PO and assign it to the new vendor. Sales > Purchase Orders, select required PO and click View.
- On the top menu of the PO page click Replace PO;
- Confirm your decision;
- Create new PO with necessary updates;
- Resend PO to the new vendor.
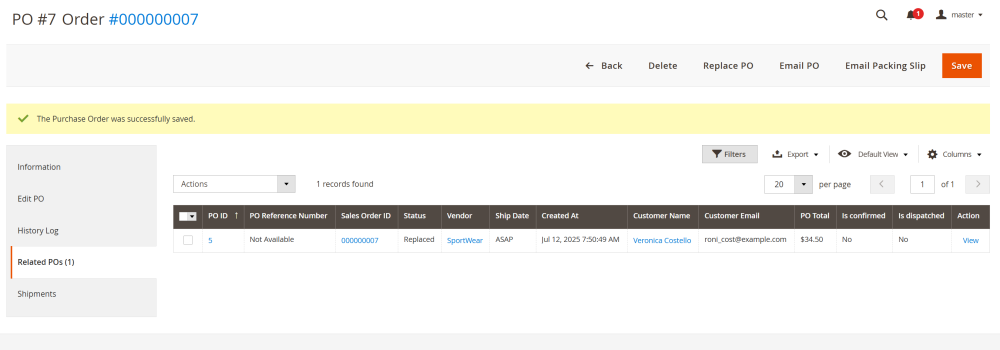
Both original and replacement POs are linked for reference, they can be found in the Related POs section in the PO page.
Using Purchase Order and Dropshipping
- Extension Configuration
- Vendor Management
- Creating Custom Terms and Conditions for Purchase Orders
- Purchase Order Management
Extension Configuration
To configure the extension, go to Stores > Configuration > AHEADWORKS EXTENSIONS > Purchase Order and Dropshipping.
The General section includes the following field:
- Enable Purchase Order-Specific Terms and Conditions – set to Yes to allow attaching specific terms and conditions to purchase orders (POs).
The Email Notifications section has the following options:
- Notification Email Sender – Select which store contact will be used as the sender for PO emails (e.g. General Contact, Sales Representative, Customer Support, or any other custom email).
| Note: store contacts can be managed at Stores > Configuration > General > Store Email Addresses |
- Send Purchase Order to Vendor Template – Select the email template used to send POs to vendors.
Click Save Config in the top-right corner to apply the settings.

Vendor Management
Creating a Vendor
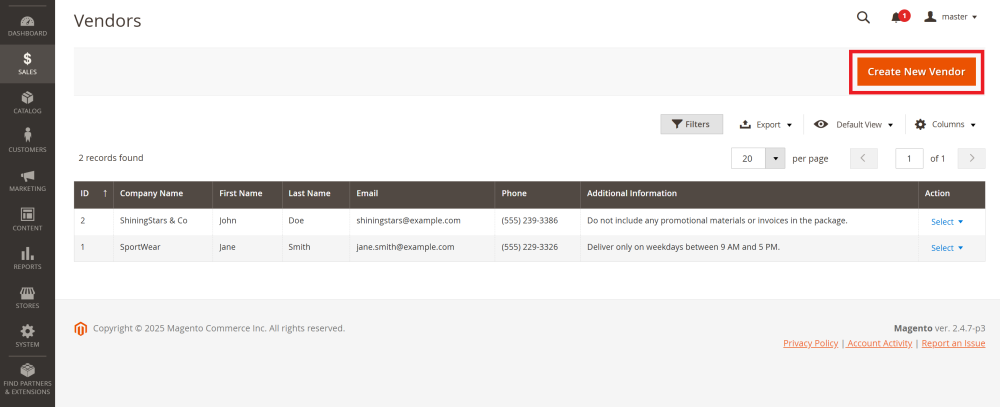
To create a vendor go to Sales > Purchase Order and Dropshipping by AheadWorks > Vendors.
Here, you’ll see a table displaying all existing vendors. To add a new vendor, click Create New Vendor in the top-right corner.
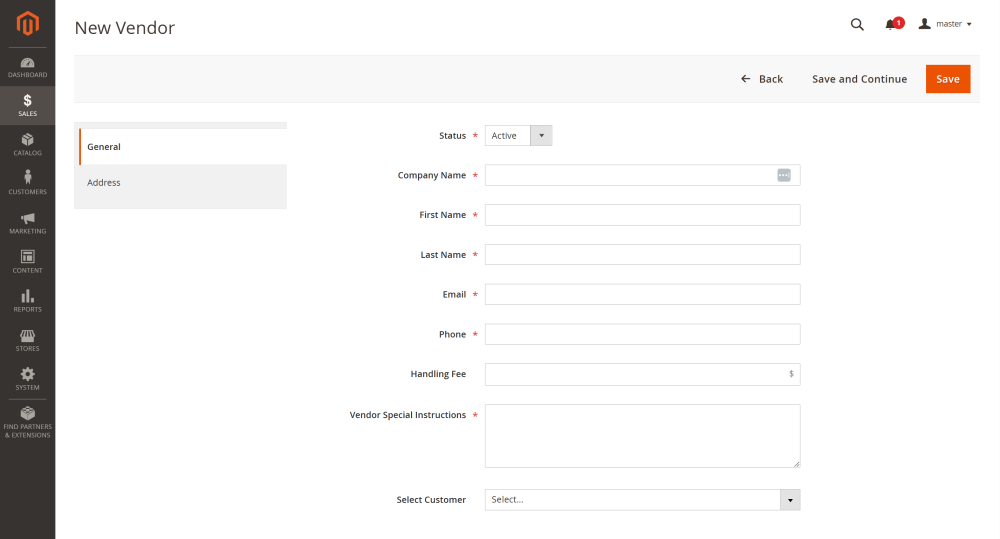
At the New Vendor page, there are two sections to fill:
- General section:
- Status – set the vendor as Active or Inactive;
- Company Name – the vendor’s company name;
- First Name / Last Name – vendor contact person’s name;
- Email – email address to which the PO will be sent;
- Phone – vendor’s phone contact;
- Handling Fee – a fixed cost the vendor charges for processing a PO;
- Vendor Special Instructions – any vendor-specific notes to be included in the PO email;
- Select Customer – optionally associate the vendor with a specific Customer.
- Address section
Enter the vendor’s company address.
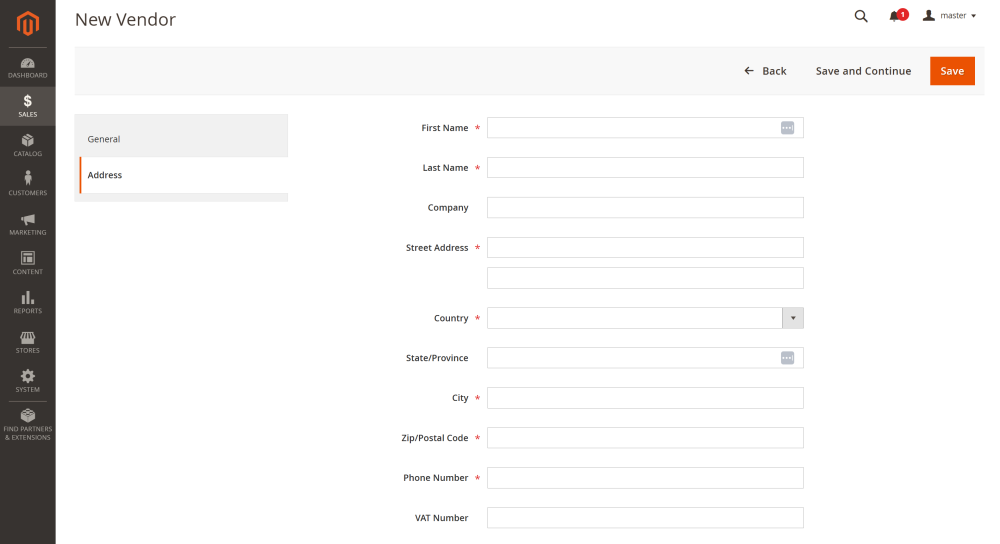
Click Save to create the vendor. The new vendor will appear in the Vendors table.
Managing Vendor Attributes
To manage vendor information fields, go to Stores > Attributes > Vendor
Here you can create your own vendor attributes, similar to product and customer attributes, to adapt vendor information to your business needs.
At the Vendor Attributes page there is a table displaying existing vendor attributes. The table includes the following columns:
- ID – Unique identifier for each attribute;
- Attribute Code – Internal code name used by the system;
- Default Label – Attribute name visible to users;
- Input Type – The type of input (Text Field, Dropdown, Text Area, etc.);
- Required – Indicates if the attribute is mandatory;
- System – Shows whether it is a system attribute;
- Sort Order – Define the attribute position in forms and lists;
- Action – Options to edit or delete the attribute.

Creating a New Attribute
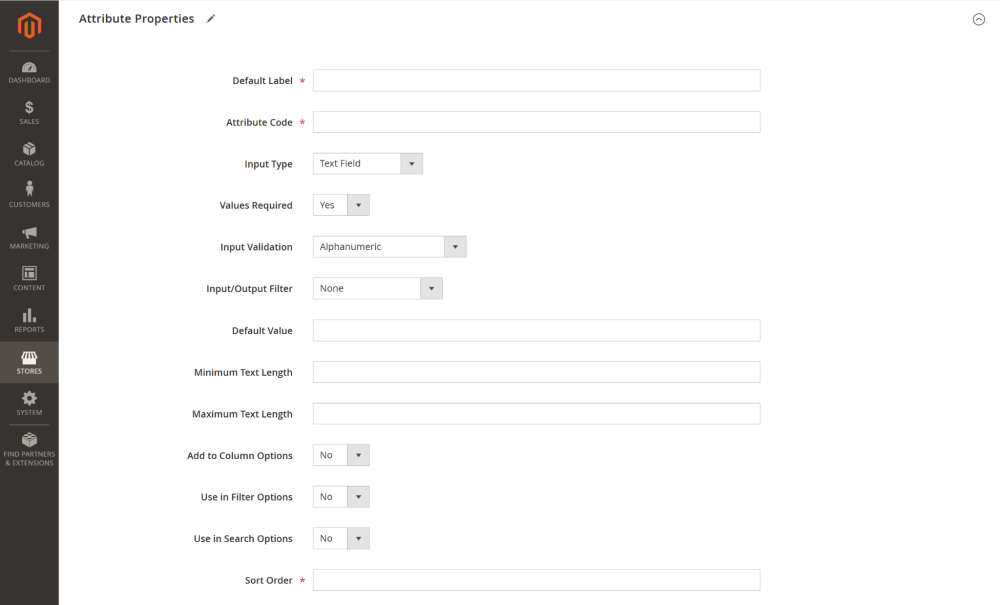
To create a new attribute click the Add New Attribute button.
At the New Attribute page, configure the following fields:
- Default Label – Attribute name visible to users;
- Attribute Code – Internal code name used by the system (cannot be changed after saving);
- Input Type – select input field type (cannot be changed after saving):
- Text filed;
- Text area;
- Date;
- Yes/No;
- Multiple Select;
- Dropdown;
- Price;
- File Attachment;
- Image filed.
- Values Required – Define if the attribute is mandatory for admin to fill in;
- Input Validation – Define validation rules to input values:
- None
- Alphanumeric
- Alphanumeric with spaces
- Numeric only
- Alpha only
- URL
- Length only
- Input/Output Filter – Choose how input/output data is filtered:
- None
- Strip HTML tags
- Escape HTML entities
- Default Value – Define a pre-filled default value;
- Minimum Text Length – Set the minimum number of characters in the input field (available only when Input Validation is set to anything but None);
- Maximum Text Length – Set the maximum number of characters in the input field (available only when Input Validation is set to anything but None);
- Add to Column Options – If set to Yes, the attribute will be added to the vendor table columns;
- Use in Filter Options – If set to Yes, the attribute can be used in table filters;
- Use in Search Options – If set to Yes, the attribute can be used in vendor table search;
- Sort Order – Define the attribute position in forms and lists.
Click Save to complete configuration.
Assigning a Vendor to a Product
You can assign one or more vendors to a product to streamline the PO creation and facilitate the out-of-stock handling.
| Note: for configurable products, vendors must be assigned individually to each child product. |
To assign vendor(s) to a product go to Catalog > Products and click Edit link next to the desired product.
At the Product page scroll down to the Vendor Management section.
In the Vendor Management section:
- Assign Vendor(s) to the product;
- Set the Vendor Cost – the price charged by the vendor for this product;
- Optionally enter product-specific information from the vendor in the Vendor Description field. It will be shown to the admin on the PO page.
You can also set this vendor as the Default Vendor using the radio button.
Click Save to apply changes.

Creating Custom Terms and Conditions for Purchase Orders
The Magento 2 Purchase Order and Dropshipping extension allows you to create specific Terms and Conditions that can be applied to Purchase Orders (POs).
Creating a Term Category
To create a new term category or update the existing one go to Sales > Terms and Conditions by Aheadworks > Term Categories.
Click Add New Category button to create a new term category, or select an existing one to update it.

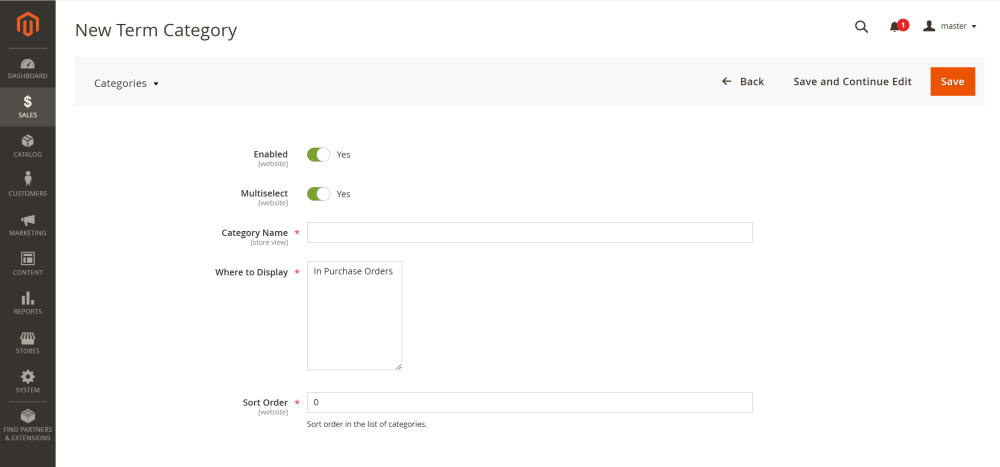
On the New Term Category page, configure the following options:
- Enable – toggle to enable or disable the category;
- Multiselect – allow this category to be selected alongside other categories;
- Category Name – enter a name for the category;
- Where to Display – choose where the category will be shown;
- Sort Order – define the order in which the category appears in listings.
Click Save to apply the settings.
Creating Terms
To create Terms or update the existing ones go to Sales > Terms and Conditions by Aheadworks > Terms.
Click Add New Term button to create a new term, or select an existing one to update it.
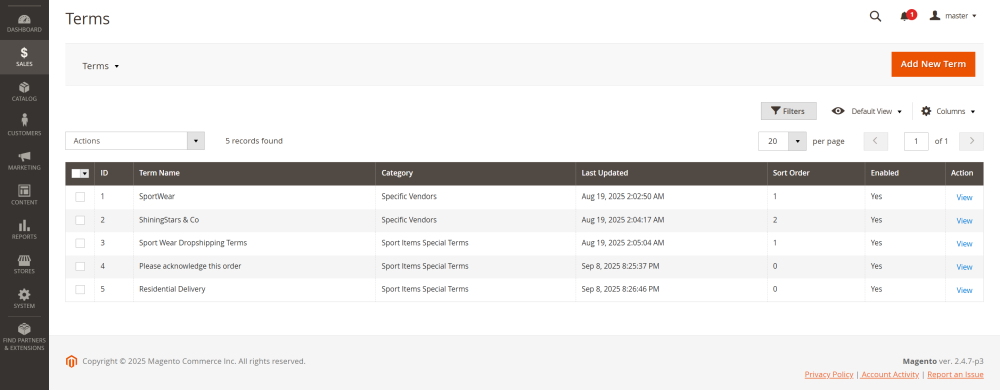
On the New Term page, configure the following options:
- Enable – toggle to enable or disable the term;
- Checked by Default – specify whether this term should be pre-selected by default;
- Term Name – enter a name for the term;
- Sort Order – define the order in which the term appears in listings;
- Term Text – enter the content of the term (this will be visible in the PO email, PDF, and customer’s account);
- Category – select the category this term belongs to.
Click Save.
Once configured, these Terms and Conditions can be selected and attached to POs from the Special Instructions section of the PO creation page.

Purchase Order Management
Creating a Purchase Order
When a customer places a Sales Order (SO), the store admin can create one or more Purchase Orders (POs) from it.
Go to Sales > Orders, open the relevant SO or create a new one.
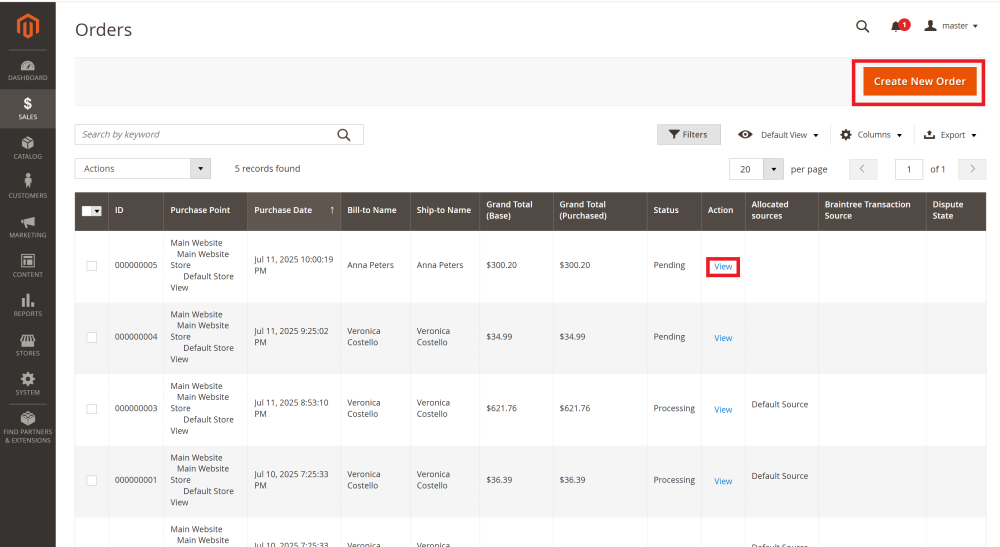
To create a PO, click the Create PO button on the Sales Order page
You’ll be redirected to the Add Purchase Order page. It contains several sections:
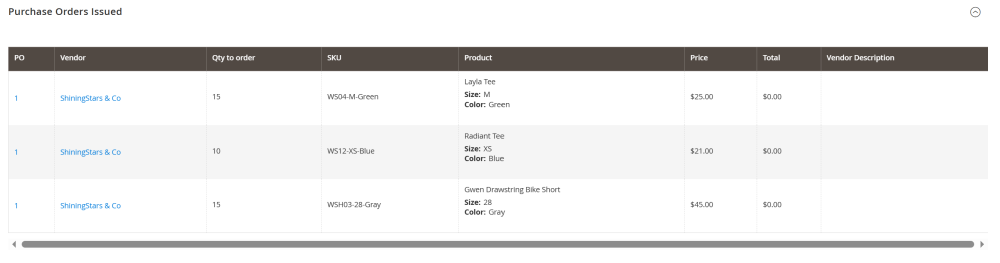
- Purchase Orders Issued table – displays all products from this SO for which PO have already been created. The table includes the following columns:
- PO – the purchase order number associated with the product;
- Vendor – the vendor who is fulfilling the product shipment;
- Qty to order – The product quantity ordered by the customer;
- SKU of the product;
- Product – displays the product name and details (e.g., size, color, etc);
- Price – price per unit charged by vendors;
- Total – total amount charged by vendor;
- Vendor Description – product-specific information from the vendor, that is entered during the assignment of the vendor to the product.
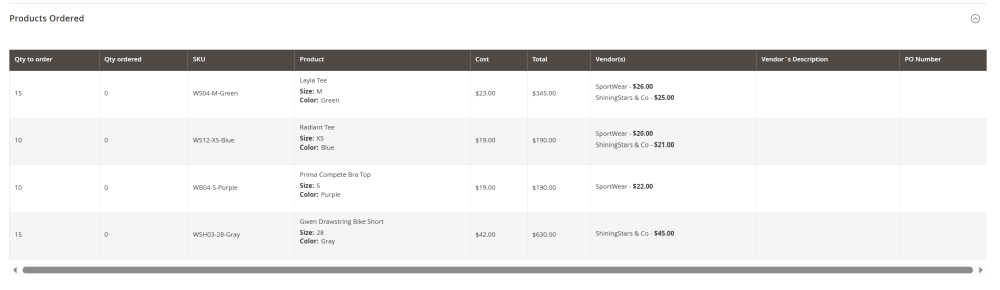
- Products Ordered table – displays all products from this SO and their assigned vendors. The table includes:
- Qty to order – the number of products ordered by the customer;
- Qty ordered – the number of products already ordered from the vendor;
- SKU of the product;
- Cost – the actual price of the product, that is set in the Advanced Pricing settings;
- Total – total cost for the ordered quantity;
- Vendor(s) – all vendors assigned to this product and their pricing;
- Vendor Description – product-specific information from the vendor, that is entered during the assignment of the vendor to the product;
- PO Number – the ID of the PO associated with the product;
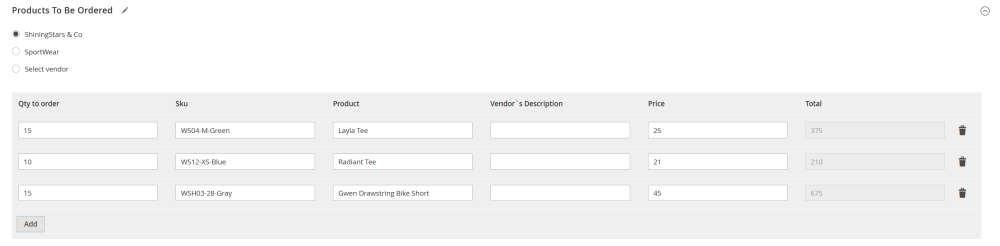
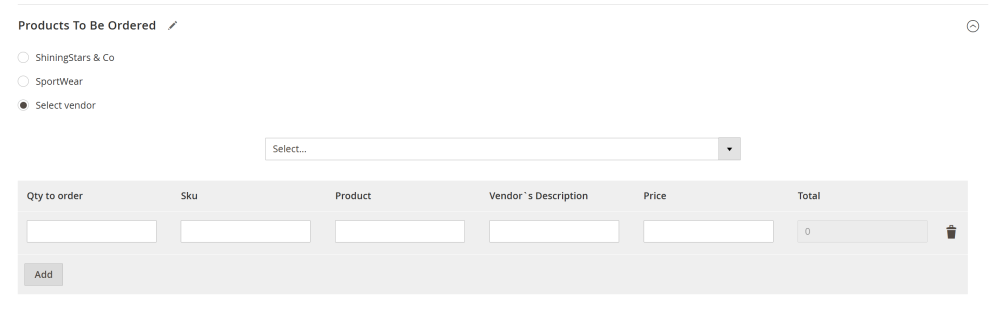
- Products to be ordered – displays the list of vendors associated with at least one product in the SO.
Here you can select which vendor will fulfill the PO:
-
- Select vendors already assigned to the products, and add new/more product for this vendor if needed;
-
- Manually pick any vendor and add any product. This allows you to substitute products if a vendor doesn’t have the exact item in stock.
| Use case: The customer ordered supplies for plastic window installation, including additional items such as bolts and screws. Typically, Vendor X supplies the plastic windows, while Vendor Y provides smaller construction materials like screws and bolts. To improve customer convenience and logistical efficiency, it would be preferable for Vendor X to handle the entire delivery (provided they can supply all required items). You can achieve this by manually assigning the relevant products to Vendor X directly in the purchase order (PO). |
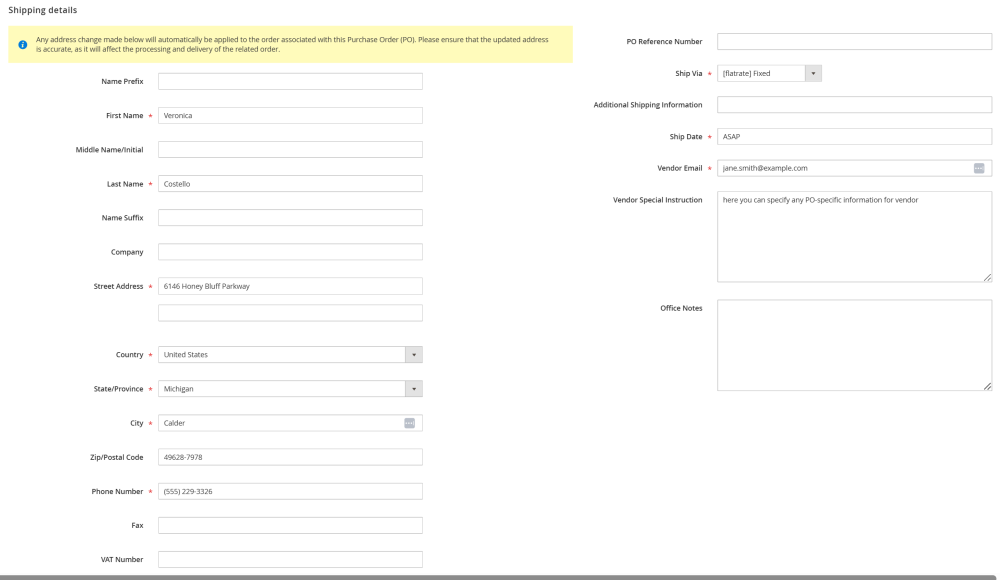
- Shipping Details section:
The left side displays the shipping address. This info is pulled from the SO, however you can edit in if necessary.
| Note: Any changes you make here will also update the shipping address in the Sales Order itself. Please ensure that the updated address is accurate, as it will affect the processing and delivery of the order. |
The right side contains vendor communication fields:
- PO Reference Number – any text/number used as internal identifier;
- Ship Via – the dropdown menu of available shipping methods (e.g., Flat Rate, Table Rate);
- Additional Shipping Information – any notes for the vendor (displayed on the Packing Slip);
- Ship Date – specific date or any note (e.g. ASAP) regarding the date of the shipping;
- Vendor Email – email to which the PO will be sent;
- Vendor Special Instructions – any notes for the vendor regarding the PO. The info will be pulled up from the vendor profile and can be edited if needed (displayed in PO email);
- Office Notes – any text for internal purposes.
- In the Special Instructions section you can add specific Terms and Conditions for this particular PO. This section is available only if the option Enable Purchase Order-Specific Terms and Conditions is set to Yes in the extension configuration settings, otherwise the block will not be available.
To add a specific Terms for the PO click the Edit button.

On the Terms page, you can select the required terms from the list of predefined terms, or enter your own custom text in the upper text field.
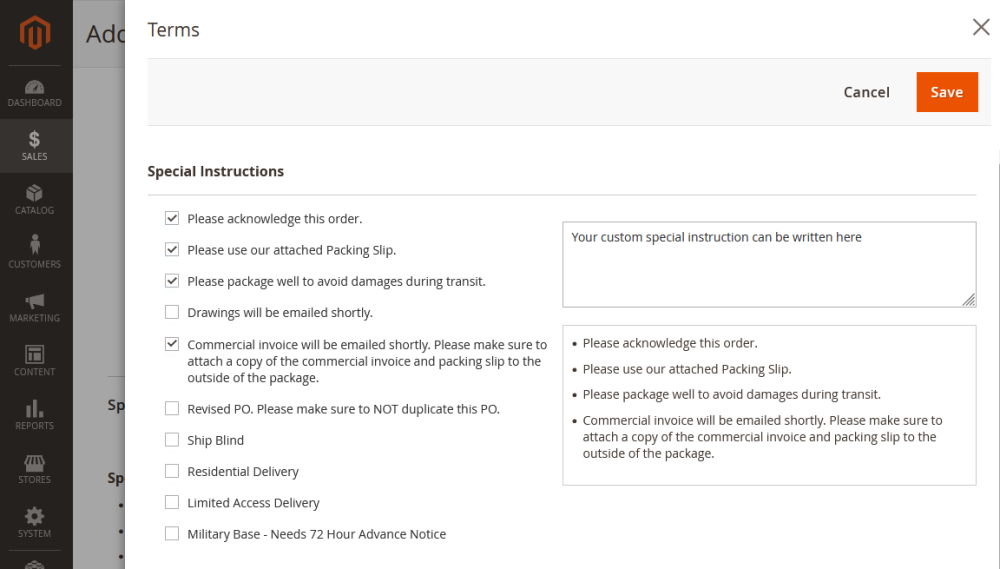
Click Save to generate the PO.
Once saved, you will be taken to the PO page.
On the top menu:
- Click Email PO to send the PO to the vendor;
- Click Email Packing Slip to send the packing slip separately;
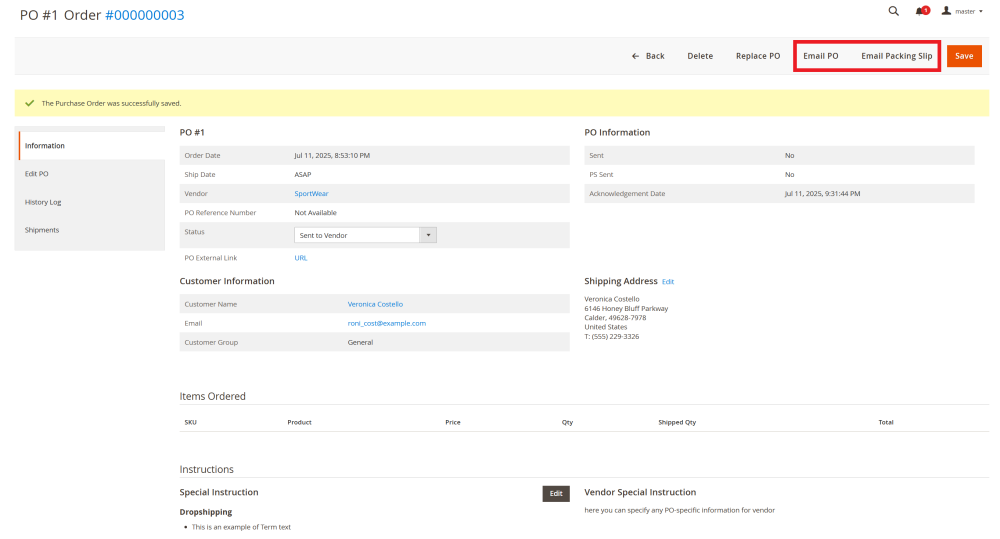
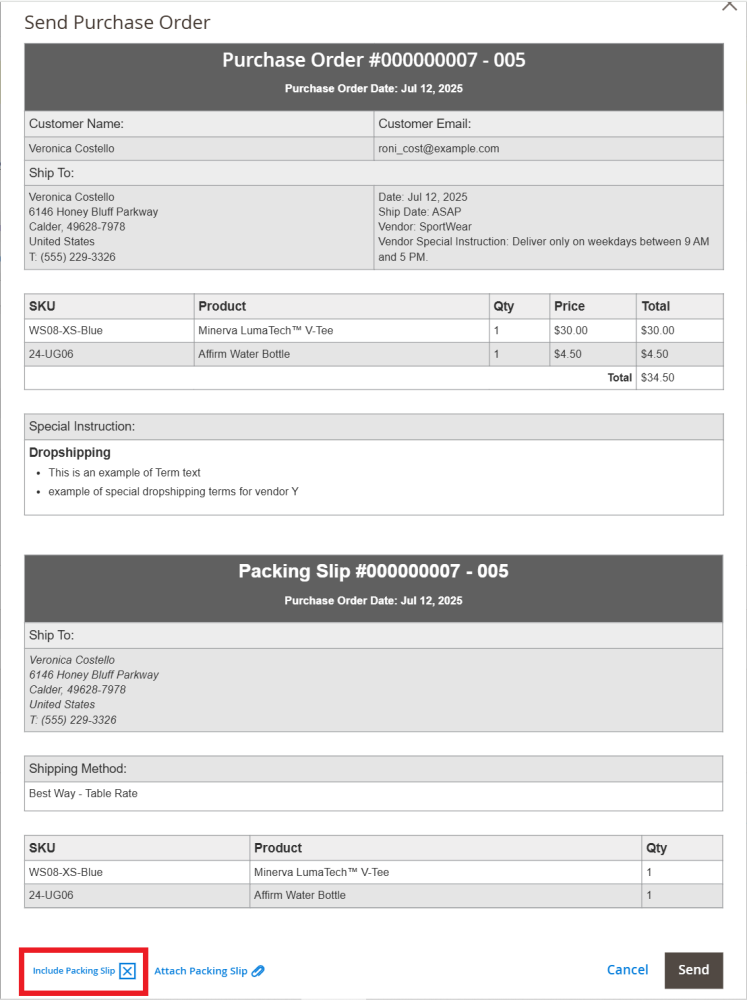
The Email PO option also allows you to include Packing Slip in the same email by checking the Include Packing Slip box.
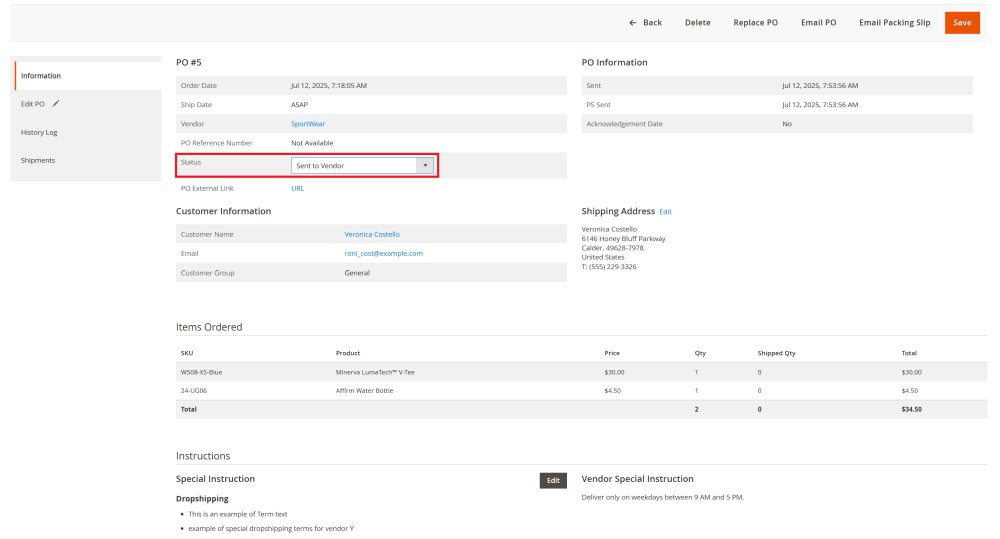
Once the PO email is sent, the status will automatically change to Send to Vendor (this status can also be set manually If the PO and/or packing slip is sent not from Magento admin).
Purchase order status updates
After the PO email and/or Packing Slip has been sent and the status is set to Send to Vendor, the status can be updated manually by the store admin or directly by the vendor using a secure PO external link.
PO status updates by store admin
To update the PO status go to Sales > Purchase Order and Dropshipping by AheadWorks > Purchase Orders and click View next to the relevant PO.
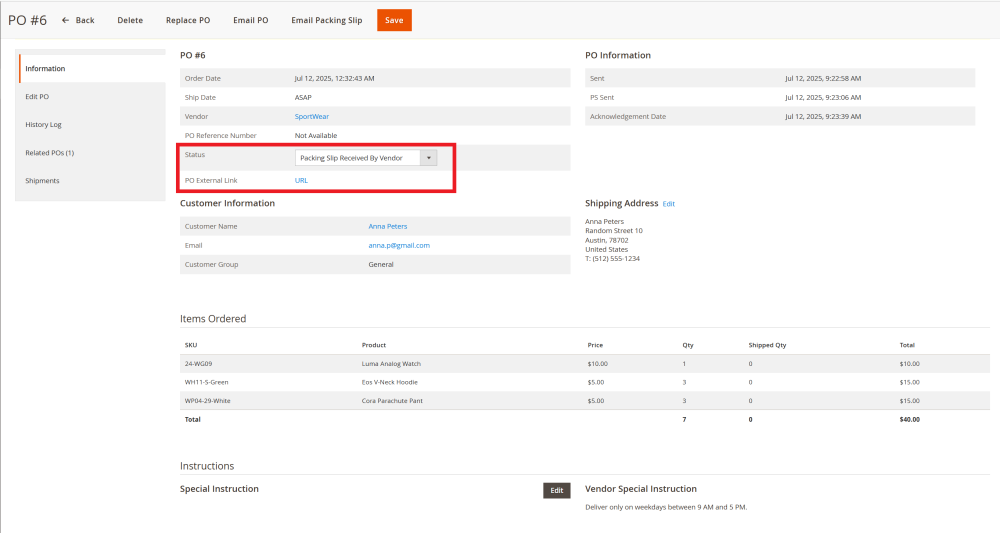
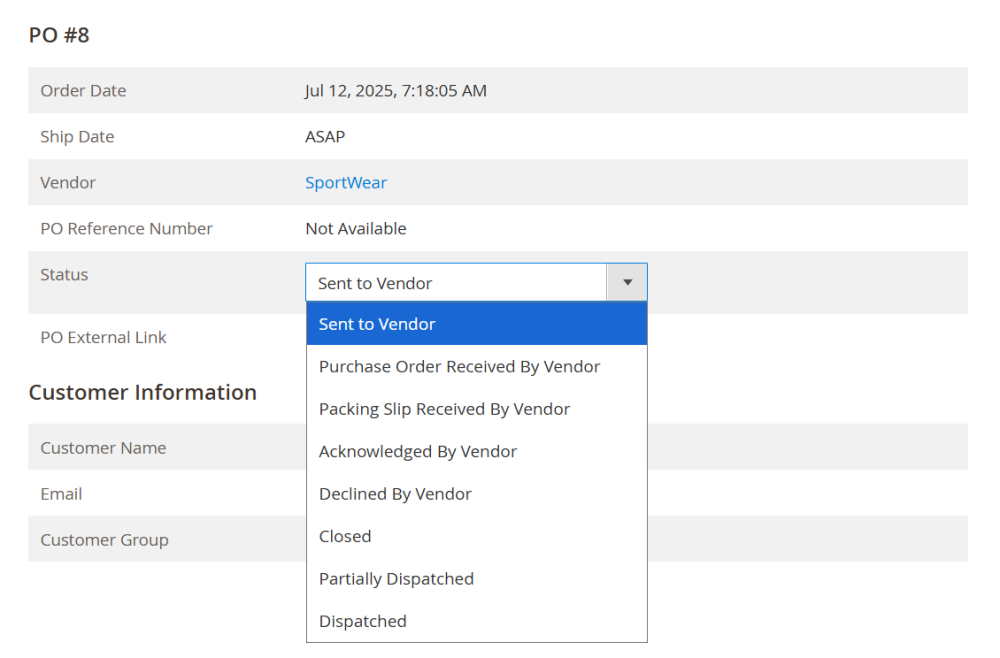
In the Information section, use the dropdown menu to choose the appropriate status:
- Send to Vendor – automatically applied once the PO email and/or packing slip is sent;
- Purchase Order Received By Vendor – used when the vendor confirms that PO email has been received;
- Packing Slip Received By Vendor – used when the vendor confirms that Packing Slip has been received;
- Acknowledged By Vendor– used when the vendor confirms that both the PO and Packing Slip have been received;
- Declined By Vendor – used when the vendor declines the order In this case, you can either assign the PO to another vendor or notify the customer about unavailable products. See Replacing a Purchase Order for details;
- Closed – set this status when a PO is declined by the vendor and reassigned to another vendor, to show that no further action is required. See Replacing a Purchase Order for details;
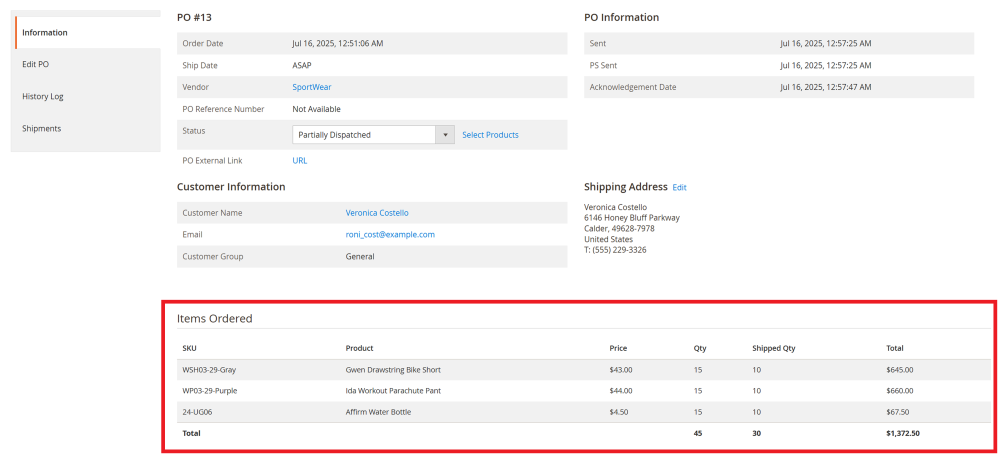
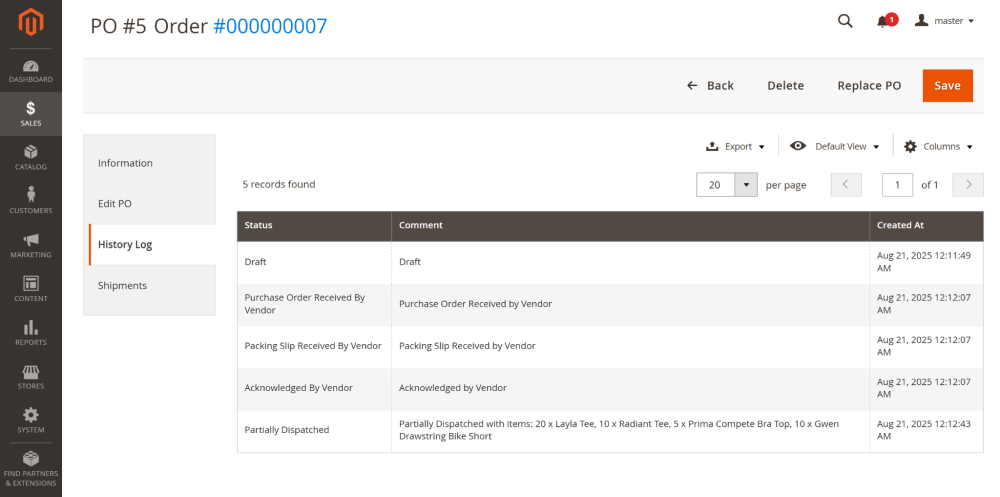
- Partially Dispatched – used when the vendor ships only part of the ordered products;
- Dispatched - used when the vendor confirms all products have been shipped.
Click Save to apply the updated status.
|
Partially Dispatched option if the Partially Dispatched option is chosen, the pop up will appear, here the admin will have to specify the quantities of the products that have been partially shipped.
Once saved, the updated quantities will be displayed in the Items Ordered table.
|

PO status updates by Vendor
Store admins can enable vendors to update the PO status themselves via a secure PO external link.
This secure link is included in the PO email sent to the vendor and is also available on the Purchase Order page in admin.
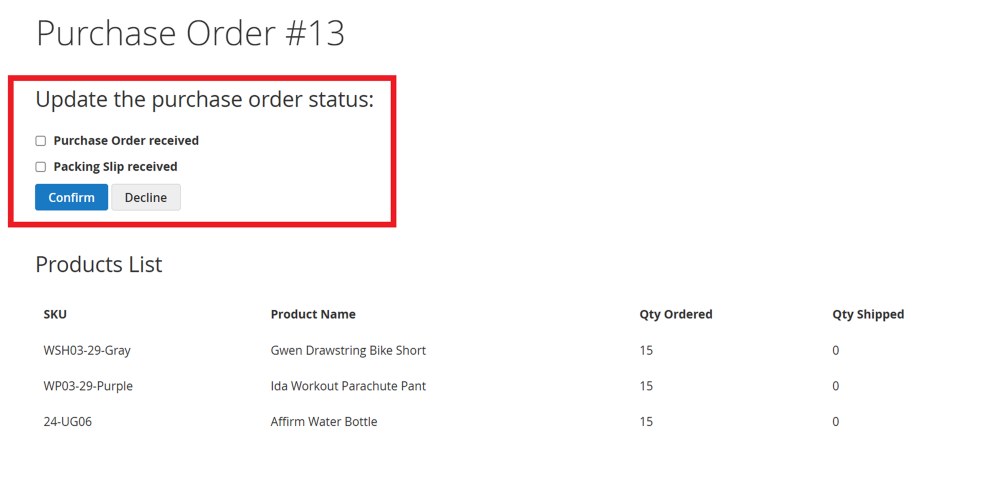
Once the store admin sends the PO email and/or Packing Slip, the vendor can click this link and confirm the receipt of the email or decline the order.
Via this link, vendors can view:
- Product Names and SKUs;
- Quantity of the ordered products;
- Quantity of already shipped products.
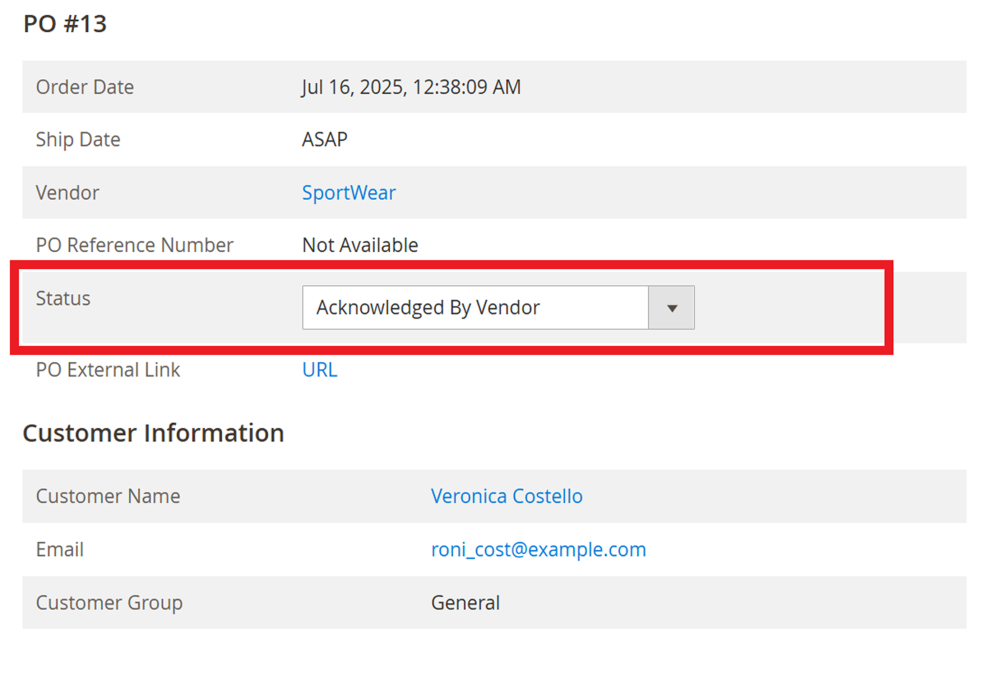
When the vendor updates the status, in the magento admin the Sent to Vendor status will be automatically changed to:
- Acknowledged by Vendor - If both the PO and Packing Slip are confirmed as received;
- Purchase Order Received by Vendor - if only the PO email confirmed as received;
- Packing Slip Received by Vendor - if only the Packing Slip confirmed as received;
- Declined by Vendor - if the vendor declined the order.
Once the PO and Packing Slip confirmed as received, the vendor can:
- Check the All products are dispatched box and click Confirm if all the products are shipped;
- Enter the quantity of the products shipped and click Confirm if only some of them are dispatched;
- Click Add New to enter tracking numbers for each product. These tracking details will be shared with the customer.
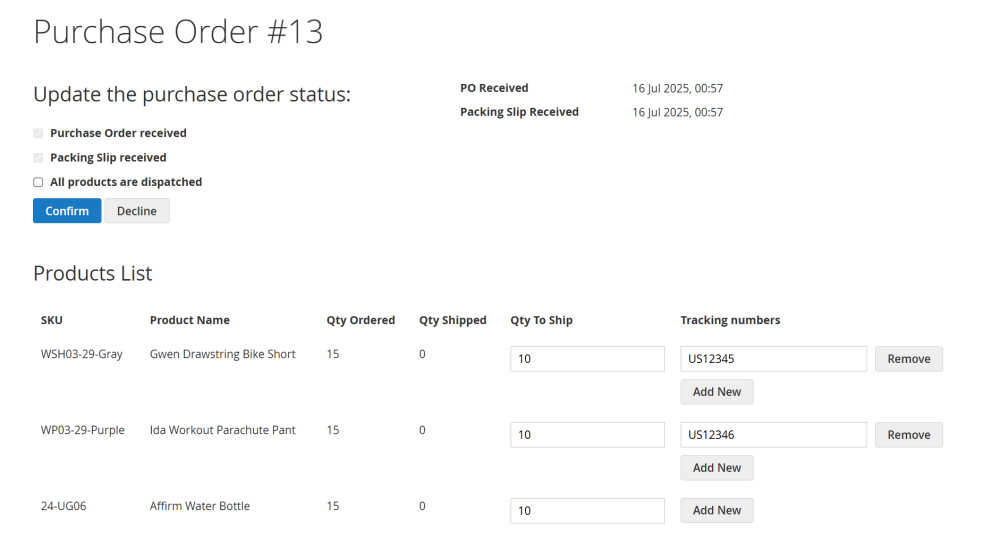
If partial shipments are made, the updated quantities will automatically reflect in the PO page in the Magento admin.

The vendors can later update the shipping details with the rest of the products dispatched along with their tracking numbers.
![]()
Once all the products are dispatched, the status in the Magento admin will be automatically changed to Dispatched.
Managing a Purchase Order
To manage an existing PO, go to Sales > Purchase Order and Dropshipping by AheadWorks > Purchase Orders and click View next to the PO you want to manage.
The PO page includes several sections:
- Information;
- Edit PO;
- History log;
- Related POs (available only if the purchase order was replaced);
- Shipments.
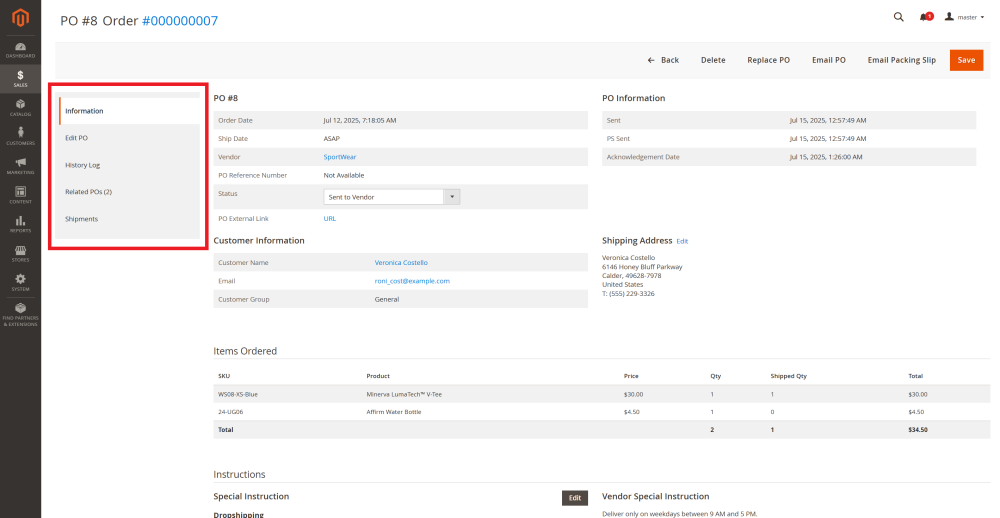
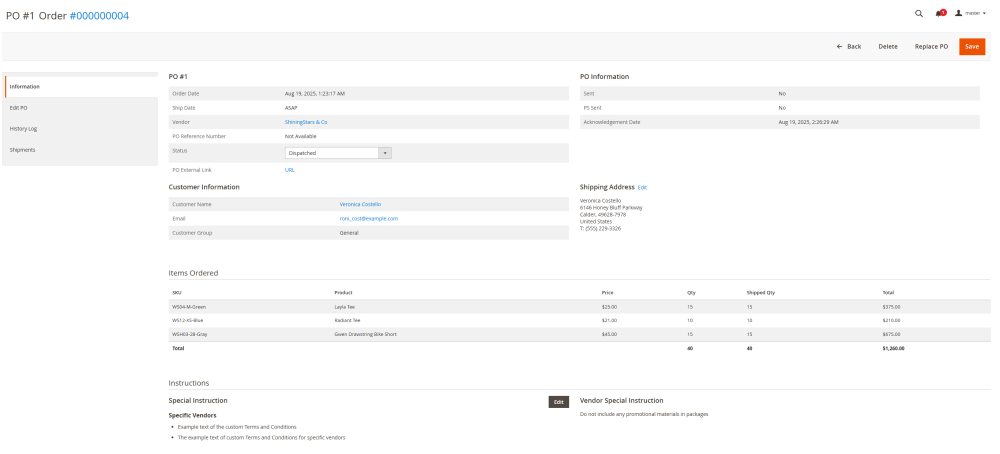
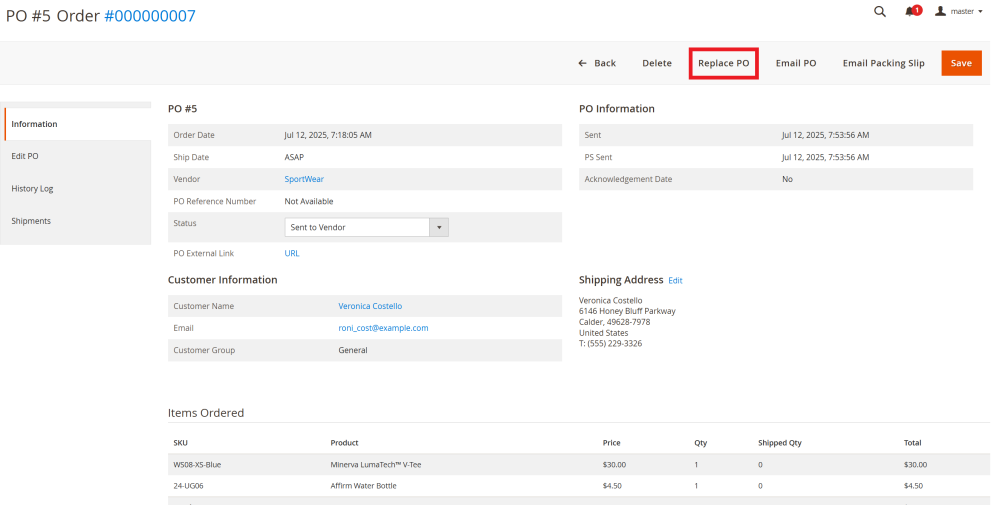
Information section
Displays the core details of the PO:
- General PO information:
- Order and ship dates;
- Vendor name;
- PO reference number;
- Status of the purchase order;
- PO external link;
- Timestamps for PO/Packing Slip being sent, and vendor acknowledgment;
- Customer details and shipping address;
- Items ordered;
- Special instructions (Terms and Conditions and Vendor Special Instructions).
The PO status, shipping address, and Terms and Conditions can be updated from this section.
| Note: If significant changes are made to the shipping address and/or Terms and Conditions, you should resend the PO email and/or Packing Slip with updated information. |
Edit PO section
Allows the store administrator to make changes to the PO.
| Note: If significant changes are made, you should resend the PO email and/or Packing Slip with updated information. |
The Purchase Orders Issued table displays products from this SO that already have POs created for them. The table includes:
- PO – the purchase order number associated with the product;
- Vendor – the vendor who is fulfilling the product shipment;
- Qty to order – The product quantity ordered by the customer;
- SKU of the product;
- Product – displays the product name and details (e.g., size, color, etc);
- Price – price per unit charged by vendors;
- Total – total amount charged by vendor;
- Vendor Description – text entered during the assignment of the vendor to the product
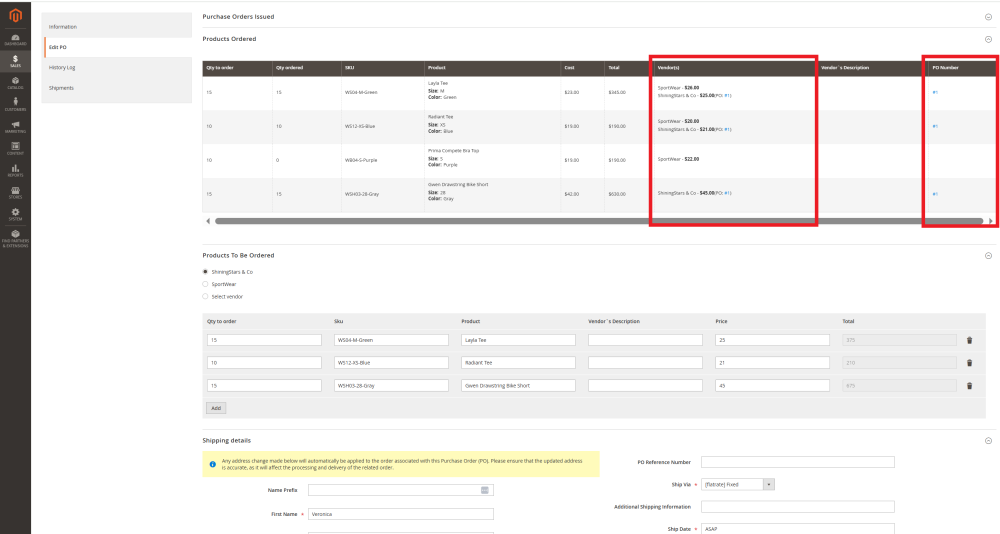
The Products Ordered table displays all products from this SO and their assigned vendors. The table includes:
- Qty to order – the number of products ordered by the customer;
- Qty ordered – the number of products already ordered from the vendor;
- SKU of the product;
- Cost – actual price of the product, set in the Advanced Pricing settings;;
- Total – total cost for the ordered quantity;
- Vendor(s) – all vendors assigned to this product and their pricing;
- Vendor’s description – text entered during the assignment of the vendor to the product;
- PO Number – the ID of the PO associated with the product;
The rest of the page layout is the same as used during the PO creation.
In the Products Ordered table, the PO Number in the Vendor(s) and PO Number columns links to the related purchase order.
History log section
Tracks all status updates made to the PO, allowing for full audit visibility.
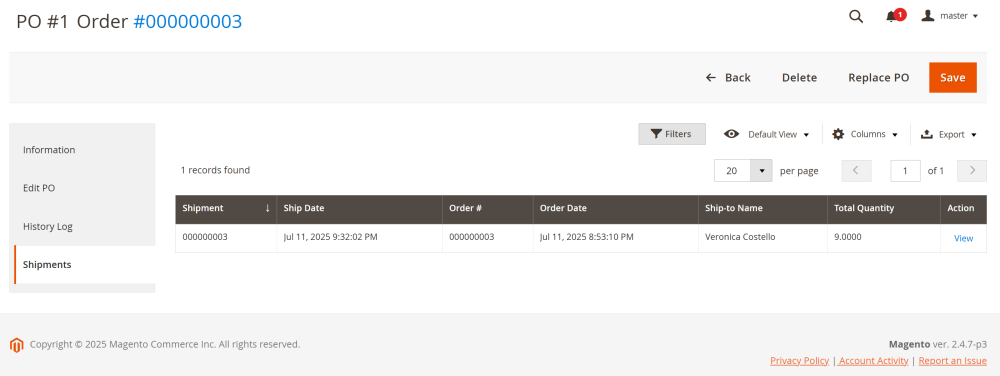
Shipments section
Displays the most recent shipments related to the PO.
Replacing a Purchase Order
If you need to change the vendor (for example, if the vendor declined the order) or modify other details in the purchase order (PO), you can replace the existing PO with a new one.
To replace the order, go to Sales > Purchase Order and Dropshipping by AheadWorks > Purchase Orders and choose the PO you want to replace.
At the PO page in the top menu click the Replace PO button.
The confirmation pop up will appear. Confirm the action to proceed.
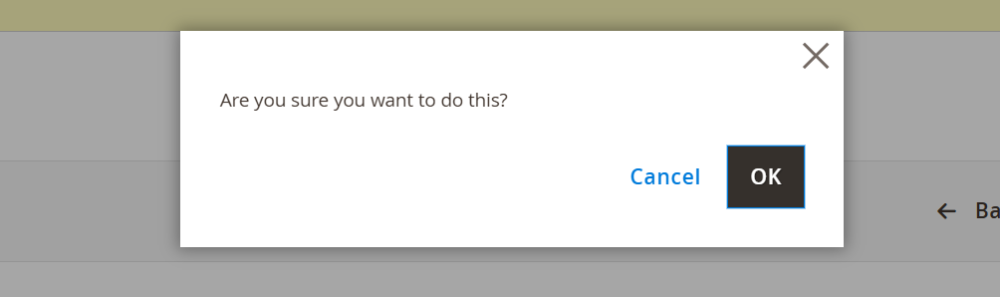
You will then be redirected to the Add Purchase Order page, where you can create a new PO with the necessary adjustments.
After saving, a new PO will be created, and you’ll need to re-send the PO email and/or Packing Slip.
A Related POs section will appear in both the original and replacement PO pages, showing their relationship and maintaining a clear audit trail.
Integrations
Integration with Cart to Quote and Help Desk Ultimate
- Integration Workflow: Brief Step-By-Step Instructions
- Prerequisites
- Customer Request
- Creating a Quote
- Sending Request For Quotation
- Quote Management
- Customer Messages
- Vendor Messages
- Selling the Quote and Creating Purchase Order
The Purchase Order and Dropshipping extension can be integrated with Cart to Quote and Help Desk Ultimate to cover the full cycle of vendor collaboration and dropshipping order management. With this integration, you can handle customer requests, create quotes, negotiate with vendors, and process purchase orders, all within Magento admin.
Integration Workflow: Brief Step-By-Step Instructions
Turn on the link between modules so Magento can connect quotes, tickets, and purchase orders.
Go to Stores > Configuration > Aheadworks Extensions > Help Desk Ultimate 2 > Integration: set both Enable integration with Cart to Quote and Enable Integration with Purchase Order and Dropshipping to Yes and Save Config.
2. Prepare Vendor Records (If Haven’t Done Before)
Vendors must exist in the system before sending RFQs.
- Go to Sales > Purchase Order and Dropshipping by Aheadworks > Vendors.
- Click Create New Vendor button;
- Complete all the required fields and Save.
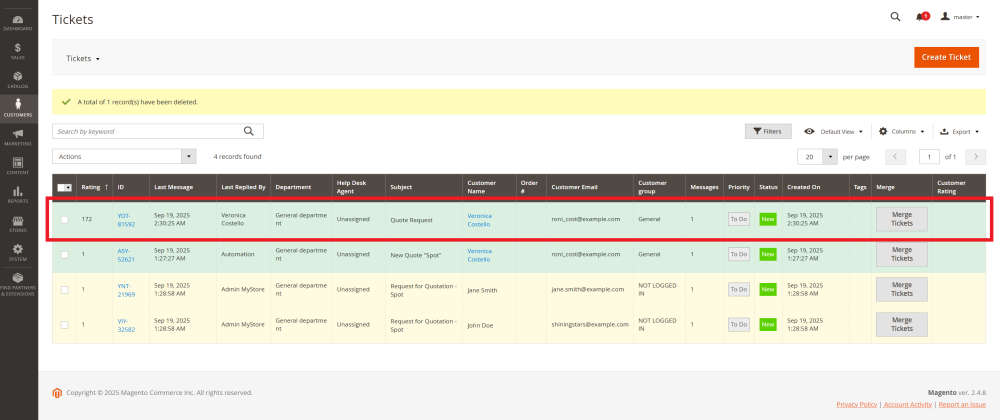
Customers can request quotes via Add to Quote or the Contact Us form. The letter option creates a ticket for every customer request submitted via the form. These tickets are created and displayed in Customers > Tickets.
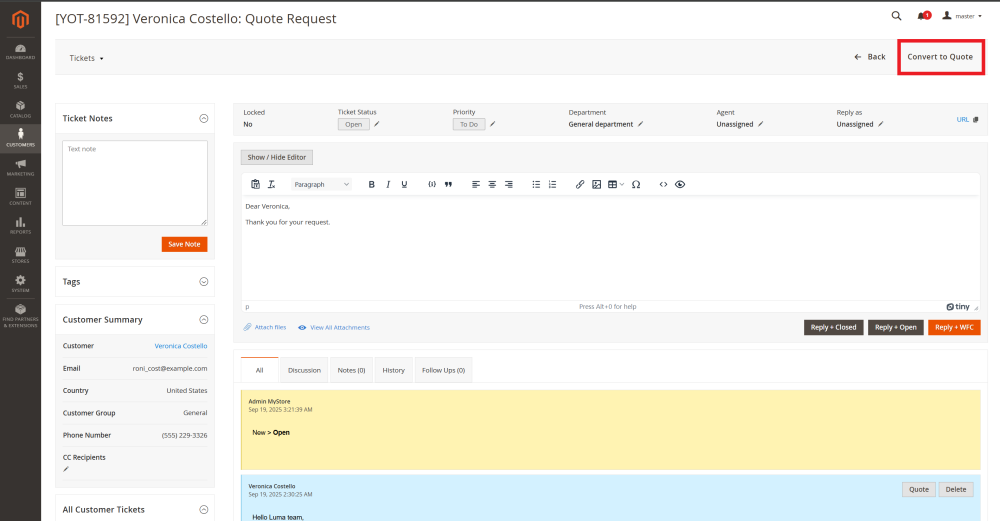
Create a new quote directly from the customer’s ticket:
- Open the customer’s ticket, negotiate if needed;
- Click Convert to Quote to generate a new quote.
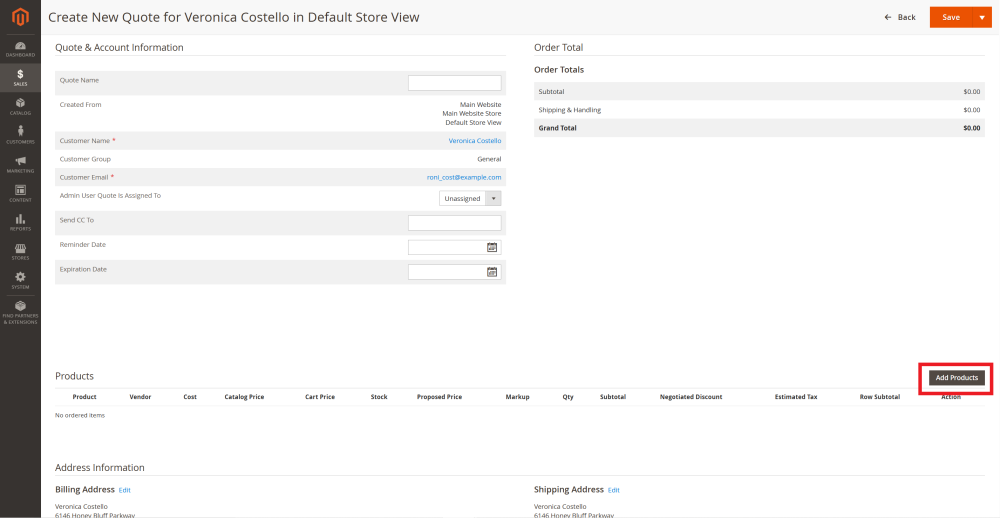
- On the New Quote page, add products, adjust details, and include custom Terms & Conditions if required.
- Save the quote.
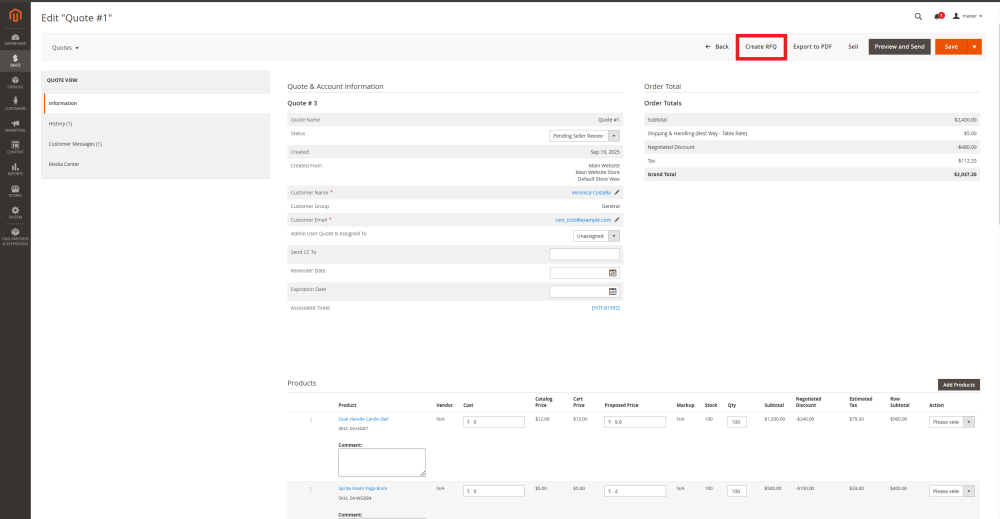
Request item prices and availability from vendors in your database directly from the Quote page:
- Click the Create RFQ button to open Email Request for Quotation page;
- Select vendors to send the RFQ to;
- Edit email subject/message if needed;
- Click Send Email with RFQ.
Vendors responses are received and managed via Help Desk tickets. Review their replies in the Vendor Messages section of the Quote page or in Customers > Tickets.
7. Update The Quote With Vendor Offers
On the Quote page, in the Products table:
- Manually select the Vendor that will fulfill the order;
- Enter the Cost received from the selected vendor;
- Set your Proposed Price that the customer will see in their quote;
- Apply changes by clicking Update Items and Quantities.
- Save the quote.
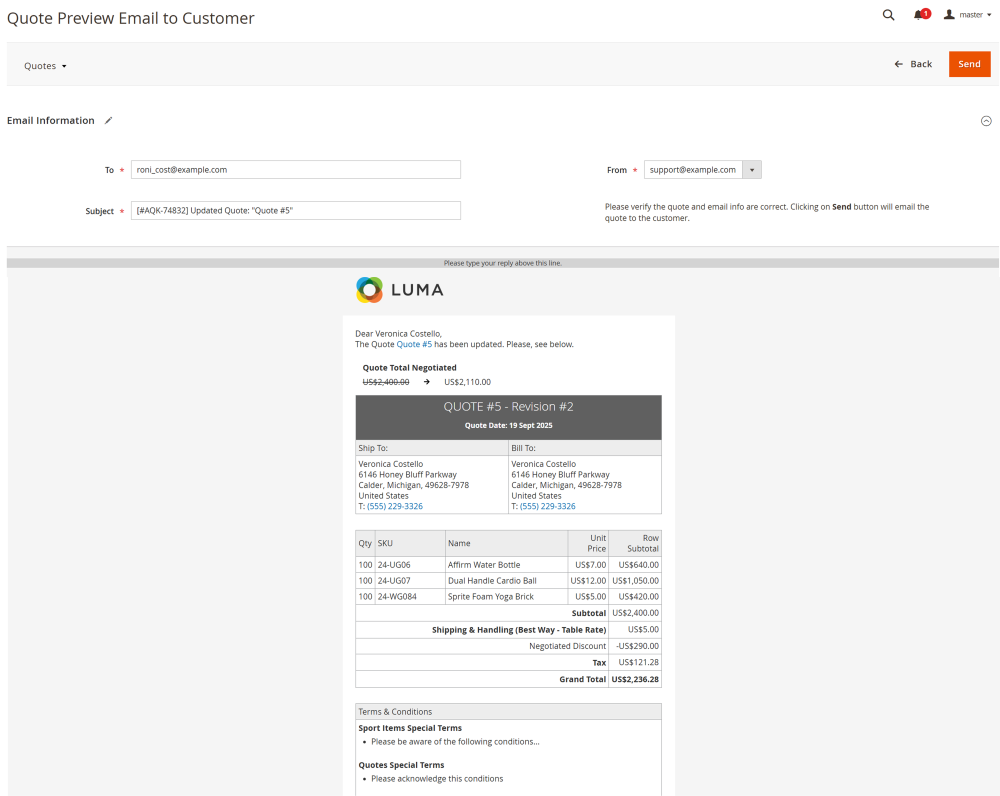
8. Send Revised Quote To The Customer
Share the updated quote with the customer:
- On the Quote page, click Preview and Send;
- Review the quote and email details;
- Click Send.
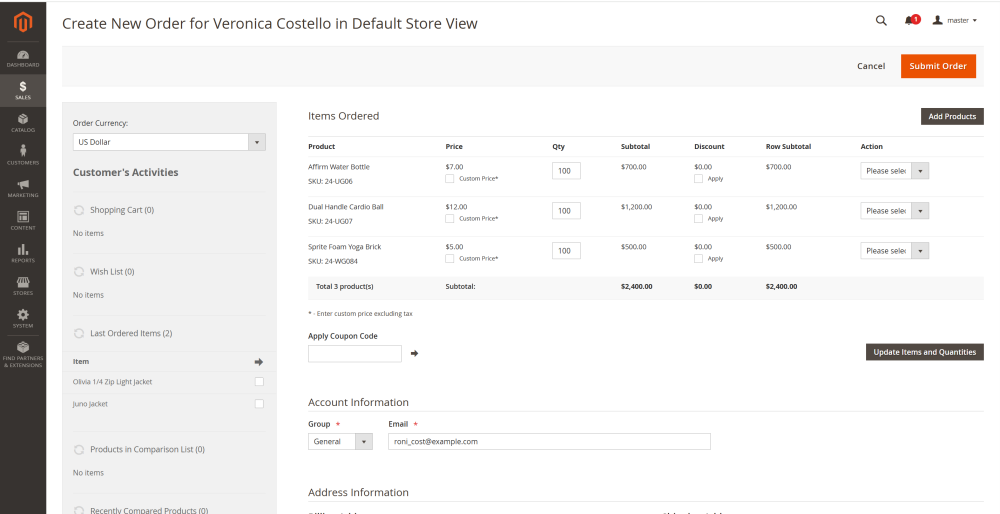
9. Convert Accepted Quote To Sales Order
Turn the customer-approved quote into a Sales Order:
- On the Quote page, click Sell;
- On the opened Create New Order page, review the quote details once again;
- Click Submit Order.
- The Sales Order page will be created.
10. Create And Send Purchase Orders (PO) To Vendor
Directly form the Sales Order page, create PO for the selected vendor who will fulfill the order:
- On the Sales Order page, click the Create PO button;
- Select the vendor and fulfill the required shipping details;
- Add specific Terms and Conditions if needed;
- Click Save. You will be redirected to the PO page.
- On the opened PO page, review the details and click the Email PO button to send PO and Packing Slip (optional) to the vendor.
Prerequisites
Once all the modules are installed, enable the integration in the Help Desk Ultimate module.
Go to Stores -> Settings -> Configuration -> Aheadworks Extensions -> Help Desk Ultimate 2.
| To learn how to configure Help Desk Ultimate follow the Help Desk Ultimate for Magento 2 user manual. |
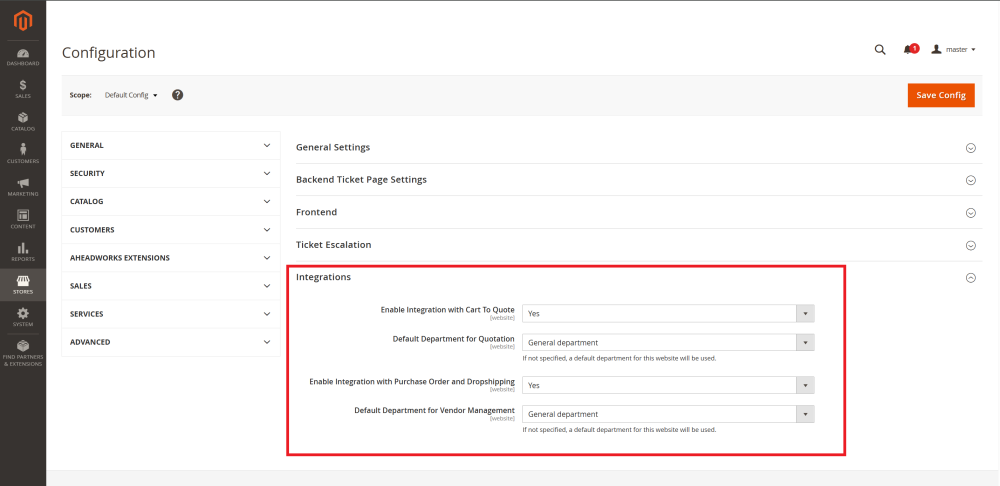
Scroll down to the Integration section and set the following options to Yes:
- Enable integration with Cart to Quote;
- Enable Integration with Purchase Order and Dropshipping.
Once you click Yes, additional fields will appear, here you have to select:
- The Default Department for Quotation;
- The Default Department for Vendor Management.
Customer Request
Customers can request a quote in two ways:
- By clicking the Add to Quote button (standard Cart to Quote functionality).
- By submitting a message through the Contact Us form.
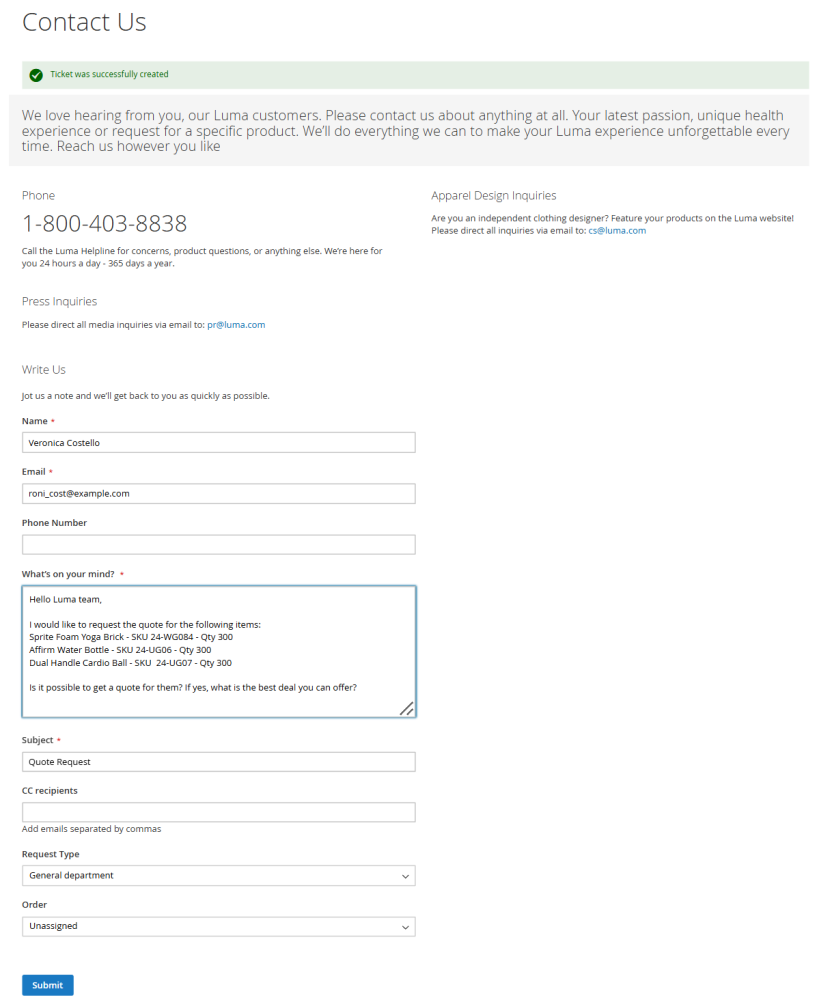
When a request is submitted via the Contact Us form, a support ticket is automatically created and displayed in Customers > Tickets.
To manage the request click on the ticket ID to open the ticket and engage with the customer.
The store admin can click the Convert to Quote button to create a new quote directly from this ticket.
|
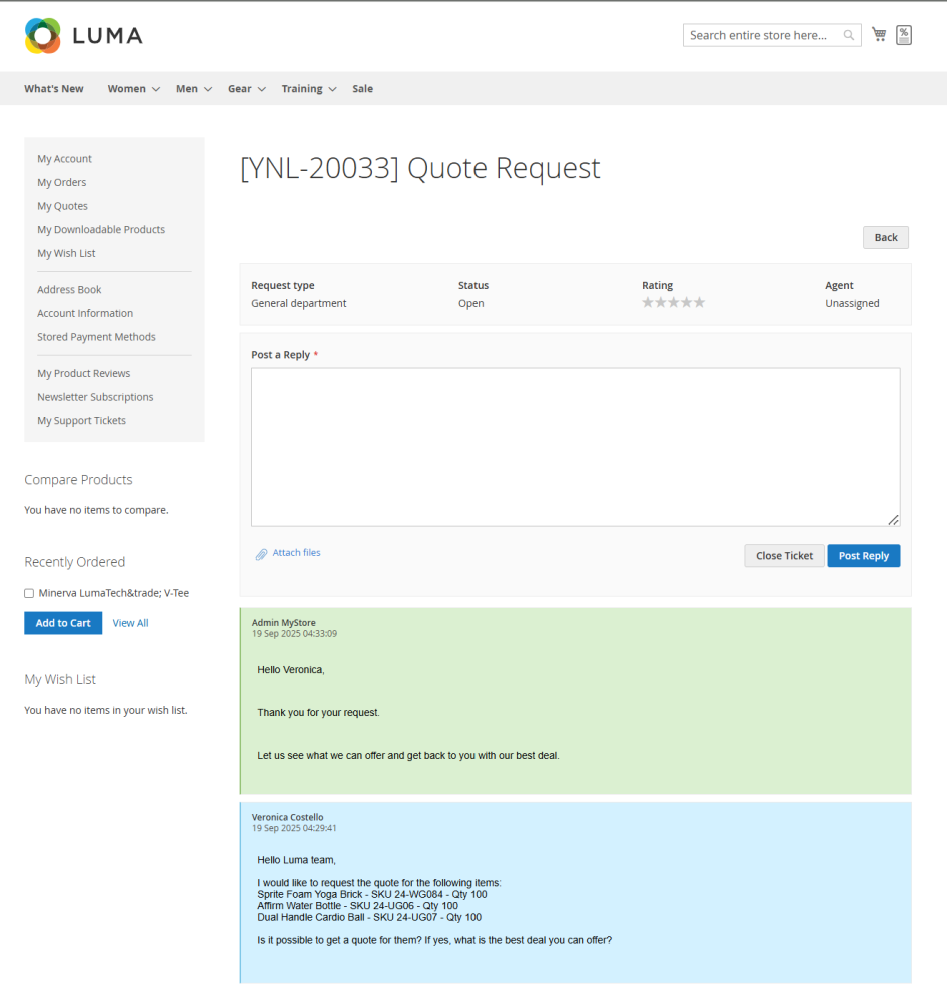
Customer communication on the storefront The customer can access the necessary ticket with all the replies and continue communication in My Account > My Support Tickets
|
Creating a Quote
When you click the Convert to Quote button on the support ticket page, the New Quote page will open in the new tab.
On this page you can:
- Configure quote details;
- Add requested products to the quote by clicking on the Add Products button;
- Add custom Terms & Conditions if necessary.
Click Save to create a quote. After saving, you will be taken to the created Quote page.
| To learn how to configure a New Quote please refer to the Cart to Quote for Magento 2 user guide. |
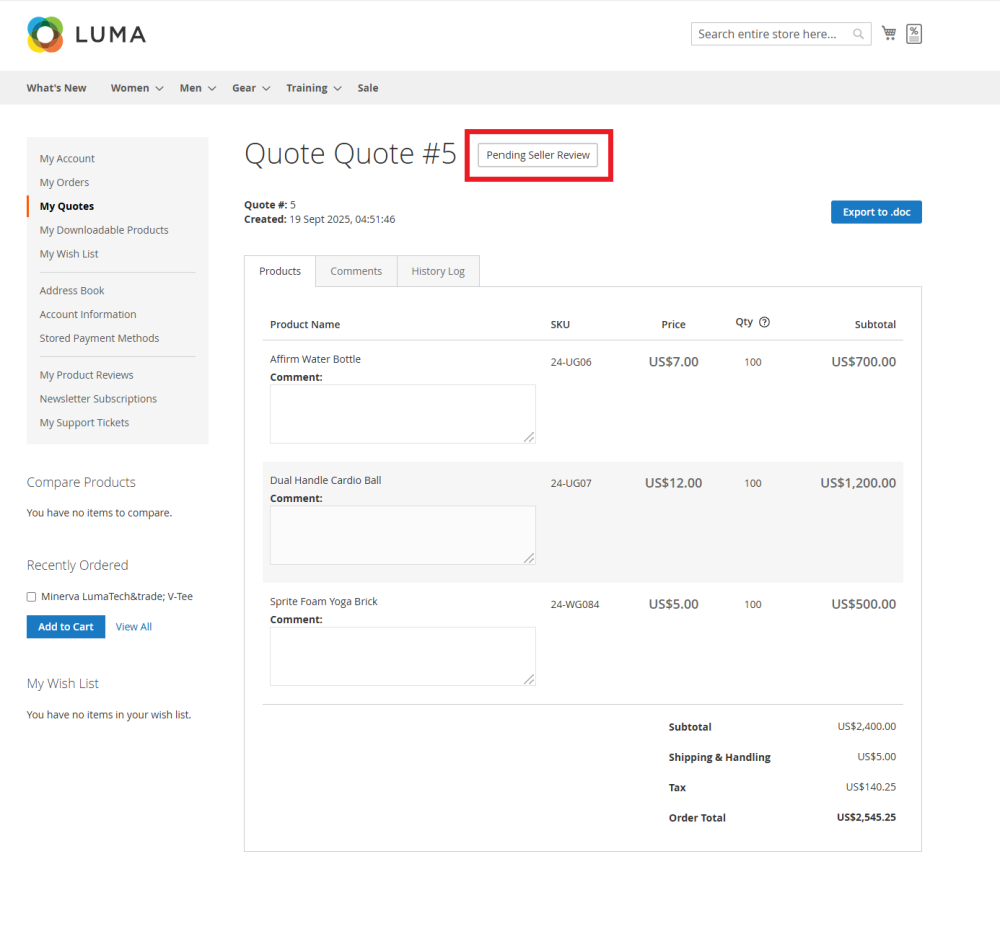
|
Saved Quote on the storefront The saved quote will be displayed in My Account > My Quotes on the storefront with the status Pending Seller Review.
|
Sending Request For Quotation
From the Quote page, you can send the Request for Quotation (RFQ) to the vendors from the database.
To do so, click Create RFQ at the top menu of the Quote page.
|
Note: Vendors must be created first in Sales > Purchase Order and Dropshipping by Aheadworks > Vendors. |
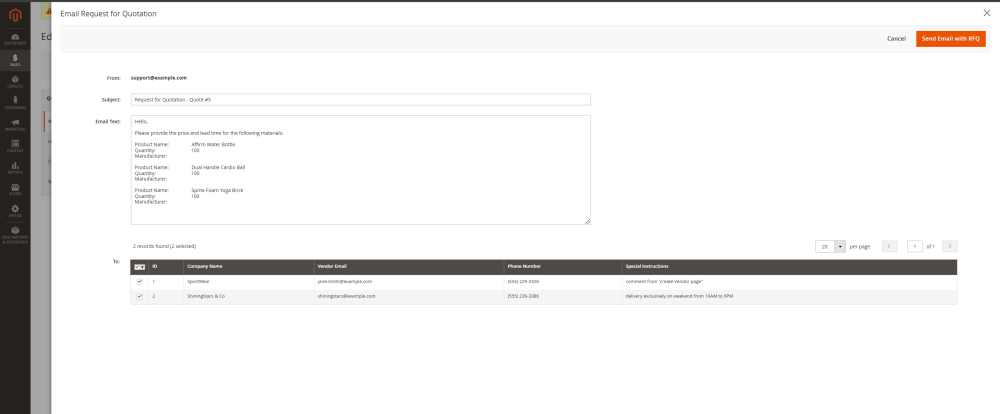
The Email Request for Quotation page will open.
On this page admin should:
- Edit the subject line and message if needed;
- Select the vendors to send the RFQ to.
After configuring this email, click the Send Email with RFQ button.
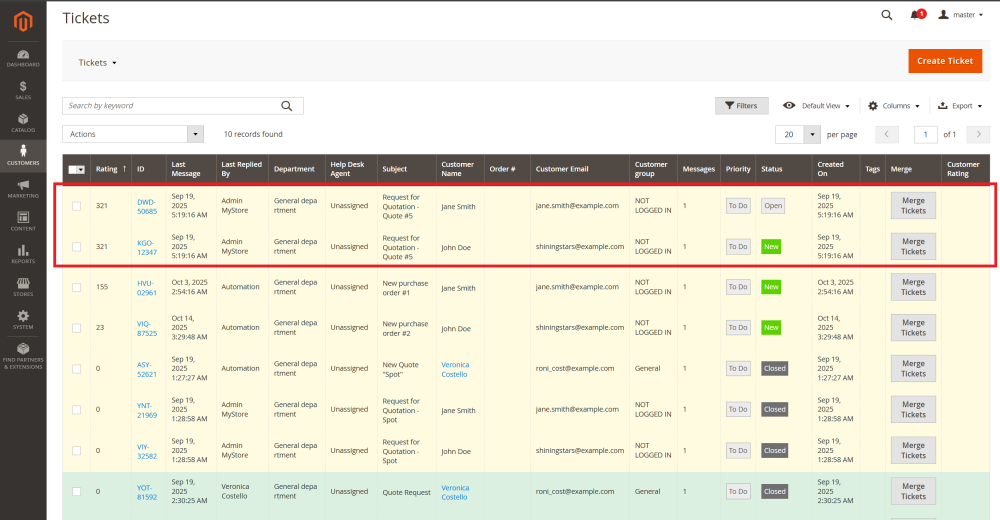
After sending, separate tickets will be created for each vendor RFQ. They can be found in Customers > Tickets.
Quote Management
Once the RFQ is sent, you will be taken back to the Quote page.
The Quote page provides access to all details, including history, customer and vendor communication, and attachments, so the admin can track and control the entire process.
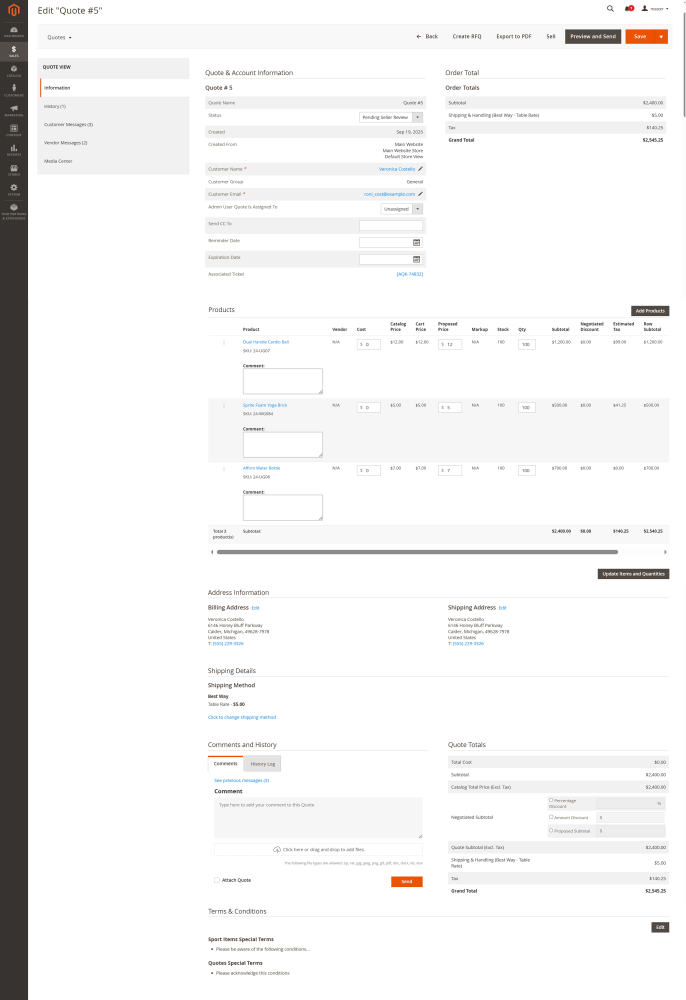
From the Quote page side menu, you can access:
- Quote History – track revisions, changes, totals, and status updates.
- Customer Messages* – view and respond to customer messages (if initiated via Contact Form).
- Vendor Messages* – monitor vendor communications related to the RFQs.
- Media Center – view all the attached to this quote documents.
* Customer Messages and Vendor Messages sections are part of the integration.
|
To learn more about quote management please refer the Cart to Quote user manual. |
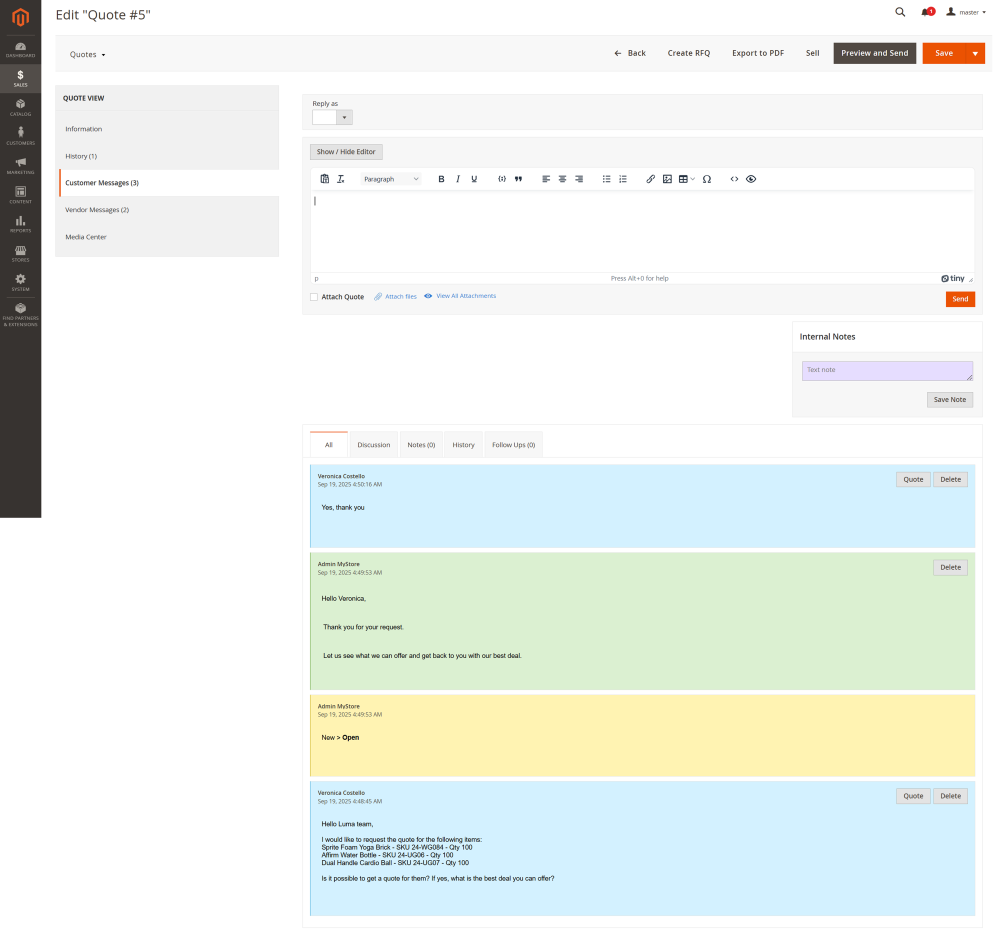
Customer Messages
This section appears if the quote originated from a Contact Us form submission.
At the Customer Messages page, admin can see the related to this quote ticket history with all the customer messages (blue), admin responses (green), and system notifications (yellow).
From this page, the admin can:
- Select the sender identity with "Reply as” option and write the message to the customer. The message will also be displayed in the related ticket at customers -> tickets.
- Attach files and/or Quote to the message.
- Post an internal note, that will be visible here and in the related ticket to admin and the agent assigned to the related ticket.
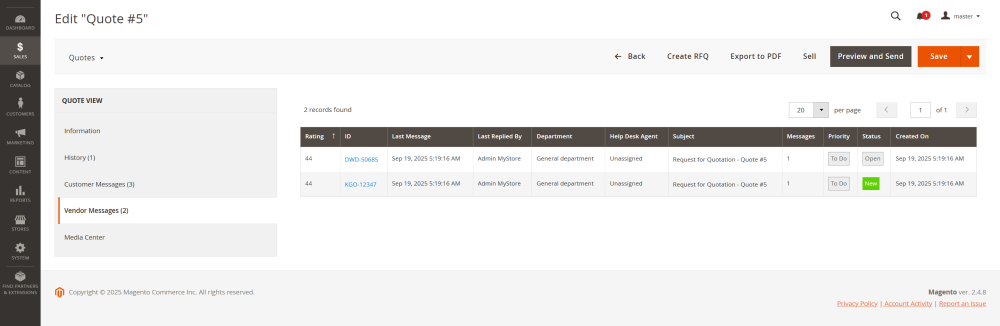
Vendor Messages
At the Vendor Messages page you’ll see the table that displays the general info about the tickets related to the Request for Quotations sent out to each vendor, with links to the tickets.
In the table you can see:
- Rating – the weight of the priority of the ticket;
- ID – the identification number of the ticket, active link to the Ticket View page;
- Last Message date - the date and time of the latest message within the ticket;
- Last Reply By – the name of the person who left the latest reply to the ticket;
- Department – the department responsible for the ticket;
- Help Desk Agent – the agent responsible for the ticket;
- Subject – the subject line of the ticket;
- Messages – the number of messages in the ticket;
- Priority – the priority of the ticket;
- Status – the status of the ticket;
- Created On – the date and time when the ticket was created;
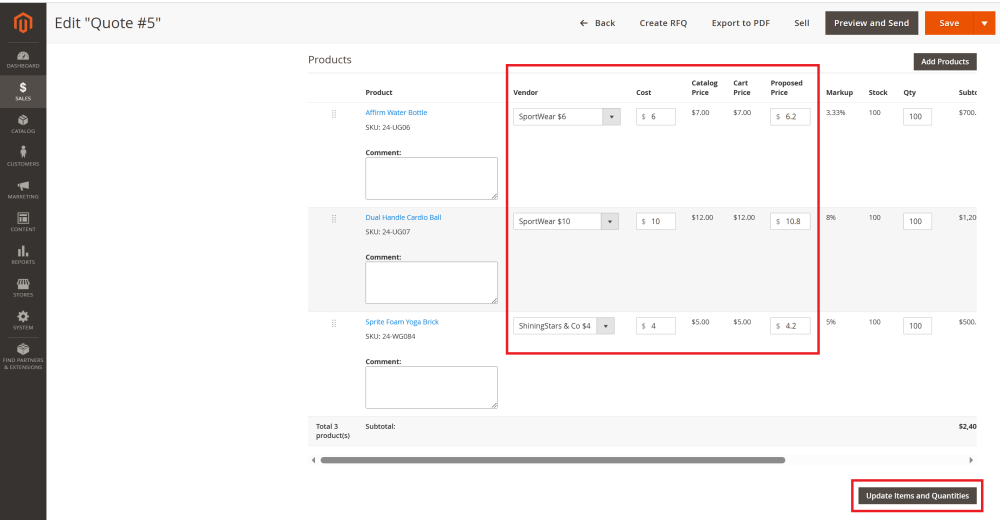
Selling the Quote and Creating Purchase Order
After vendors respond to the Request for Quotation (RFQ), update the quote manually by:
- Selecting the Vendor who will fulfill the order;
- Entering the Cost proposed by the selected vendor in the RFQ response;
- Setting the Proposed Price that the customer will see as the store’s quoted price
Once done, click the Update Items and Quantities button to apply changes. Then click Save to save the current revision.
Next, review and adjust other quote details if needed.
Click Preview and Send to open the quote preview. Adjust the email info if necessary and then click Send to email the quote to the customer.
When the customer accepts the quote, click Sell to convert it into a sales order.
You will be redirected to the Create New Order page. Update details if necessary and click the Submit Order to finalize the sales order.
After the order is submitted, the Sales Order page will open automatically.
From this page you can create a Purchase Order for the vendors who will fulfill the order.
This process follows the standard Purchase Order and Dropshipping workflow, see the corresponding section of this guide for detailed instructions on creating and managing POs.
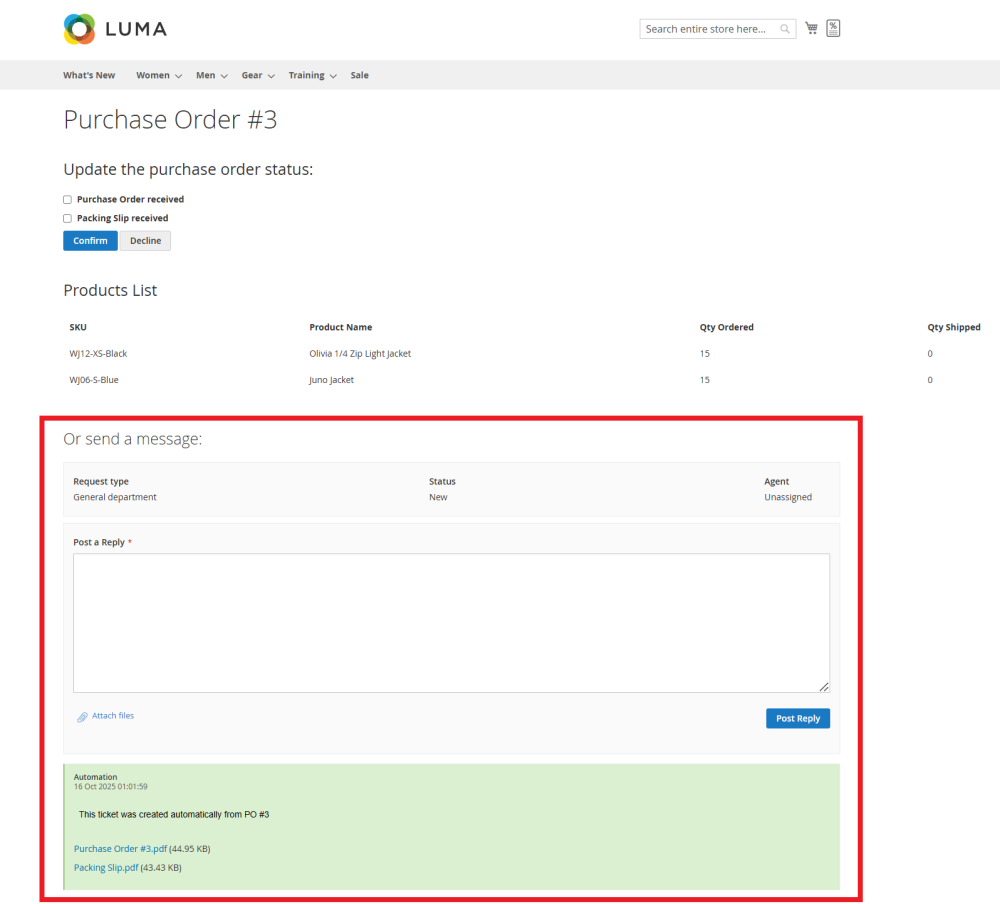
|
Note: Thanks to integration with Cart to Quote and Help Desk Ultimate, vendors handling order fulfillment can communicate directly with the store admin via tickets. The reply from and any attached files (such as PO and Packing Slip)are available on the PO status page, accessible via the secure link provided in the PO email.
|