
User Manual - Action Log
- Installing the Magento 2 Action Log extension
- Set up cron
- Uninstalling the Magento 2 Action Log extension
- Extension Compatibility
- Introducing the Magento 2 Action Log extension
- Using the Magento 2 Action Log extension
Installing the Magento 2 Out of Stock Notification extension
Command Line Installation
- Backup your web directory and store database
- Download the Action Log installation package
- Upload contents of the Action Log installation package to your store root directory
- In SSH console of your server navigate to your store root folder:
cd path_to_the_store_root_folder |
run the following command: :
php bin/magento module:enable Aheadworks_ActionLog |
then:
php bin/magento setup:upgrade |
after:
php bin/magento setup:static-content:deploy -f |
5. Flush store cache; log out from the backend and log in again
|
Make sure the installation is done from the FTP administrator account. Otherwise, set 775 permissions to the store root directory after the extension is deployed. |
Composer Installation
If you are installing an extension from Aheadworks for the first time, you need to add our composer repository to your Magento store:
1. Login to your ssh console and navigate to your store folder:
cd path_to_the_store_root_folder |
Run the following command:
composer config repositories.aheadworks composer https://dist.aheadworks.com/ |
After the command was executed successfully, you can use the composer to install the extension.
To install the extension:
2. Login to your ssh console and navigate to your store folder:
cd path_to_the_store_root_folder |
3. Run the following command to install the latest version of the extension:
composer require aheadworks/module-action-log |
if you need to install a specific version, run this command:
composer require aheadworks/module-action-log:<version> |
|
Specify the version of the extension in <version> |
When prompted, enter Public Key (Username) and Private Key (Password):

Both Public Key (Username) and Private Key (Password) can be found in My Projects and Licenses in your personal account on our site:
 |
To upgrade the extension:
To update or upgrade an extension:
Download the updated extension file. Take note of the module-name and version. Export the contents to your Magento root.
If a composer package exists for the extension, run one of the following.
Update per module name:
composer update aheadworks/module-action-log |
Updater per version:
composer require aheadworks/module-action-log:<version> |
Run the following commands to upgrade, deploy, and clean the cache.
php bin/magento setup:upgrade --keep-generated |
Set up cron
If you have already configured cron jobs for your Magento installation then you can skip this step. Read the following instructions on setting cron job for your Magento store: Magento user guide.
Generally, it would be enough to run in SSH console of your server:
crontab -e |
And insert the following line:
*/3 * * * * php -c <ini-file-path> <your Magento install dir>/bin/magento cron:run |
Remember to confirm the Save request when exiting the installation.
Uninstalling the Magento 2 Out of Stock Notification extension
Since Magento introduced declarative Database you need to be very carefull when uninstalling or disabling the module.
|
NOTE: Please be very careful when uninstalling/disabling this module. This module uses a declarative DB scheme. Once the module is uninstalled the DB tables will be lost. |
Manual Removal
1. Disable the module by executing the following commands:
php bin/magento module:disable Aheadworks_ActionLog |
2. Remove the extension files from the following folder:
app/code/Aheadworks/ActionLog |
Automatic Removal (via Composer)
1. Disable the module by executing the following commands:
php bin/magento module:uninstall Aheadworks_ActionLog |
Extension Compatibility
| Module Version | Magento Version |
| As of version 1.0.0 | 2.4.6 - 2.4.8 |
The PHP version depends on your current Magento version. Please, refer to your Magento version release notes.
Introducing the Magento 2 Action Log extension
Extension Overview
The Aheadworks Action Log extension provides detailed visibility into admin activity within the Magento backend. It records admin actions, authentication events, and active sessions, helping store owners and technical teams monitor changes, investigate issues, and improve security.
All module management and monitoring is performed directly from the Magento Admin panel. The extension does not include CLI commands and operates entirely through the UI.
Key Features
-
Log administrator actions and system events, including configuration changes and entity operations
-
Restore changes performed by admin user
-
Track admin login and logout history
-
Monitor currently active admin sessions
-
Terminate active admin sessions directly from the Admin panel
-
Centralized event journal with filtering and detailed change history
-
Configurable data retention and optional email notifications
Using the Magento 2 Action Log extension
Extension Configuration
To enable the extension, go to Stores > Configuration > AHEADWORKS EXTENSIONS > Action Log
General Settings
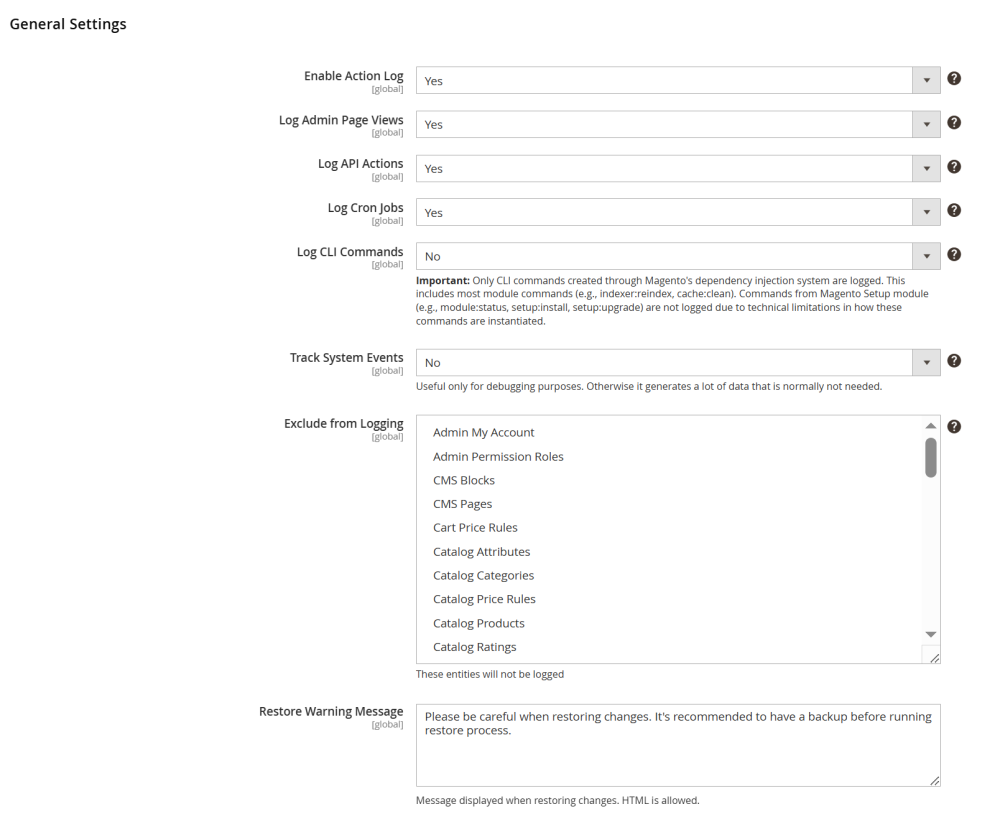
In the General Settings section configure the core behavior of the extension:
-
Enable Action Log – set this option to Yes to enable the extension;
-
Log Admin Page Views – set to Yes to track admin UI page views and CRUD actions for audit purposes. Set to No to reduce log volume;
-
Log API Actions – set to Yes to log REST and SOAP API requests (displayed in All Actions Log with source = API);
-
Log Cron Jobs – set to Yes to record cron job executions;
-
Log CLI Commands – set to Yes to log Magento DI-based CLI commands (e.g., indexer:reindex, cache:clean); set to No if you don’t audit CLI.
|
Note: Only CLI commands created through Magento's dependency injection system are logged. This includes most module commands (e.g., indexer:reindex, cache:clean). Commands from the Magento Setup module (e.g., module:status, setup:install, setup:upgrade) are not logged due to technical limitations in how these commands are instantiated. |
-
Track System Events – set to Yes to log system-level changes such as themes, UI bookmarks, and indexers. This option is primarily useful for debugging purposes. Otherwise it generates a lot of data that is normally not needed.
-
Exclude from Logging – select entity types that should be excluded from logging to reduce noise (e.g., certain tax or inventory entities).
-
Restore Warning Message – custom text message displayed before restoring changes to remind about backups/maintenance windows.
| Note: Enabling system events and page view tracking may generate a large number of log records. |
Data Retention
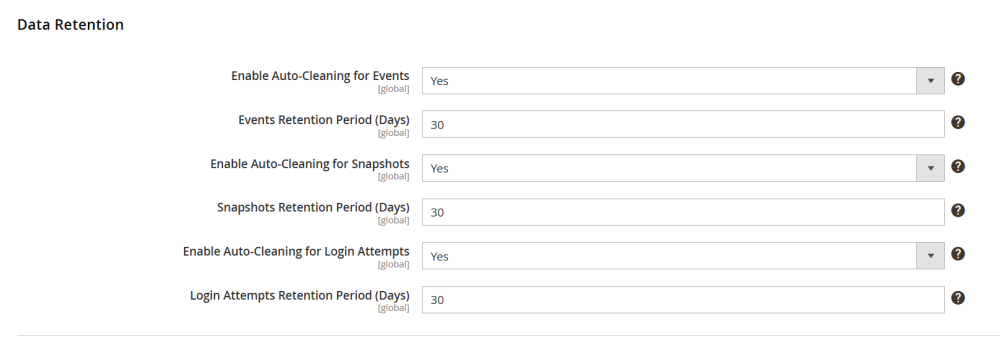
This section helps control database size by automatically removing outdated records:
-
Enable Auto-Cleaning for Events – set to Yes to enable nightly cron-based cleanup of old action log records;
-
Events Retention Period (Days) – define the number of days action log records are stored;
-
Enable Auto-Cleaning for Snapshots – set to Yes to enable the auto-clean of old before/after snapshots;
-
Snapshots Retention Period (Days) – define the number of days snapshots are stored;
-
Enable Auto-Cleaning for Login Attempts – set to Yes to enable the auto-clean of old login attempt records;
-
Login Attempts Retention Period (Days) – define the number of days login attempt records are stored.
| Practical recommendation: start with a retention period of 30–90 days and extend only if longer audit history is required. |
Email Notifications
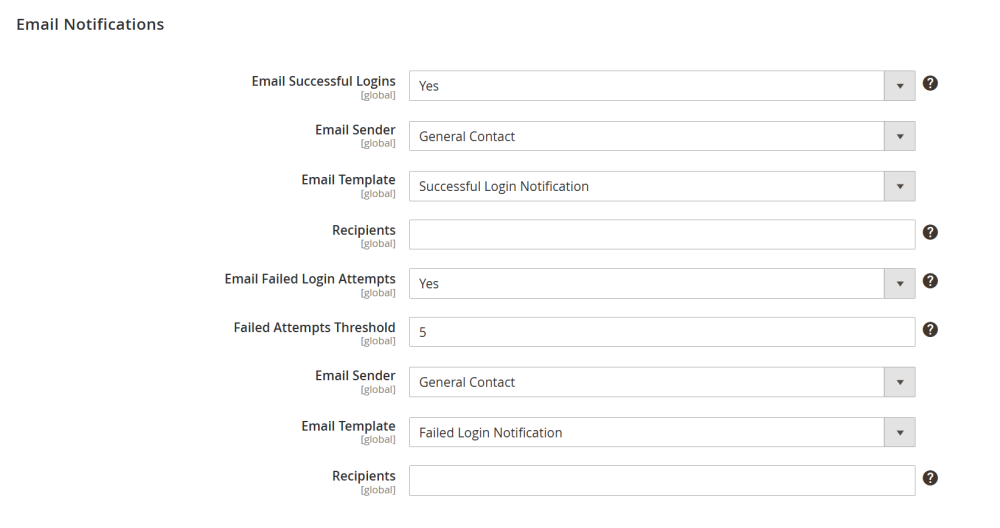
This section allows configuring notifications related to admin authentication activity.
-
Email Successful Logins – set to Yes to send email notifications when an admin user successfully logs in;
-
Email Failed Login Attempts – set to Yes to send email notifications when login attempts fail;
-
Failed Attempts Threshold – define the number of failed attempts required to trigger an email notification.
For each email type, the following settings can be configured separately:
-
Email Sender – select the sender identity;
-
Email Template – select the pre-build email template. The templated can be configured in Marketing > Communications > Email Templates,
-
Recipients – enter recipient email addresses, separated by commas.
|
Recommendations:
|
Working with Action Logs
All Actions Log
To monitor the main journal of all recorded actions, go to Stores > Action Log by Aheadworks > Events.
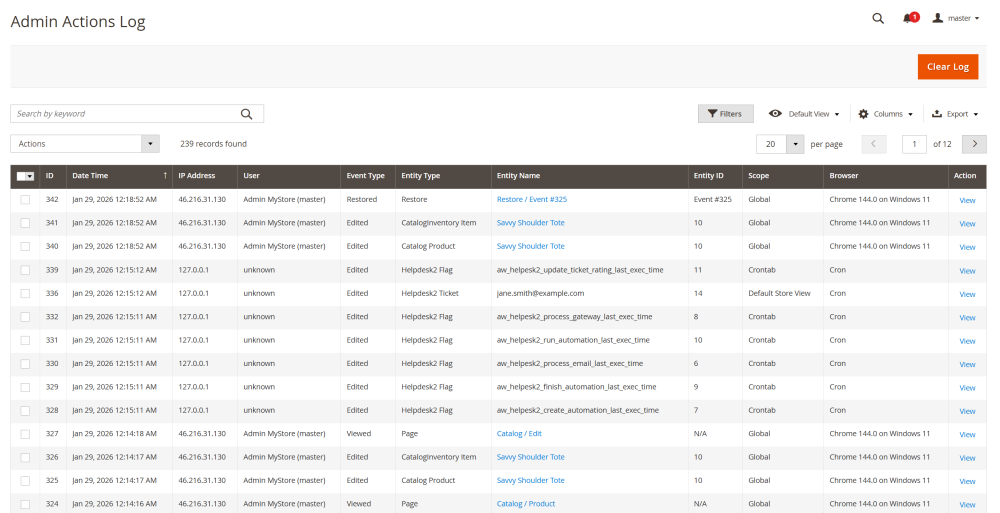
The Admin Actions Log page displays a table with all logged actions performed in the Magento admin panel, as well as system-related events.
The table supports filtering by user, event type, entity, date, and IP address, allowing you to quickly locate specific actions or investigate changes.
The table includes the following columns:
-
ID – unique identifier of the log record;
-
Date and time – date and time when the action occurred;
-
IP Address – IP address from which the action was performed;
-
User – admin user who performed the action (or unknown for system events)
-
Event type – type of action performed (e.g, Edited, Viewed, Restored)
-
Entity type – type of entity affected by the action;
-
Entity Name – name of the affected entity;
-
Entity ID – internal identifier of the affected entity;
-
Scope – scope in which the action was performed;
-
Browser – browser or source used to perform the action;
-
Action – View action that opens detailed information about the selected event
If available in your admin panel, you can use the Export option to download the currently filtered log records for further analysis or reporting.
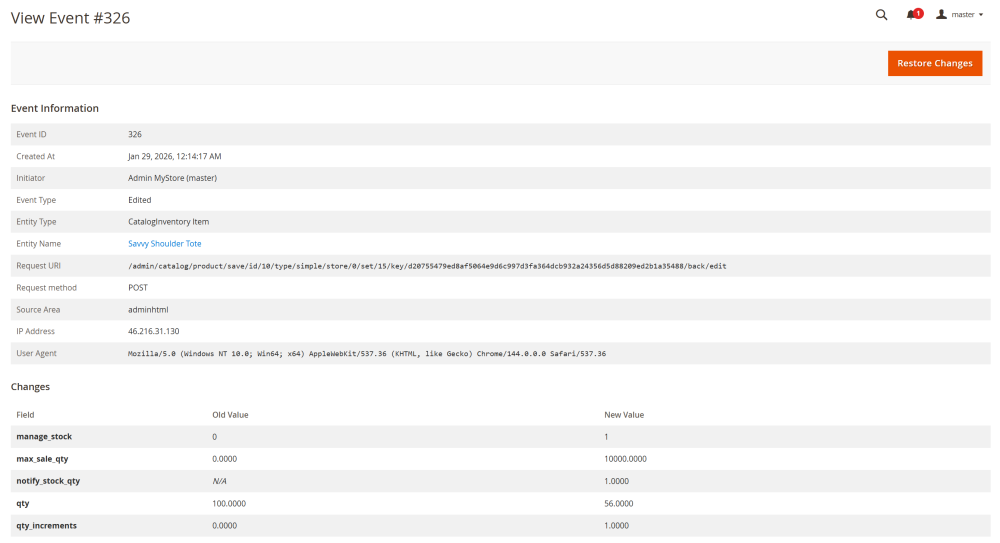
Clicking a record opens its detailed information. At the View Event page, the following Event Information is displayed:
-
Event ID;
-
Created At;
-
Initiator;
-
Event Type;
-
Entity Type & Name;
-
Request URL;
-
Request Method;
-
Source Area;
-
IP Address;
-
User Agent.
If the Event Type is Edited, an additional Changes section is displayed. This section shows the Old Values and the New Values applied during the change.
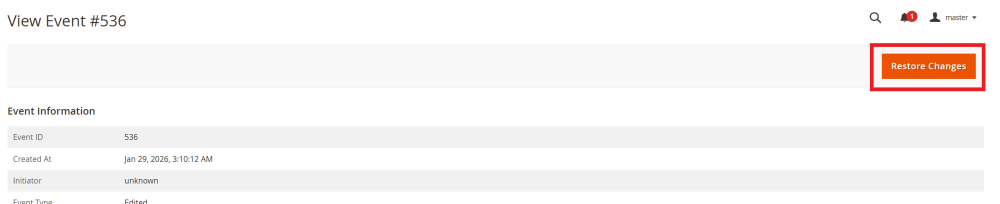
If the Event Type is Edited, you can also restore the changes from the View Event page by clicking the Restore Changes button.
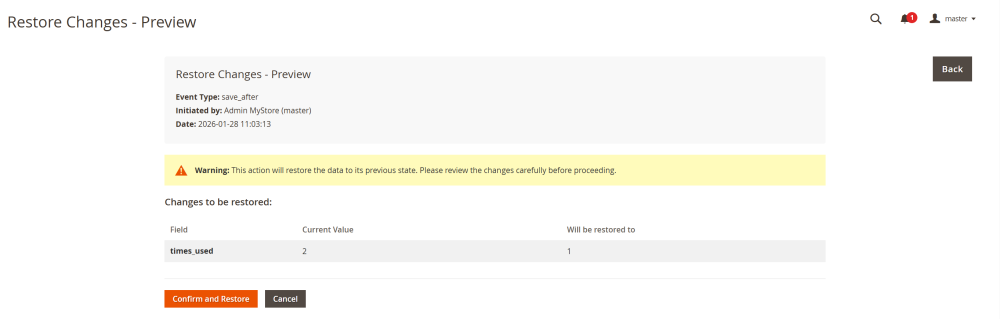
Restore Changes - Preview page opens. At this page review changes to be restored and click the Confirm and Restore button to proceed.
| Note: This action restores the data to its previous state. Review the changes carefully before proceeding, as this action cannot be undone. |
Practical usage of Admin Action Logs:
-
Investigate issues by filtering actions by user and time period
-
Review recent changes on a regular basis
-
Export filtered results for audit purposes
Authentication Log
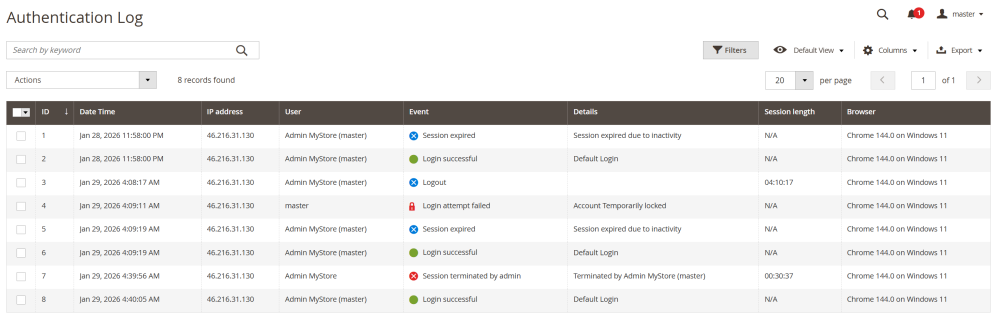
To monitor the history of logins and logouts activity, go to Stores > Action Log by Aheadworks > Authentication Log.
The Authentication Log page displays a table containing all admin login-related events, including successful logins, failed login attempts, logouts, and session expirations.
The table supports filtering, making it easy to review authentication activity and investigate suspicious behavior.
The table includes the following columns:
-
ID – unique identifier of the log record;
-
Date and time – date and time when the authentication event occurred;
-
IP Address – IP address from which the authentication action was performed;
-
User – admin user associated with the authentication event;
-
Event – type of authentication event (e.g., Login successful, Login attempt failed, Logout, Session expired, Session terminated by admin)
-
Details – additional information explaining the event;
-
Section Length – duration of the admin session, if applicable
-
Browser – browser or source used during the authentication process;
Practical usage:
-
Monitor repeated failed login attempts to detect potential security risks
-
Identify unusual login times or unfamiliar IP addresses that may indicate suspicious activity
Active Admin Sessions
To monitor all currently active admin users sessions, go to Stores > Action Log by Aheadworks > Active Sessions.
The Active Admin Sessions page displays a table with all active admin sessions.
Built-in filtering and search options make it easy to review session activity and quickly identify suspicious or outdated sessions.
The table includes the following columns:
-
User – the admin account currently logged in;
-
IP address – the IP address from which the session was initiated;
-
Browser – the browser and operating system used for the session;
-
Session Started – the date and time when the admin session began;
-
Last Activity – the time since the user’s most recent action;
-
Action – available action for managing the session.
Admins can terminate other users’ active sessions directly from this table. To end a session, click Terminate session in the Action column for the corresponding user.
| Note: You cannot terminate your own current admin session via the UI. |

Practical usage:
-
Terminate suspicious or inactive sessions to improve security.
-
End sessions after user offboarding, role changes, or permission updates
Common Administrative Scenarios
Reviewing Product or Order Changes
To identify changes made to products or orders:
-
Open All Actions Log
-
Apply filters by entity type and date range
-
Open the event details to review what was changed and by whom
Investigating Suspicious Login Activity
To analyze potential security issues related to admin access:
-
Open Authentication Log
-
Filter records by admin user and date
-
Review failed login attempts and unfamiliar IP addresses
-
If required, open Active Admin Sessions and terminate active sessions for other users
Performing Regular Audits
For routine monitoring and compliance purposes:
-
Review recent entries in All Actions Log and Authentication Log on a regular basis
-
Export log records in CSV format, if available, for internal review or security reporting