
User Manual - Order Attributes
- Installing the Magento 2 Order Attributes extension
- Set up cron
- Uninstalling the Magento 2 Order Attributes extension
- Extension Compatibility
- Introducing the Magento 2 Order Attributes Extension
- Usingthe Magento 2 Order Attributes Extension
Installing the Magento 2 Order Attributes extension
Command Line Installation
- Backup your web directory and store database
- Download the Magento 2 Order Attributes installation package
- Upload contents of the Magento 2 Order Attributes installation package to your store root directory
- In SSH console of your server navigate to your store root folder:
cd path_to_the_store_root_folder |
run the following command: :
php bin/magento module:enable Aheadworks_OrderAttributes |
then:
php bin/magento setup:upgrade |
after:
php bin/magento setup:static-content:deploy -f |
5. Flush store cache; log out from the backend and log in again
|
Make sure the installation is done from the FTP administrator account. Otherwise, set 775 permissions to the store root directory after the extension is deployed. |
Composer Installation
If you are installing an extension from Aheadworks for the first time, you need to add our composer repository to your Magento store:
1. Login to your ssh console and navigate to your store folder:
cd path_to_the_store_root_folder |
Run the following command:
composer config repositories.aheadworks composer https://dist.aheadworks.com/ |
After the command was executed successfully, you can use the composer to install the extension.
To install the extension:
2. Login to your ssh console and navigate to your store folder:
cd path_to_the_store_root_folder |
3. Run the following command to install the latest version of the extension:
composer require aheadworks/module-order-attributes |
if you need to install a specific version, run this command:
composer require aheadworks/module-order-attributes:<version> |
|
Specify the version of the extension in <version> |
When prompted, enter Public Key (Username) and Private Key (Password):

Both Public Key (Username) and Private Key (Password) can be found in My Projects and Licenses in your personal account on our site:
 |
To upgrade the extension:
To update or upgrade an extension:
Download the updated extension file. Take note of the module-name and version. Export the contents to your Magento root.
If a composer package exists for the extension, run one of the following.
Update per module name:
composer update aheadworks/module-order-attributes |
Updater per version:
composer require aheadworks/module-order-attribute:<version> |
Run the following commands to upgrade, deploy, and clean the cache.
php bin/magento setup:upgrade --keep-generated |
Set up cron
If you have already configured cron jobs for your Magento installation then you can skip this step. Read the following instructions on setting cron job for your Magento store: Magento user guide.
Generally, it would be enough to run in SSH console of your server:
crontab -e |
And insert the following line:
*/3 * * * * php -c <ini-file-path> <your Magento install dir>/bin/magento cron:run |
Remember to confirm the Save request when exiting the installation.
Uninstalling the Magento 2 Order Attributes extension
Since Magento introduced declarative Database you need to be very carefull when uninstalling or disabling the module.
|
NOTE: Please be very careful when uninstalling/disabling this module. This module uses a declarative DB scheme. Once the module is uninstalled the DB tables will be lost. |
Manual Removal
1. Disable the module by executing the following commands:
php bin/magento module:disable Aheadworks_OrderAttributes |
2. Remove the extension files from the following folder:
app/code/Aheadworks/OrderAttributes |
Automatic Removal (via Composer)
1. Disable the module by executing the following commands:
php bin/magento module:uninstall Aheadworks_OrderAttributes |
Extension Compatibility
| Module Version | Magento Version |
| As of version 1.0.0 | 2.4.6 - 2.4.8 |
The PHP version depends on your current Magento version. Please, refer to your Magento version release notes.
Introducing the Magento 2 Order Attributes extension
Extension Overview
The Magento 2 Order Attributes extension allows store admins to create and manage custom attributes for orders. These attributes can be collected during checkout and displayed across the storefront, customer account, admin panel, emails, and PDF documents.
It helps merchants gather additional order-related information without modifying core Magento functionality.
Key Features
-
Custom order attributes creation
-
Multiple input types support (text, select, date, file upload, etc.)
-
Flexible display control across checkout, admin, emails, and PDFs
-
Store view and customer group visibility management
-
Editable attribute values on the backend (optional)
Using the Magento 2 Order Attributes extension
Extension Configuration
To enable the extension, go to Stores > Configuration > AHEADWORKS EXTENSIONS > Order Attributes
General Settings
In the General Settings section set Is Active option to Yes to enable the extension.

Creating Order Attributes
To create a new order attribute, go to Sales > Order Attributes > Manage Attributes and click the Add New Attribute button.
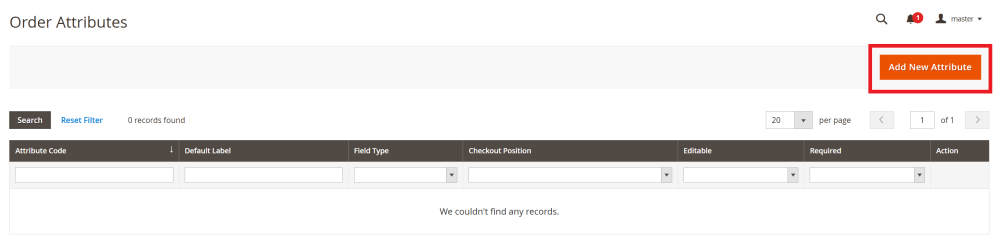
The New Order Attribute page allows you to create and configure a custom order attribute that can be used during checkout and managed from the admin panel.
Attribute configuration is divided into tabs. Each tab controls a specific aspect of attribute behavior and display.
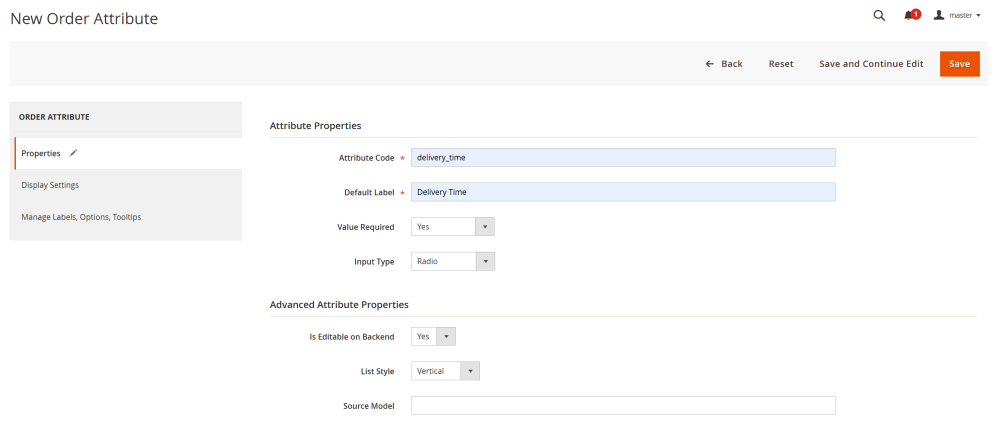
Properties Tab
In the Attribute Properties section, configure the core settings of the order attribute.
- Attribute Code – enter a unique system identifier for the attribute.
| Note: The code must contain only lowercase letters a–z and numbers. Use the underscore _ symbol for separation (e.g. delivery_time) |
-
Default Label – enter the main label of the attribute, that is used on the backend.
-
Values Required – define whether the attribute must be filled in:
-
No – the field is optional;
-
Yes – the field is mandatory;
-
Frontend Only – the field is required only on the storefront.
-
-
Input Type – select the type of input field used for the attribute. Available types include:
-
Text:
-
Text Field – simple single-line text input.
-
Textarea – input field for longer text or messages.
-
-
Select:
-
Drop Down – select box that allows choosing one option from a list.
-
Multi Select – allows selecting one or more options from a list.
-
Yes/No – provides the selection between two options: Yes or No.
-
-
Date:
-
Date – input field for selecting a date.
-
Time – input field for selecting time.
-
Date & Time – input field for full date and time selection.
-
-
Checkbox:
-
Checkbox – allows selecting one or more options from a list. Can also be used for agreements (e.g., “I agree” checkbox).
-
-
Radio:
-
Radio – allows selecting only one option from a predefined list.
-
-
Files:
-
Files Upload – allows uploading files of allowed formats.
-
-
The Advanced Attribute Properties section contains additional settings. Available options depend on the selected Input Type.
-
Is Editable on Backend – if enabled, the attribute value can be modified after checkout from the admin (Not available for Text Upload input type)
-
Default Value – define a default value for the attribute. Available for:
-
Text Field
-
Textarea
-
Yes/No select
-
Input Validation – select a validation rule for the field to control allowed input values (e.g., numeric or decimal formats). Validation Types:
-
None – allows any characters;
-
Decimal Numbers – allows decimal numeric values;
-
Integer Number – allows whole numbers only;
-
Email – validates email address format;
-
URL – validates web address format;
-
Letters – allows alphabetical characters only (a-z, A-Z);
-
Letter (a-z, A-Z) or Numbers (0-9) – allows letters (a-z, A-Z) and digits (0-9) only; no spaces or special characters are allowed.
Available for:
-
-
Text Field
-
Textarea
-
-
Input Size – define the required size of the input field. Available for:
-
Text Field
-
Textarea
-
Multiselect
-
Source Model – specify a source model class if the attribute requires a dynamic options list. For example, this can be used to load a product list from a specific category. Available for:
-
Drop Down
-
Multi Select
-
Checkbox
-
Radio
-
List Style – define how options are displayed:
-
Vertical – options are displayed in a column (default);
-
Horizontal – options are displayed in a single line.
This setting is useful for compact layouts. Available for:
-
-
Radio
-
Checkbox
-
-
Available File Formats – define allowed file formats to be uploaded. Available only for Text Upload input type.
-
Max File Size in KB – define allowed file size. Available only for Text Upload input type.
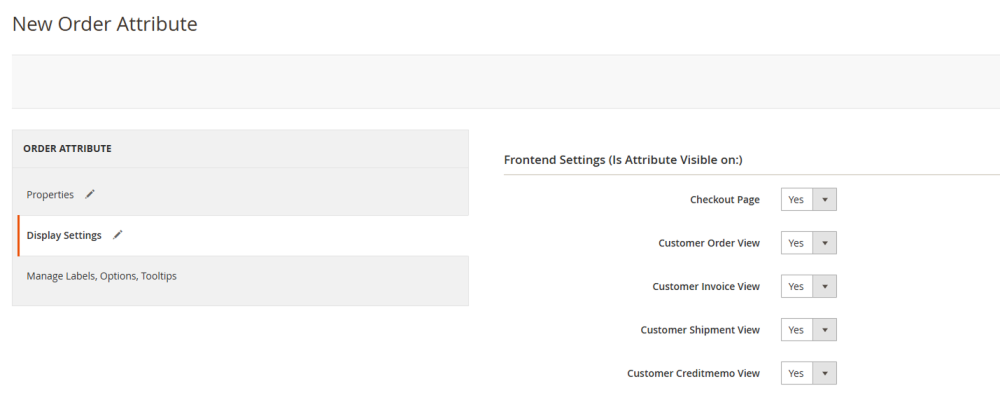
Display Settings
The Display Settings tab controls where and how the custom order attribute is displayed across the storefront, customer account pages, backend admin panel, emails, and PDF documents.
In the Frontend Settings section define where customers can see attribute values on the storefront:
-
Checkout Page – choose Yes to display the custom attribute during checkout. If enabled, you can define the checkout position in Display Settings > Advanced Display Settings > Position on Checkout.
-
Customer Order View, Customer Invoice View, Customer Shipment View, Customer Credit Memo View – choose Yes for the required option for the attribute to be displayed on that page.
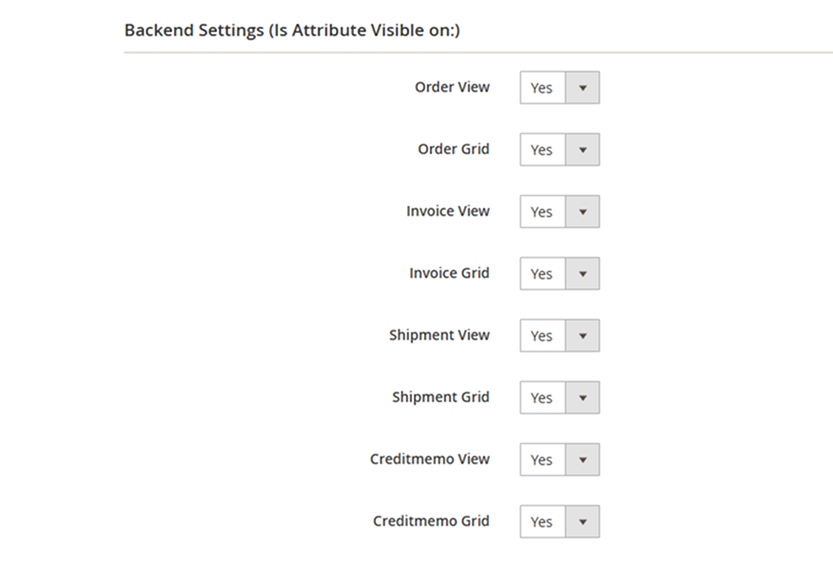
In the Backend Settings define where the attribute value is visible in the admin panel:
-
Order View, Invoice View, Shipment View, Credit Memo View – choose Yes for the required option for the custom attribute to be displayed on that preview page.
-
Order Grid, Invoice Grid, Shipment Grid, Credit Memo Grid – choose Yes for the required option for the custom attribute to be displayed on that listing grid.
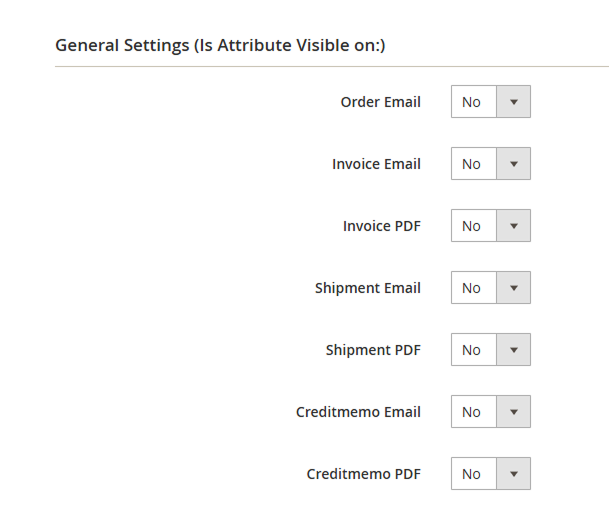
In the General Settings control the visibility of the attribute in emails and PDF documents
-
Order Email, Invoice Email, Shipment Email, Credit Memo Email – choose Yes for the required option for the custom attribute to be displayed in that email.
-
Invoice PDF, Shipment PDF, Credit Memo PDF – choose Yes for the required option for the custom attribute to be displayed in that PDF.
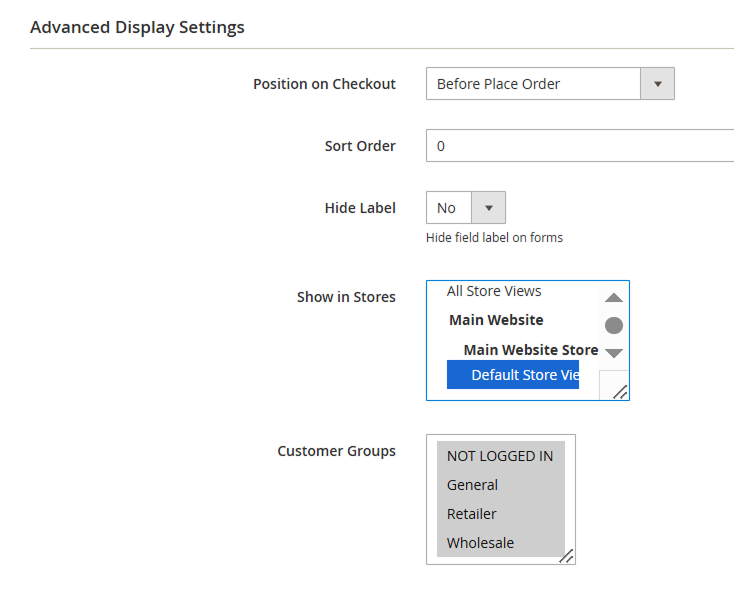
In the Advanced Display Settings fine-tune attribute behavior, visibility, and placement.
-
Sort Order – define the display order of the attribute. Attributes with lower numbers are displayed first.
-
Hide Label – choose whether to show or hide the field label on forms.
-
Show in Stores – limit attribute visibility to selected store views.
-
Customer groups – control which customer groups can see the attribute.
-
Position on checkout – defines where the attribute appears during checkout. This field is available only if Frontend Setting > Checkout Page is set to Yes.
The following checkout positions are available:
-
Billing Address
-
Shipping Address
-
Before Shipping Method
-
After Shipping Method
-
Before Payment Method
-
After Payment Method
-
Before Place Order Button
-
Order Summary Before Items
-
Order Summary After Items
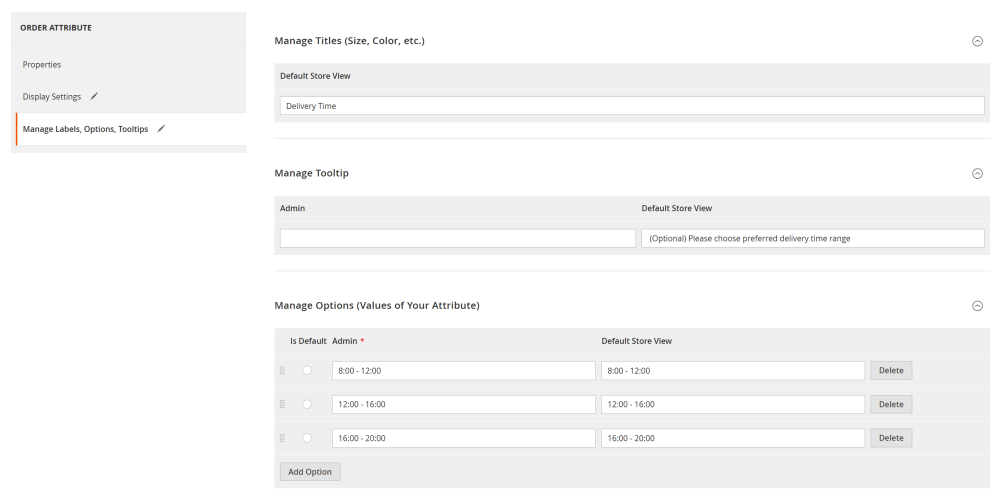
Manage Labels, Options, Tooltips
The Manage Labels, Options, Tooltips section is used to define how the order attribute is titled, explained, and used with selectable values.
Manage Titles (Size, Color, etc.)
In this section, you can localize or customize the attribute title per store view if needed.
Default Store View defines the main label of the attribute as it appears on the storefront and in the admin panel.
Manage Tooltip
This section allows you to add additional instructions or clarify what information the customer should select or enter.
-
Admin – tooltip text shown in the Magento admin panel.
-
Default Store View – tooltip text shown to customers on the storefront.
Manage Options (Values of Your Attribute)
This section is used to define selectable values for the attribute. It is available for input types that rely on predefined options.
Each option includes:
-
Is Default – select one option as the default value.
-
Admin – text displayed in the admin panel.
-
Default Store View – text displayed on the storefront.
-
Delete – removes the option.
Options can be reordered using drag-and-drop controls on the left. Use the Add Option button to create additional values.
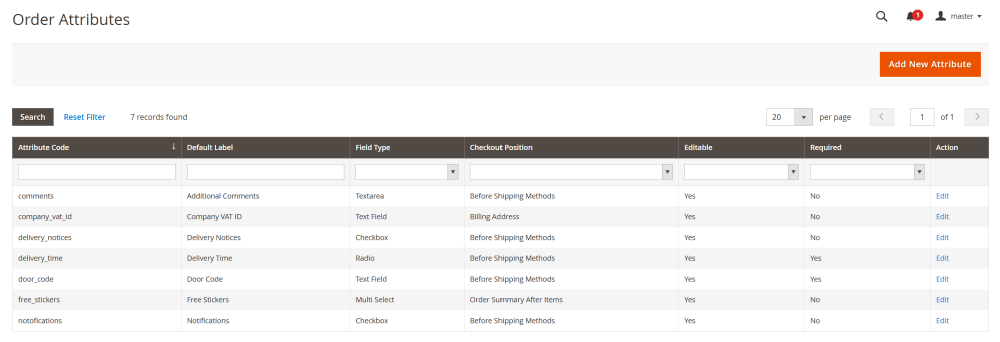
Managing Order Attributes
To manage existing order attributes go to Sales > Order Attributes > Manage Attributes
The Order Attributes page displays a table of all custom order attributes created in the system. From this page, admins can review existing attributes, quickly check their configuration, and edit.
The table provides an overview of all configured order attributes with the following columns:
-
Attribute Code – the unique system identifier of the attribute.
-
Default Label – the main label of the attribute used in the admin panel and storefront.
-
Field Type – the input type assigned to the attribute (e.g., Text Field, Textarea, Checkbox, Radio, Multi Select).
-
Checkout Position – indicates where the attribute is displayed during checkout, if applicable (e.g. Billing Address, Before Shipping Methods, Order Summary After Items, etc).
-
Editable – shows whether the attribute value can be edited in the admin panel after checkout.
-
Required – indicates whether the attribute is mandatory to be field.
-
Action – provides an Edit link to modify the attribute configuration.
To edit existing Order Attributes, click the Edit text link next to the required attribute.
Order Attributes Display
Order Attributes Display on Backend
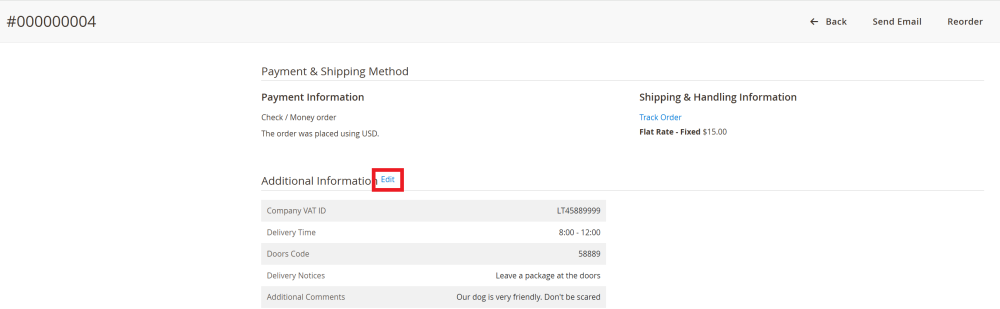
Order attributes are displayed according to Display Settings. If not configured otherwise, they appear in the Additional Info section of order, invoice, shipment, and credit memo preview pages
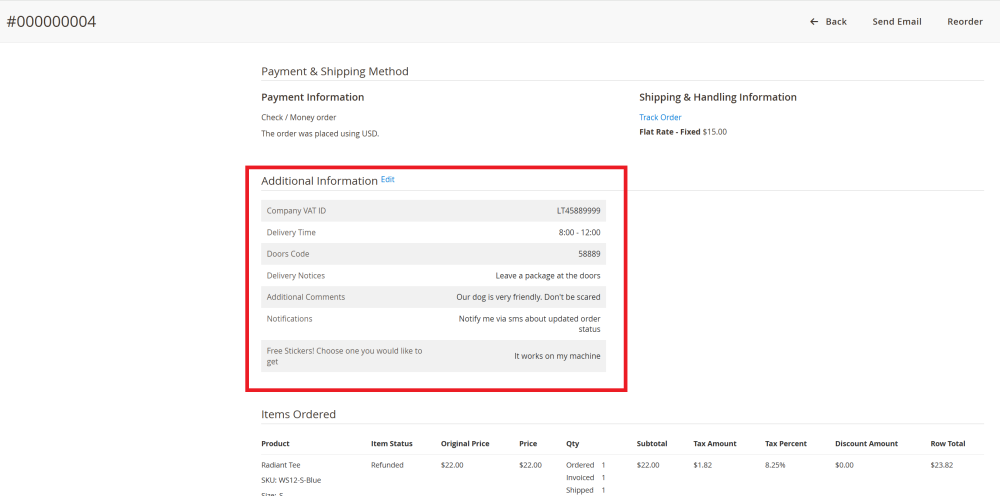
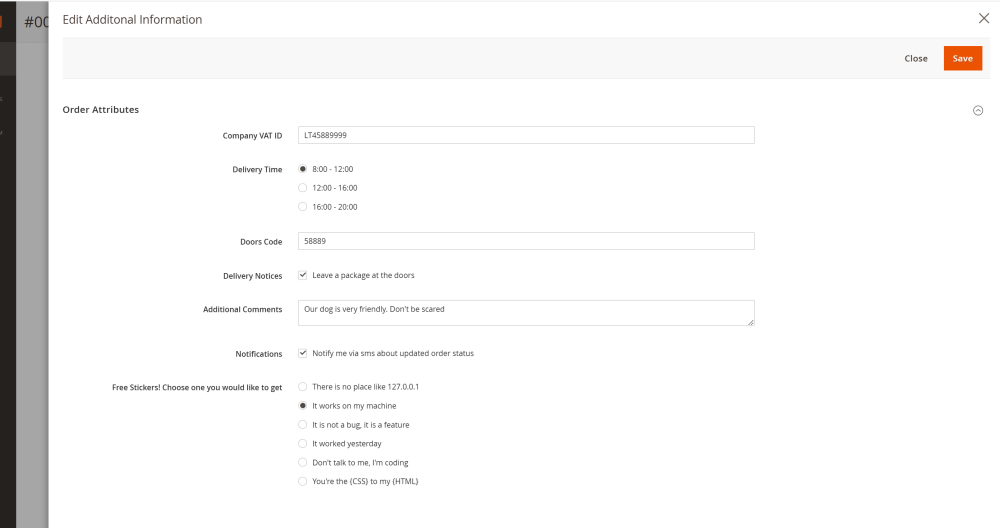
Admin can edit order attributes for the specific order directly from the preview page (if allowed in Advanced Attribute Properties settings) by clicking on the Edit text link.
The custom Order Attributes can also be displayed in order, invoice, shipment, and credit memo centralized tables (if configured in Display Settings)
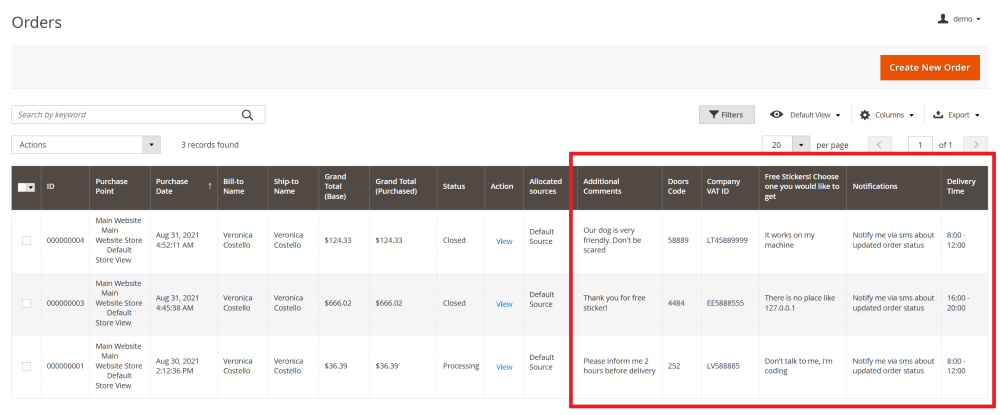
| Note: if configured in Display Settings, the order attributes can also be displayed in Order, Invoice, Shipment, Credit memo emails and PDFs |