
User Manual - Store Locator
- Installing Store Locator
- Uninstalling Store Locator
- Compatibility
- Adding the Store Location
- Adjusting Store Locator Settings
- General Settings
- Importing Locations via CSV
Magento 2 Store Locator is a straightforward solution enabling purchasers to find nearby physical locations of a web store by concrete address or current location distance. From the frontend area, store admins can quickly create new locations of their outlets and add the appropriate markers to Google Maps on individual store views. Additionally, they can set the map zoom, latitude, and longitude values of each created location.
Installing Store Locator
Command Line Installation
- Backup your web directory and store database
- Download the Store Locator installation package
- Upload contents of the Store Locator installation package to your store root directory
- In SSH console of your server navigate to your store root folder:
cd path_to_the_store_root_folder |
run the following command:
php bin/magento module:enable Aheadworks_StoreLocator |
then:
php bin/magento setup:upgrade |
after:
php bin/magento setup:static-content:deploy -f |
5. Flush store cache; log out from the backend and log in again
|
Make sure the installation is done from the FTP administrator account. Otherwise, set 775 permissions to the store root directory after the extension is deployed. |
Composer Installation
If you are installing an extension from Aheadworks for the first time, you need to add our composer repository to your Magento store:
1. Login to your ssh console and navigate to your store folder:
cd path_to_the_store_root_folder |
Run the following command:
composer config repositories.aheadworks composerhttps://dist.aheadworks.com/ |
On successful execution of the command you will be able to use the composer to install the extensions.
To install the extension:
2. Login to your ssh console and navigate to your store folder:
cd path_to_the_store_root_folder |
3. Run the following command to install the latest version of the extension:
composer require aheadworks/module-store-locator |
if you need to install a specific version, run this command:
composer require aheadworks/module-store-locator:<version> |
|
Specify the desirable extension version in <version>. |
When prompted, enter Public Key (Username) and Private Key (Password):
.png?version=1&modificationDate=1613637668044&cacheVersion=1&api=v2&width=450)
Both Public Key (Username) and Private Key (Password) can be found in My Projects and Licenses in your personal account on our site:
|
|

4. Enable the extension:
php -f bin/magento module:enable <Module_Name> |
|
Specify the version of the extension in <version> |
Next, register the extension:
bin/magento setup:upgrade |
Recompile your Magento store if you are in the Production mode:
bin/magento setup:di:compile |
To verify that the extension is enabled, run this command:
bin/magento module:status |
Clean store cache, by running the following command:
bin/magento cache:clean |
Log out and Log in the backend again.
To upgrade the extension:
5. To update or upgrade an extension:
Download the updated extension file. Take note of the module-name and version. Export the contents to your Magento root.
If a composer package exists for the extension, run one of the following.
Update per module name:
composer update aheadworks/module-store-locator |
Updater per version:
composer require aheadworks/module-store-locator:<version> |
Run the following commands to upgrade, deploy, and clean the cache.
php bin/magento setup:upgrade --keep-generated |
Uninstalling Store Locator
Since Magento introduced declarative Database you need to be very carefull when uninstalling or disabling the module.
|
NOTE: Please be very careful when uninstalling/disabling this module. This module uses a declarative DB scheme. Once the module is uninstalled the DB tables will be lost. |
Manual Removal
1) Run command:
bin/magento module:uninstall --non-composer Aheadworks_StoreLocator
|
It will remove hide price attributes from the system (e.g. eav_entity_type table).
2) Disable extension:
bin/magento module:disable Aheadworks_StoreLocator
|
3) Run setup upgrade:
bin/magento setup:upgrade
|
It will remove module related tables from the system (hp_rule_entity, hp_rule_product, etc).
4) Remove module files manually:
app/code/Aheadworks/StoreLocator
|
Automatic Removal (via Composer)
1) Disable extension:
bin/magento module:disable Aheadworks_StoreLocator
|
2) Run setup upgrade:
bin/magento setup:upgrade
|
3)
php bin/magento module:uninstall Aheadworks_StoreLocator
|
Compatibility
|
Module Version |
Magento Version |
|
1.2.0 |
2.4.4 - 2.4.6 |
|
1.3.0 |
2.4.6 - 2.4.8 |
The PHP version depends on your current Magento version. Please, refer to your Magento version release notes.
Adding the Store Location
Store Locator extension comes ready for work right after the installation.
The first thing you want to do is to add the location of your store to the map. To do this, navigate to Content → Store Locator by aheadworks:
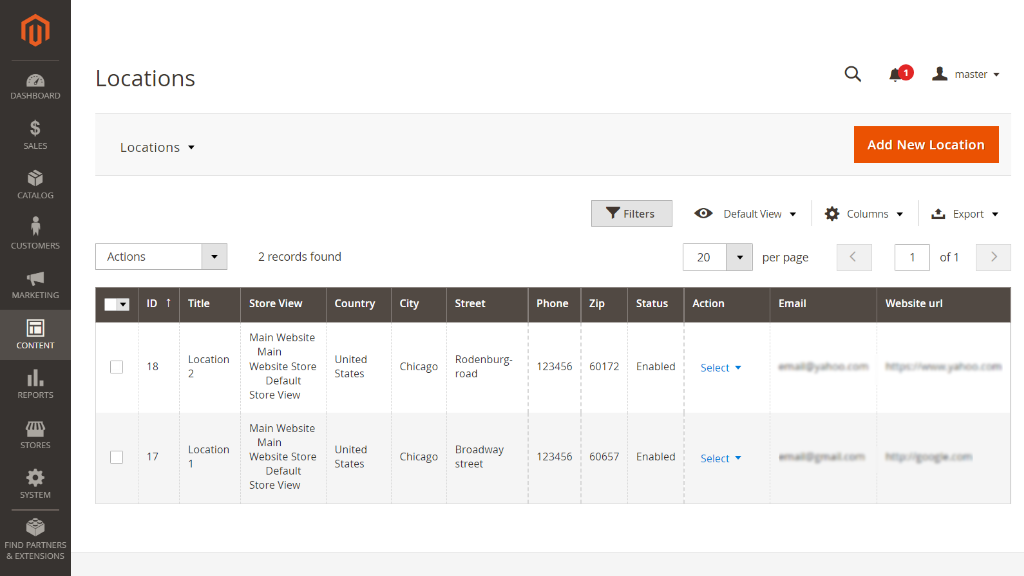
This screen is a management center of all your store locations. Whether you want to add a new location, edit a previously created one, or find a particular location by any attribute, - this is the place you are looking for.
To add new store location click the Add New Location button
at the top right-hand corner of the screen.
- In the General Information section of the New Location screen you are suggested to specify the store location related values such as logo, country, street, phone, email and w;
- At the Google Maps Settings section of the New Location screen you can either manually specify the latitude and longitude of the store or click on the Find Store on Map button to let Google Maps do it for you;
- Once everything is done - click on the Save Location button.
Click to see how the attributes will affect the store look...
That's it, you have just added your first store location.
|
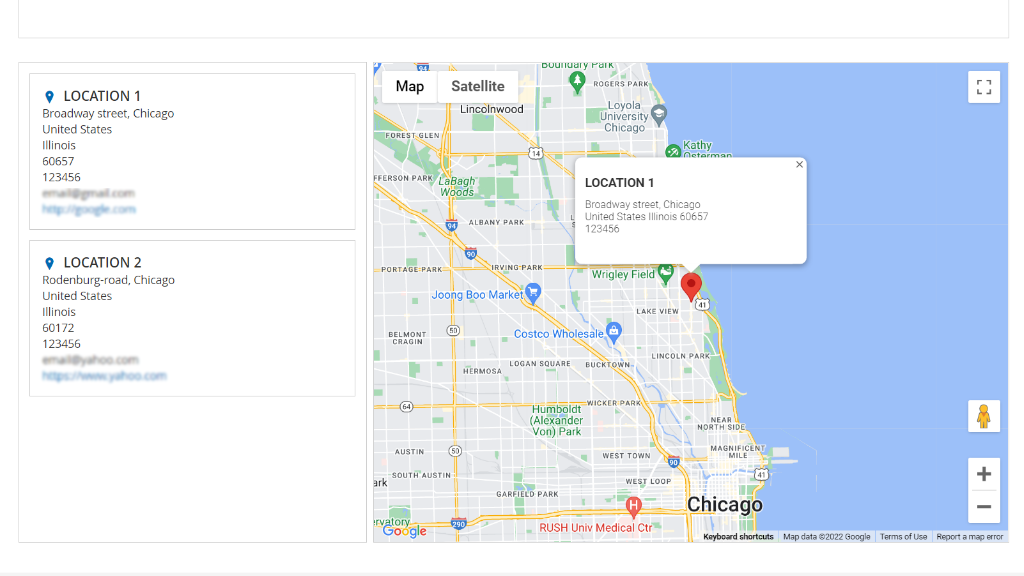
- As of version 1.2.0 it becomes possible to have a separate page for each location. Clicking on a marker opens a page with its corresponding location. - SEO optimization. You can also make your reviews appear in Google snippets using the schema.org markup. |
Adjusting Store Locator Settings
You have added the location of a store and definitely want to look through it. It is now high time to proceed to the Store Locator settings screen to learn how to do it.
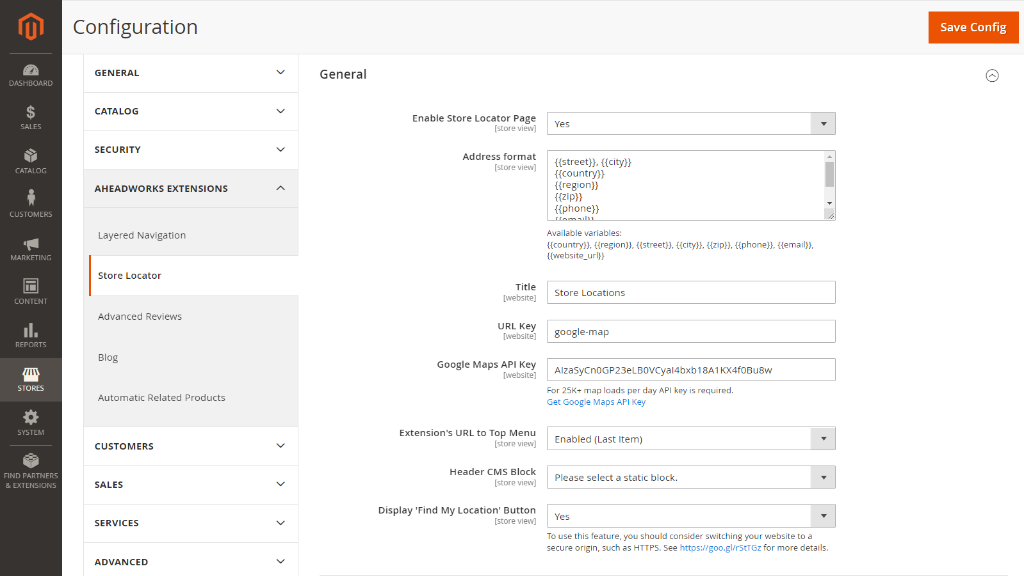
Stores → Configuration → aheadworks extensions → Store Locator
General Settings
The extension is enabled by default after the installation, however, the Extension's URL to Top Menu option that brings the Store Locator section to the frontend navigation menu is disabled.
Let's go through the settings available and what they do:
- Enable Store Locator Page - allows enabling/disabling the extension and the Store Locator frontend page in particular;
- Address format - specify any order in which the address fields appear;
- Title - defines the Store Locator page title;
- URL Key - defines the links the Store Locator page will be accessible by;
- Google Maps API Key - this API key is required to use the Google Maps API, even within Google's free usage limits. This setting is most relevant for stores with high traffic (25K+ map loads per day), but all stores must enter a valid API key to enable map features;
- Extension's URL to Top Menu - allows adding the Store Locator page link to the top category menu at the frontend;
- Header CMS Block - allows displaying any CMS block at the Store Locator page;
|
Back to the store location, you have added. For testing purposes, you can leave Extension's URL to Top Menu option disabled and access the Store Locator page directly by the URL Key specified. Say you need to add several store locations and want to have a look at them before letting your customers access the page. In this case, you can add the store locator URL Key ('store-locations' as in the example above) to your store URL:
and thus access the Store Locator page without revealing the link before your customers. |
Once you have applied all the settings changes and decided on where at the Top Menu you want the Extension's URL displayed you may want to proceed to Search and SEO settings:
Stores → Configuration → aheadWorks extensions → Store Locator
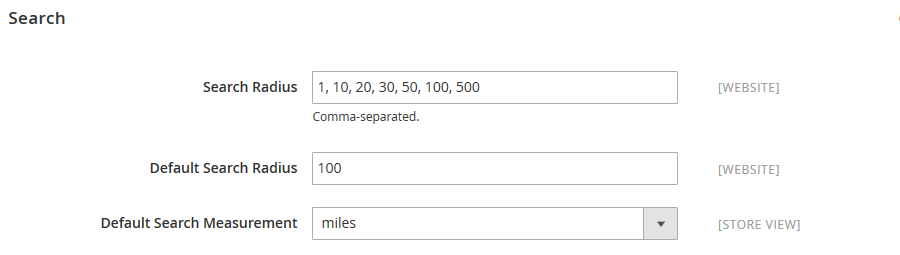
Search and SEO settings
Search settings let you enhance customer's search experience:
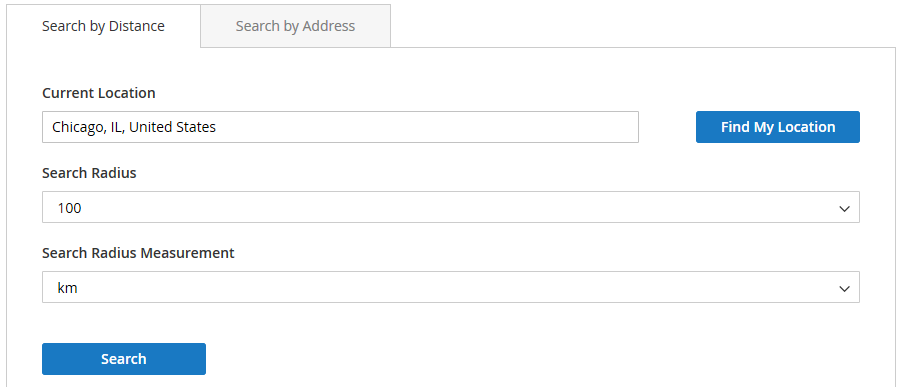
- Search Radius - allows defining a set of search radii available for customers;
- Default Search Radius - defines the search radius set by default at the Store Locator page;
- Default Search Measurement - miles/kilometers.
|
Click to see the search options
Store Locator offers quick navigation.
Once the Current Location is set customers are suggested to select a Search Radius and Search Radius Measurement from the appropriate boxes and then click on the Search button. That's it. The Store Locator will display all the stores available for customers nearby. |
SEO settings let you type in the Meta Keywords and Meta Description of the Store Locator page.
Once you are done with Search and SEO settings click on the Save Config button.
Congratulations! You have successfully set up and configured Store Location extension. Now you may want to add more store locations.
Importing Locations via CSV
In case if you want to add multiple store locations at once, you can take advantage of the provided import functionality. This functionality is integrated into the native Magento Data Import section located at System → Data Transfer → Import.
The Entity Type section contains the Aheadworks Store Locator - Locations option, which, if selected, enables an import configuration form with two configuration blocks, Import Behavior and File to Import.
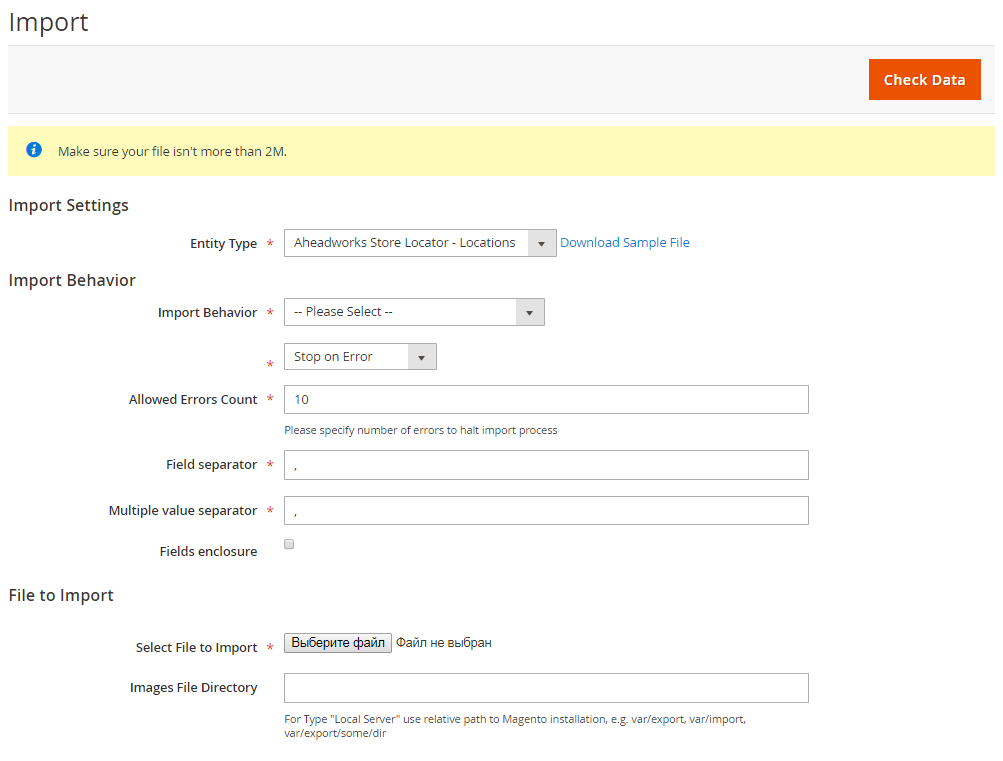
System → Data Transfer → Import → Aheadworks Store Locator - Locations
Import Behavior
The Import Behavior set contains the following options:
- Import Behavior. The box contains two options: Add Locations and Delete Locations and Add Locations. If the first option is selected, the functionality adds new locations to existing ones. If the second option is chosen, the module will replace previous locations with the new ones;
- Stop on Error / Skip Error Entries. You can choose either to stop the import process each time an error is detected or skip errors and continue importing;
- Allowed Errors Count. Defines the number of errors to cease the import process;
- Field Separator. The symbol that separates fields;
- Multiple Value Separator. The symbol that separates multiple values;
- Fields Enclosure. Tick the button in case if you upload files containing spreadsheets.
File to Import
The File to Import configuration section contains the following options:
- Select File to Import. The option allows you to select a CSV file to be imported.
|
Please make sure that the file doesn't exceed the limit of 2 Mb. |
- Images File Directory. Using this option you can set a path to images in the imported file. For example, if the images are stored in the store_root/pub/media/import/aw folder, the path is going to be aw/image.png.
![]()
Already used our product?
We would appreciate your feedback. Please, leave a review.