
User Manual - Countdown Timer
- Installing Magento 2 Countdown Timer
- Set up cron
- Uninstalling Countdown Timer
- Compatibility
- Introducing Countdown Timer for Magento 2
- Getting Around
- Countdown Settings
- Frontend View
Magento 2 Countdown Timer allows conducting customer behavior based on time limitations. Using the sense of urgency as a spurring mechanism helps to push customers to purchase-making decisions.
Installing Magento 2 Countdown Timer
Command Line Installation
- Backup your web directory and store database
- Download the Countdown Timer installation package
- Upload the contents of the Countdown Timer installation package to your store root directory
- In the SSH console of your server, navigate to your store root folder:
cd path_to_the_store_root_folder |
run the following command:
php bin/magento module:enable Aheadworks_Countdown |
then:
php bin/magento setup:upgrade |
after:
php bin/magento setup:static-content:deploy -f |
5. Flush the store cache; log out from the backend and log in again
|
Make sure the installation is done from the FTP administrator account. Otherwise, set 775 permissions to the store root directory after the extension is deployed. |
Composer Installation
- If you are installing an extension from Aheadworks for the first time, you need to add our composer repository to your Magento store:
Login to your ssh console and navigate to your store folder:
cd path_to_the_store_root_folder |
Run the following command:
composer config repositories.aheadworks composer https://dist.aheadworks.com/ |
On successful execution of the command you will be able to use the composer to install the extensions.
To install the actual product:
2. Login to your ssh console and navigate to your store folder:
cd path_to_the_store_root_folder |
3. Run the following command to install the latest version of the extension:
composer require aheadworks/module-countdown |
if you need to install a specific version, run this command:
composer require aheadworks/module-countdown:<version> |
|
Specify the version of the extension in <version> |
When prompted, enter Public Key (Username) and Private Key (Password):
.png?version=1&modificationDate=1613404488314&cacheVersion=1&api=v2&width=450)
Both Public Key (Username) and Private Key (Password) can be found in My Projects and Licenses in your personal account on our site:
 |
4. Enable the extension:
php -f bin/magento module:enable <Module_Name> |
|
Add the product name in <Module_Name> |
Next, register the extension:
bin/magento setup:upgrade |
Recompile your Magento store if you are in the Production mode:
bin/magento setup:di:compile |
To verify that the extension is enabled, run this command:
bin/magento module:status |
Clean store cache, by running the following command:
bin/magento cache:clean |
Log out and Log in the backend again.
To upgrade the extension:
5. To update or upgrade an extension:
Download the updated extension file. Take note of the module-name and version. Export the contents to your Magento root.
If a composer package exists for the extension, run one of the following.
Update per module name:
composer update aheadworks/module-countdown |
Updater per version:
composer require aheadworks/module-countdown:<version> |
Run the following commands to upgrade, deploy, and clean the cache.
php bin/magento setup:upgrade --keep-generated |
Set up cron
If you have already configured cron jobs for your Magento installation, then you can skip this step. Read the following instructions on setting cron job for your Magento store: Magento user guide.
Generally it would be enough to run in the SSH console of your server:
crontab -e |
And insert the following line:
*/3 * * * * php -c <ini-file-path> <your Magento install dir>/bin/magento cron:run |
Remember to confirm the Save Request on exit.
Uninstalling Countdown Timer
Since Magento introduced declarative Database you need to be very carefull when uninstalling or disabling the module.
|
NOTE: Please be very careful when uninstalling/disabling this module. This module uses a declarative DB scheme. Once the module is uninstalled the DB tables will be lost. |
Manual Removal
1) Run command:
bin/magento module:uninstall --non-composer Aheadworks_Countdown
|
It will remove hide price attributes from the system (e.g. eav_entity_type table).
2) Disable extension:
bin/magento module:disable Aheadworks_Countdown
|
3) Run setup upgrade:
bin/magento setup:upgrade
|
It will remove module related tables from the system (hp_rule_entity, hp_rule_product, etc).
4) Remove module files manually:
app/code/Aheadworks/Countdown
|
Automatic Removal (via Composer)
1) Disable extension:
bin/magento module:disable Aheadworks_Countdown
|
2) Run setup upgrade:
bin/magento setup:upgrade
|
3)
php bin/magento module:uninstall Aheadworks_Countdown
|
Compatibility
|
Module Version |
Magento Version |
|
1.0.2 and earlier versions |
2.3.Х - 2.3.6 2.4.0 - 2.4.3 |
|
As of version 1.0.3 |
2.4.0 - 2.4.5 |
|
As of version 1.0.4 |
2.4.4 - 2.4.6 |
|
As of version 1.0.6 |
2.4.5 - 2.4.7 |
|
As of version 1.0.7 |
2.4.6 - 2.4.8 |
The PHP version depends on your current Magento version. Please, refer to your Magento version release notes.
Introducing Countdown Timer for Magento 2
The Countdown extension for Magento 2 adds a countdown functionality to your store and provides:
- Dynamic timer with days, hours, minutes and seconds displayed;
- One-time timer or recurring countdowns based on days, weeks, months, or years;
- Ability to schedule promos for discounts, special events, or time-related services;
- Product and category page linkage to a countdown;
- URL insert to bind a timer to a specific page in a store
- Rich design options for a countdown (including icons, texts, and a field for custom CSS)
Getting Around
Rule Grid
All the countdowns you make are stored in one grid that can be found on the following path: Content > Countdown by Aheadworks > Countdown Rules.
Rules can be treated individually or massively. Actions imply rules can be enabled, disabled, edited, or deleted.
Thanks to the in-line grid functionality, general settings for each rule can be changed right on the page upon a double click on the corresponding entry.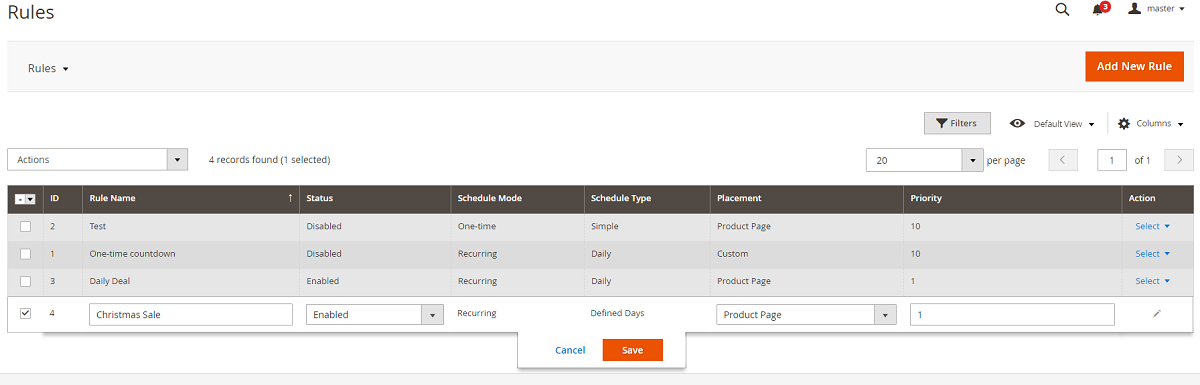
Countdown Settings
Creating a new countdown rule is possible upon pressing the 'Add New Rule' button. By doing so you open the new rule configuration page.
General Settings
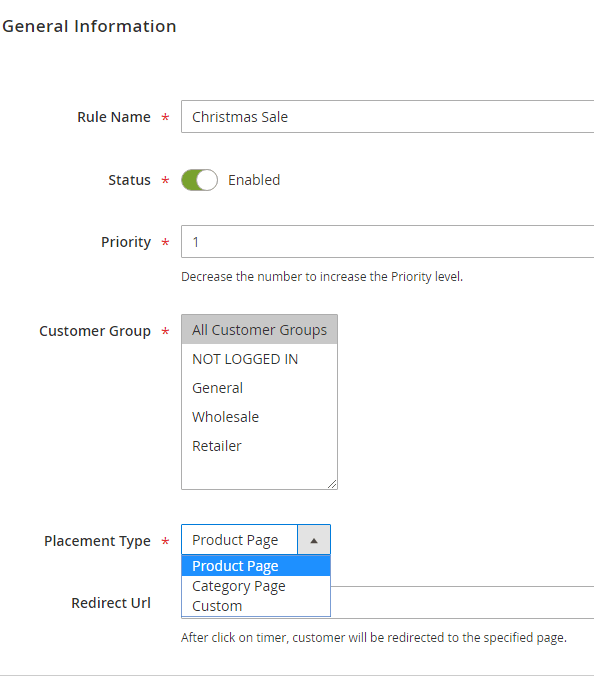
To run a rule in the correct way there are some obligatory fields to fill in.
- Specify the rule name to know what the rule is about.
- Enable the rule or leave it disabled.
- Set priority (the rules with higher priority are applied first).
- Choose the customer groups that are able to see a countdown and interact with it.
- Decide the countdown placement:
- the 'Product Page' option stands for placement on a product page;
- 'Category Cage' is for countdown display on a category page;
- Custom placement means placement via a native Magento widget.
- The 'Redirect URL' field allows inserting a specific URL where customers will be redirected upon a click on a countdown.
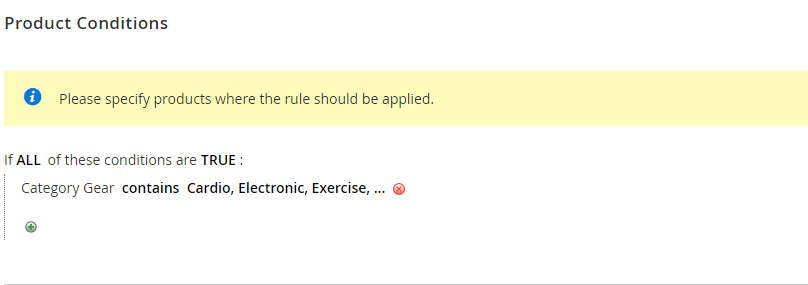
Product Conditions
Product conditions are used to assign the countdown application and specify where the countdown will be displayed.
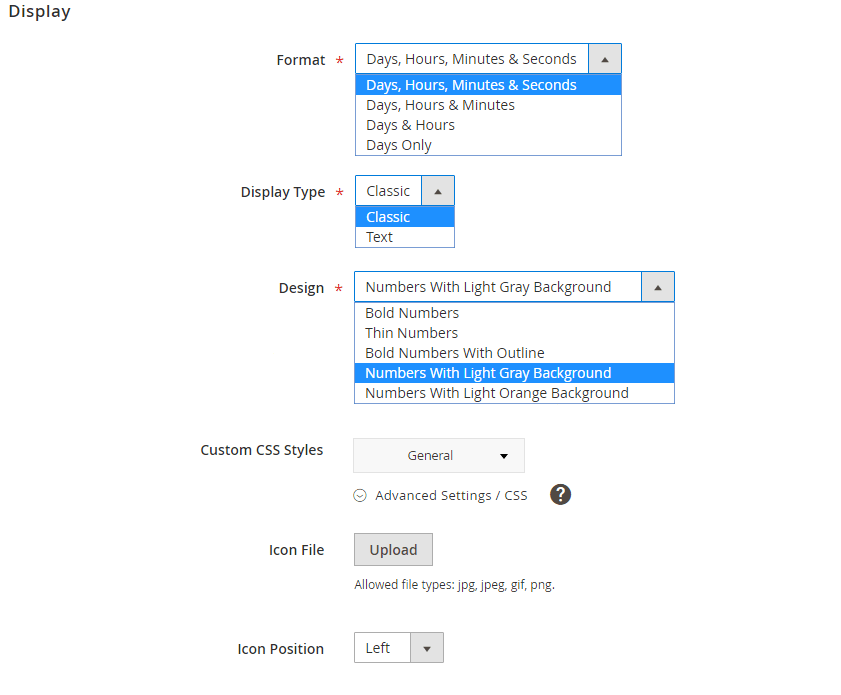
Display Options
To set the exact countdown you need for your promo there are several design features.
- Select the most suitable format for your countdown from 'Days, Hours, Minutes & Seconds', 'Days, Hours, & Minutes', 'Days & Hours', 'Days Only'.
- 'Display type' contains classic and text options. The classic mode presents a countdown block. 'Text' implies only text is used for time display.
- The inside of the countdown block can be designed in 5 ways;
- bold numbers;
- thin numbers;
- bold numbers with the outline;
- numbers with the light gray background;
- numbers with the light orange background.
- 'Custom CSS Styles' allows inserting a CSS code for rich text design.
- Icon upload is available for jpg, jpeg, gif, and png formats.
- Icon position can be chosen between right or left.
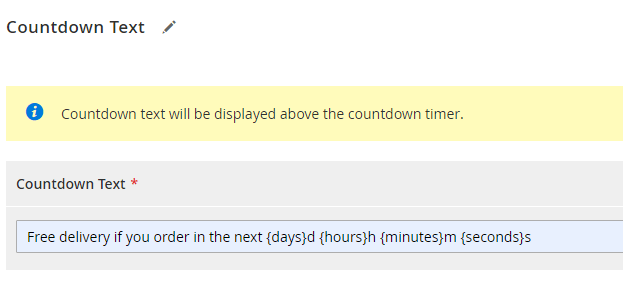
Countdown Text Field
The text for a countdown is inserted in the countdown text filed. The functionality supports variables.
Scheduling a one-time countdown
For setting up a one-time countdown you need to specify the relevant mode and indicate the start and end dates.

Scheduling a recurring countdown
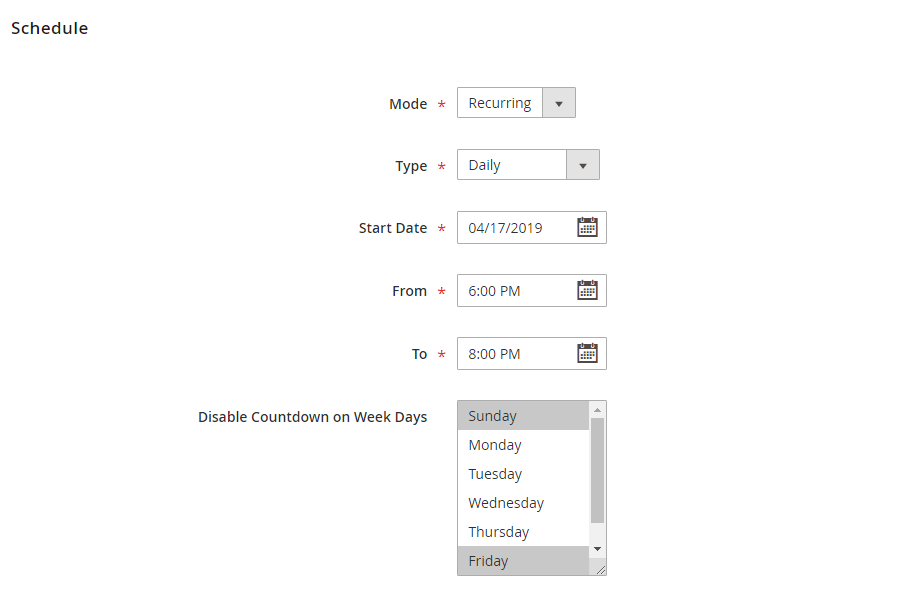
Setting up a recurring countdown demands selecting the relevant mode and countdown type to decide how often the countdown rule will be repeated - daily, every X days, or on defined days.
For a daily countdown, you need to configure the start date and the duration time. If needed countdown can be disabled on specific days of the week.
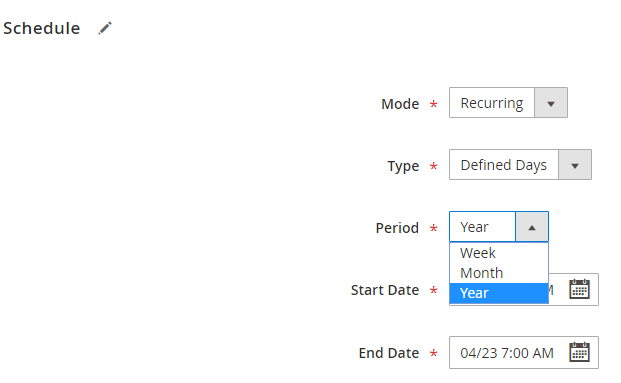
The 'Defined Days' countdown is set upon a certain time period: week, month, or year.
The same as a daily countdown, the rule for defined days needs the start and end date fields to be filled.
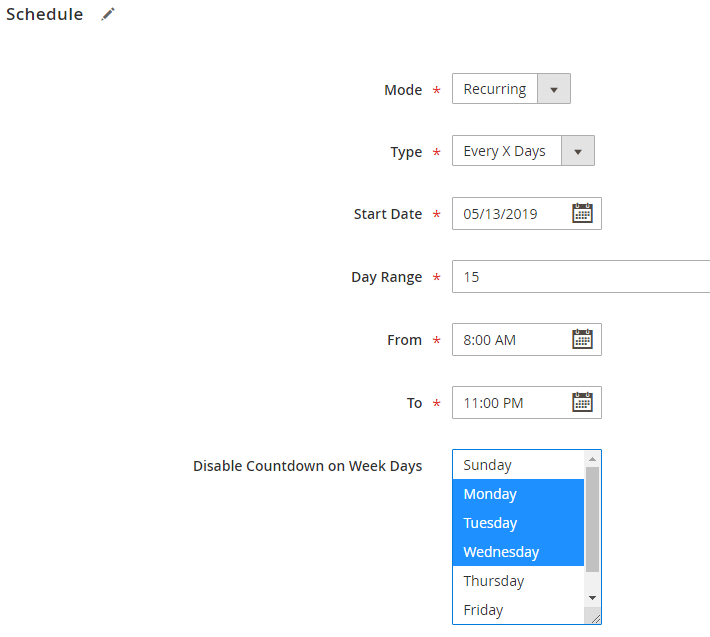
The 'Every X Days' rule contains the 'Day Range' field unique for the rule only. When the particular start date is selected the rule will be applied every - let's take - 15 days beginning with the specified date in a particular time period decided in the corresponding 'From' and 'To' lines.
The 'Disable Countdown on Week Days' option is identical to the one in a daily countdown
Frontend View
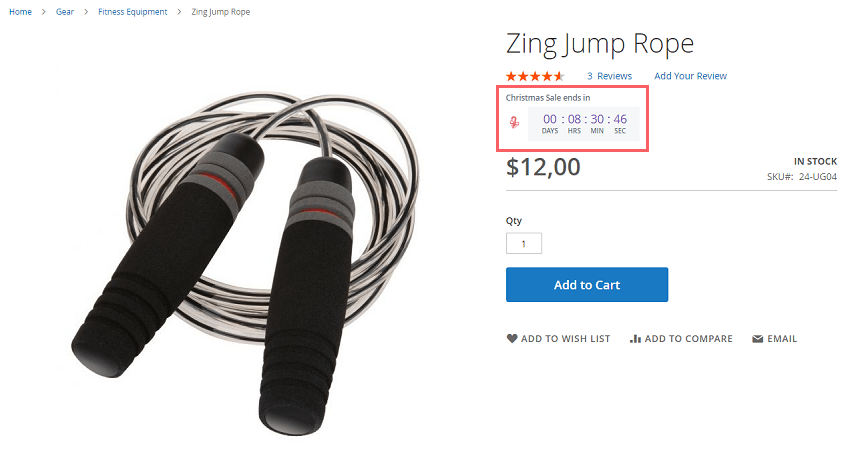
Countdown on a product page
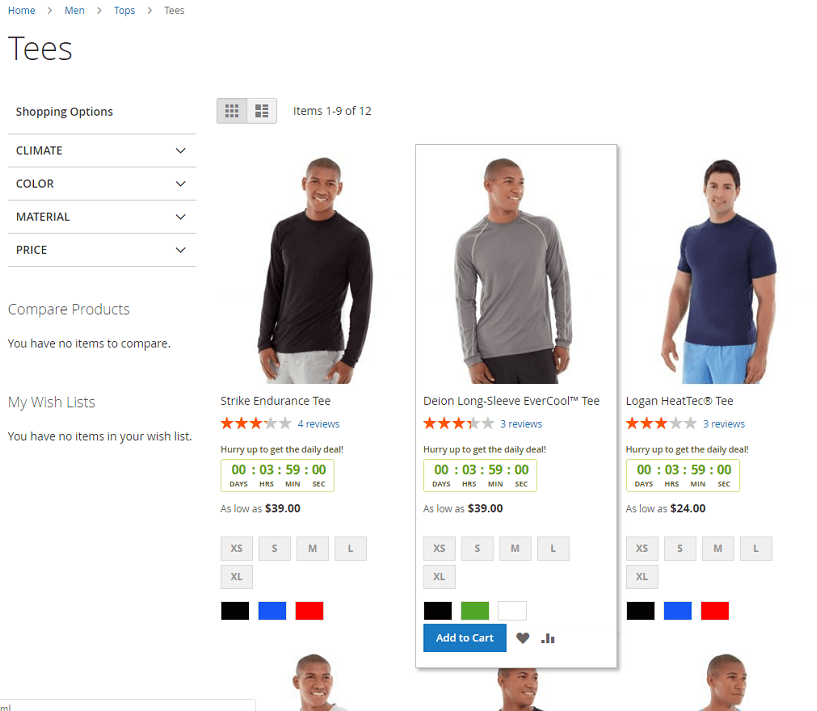
Countdown on a category page
Countdown widget
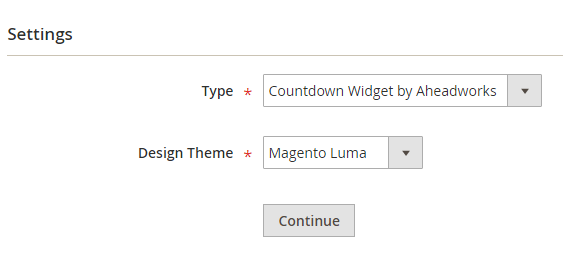
Countdown widget is set via native Magento functionality (Content > Widgets). You just need to choose the Aheadworks Countdown type.
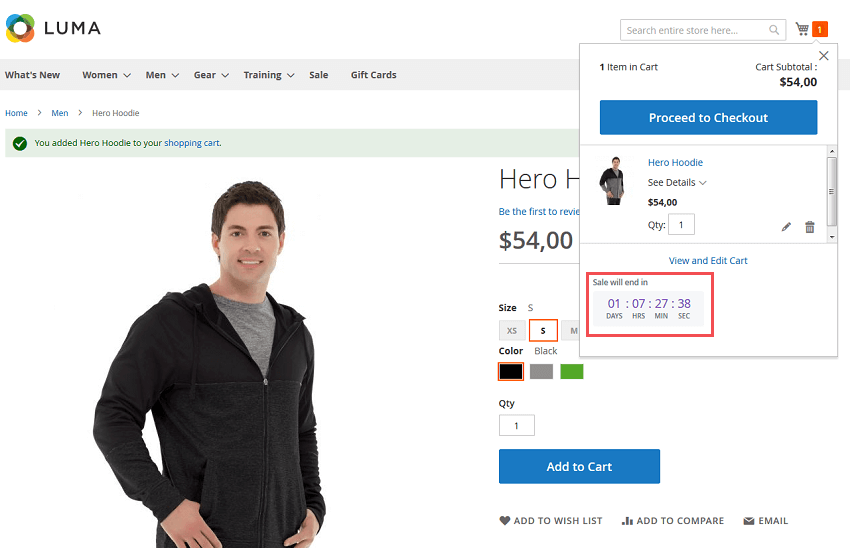
In the frontend countdown widget looks like this:
![]()
Already used our product?
We would appreciate your feedback. Please, leave a review.