
User Manual - Custom Static Blocks
- Installing Custom Static Blocks
- Uninstalling Custom Static Blocks
- Compatibility
- Getting Around
- Creating a custom static block
The Magento 2 Custom Static Blocks extension allows web merchants to smartly arrange the layout of their stores via customizable content blocks. For individual customer groups, store admins can create static blocks by choosing the pages where each block should be displayed and in-page block positions. By using conditions, admins can apply each block to a custom selection of products. Finally, the scheduling options enable them to display blocks at specific times and time periods.
Installing Custom Static Blocks
Command Line Installation
- Backup your web directory and store database
- Download the Custom Static Blocks installation package
- Upload contents of the Custom Static Blocks installation package to your store root directory
- In SSH console of your server navigate to your store root folder:
cd path_to_the_store_root_folder |
run the following command:
php bin/magento module:enable Aheadworks_Csblock |
then:
php bin/magento setup:upgrade |
after:
php bin/magento setup:static-content:deploy -f |
5. Flush store cache; log out from the backend and log in again
|
Make sure the installation is done from the FTP administrator account. Otherwise, set 775 permissions to the store root directory after the extension is deployed. |
Composer Installation
If you are installing an extension from Aheadworks for the first time, you need to add our composer repository to your Magento store:
1. Login to your ssh console and navigate to your store folder:
cd path_to_the_store_root_folder |
Run the following command:
composer config repositories.aheadworks composer https://dist.aheadworks.com/ |
After the command was executed successfully, you can use the composer to install the products.
To install the extension:
2. Login to your ssh console and navigate to your store folder:
cd path_to_the_store_root_folder |
3. Run the following command to install the latest version of the extension:
composer require aheadworks/module-csblock |
if you need to install a specific version, run this command:
composer require aheadworks/module-csblock:<version> |
|
Specify the version of the extension in <version> |
When prompted, enter Public Key (Username) and Private Key (Password):
.png?version=1&modificationDate=1613404666532&cacheVersion=1&api=v2&width=450)
Both Public Key (Username) and Private Key (Password) can be found in My Projects and Licenses in your personal account on our site:
 |
4. Enable the extension:
php -f bin/magento module:enable Aheadworks_Csblock |
Next, register the extension:
bin/magento setup:upgrade |
Recompile your Magento store if you are in the Production mode:
bin/magento setup:di:compile |
To verify that the extension is enabled, run this command:
bin/magento module:status |
Clean store cache, by running the following command:
bin/magento cache:clean |
Log out and Log in the backend again.
To upgrade the extension:
5. To update or upgrade an extension:
Download the updated extension file. Take note of the module-name and version. Export the contents to your Magento root.
If a composer package exists for the extension, run one of the following.
Update per module name:
composer update aheadworks/module-csblock |
Updater per version:
composer require aheadworks/module-csblock:<version> |
Uninstalling Custom Static Block
Since Magento introduced declarative Database you need to be very carefull when uninstalling or disabling the module.
|
NOTE: Please be very careful when uninstalling/disabling this module. This module uses a declarative DB scheme. Once the module is uninstalled the DB tables will be lost. |
Manual Removal
1) Run command:
bin/magento module:uninstall --non-composer Aheadworks_Csblock
|
It will remove hide price attributes from the system (e.g. eav_entity_type table).
2) Disable extension:
bin/magento module:disable Aheadworks_Csblock
|
3) Run setup upgrade:
bin/magento setup:upgrade
|
It will remove module related tables from the system (hp_rule_entity, hp_rule_product, etc).
4) Remove module files manually:
app/code/Aheadworks/Csblock
|
Automatic Removal (via Composer)
1) Disable extension:
bin/magento module:disable Aheadworks_Csblock
|
2) Run setup upgrade:
bin/magento setup:upgrade
|
3)
php bin/magento module:uninstall Aheadworks_Csblock
|
Run the following commands to upgrade, deploy, and clean the cache.
php bin/magento setup:upgrade --keep-generated |
Compatibility
|
Module Version |
Magento Version |
|
1.0.13 and earlier versions |
2.3.Х - 2.3.6 2.4.0 - 2.4.3 |
|
As of version 1.0.14 |
2.4.0 - 2.4.4 |
|
As of version 1.0.15 |
2.4.4 - 2.4.6 |
|
As of version 1.1.3 |
2.4.6 - 2.4.8 |
The PHP version depends on your current Magento version. Please, refer to your Magento version release notes.
Getting Around
The extension introduces its section under Content → Custom Static Blocks by aheadworks → Manage Blocks

Manage Blocks screen is the management center of the extension. Here store administrator can:
- Create new blocks;
- Enable/disable/delete existing blocks;
- Click the block to proceed to the block editing page.
Here store administrator can also adjust the Manage Blocks screen look and feel according to requirements:
- The Columns button allows adding/disabling the blocks grid columns, some may be excessive and some relevant to your current tasks;
- The Filter button allows looking for the custom blocks matching a set of attributes;
- The Default View button allows saving perfect custom blocks grid look you found to quickly load it whenever required.
That is all for the Custom Static Blocks store backend pages. The extension does not have general settings as all the blocks are configured separately.
Creating a custom static block
Click Create New Block button at the Manage Blocks screen to create the first custom block.
General
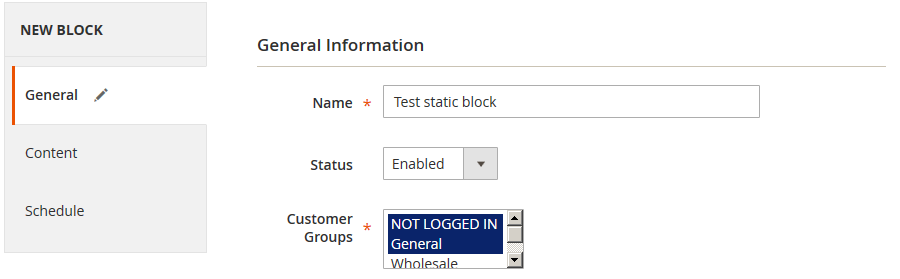
At the General section of the new static block page administrator is suggested to define where and how the block will be displayed. The screen offers the following settings:
- Name - the name of the static block for internal identification purposes;
- Status - the status of the block: enabled/disabled;
- Customer Groups - the customer groups the block will be displayed to;
- Where to Display - on what page types the block will be displayed:
- Home Page;
- Product Pages;
- Catalog Pages;
- Shopping Cart;
- Checkout.
- Position - the position on the page where the block will be displayed:
- Sidebar top;
- Sidebar bottom;
- Content top;
- Page bottom;
- Menu Top;
- Menu Bottom.
- Conditions - lets the store administrator define the conditions on which the static block will be displayed (e.g.: product attributes, category). The setting is Where to Display dependent.
This covers the placement aspects of the Custom Static Blocks.
|
If you insert a custom static block and some widget in the same page position, the widget will be displayed before the static block (since in Magento widgets have a higher priority than custom static blocks of the module). |
Content
Once done with the General section click Content in the navigation menu to your left:

At the Content section of the new static block page administator is suggested to define the static block's content.
The content is defined by the CMS blocks available at your store. Before adding a static block's content make sure you have created the appropriate CMS block under Content > Elements > Blocks.
- To add new content option to the static block, click on the '+' button - it will add a new line of content;
- In the content line specify the Store View for the CMS block you want it displayed at;
- Select appropriate CMS block in the Static Block box (if required the CMS block can be edited on spot);
- Click on the '+' icon one more time if you want to add another CMS block.
|
If two or more CMS blocks added to the static block's content the CMS blocks will ALL be displayed simultaneously ( one after another in the order they have been added to the Content). Providing Store View setting is adjusted properly this can prove useful for managing a single static block when dealing with store views of different language. For example: Lets say you have two store views: English and German. You can add two CMS blocks with the content in proper language and set English store view for the first one and German store view for the second one. Thus you can share the same General and Scheduling options for both CMS blocks without creating several Custom Static Blocks. |
Schedule
The final step of configuring the Custom Static Block is the Schedule section.
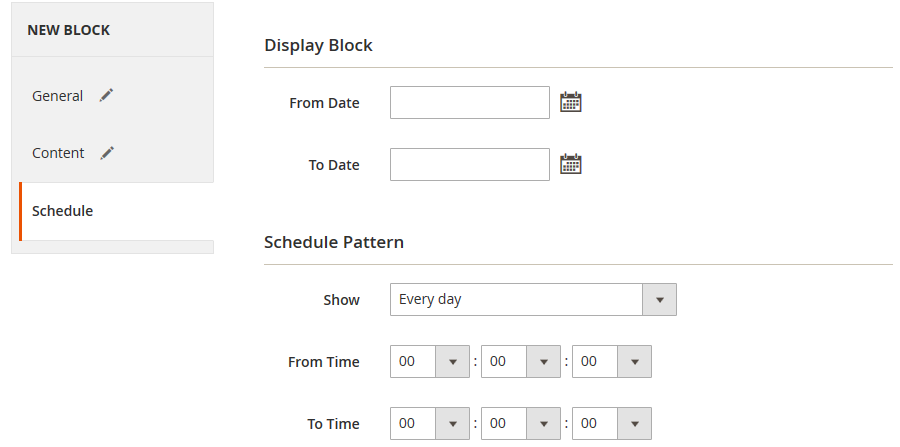
NOTE: At least 1 minute should be set to display the block. Time is set by the timezone of the store (Admin > Stores > Configuration > General > General > Locale Options > Timezone option). The set time is displayed according to the timezone of the store. If the customer's time is GMT +1, and the store has GMT +3, then set time from 10 to 12 - the customer's time will be from 8 to 10.
Here administrator is suggested if the block should be scheduled to display at a set time, or leave the fields blank to manually manage the block activity.
The section is spilt into two sections: Display Block - defines from when and how long the block should be active, and Schedule Patter - defines on what schedule the block be displayed during the Display Block period.
For example:
- In the Display Block section you have configured block to be displayed from January 1st to January 30th.
- In the Schedule Patterns you have selected From Monday to Friday;
- In the From/To Time you have set 8:00 - 13:00.
On such conditions the block will be displayed from January 1st to January 30th on the business week only: Monday, Tuesday, Wednesday, Thursday, Friday. From 8:00 to 13:00.
Such scheduling settings may prove useful if you are intended on running a particular sales campaign to get more customers on business days.
That covers the Custom Static Blocks settings. You may now want to create some static blocks to test the best possible display options.
![]()
Already used our product?
We would appreciate your feedback. Please, leave a review.