
User Manual - Customer Attributes
- Installing Customer Attributes
- Installing Hyvä Theme Compatibility Module
- Uninstalling M2 Customer Attributes
- Compatibility
- Getting Around
- M2 Customer Attributes Use
- Attributes in Action
- Integration with Customer Segmentation
Magento 2 Customer Attributes extends the list of built-in Magento customer attributes and customer address attributes and further facilitates their meaningful utilization via various options for display as well as for integration with Aheadworks and native Magento modules. Alongside adding new attributes merchants are able to manage the existing ones to fully respond to their business needs.
API documentation link
Installing Customer Attributes
Command Line Installation
- Backup your web directory and store database
- Download the Customer Attributes installation package
- Upload the contents of the Customer Attributes installation package to your store root directory
- In the SSH console of your server, navigate to your store root folder:
cd path_to_the_store_root_folder |
run the following command:
php bin/magento module:enable Aheadworks_CustomerAttributes |
then:
php bin/magento setup:upgrade |
after:
php bin/magento setup:static-content:deploy -f |
5. Flush store cache; log out from the backend and log in again
|
Make sure the installation is done from under the FTP administrator account. Otherwise, set 775 permissions to the store root directory after the extension is deployed. |
Composer Installation
- If you are installing an extension from Aheadworks for the first time, you need to add our composer repository to your Magento store:
Login to your ssh console and navigate to your store folder:
cd path_to_the_store_root_folder |
Run the following command:
composer config repositories.aheadworks composer https://dist.aheadworks.com/ |
On successful execution of the command you will be able to use the composer to install the extensions.
To install the extension:
2. Login to your ssh console and navigate to your store folder:
cd path_to_the_store_root_folder |
3. Run the following command to install the latest version of the extension:
composer require aheadworks/module-customer-attributes |
if you need to install a specific version, run this command:
composer require aheadworks/module-customer-attributes:<version> |
|
Specify the version of the extension in <version> |
When prompted, enter Public Key (Username) and Private Key (Password):
.png?version=1&modificationDate=1613404536065&cacheVersion=1&api=v2&width=450)
Both Public Key (Username) and Private Key (Password) can be found in My Projects and Licenses in your personal account on our site:
 |
4. Enable the extension:
php -f bin/magento module:enable <Module_Name> |
Next, register the extension:
bin/magento setup:upgrade |
Recompile your Magento store if you are in the Production mode:
bin/magento setup:di:compile |
To verify that the extension is enabled, run this command:
bin/magento module:status |
Clean store cache, by running the following command:
bin/magento cache:clean |
Log out and Log in the backend again.
To upgrade the extension:
5. To update or upgrade an extension:
Download the updated extension file. Take note of the module-name and version. Export the contents to your Magento root.
If a composer package exists for the extension, run one of the following.
Update per module name:
composer update aheadworks/module-customer-attributes |
Updater per version:
composer require aheadworks/module-customer-attributes:<version> |
Run the following commands to upgrade, deploy, and clean the cache.
php bin/magento setup:upgrade --keep-generated
php bin/magento setup:static-content:deploy
php bin/magento cache:clean
|
Installing Hyvä Theme Compatibility Module
Starting from Customer Attributes version 1.3.0 and its Hyvä Compatibility Module version 1.1.0, the Hyvä Compatibility Module is available only via the Aheadworks Composer repository.
Older versions of the Hyvä Compatibility Module can still be accessed via GitLab.
Installing Hyvä-compatibility module 1.1.0 and newer
To install Hyvä Compatibility Module 1.1.0 or newer via Aheadworks Composer, run the following command:
composer require aheadworks/module-customer-attributes-hyva
Installing older versions of Hyvä-compatibility module
To install an older version of the Hyvä Compatibility Module, use the following command:
composer require hyva-themes/magento2-aheadworks-customer-attributes
Hyvä-compatibility Modules with CSP Compliance
Starting from Hyvä Compatibility Module version 1.1.0, all Hyvä compatibility modules are CSP compliant. Older versions remain non-CSP compliant.
Note: The CSP-compliant modules may not be compatible with older versions of Hyvä Theme (1.3.9 and older). Before updating, please verify which version of the Hyvä Theme your store is using.
Compatibility
|
Module Version |
Magento Version |
|
As of version 1.2.0 |
2.4.4 - 2.4.6 |
|
As of version 1.2.1 |
2.4.6 - 2.4.8 |
The PHP version depends on your current Magento version. Please, refer to your Magento version release notes.
Uninstalling M2 Customer Attributes
Since Magento introduced declarative Database you need to be very carefull when uninstalling or disabling the module.
|
NOTE: Please be very careful when uninstalling/disabling this module. This module uses a declarative DB scheme. Once the module is uninstalled the DB tables will be lost. |
If extension is removed, all created attributes will not be removed as well and to change them we need to install the extension again.
Manual Removal
1. Disable the module by executing the following commands:
php bin/magento module:disable Aheadworks_CustomerAttributes |
2. Remove the extension files from the following folder:
app/code/Aheadworks/CustomerAttributes |
|
Note for a developer: To use the uninstall script in the standard workflow, see Magento\Setup\Console\Command\ModuleUninstallCommand::validate(). The function should return an empty array for further correct processing. You can simply comment out the lines 319-338. |
Automatic Removal (via Composer)
1. Disable the module by executing the following commands:
php bin/magento module:uninstall Aheadworks_CustomerAttributes |
Getting Around
Business Advantages
The Magento 2 Customer Attributes is an extension for perfect merchants who are willing to understand their particular customers and get a hold of their individual and clear-cut needs. The module allows getting customer profiles as complete as required, enriching them with data from new or edited customer and customer address attributes. It works on the front as well as backend, and enables both merchants and customers pumping a Magento store with the necessary information, the due configuration provided. Moreover, a few built-in options for integrations further extend the functionality of the module to realize a variety of use-cases and address urgent business needs.
What Makes It Different
- Extensive list of properties to configure meaningful attributes;
- Data validation and input values verification;
- Dependable and 'hidden' attributes;
- Placement of attributes on the storefront and/or backend;
- Checkout and Customer Segmentation integration.
What's New?
As of version 1.1.2 the present extension enables the following:
- Declarative schema upgrade
M2 Customer Attributes Use
The extension does not have any particular settings for operation but for the configuration of customer attributes themselves. The frontend use of the created/edited attributes does not differ from utilization of any other common types of input fields, which are universally known. Therefore, the present manual focuses on the backend use of customer attributes and customer address attributes, with occasional examples of display on the storefront when need be.
Customizing Attributes
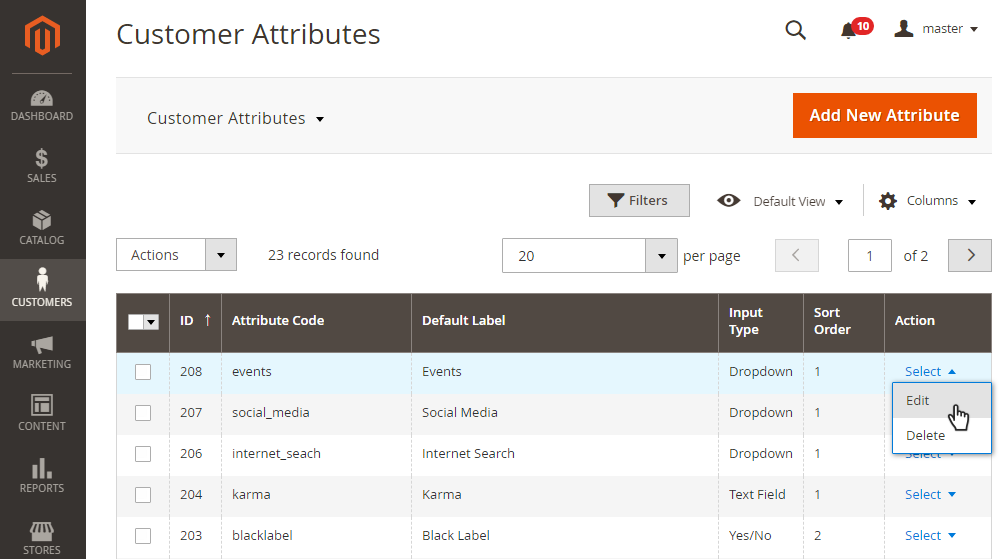
Customer Attributes Grid
To get access to all customer attributes in the store please proceed to Customers → Customer Attributes. The page shows a grid of the following columns:
- ID - the identification number of the attribute;
- Attribute Code - the alphanumeric code of the attribute;
- Default Label - the descriptive label of the attribute;
- Input Type - the type of the input;
- Sort Order - the numeric value to sort the attribute against other attributes in the related form/view;
- Action - the dropdown box 'Select' with two options: Edit and Delete.
You can delete attributes individually with the help of the Select box or in bulk with the help of the Actions dropbox field on the top left above the grid. Editing is only possible for each individual attribute.
Create / Edit Attributes
To create a new attribute click the Add New Attribute button on the top right of the page. The Edit Attribute page looks the same as the New Attribute page, but for the Attribute Code, Input Type and Values Required properties blocked.
The pages are split into four sections: Attribute Properties, Storefront Properties, Manage Labels and Manage Relations.
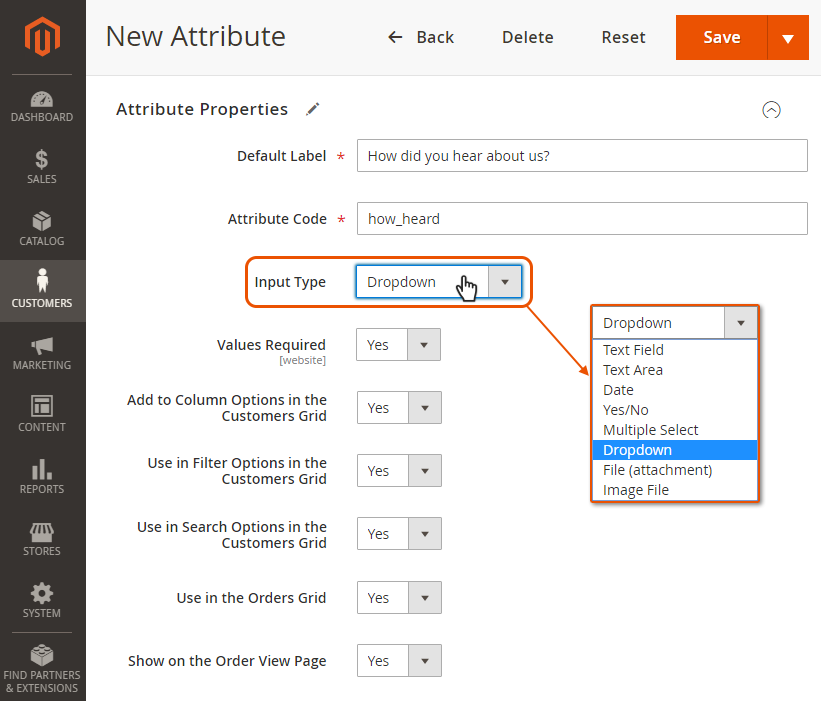
Configuring attribute properties
The Attribute Properties section contains essential parameters for customization of an attribute, mainly:
- Default Label - the descriptive label of the attribute;
- Attribute Code - the alphanumeric code of the attribute;
- Input Type - the type of the input value (Text field, text area, date, Yes/No, Multiple select, Dropdown, File, Image);
- Values Required - Yes/No alternatives (the attribute will be marked with an asterix (*) in the view);
- Add to Column Options in the Customers Grid - Yes/No alternatives;
- Use in Filter Options in the Customers Grid - Yes/No alternatives;
- Use in Search Options in the Customers Grid - Yes/No alternatives;
- Use in the Orders Grid - Yes/No alternatives;
- Show on the Order View Page - Yes/No alternatives.
Properties set-up depends on the business concept and application needs of each unique attribute, and therefore cannot be advised herein but for some sample use-cases.
|
Take special note:
|
Selecting an input type opens up extra properties for configuration of the attribute, for example:
- Text Area - Input Validation and Default Value;
- Text Field - Input Validation, Default Value and Input/Output filter;
- Date - Input Validation and Default Value, Input/Output filter, Minimum Value, Maximum Value;
- Yes/No - Default Value;
- File Attachment - Maximum File Size and File Extensions;
- Image File - Maximum File Size, Maximum Image width and Maximum Image Hight.
|
On checkout, file upload is not supported either for customers (on frontend) or the admin (in the backend). Thereby, attributes with input types File Attachment and Image File though displayed, will not function properly. |
Below is the description of the extra properties:
- Input Validation - validates the input value of the attribute against the following types: None, Alphanumeric, Alphanumeric With Spaces, Numeric Only, Alpha Only, URL, Email, Length Only;
- Input/Output filter - filters out html tags and html entities from the input value of the attribute against the following criteria: None, Strip HTML Tags, Escape HTML Entities;
- Default Value - the input value of the attribute by default as shown on the storefront;
- Minimum/Maximum text length - the numeric value correspondent to the required number of letters in the text;
- Minimum/Maximum Value - data values setting down the desired period for the attribute input;
- Maximum File Size - the maximum size of the file attribute in bytes;
- File Extensions - a list of common/custom file extensions separated with comma (,);
- Maximum Image Width/Height - the maximum values of the width/height of the image file attribute in pixels.
Configuring storefront view properties
The Storefront Properties section contains three parameters for customization of the view of an attribute, mainly:
- Show on storefront - Yes/No alternative.
- Sort Order - numeric value to set the placement of the attribute in the form/view with regard to other attributes on this form/view;
- Display on Forms - a list of forms to host the attribute: Customer Registration, Customer Account Edit and Admin Checkout.

You may be the only user of the newly-created/edited attributes, or you may let customers submit some more information about themselves too. In the former case, to create attributes for internal use ('secret' or 'hidden') select 'No' in Show on Storefront, otherwise opt for 'Yes'. This will make the attribute availalble on the storefront.
|
The Admin Checkout form is available only on the backend, whereas the other two are show both on the front and backend. You may select more than one form for display. |
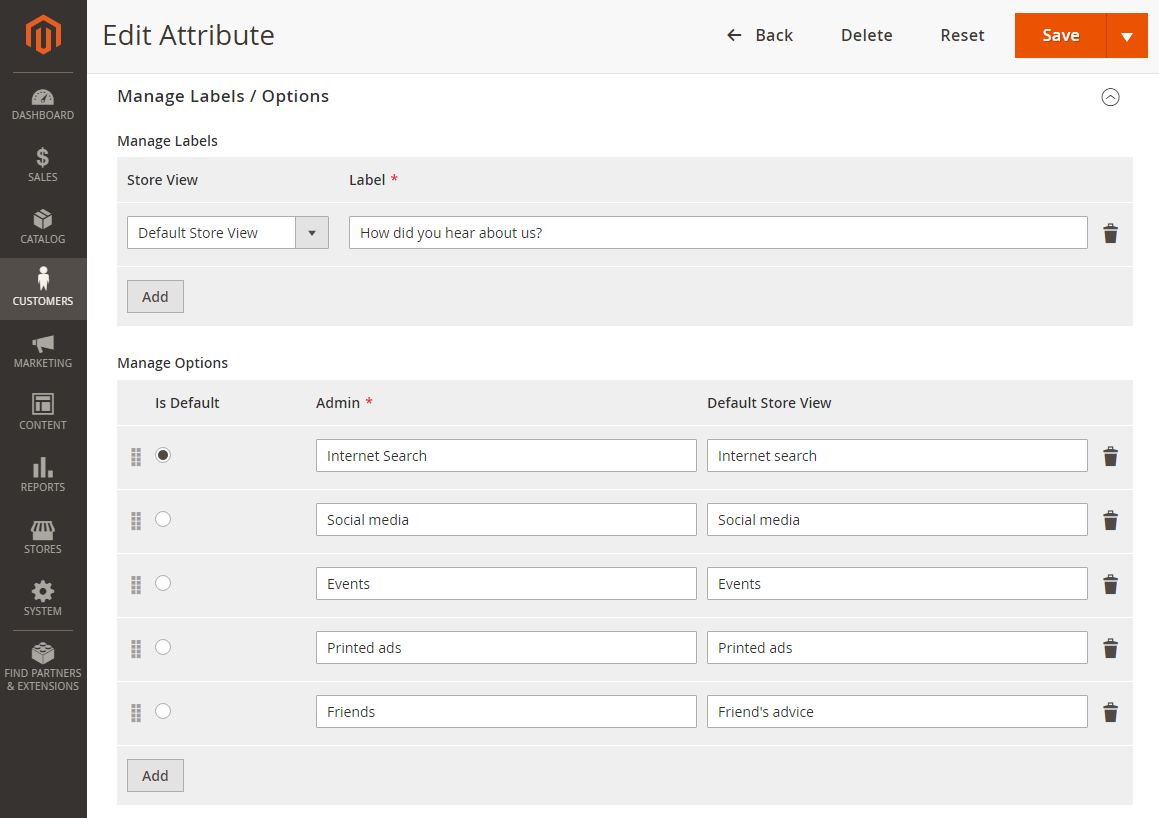
Managing Labels / Options
The Manage Labels / Options section is divided into two parts: Options and Labels.
- Manage Labels prompts you to choose the store view and label the attribute. To add more views click the Add button below the correspondent field. To delete the entry click the bin icon next to the correspondent row.
|
Should you have opted for internal use of the attribute, do not add any entries here. |
- Manage Options suggests indicating further values for the attributes of the input types Dropdown, Multiple Select. This block will not be available should other input types be selected.
Managing Relations
The Manage Relations allows connecting the given attribute to the dependent ones, if any.
|
The block is available for the Yes/No and Dropdown only. It becomes active once the previous three sections have been completed and the attribute has been saved. |
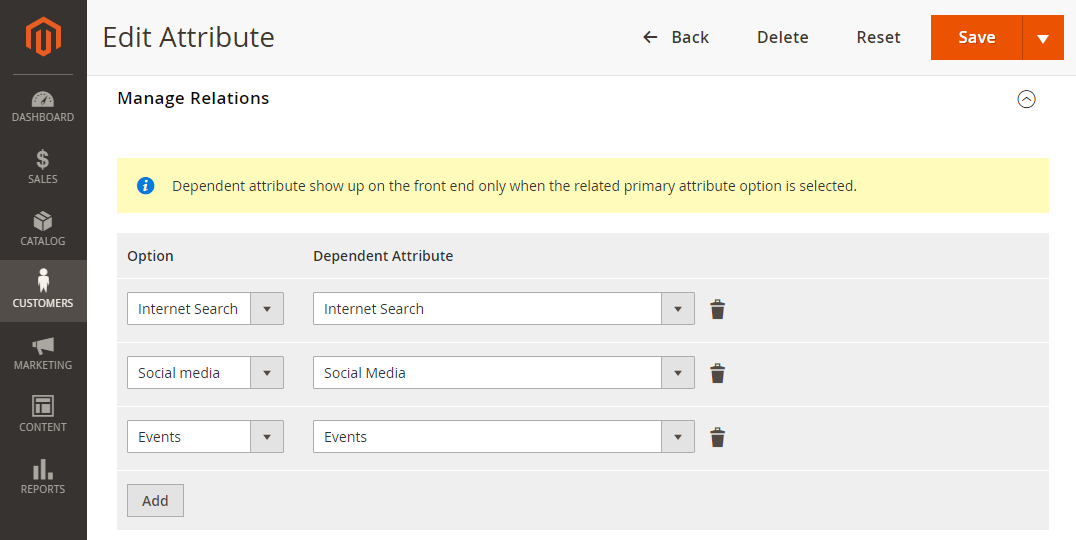
Make sure you have created dependent attributes first to see them in the Dependent Attribute field as alternatives for choice. The Option field shows the options for dropdown (Yes or No, in case of the Yes/No type) as indicated on the previous step.
|
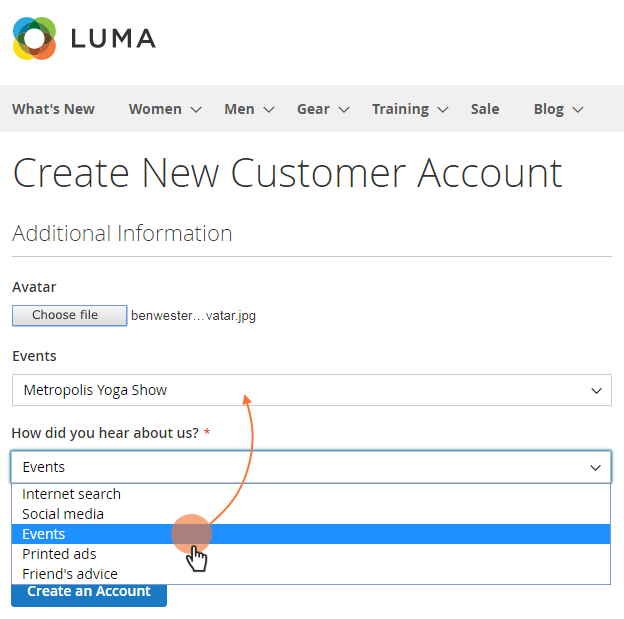
In the example above there have been created three dependent attributes for a multi-tier dropdown box: 'Internet Search', 'Social Media' and 'Events'. At their lower tier they correspond to the options (of the same names) in the upper-tier within the attibute 'How did you hear about us'. The dependent attributes each have their own options for further dropdown. Once the relations between the attributes are settled, this is what you will have in the end (storefront view):
|
Customer Address Attributes Grid and Pages
To get access to all customer address attributes in the store please proceed to Customers > Customer Address Attributes. The reason behind the two groups of attributes available in the extension lies in the compliance with the native Mangento architecture of frontend forms and algorithms of collecting and storing relevant attributes which split the attributes this way. The Customer Attributes and Customer Address Attributes pages look the same.
The Edit/New Address Attributes pages are similar to the described above pages for customer attributes with the only two differences:
- The properties Use in the Orders Grid and Show on the Order View Page for logical reasons are not available;
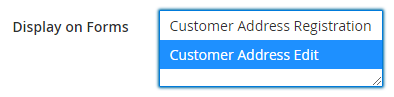
- The Display Forms property has two parameters for choice: Customer Address Registration and Customer Address Edit.
|
If you want to have new attributes visible on the Checkout form on the front use the Customer Address type. |
|
The Customer Address Registration form is displayed both on registration of a new customer and on checkout for a guest. The Customer Address Edit is shown on the Customer Account page. Customer attributes assigned to the Customer Address Registration form can also appear on the Customer Account page on the storefront, but only on addtion of a new address. |
Attributes in Action
Display in the Customers and Orders Grid
Should due properties be set-up on New/Edit Attribute page the attributes will be available in the Customers and/or Orders grids. You will then be able to browse them in the grids and use as options for columns layout, filtering or search.
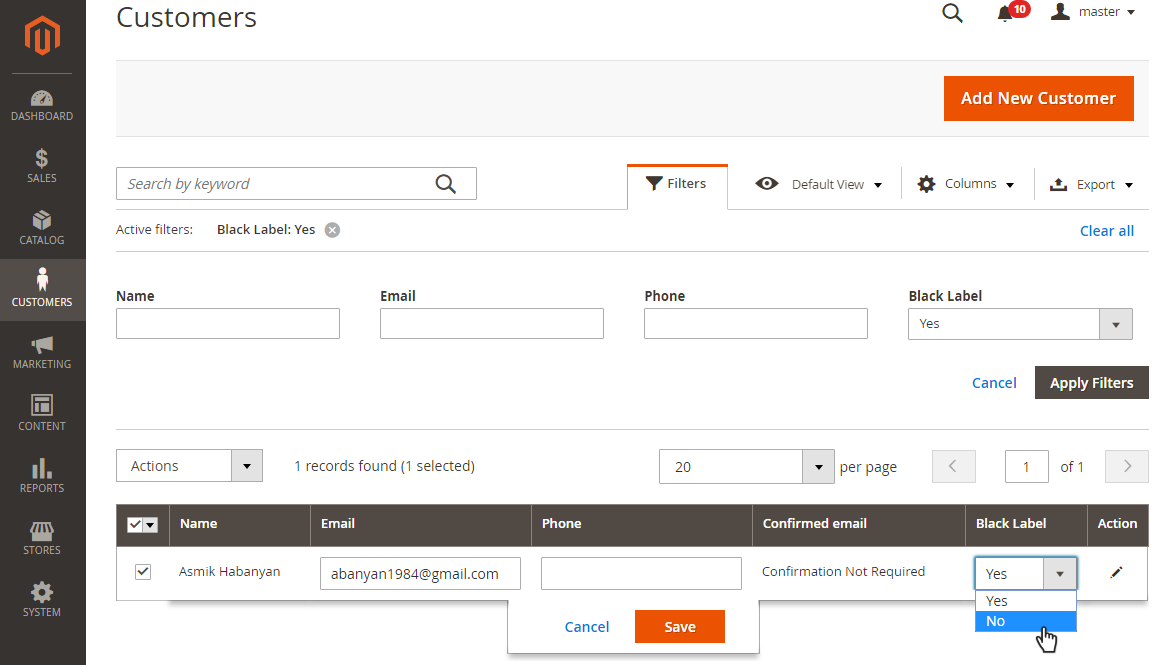
To get access to the information on all customers in the store please proceed to Customers → All Customers. In the example below you may see that the entries in the grid were filtered against the custom attribute Black Label, the values of which you may see/edit in the grid too.
Display on the Orders View Page
Should due properties be set up on New/Edit Attribute page the attributes will be available in the Customers and/or Orders grids. You will then be able to browse and edit them, for example on the Admin Checkout Page.
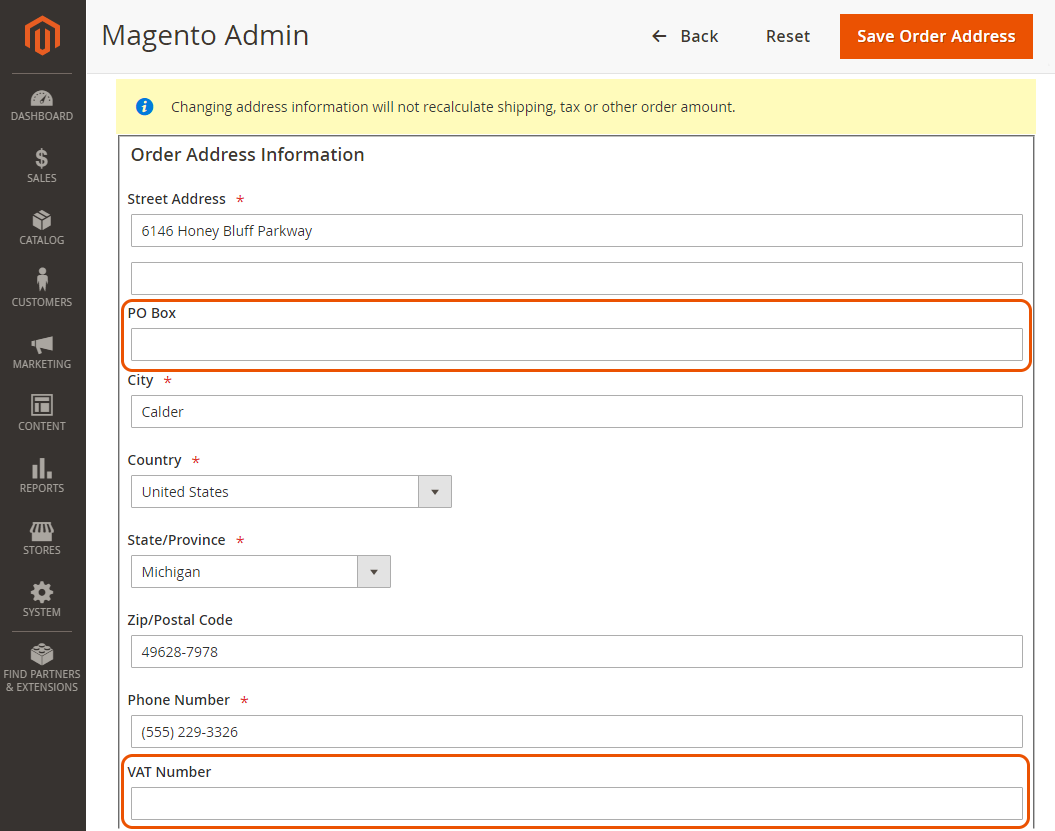
To get access to the Orders View pages please proceed to Sales → Orders, pick up an order and click on the correspondent row for editing. In the example below you may see the Admin page for Order Address Information with two custom fields available PO Box and VAT Number.
Display in email templates
To display custom attribute in email template use following line:
{ {layout handle="aw_customer_attributes_email" customer=$customer attribute_code="attribute_code"} }
|
$customer - customer object in email template, if available;where
attribute_code - code of the custom attribute.
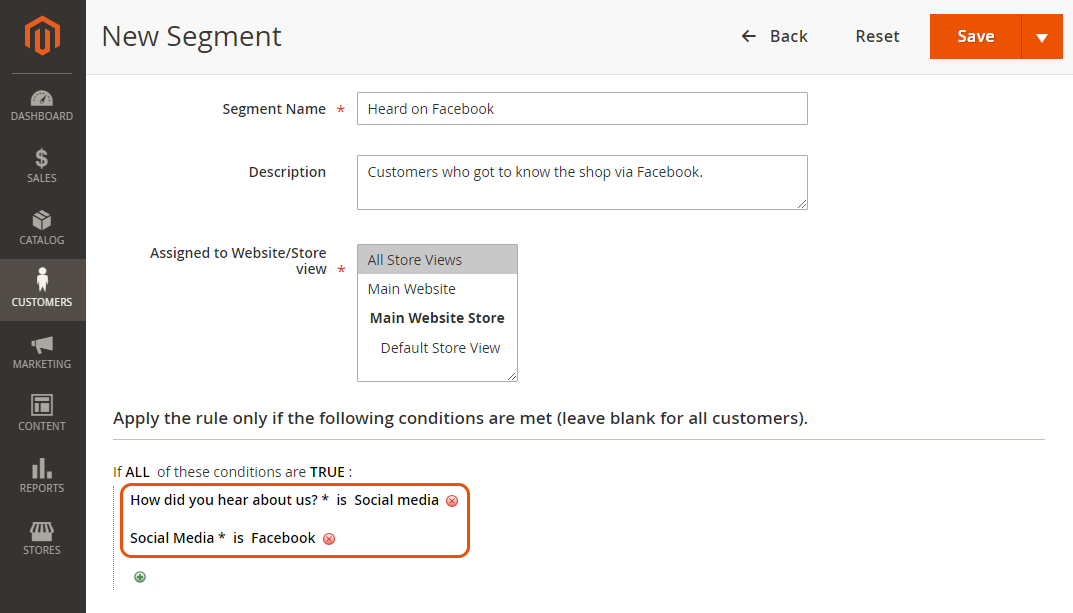
Integration with Customer Segmentation
Newly created attributes become available in scope of all store attributes for rule-making in the Customer Segmentation extension. In the example below you may see a rule for segmentation conditioned against the two custom attributes 'How did you hear about us?' and 'Social Media'. The rule segments customers who got to know the shop via Facebook.
![]()
Already used our product?
We would appreciate your feedback. Please, leave a review.