
User Manual - NMI
- Installing Magento 2 NMI
- Installing Hyvä Theme Compatibility Module
- Uninstalling NMI
- Compatibility
- Introducing the Magento 2 NMI extension
- Configuring Magento 2 NMI
- Using Magento 2 NMI
- Integrations
Magento 2 NMI implements the Network Merchants, Inc. (NMI) eCommerce payment method within a Magento 2 store. The extension allows processing payments securely and fast as a result of the PCI compliance and the SOAP API connection. All the credit card data, inserted in the fields at checkout, are kept solely on the NMI servers and are available for re-use only upon customer permission via the Magento 2 Vault functionality.
Installing Magento 2 NMI
Command Line Installation
- Backup your web directory and store database
- Download the NMI installation package
- Upload contents of the NMI installation package to your store root directory
- In SSH console of your server navigate to your store root folder:
cd path_to_the_store_root_folder |
run:
php bin/magento module:enable Aheadworks_Nmi |
then:
php bin/magento setup:upgrade |
after:
php bin/magento setup:static-content:deploy -f |
5. Flush store cache; log out from the backend and log in again
|
Make sure the installation is done from the FTP administrator account. Otherwise, set 775 permissions to the store root directory after the extension is deployed. |
Composer Installation
If you are installing an extension from Aheadworks for the first time, you need to add our composer repository to your Magento store:
1. Login to your ssh console and navigate to your store folder:
cd path_to_the_store_root_folder |
Run the following command:
composer config repositories.aheadworks composer https://dist.aheadworks.com/ |
On successful execution of the command you will be able to use the composer to install the extensions.
To install the extension:
2. Login to your ssh console and navigate to your store folder:
cd path_to_the_store_root_folder |
3. Run the following command to install the latest version of the extension:
composer require aheadworks/module-nmi |
if you need to install a specific version, run this command:
composer require aheadworks/module-nmi:<version> |
|
Specify the version of the extension in <version> |
When prompted, enter Public Key (Username) and Private Key (Password):
.png?version=1&modificationDate=1613638223053&cacheVersion=1&api=v2&width=450)
Both Public Key (Username) and Private Key (Password) can be found in My Projects and Licenses in your personal account on our site:
 |
4. Enable the extension:
php -f bin/magento module:enable Aheadworks_Nmi |
Next, register the extension:
bin/magento setup:upgrade |
Recompile your Magento store if you are in the Production mode:
bin/magento setup:di:compile |
To verify that the extension is enabled, run this command:
bin/magento module:status |
Clean store cache, by running the following command:
bin/magento cache:clean |
Log out and Log in the backend again.
To upgrade the extension:
5. To update or upgrade an extension:
Download the updated extension file. Take note of the module-name and version. Export the contents to your Magento root.
If a composer package exists for the extension, run one of the following.
Update per module name:
composer update aheadworks/module-nmi |
Updater per version:
composer require aheadworks/module-nmi:<version> |
Run the following commands to upgrade, deploy, and clean the cache.
php bin/magento setup:upgrade --keep-generated |
Installing Hyvä Theme Compatibility Module
Starting from NMI Payment version 1.4.0 and its Hyvä Compatibility Module version 1.3.0, the Hyvä Compatibility Module is available only via the Aheadworks Composer repository.
Older versions of the Hyvä Compatibility Module can still be accessed via GitLab.
Installing Hyvä-compatibility module 1.3.0 and newer
To install Hyvä Compatibility Module 1.3.0 or newer via Aheadworks Composer, run the following command:
composer require aheadworks/module-nmi-hyva
Installing older versions of Hyvä-compatibility module
To install an older version of the Hyvä Compatibility Module, use the following command:
composer require hyva-themes/magento2-aheadworks-nmi
Hyvä-compatibility Modules with CSP Compliance
Starting from Hyvä Compatibility Module version 1.3.0, all Hyvä compatibility modules are CSP compliant. Older versions remain non-CSP compliant.
Note: The CSP-compliant modules may not be compatible with older versions of Hyvä Theme (1.3.9 and older). Before updating, please verify which version of the Hyvä Theme your store is using.
Uninstalling NMI
Manual Removal
1. Disable the module by executing the following commands:
php bin/magento module:disable Aheadworks_Nmi |
2. Remove the extension files from the following folder:
app/code/Aheadworks/nmi |
Automatic Removal (via Composer)
1. Disable the module by executing the following commands:
php bin/magento module:uninstall Aheadworks_Nmi |
Compatibility
|
Module Version |
Magento Version |
|
1.3.0 and earlier versions |
2.3.Х - 2.3.6 2.4.0 - 2.4.3 |
|
As of version 1.3.1 |
2.3.7-p3+ 2.4.0 - 2.4.5 |
|
As of version 1.3.3 |
2.4.4 - 2.4.5 |
|
As of version 1.3.4 |
2.4.4 - 2.4.6 |
The PHP version depends on your current Magento version. Please, refer to your Magento version release notes.
Introducing the Magento 2 NMI extension
NMI for Magento 2 is a module to enhance the Magento 2 checkout with the NMI payment method, high-level security and increased user-friendliness of the interface provided.
Features and Highlights:
- Full PCI Standard compliance;
- SOAP API request processing via NMI WSDL;
- Magento 2 Vault support;
- Admin orders support;
- Alternative NMI API endpoint URL support;
- Multi-address shipment support.
Business value
NMI extension for Magento 2 allows arranging for secure and fast payments, multiple settings enabled, with the NMI payment gateway. Enabling various alternative payment methods helps reach broader customer audience, and employing the extension from Aheadworks - do that in a most customer-centered way. With multi-address shipping support, country specification and other settings the present extension saves a great amount of time both for admin and shoppers, and thereby ensures the very customer-focused eCommerce approach.
Configuring Magento 2 NMI
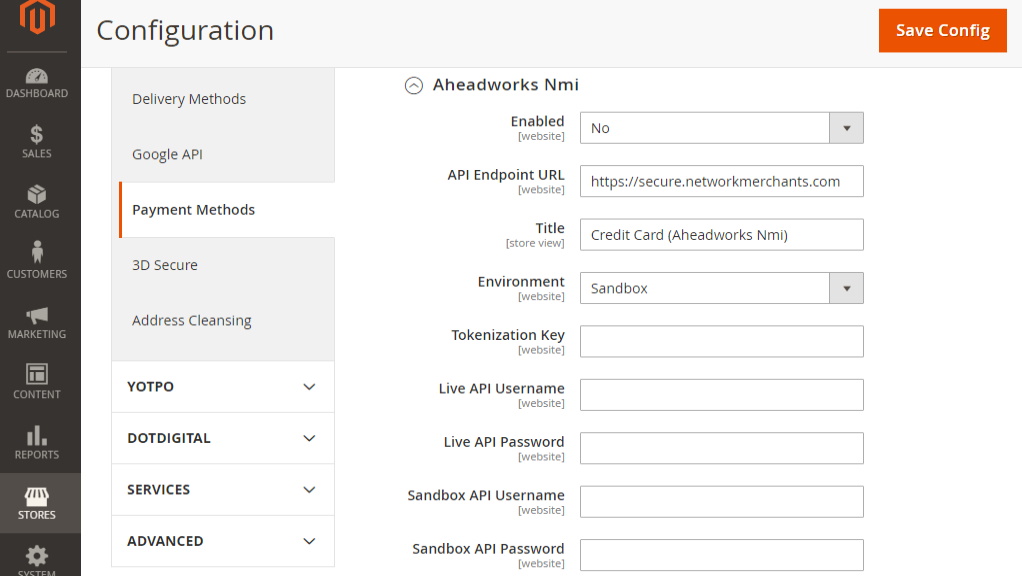
To configure the extension follow Stores → Configuration → Sales → Payment Methods → Aheadworks NMI.
|
To make use of Aheadworks Magento 2 NMI, it is important you have an account with Network Merchants LLC and consequently access to the gateway. If you do not have one, please contact NMI or your payment facilitator. |
Access
When on the Aheadworks NMI section of the Payments page address yourself to the following fields:
- Enabled - the Yes/No selector to en/disable the payment gateway;
- API Endpoint URL - the text-field to contain API Endpoint URL, to switch from the default URL;
- Title - the text-field to tell the name of the payment method name as it will be displayed on the checkout page (Credit Card (Aheadworks Nmi) by default);
- Environment - the Sandbox/Production selector to define the environment for operation of the present module;
- Tokenization Key - the text-field to contain the token that represents the payment account number (provided by NMI as part of the sign-up process);
- Live API Username - the text-field to contain your API Username, the part of your access data to enable integration of the NMI service and third-party applications (Please contact NMI or your payment facilitator for this information);
- Live API Password - the text-field to contain your API Password, the part of your access data to enable integration of the NMI service and third-party applications (Please contact NMI or your payment facilitator for this information);
- Sandbox API Username - the text-field to contain a Sandbox API Username, to access integration of the NMI test mode and the present extension (Please contact NMI or your payment facilitator for this information);
- Sandbox API Password - the text-field to contain a Sandbox API Password, to access integration of the NMI test mode and the present extension (Please contact NMI or your payment facilitator for this information).
|
Use Sandbox API Username and Password for the Sandbox environment, use Live API Username and Password for the Production environment. Authentication via security keys is available now. |
Magento 2 Vault
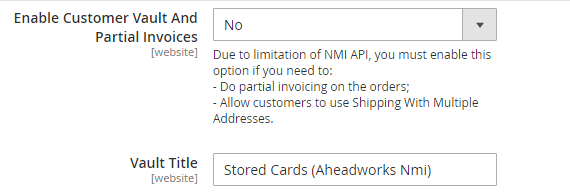
Magento 2 Vault and Partial Invoices can be enabled on the same page, below the NMI account credentials. It enables saving customer credit card data on the NMI server, and retrieving it later at checkout, if need be.
There are two boxes to operate Vault:
- Enable Customer Vault and Partial Invoices - select Yes or No;
- Vault Title - enter the title for stored for NMI credit cards (as it will appear on the backend).
|
Orders can be partially invoiced offline any time, and it doesn’t depend on the vault status. |
|
If vault is disabled, NMI payment isn’t shown on Multishipping Addresses Checkout. |
Payments
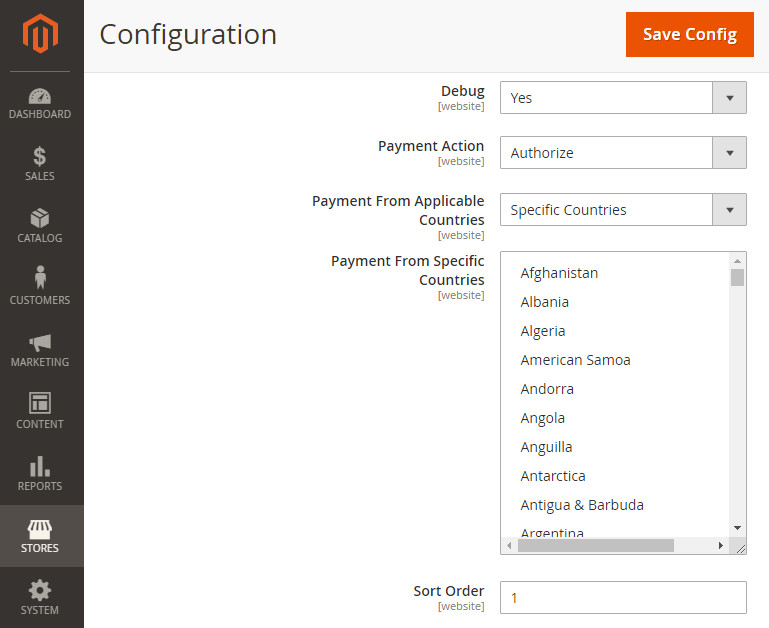
The following options are available just below the Vault fields to further tweak NMI payments:
- Debug - enable to include some transaction information into the logs files;
- Payment Action - select action: authorize' or 'authorize and capture';
- Payment from Applicable or Specific Countries - specify the geography of NMI users: only customers from chosen countries will see the NMI option at checkout;
- Sort Order - position the method on the checkout page.
Using Magento 2 NMI
Checkout View
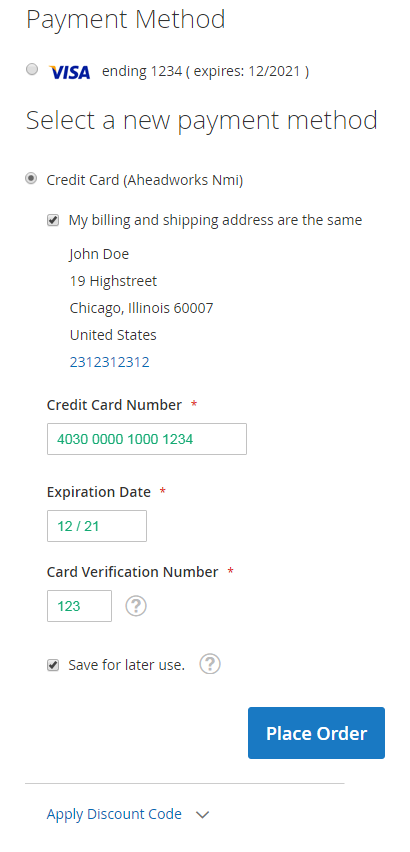
NMI for Magento 2 is integrated into the native Magento 2 checkout functionality and represents a design that all the Magento 2 users are familiar with.
Regular Checkout
Save for later use - is a checkbox provided by the Magento 2 Vault. It allows using the same credit card data without re-entering it.
A 'VISA' credit card payment method (see the top of the image above) is an actual representation of Magento 2 Vault functionality.
Multi-address Checkout
Checkout with multiple addresses follows the native Magento 2 functionality as well. Go to cart and click the Check Out with Multiple Addresses active link.
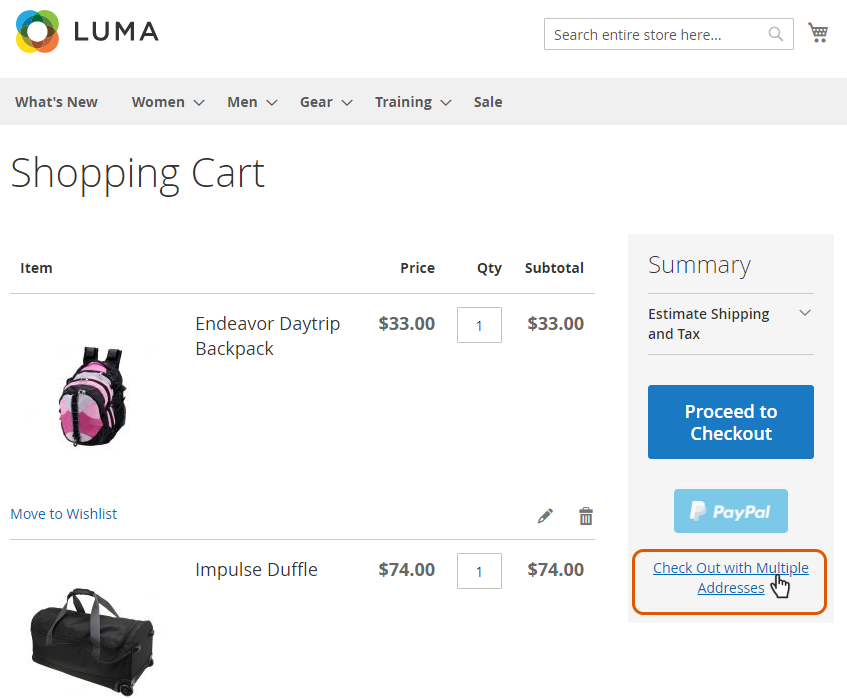
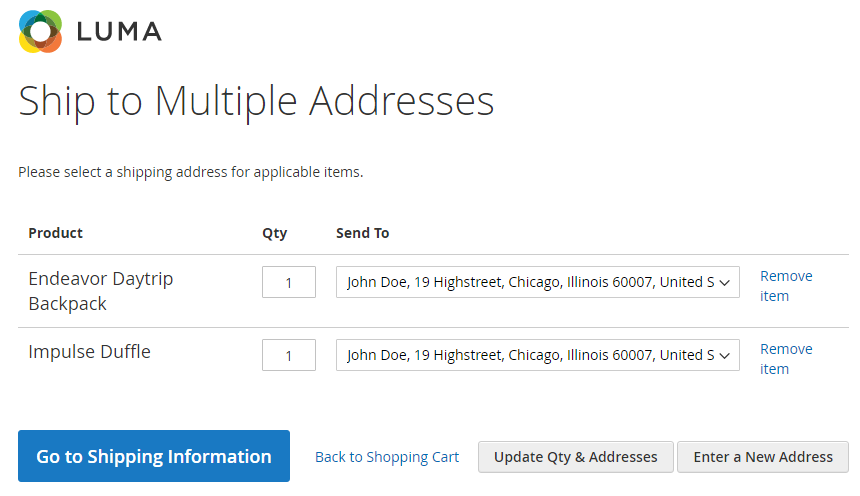
The link will redirect you to the page where addresses are to be specified. You may also alter the quantity of the products in cart or remove the items from the list.
Clicking the Go to Shipping Information blue button on the left will take you further into the process.
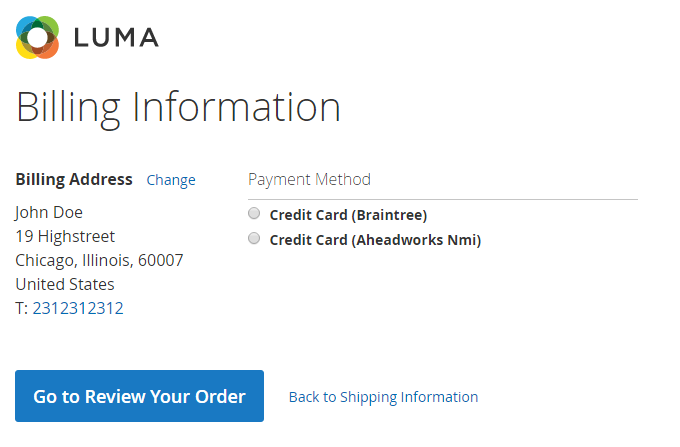
You will soon see the Billing information page, where all available for multi-address payment methods will be shortlisted. Click the corresponding radio-button to select Aheadworks NMI, and proceed with the Go to Review Your Order button.
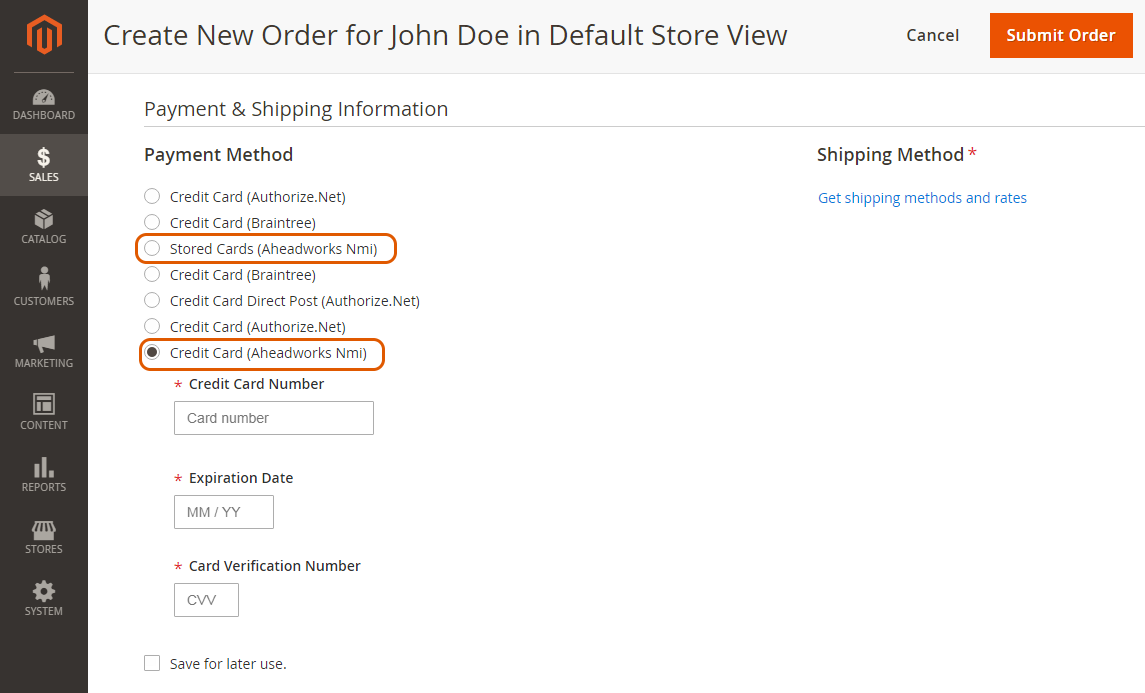
Admin Orders Support
The NMI for Magento 2 extension enhances the native Magento 2 functionality on the backend too. It allows selecting the NMI payment method for orders created by the admin on the backend. Follow the official Magento 2 guide to learn how to create orders from the backend.
The Create New Order page will feature the NMI payment gateway in the list of payment methods in the appropriate block. You will be able to choose either a stored card (Stored Cards (Aheadworks NMI) or whatever name you gave to the bank of stored NMI cards) or enter a new one (Credit Card (Aheadworks NMI)).
Integrations
Smart One Step Checkout Extension for Magento 2
When Smart One Step Checkout Extension is installed, NMI payment gets availiable on the enhanced checkout page.
Advanced Subscription Products for Magento 2
With the integration of the NMI payment extension and Advanced Subscription Products, the NMI Payment option becomes available for selection when creating a new subscription order on the backend. Additionally, customers can now update their payment method for subscriptions to NMI Payment directly on the storefront.
| For instructions on configuring subscription orders, refer to the Advanced Subscription Products for Magento 2 user manual. |
With the integration, when setting up a new subscription order, the store admin will have two additional payment method options (the same as described above in the Admin Orders Support section):
- Choose a previously saved card, displayed as Stored Cards (Aheadworks NMI) or a custom label set in the configuration;
- Enter a new credit card, displayed as Credit Card (Aheadworks NMI).
|
When a subscription order is created for a new customer, the only available option will be Credit Card (Aheadworks NMI), as no cards have been saved by the customer yet. |
NMI Payment on the storefront
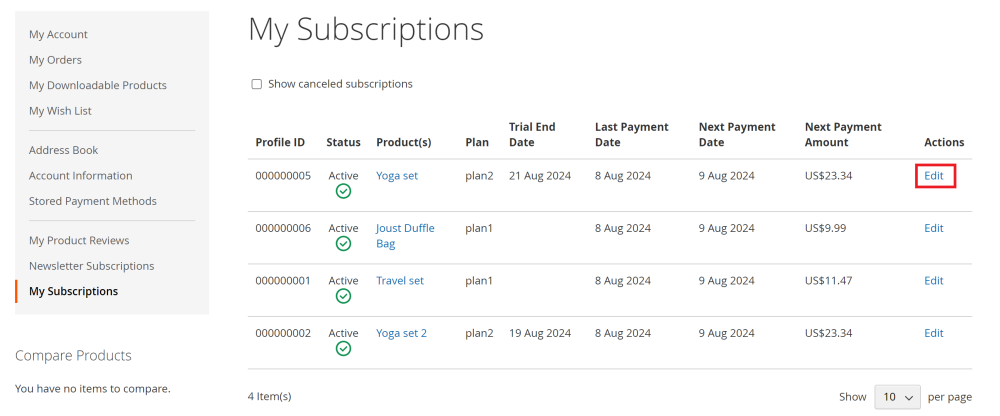
Along with the above mentioned changes in the checkout process, thanks to the integration, customers can now change the payment method to NMI payment on the storefront on the My Subscriptions page.
To do this, the customer needs to go to the My Subscriptions page and edit the desired subscription by clicking on the active Edit link.
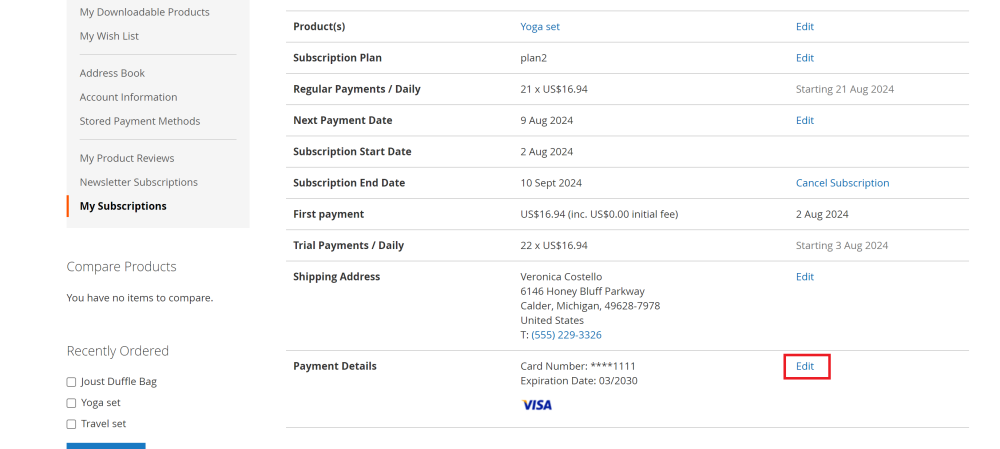
Then scroll down to the Payment Details section and click the active Edit link.
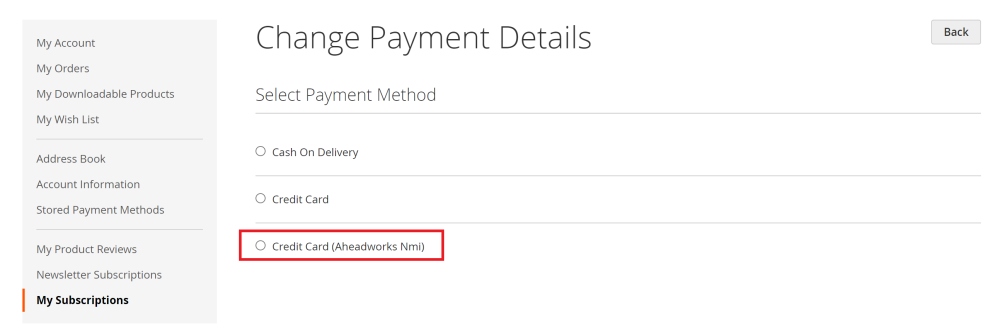
On the Change Payment Details page, the customer should select the Credit Card (Aheadworks Nmi) radio button and enter the card details. Then click the Back button to return to the Subscription details page.
![]()
Already used our product?
We would appreciate your feedback. Please, leave a review.