User Manual - Product Labels
- Installing Product Labels
- Uninstalling Product Labels
- Compatibility
- Introducing Product Labels
- Backend Configuration
- Configuring CSS Parameters
- Label Examples (with CSS Parameters)
- Note For Developers
Guide customers’ attention and prompt purchasing response by marking selected products out with visually appealing labels signifying sales campaigns and special offers.
Installing Product Labels
Command Line Installation
- Backup your web directory and store database
- Download the Product Labels installation package
- Upload contents of the Product Labels installation package to your store root directory
- In SSH console of your server navigate to your store root folder:
cd path_to_the_store_root_folder |
run the following command:
php bin/magento module:enable Aheadworks_OnSale |
then:
php bin/magento setup:upgrade |
after:
php bin/magento setup:static-content:deploy -f |
5. Flush store cache; log out from the backend and log in again
|
Make sure the installation is done from the FTP administrator account. Otherwise, set 775 permissions to the store root directory after the extension is deployed. |
Composer Installation
If you are installing an extension from Aheadworks for the first time, you need to add our composer repository to your Magento store:
1. Login to your ssh console and navigate to your store folder:
cd path_to_the_store_root_folder |
Run the following command:
composer config repositories.aheadworks composer https://dist.aheadworks.com/ |
After the command was executed successfully, you can use the composer to install the products.
To install the extension:
2. Login to your ssh console and navigate to your store folder:
cd path_to_the_store_root_folder |
3. Run the following command to install the latest version of the extension:
composer require aheadworks/module-onsale |
if you need to install a specific version, run this command:
composer require aheadworks/module-onsale:<version> |
|
Specify the version of the extension in <version> |
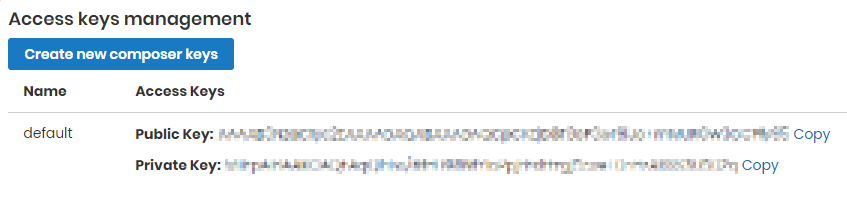
When prompted, enter Public Key (Username) and Private Key (Password):

Both Public Key (Username) and Private Key (Password) can be found in My Projects and Licenses in your personal account on our site:
Run the following command to install Product Labels GraphQL:
|
4. Enable the extension:
php -f bin/magento module:enable <Module_Name> |
|
Add the product name in <Module_Name> |
Next, register the extension:
bin/magento setup:upgrade |
Recompile your Magento store if you are in the Production mode:
bin/magento setup:di:compile |
To verify that the extension is enabled, run this command:
bin/magento module:status |
Clean store cache, by running the following command:
bin/magento cache:clean |
Log out and Log in the backend again.
|
Want to use the Hyvä theme module? To install the Hyvä theme module, you need to install the module via composer using command: composer require hyva-themes/magento2-aheadworks-onsale |
To upgrade the extension:
5. To update or upgrade an extension:
Download the updated extension file. Take note of the module-name and version. Export the contents to your Magento root.
If a composer package exists for the extension, run one of the following.
Update per module name:
composer update aheadworks/module-onsale |
Updater per version:
composer require aheadworks/module-onsale:<version> |
Run the following commands to upgrade, deploy, and clean the cache.
php bin/magento setup:upgrade --keep-generated |
Uninstalling Product Labels
Since Magento introduced declarative Database you need to be very carefull when uninstalling or disabling the module.
|
NOTE: Please be very careful when uninstalling/disabling this module. This module uses a declarative DB scheme. Once the module is uninstalled the DB tables will be lost. |
Manual Removal
1. Disable the module by executing the following commands:
php bin/magento module:disable Aheadworks_OnSale |
2. Remove the extension files from the following folder:
app/code/Aheadworks/OnSale |
Automatic Removal (via Composer)
1. Disable the module by executing the following commands:
php bin/magento module:uninstall Aheadworks_OnSale |
Compatibility
|
Module Version |
Magento Version |
PHP |
|
1.1.5 and earlier versions |
2.3.Х - 2.3.6 2.4.0 - 2.4.3 |
7.4 and earlier versions |
|
As of version 1.1.6 |
2.3.7-p3+ 2.4.0 - 2.4.5 |
7.4, 8.1 |
|
As of version 1.3.0 |
2.4.3 - 2.4.5 |
7.4, 8.1 |
|
As of version 1.4.0 |
2.4.4-2.4.6 |
8.1 |
Introducing Product Labels
Extension Logic
The Product Labels extension for Magento 2 provides a full-range functionality for product label customization:
- Selecting one of the three types of labels;
- Customizing labels display over the image or price of the product;
- Editing the design of labels;
- Tailoring the text and look of the label against its the size;
- Conditioning of labelling strategies with regard to product attributes, customer groups, time of visibility and stock range;
- Managing multiple labels over a selected product.
Help your products speak to customers, delivering clear and attractive promotional messages with the help of various fancy labels. Stimulated attention and fostered curiosity will, by far, enliven customers’ experience and will prompt to buy more. Product labelling has never been anything but effective with the Magento 2 On Sale extension. It offers impressive variety of editing options, unrivalled control over display alternatives, relaxing flexibility of rule-making, as well as meaningful versatility of labels use.
Integrations
- Add Free Product to Cart
- GraphQL support
What's New?
The latest versions of the extension (1.3.0) enable the following:
- Applying labels to bundle products
- The "Is New" label added automatically
Backend Configuration
Browsing Labels
Start your work with Product Labels by navigating to Marketing → Product Labels by Aheadworks → Labels.
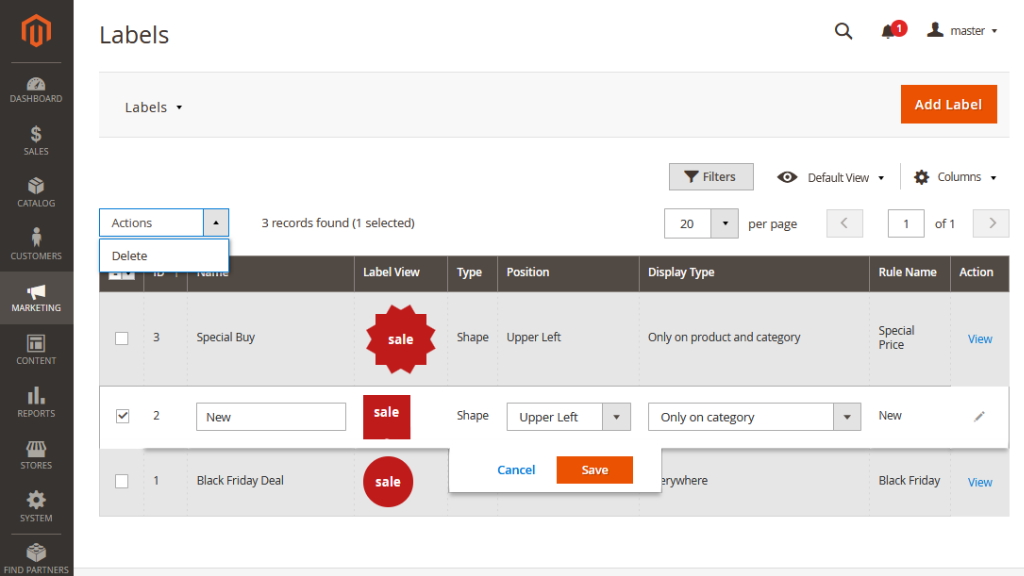
The 'Labels' grid allows browsing and quick-editing of labels. It is split into the following columns:
- ID - an identification number of the label;
- Name - a descriptive title of the label;
- Type - atype of the label (CSS-object, image or text);
- Rule Name - a title of the display rule assigned to the label;
- Label view - a look of the label;
- Position - a position of the label within a product block;
- Display Type - label placement;
- Action - the 'View' active link to the Label Edit page.
You can change the name and position of a label right in the grid. Click the corresponding label row and edit the values in the 'Name' and 'Position' columns.
With the 'Actions' box above the grid, you can delete the label(s) selected, individually or in bulk.
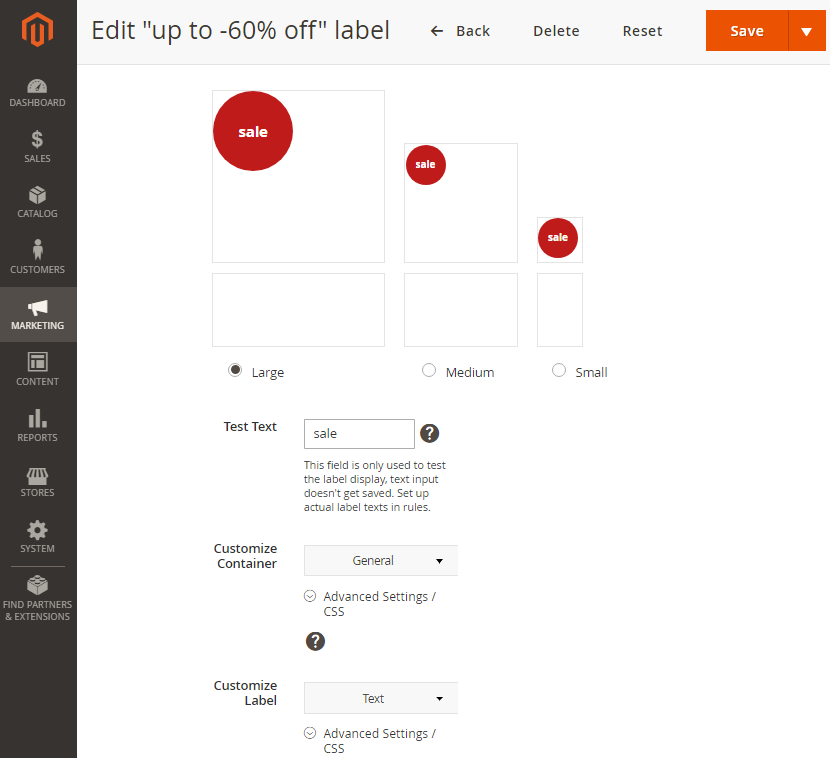
Creating/Editing Labels
To create a label, click the 'Add Label' button at the top right of the page.
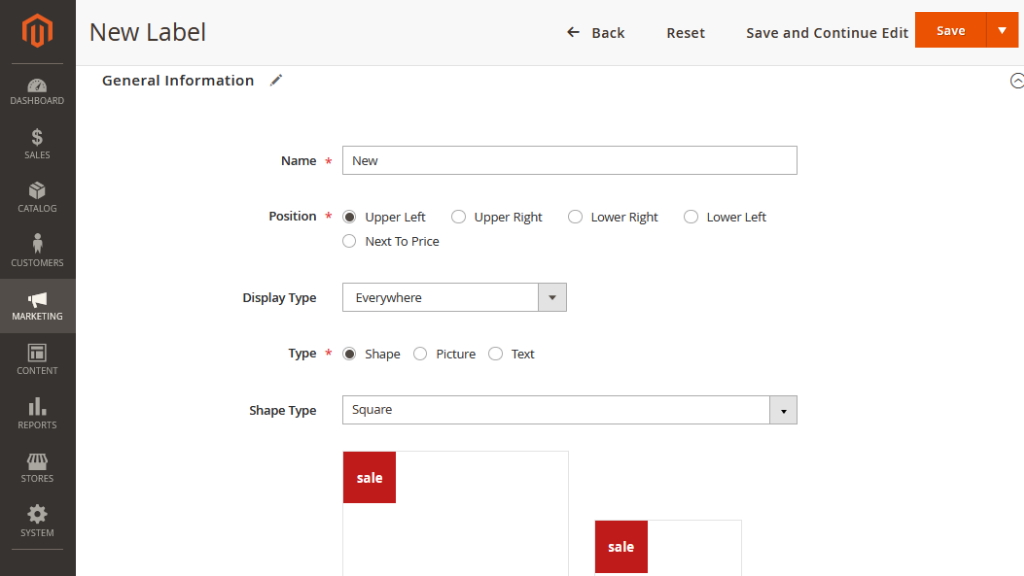
There are three obligatory parameters on this page: Name, Position and Type. Deciding on label placement over the image of a product consider the four positions: Upper-left/right and Lower-left/right corner. There is also an option to place the label Next to Price.
Display Type - choose where the labels will be displayed:
- Everywhere;
- Only on product page;
- Only on category;
- Only on product and category.
The Product Labels module allows creating labels of the following display-types:
- CSS shape - a customizable object that can be presented in one of the seven forms (Select one from the 'Shape Type' box);
- Picture - an image to upload (When chosen, the 'Upload' button will replace the 'Shape Type' box. The image is uploaded in original resolution);
- Text only - a text against a custom background.
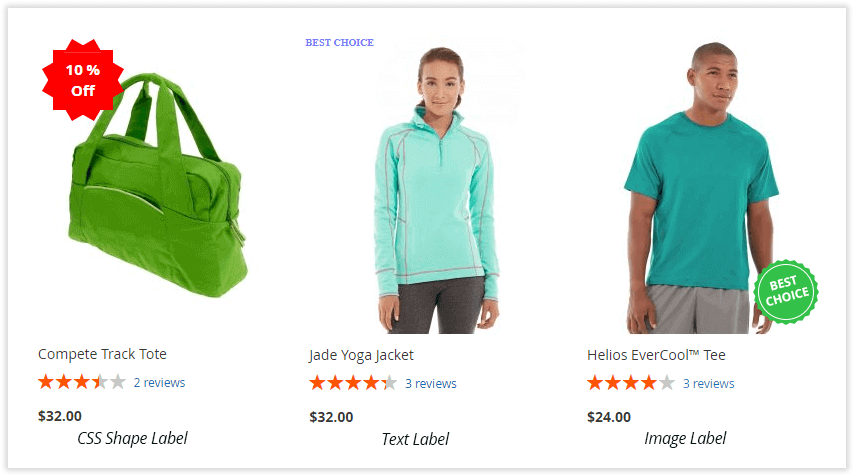
Below you can see how each label type looks on the storefront:
Obligatory parameters defined, proceed to the design of the label:
- Size - choose one of the three sizes available for configuration: Large, Medium and Small;
- Test Text - try various wordings, and see how they look on the label (optional, but advisable);
- Customize Container - configure CSS shape settings;
- Customize Label - specify CSS label parameters.
|
The sizes of the labels correspond to the sizes of the pages they will appear on. Labels automatically appear over the product image or/and next to product price on all of the following pages:
Thereby, Product page is L, Catalague page - M and Mini Cart - S. |
|
We suggest that you configure all the parameters herein to ensure the good look of your labels on all pages. All changes to the text, container or label will be visible in real time in the area just above the size alternatives. To conditionally split the text into separate lines use the {br} variable where the line break is meant to be. |
The Customize Container and Customize Label functions have two alternatives: General Settings and Advanced Settings. The latter allow using custom CSS codes.
General settings include
- Background Color;
- Hight and Width of the container;
- Font Color;
- Font Size.
When finished, there are three options to complete work on the new label:
- Click 'Save' button at the top of the page to save the label and get redirected to the Labels grid;
- Click the 'Save and Continue Edit' option if you want to keep configuring it;
- Click the little triangle next to the 'Save' button and then 'Save and Duplicate' to save the label and keep working with the duplicate of thereof.
Browsing Rules
The label created, define a display rule for it. Proceed to Marketing → Product Labels by Aheadworks → Rules.
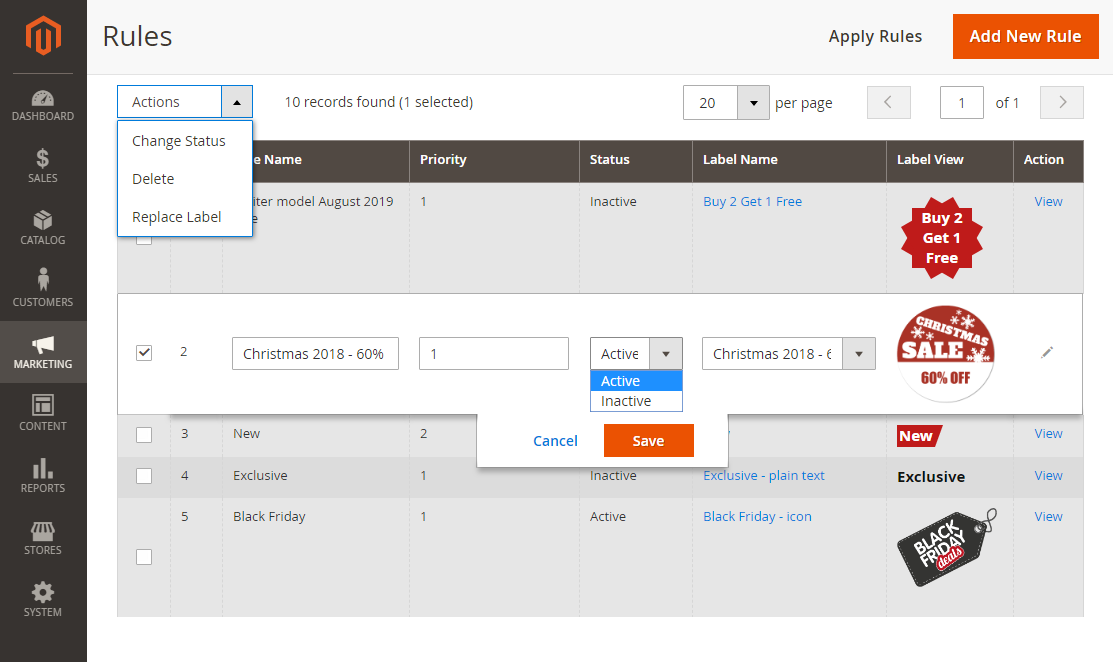
The 'Rules' grid lists all the previously configured display rules. The data presented in the grid is divided into the following columns:
- ID - the ID of the rule;
- Rule Name - the title of the rule;
- Priority - the priority of the rule defining the display order of the labels put on the same product(s) and/or product group(s));
- Status - the status of the rule (active or inactive);
- Label Name - the title of the label;
- Action - contains the 'View' active link to take you to the Edit Rule page.
If required, you can change the name, priority, status, and position of a rule and re-assign labels to them right from the grid. Click the rule row and edit the values in the corresponding columns.
From the 'Actions' box above the grid, you can perform individual or mass actions as follows:
- Change Status - edit the status of the selected rule(s): enable or disable;
- Delete - delete the selected rule(s);
- Replace label - assign a new label to the selected rule(s).
To add a new rule, click the 'Add New Rule' button at the top right of the page.
|
Creating a rule may not be enough, should you want it to work. The 'Apply Rules' button, next to the Add New Rule one allows updating the catalog and brings your rules to life. |
|
To re-index the configured rules and apply them on the storefront, go to System → Tools → Index Management and select the 'Aheadworks Product Labels' extension to be reindexed. |
Creating/Editing Rules
The extension presumes each new rule gets the 'Enabled' flag from the start, should you wish otherwise change the status of the rule with the 'Enable Rule' parameter herein.
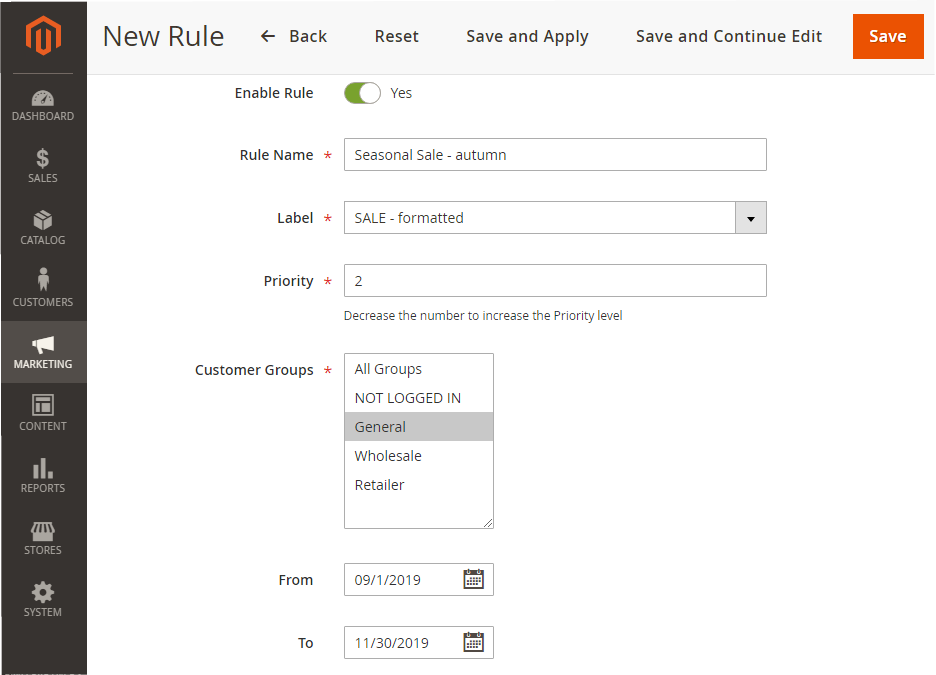
There are four obligatory parameters on this page:
- Rule Name - suggest a name for the rule;
- Label - opt for one of the labels on the list;
- Priority - indicate the level of priority with regard to other rules assigned to this label;
- Customer Goups - choose groups of customers to fall under the rule.
Next, select rule duration from the 'From' and 'To' fields, and proceed to wording and conditioning the label.
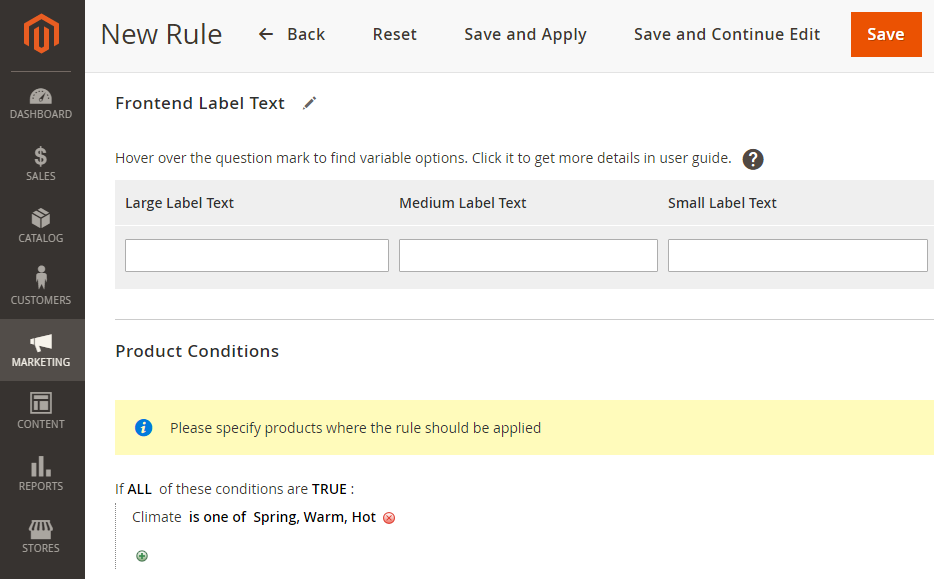
It is advisable you spare a minute to think if your label fits your message within the full range of label sizes. The 'Test Text' field on the Create/Edit label page allows you to test your wordings, and the 'Frontend Label Text' block herein - to set the chosen ones.
|
For example, a 'Buy 2{br}Get 1{br}Free' wording (default font size) may be all right for a large label, but will be too long for a small one. Thereby, consider paraphrasing to a synonymous phrase: 3 for 2, or similar. |
The 'Frontend Label Text' block allows using store variables to support label wordings with dynamic data. Here is the list of variables available for use:
- {attribute:code} - attribute value (example: 'Black items on sale');
- {save_percent} - discount percentage (example: 'Save 5%');
- {save_amount} - discount amount (example: 'Save 50$');
- {price} - regular price (example: 'Price is 10$');
- {special_price} - special price (example: 'For 10$ only');
- {stock} - stock amount (example: '3 items left');
- {br} - new line (used to move some part of the text to a new line)
- {sku} - product SKU (used to specify stock keeping units of the product(s) )
- {spdl} - X days left for a special price (example: '10 days left for a special price');
- {sphl} - X hours left for a special price (example: '3 hours left for a special price').
Next, proceed to the 'Product Conditions' section. This is where you can set the products or product group(s) the label rule will be assigned to.
Add conditions to the given 'Product Attributes' and/or 'Stock Range' parameters. To add conditions click on the green button and choose an attibute for conditioning. For further configuration proceed to the 'ALL', 'TRUE', 'IS', '...' and other clickable elements (in bold font) to alter them in accordance with your rule.
To delete a condition click on the red button.
'Stock Range' condition
As of version 1.2.0, the 'Stock Range' condition is added, so that labels are displayed for the out-of-stock products.
If set Stock Range equals to 0 condition, a label will be shown for out-of-stock products only.
'Is New' condition
The 'Is New' condition enables store owners to add a "New" label to products that have recently been added to the store's inventory.
-
Set the number of days during which a new label is automatically added (starting from the creation date);
-
For configurable, bundle and grouped products: creation date of parent product is only considered.
The rule is configured. There are three options to save the rule:
- The 'Save' button redirects you to the Rules Grid;
- The 'Save and Continue Edit' button saves the rule and keeps you on the Create/Edit Rule page;
- The 'Save and Apply' button saves the rule, applies it and redirects you to the Rules Grid.
|
Remember to put the newly created/updated rules into action by applying them and reindexing the extension. |
|
Label Display on Different Product Types Every child product in your catalog can be covered by multiple conditions. Thus, child products might have multiple labels. This in turn may pile the parent product up with labels. Which labels should be displayed? Example and solution: Assign a label to those child-items which stock is greater than 50, and another label - to items with stock less than 50. Thereby, different child products will have different stock conditions. If you need to put labels on parent items only, set their attributes in product settings. By doing this, you will pinpoint products that should have labels put on them. For stock conditions, this will work in the following way: first, you should sum up stock values of all child products. Then, define whether this sum meets the previously specified conditions. If yes, display a label on the parent product. |
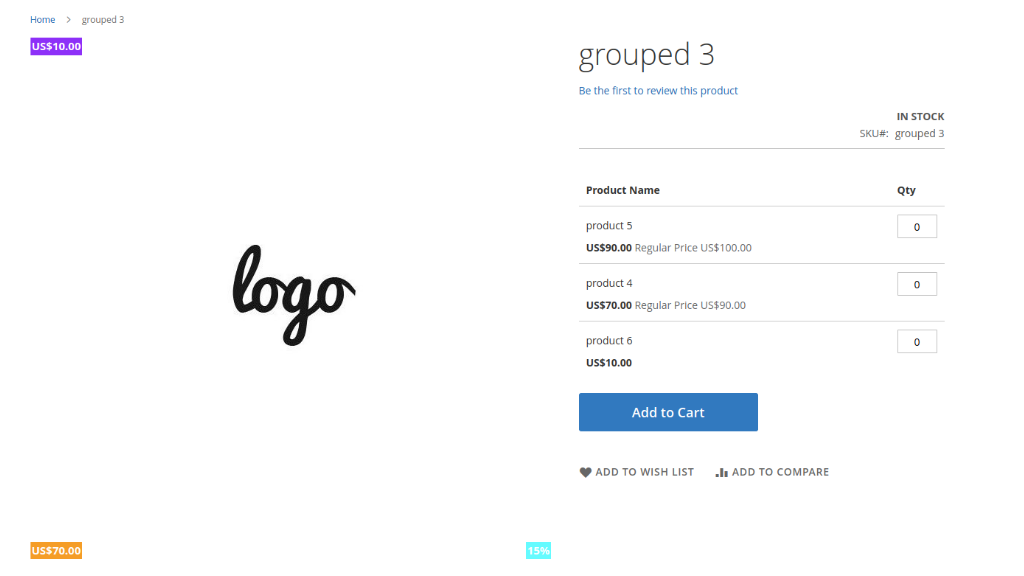
Label Display on Grouped Products
As of version 1.4.0, it is possible to apply labels to the grouped products. List of variables available for use:
-
{save_percent} - percent is calculated by sum of all child products;
-
{price} - the attribute shows the minimal price among all child products (it’s the same as price of a grouped product on the Catalog page);
-
{special_price} - it shows only the special price of one child product (minimal one).
Grouped product isn’t considered in conditions with Special Price in label-rules.
|
As of version 1.2.0, the extension supports native Magento Catalog Price Rules, so merchants can configure the rule to show labels when the product price is discounted by Catalog Price Rule and {save_percent} variable should calculate a discount percent. To configure the rule, go to Marketing > Catalog Price Rule. |
Extension Settings
To configure general parameters of the extension, go to Stores > Configuration > AHEADWORKS EXTENSIONS > Product Labels by Aheadworks.
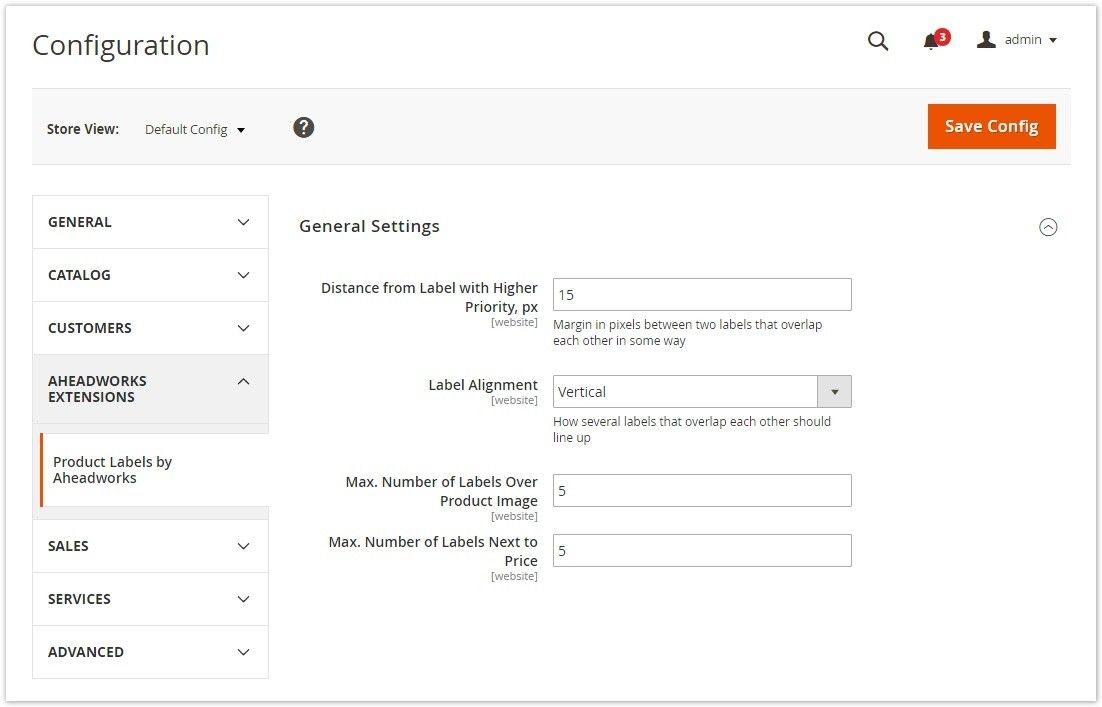
The 'Configuration' page includes four parameters. This is where you manage multiple labels assigned to same products.
- Distance from Label with Higher Priority, px - the margin between the two overlapping labels (the ones of the same rule priority);
- Label Alignment - how overlapping labels should line up: horizontally or vertically;
- Max. Number of Labels Over Product Image - the maximum number of labels that can be put on product images;
- Max. Number of Labels Next to Price - the maximum number of labels that can be put next to product prices.
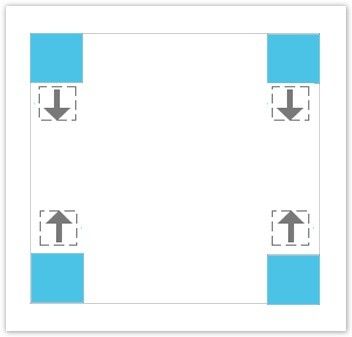
Labels can be aligned vertically by one of the ways introduced below.
Horizontal alignment implies the following options:
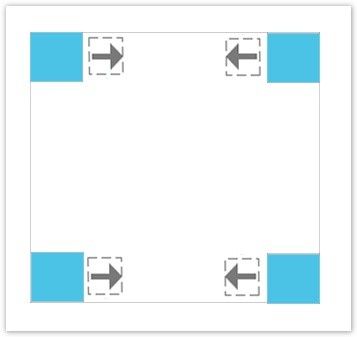
Labels with highest priorities will remain in the positions defined in the rules. Other labels will find their location with regard to the distance and alignment parameters set in the general configuration settings.
Configuring CSS Parameters
Product Labels for Magento 2 allows configuring almost any visual aspect of labels.
Customize CSS Container
In the 'Customize Container' section, you can tweak the following parameters, inter alia:
- background - shape color (alphabetic, HEX, RGB, RGBA, HSL, or HSLA values);
- border-radius - shape round radius;
- margin - shape external indent (in pixels);
- transform:rotate - shape rotation angle (in degrees);
- width - shape width (in pixels);
- height - shape height (in pixels);
- max-width - maximum shape width (in pixels);
- max-height - maximum shape height (in pixels);
- min-width - minimum shape width (in pixels);
- min-height - minimum shape height (in pixels);
- opacity - shape opacity (numerical value).
Customize other CSS Parameters
In addition to the CSS container, you can configure the look of your labels with the following parameters, inter alia:
- color - text color (alphabetic, HEX, RGB, RGBA, HSL, or HSLA values);
- border - border width and color (alphabetic and/or pixel values);
- padding - internal indent (in pixels);
- font - text font (alphabetic values);
- font-size - text size (alphabetic and/or pixel values).
|
The scope of available fonts is specified by the Magento theme installed on the store. |
See the full list of CSS parameters here.
Label Examples (with CSS Parameters)
Label Type: Shape
| Label Example | Shape Type |
CSS Code |
 |
Point Burst |
width: 40px; |
| Rectangle |
background-color: #ec4e0f; |
|
 |
Flag |
width: 50px; |
 |
Circle |
background-color: transparent; |
| Rectangle |
background-color: transparent; |
|
| Rectangle with Bevel Down |
background-color: #437dd6; |
Label Type: Text
| Label Example |
CSS Code |
|
color: #4aa51d; |
Label Type: Picture
|
Label Example |
Image Link | CSS Code |
|
|
bestchoice.png (text included in the picture) | width: 66px; height: 66px; |
|
|
flag1.png |
width: 100px; |
|
|
circle1.png |
width: 80px; |


Note For Developers
Please make sure this note is for developers only. The actions described herein do not affect or cancel the functionality described above in any way, but allow for further customization of the module on the developer level.
|
If you need to change the location of a label on a page, alter the view.xml file. You might like to move the label above the price (instead of having it below the price, by default) or place it somewhere else. |
The old way was to modify di.xml and change configuration inside move_to_selector_by_area array argument. This approach is still supported for backward compatibility but it’s marked as deprecated.
![]()
Already used our product?
We would appreciate your feedback. Please, leave a review.