
User Manual - RMA
- Installing M2 RMA
- Installing Hyvä Theme Compatibility Module
- Uninstalling M2 RMA
- Introducing M2 RMA
- Compatibility
- Getting Around
- Extension Settings
- Backend Configuration
- Order Page Improvements
Magento 2 RMA completely arranges the return merchandise process in web stores. Customers can create return requests and monitor them from their accounts. Store admins can arrange requests from the backend by adding custom fields to an RMA request form, communicating with customers in the dedicated chat area, and sending email alerts and custom canned responses while requests are processed.
API documentation link
Installing M2 RMA
|
NOTE: To proceed with the installation of our additional modules, it is essential to first have the RMA module installed. Kindly refrain from installing additional modules if the RMA module is not yet installed. |
|
NOTE: Please be very careful when uninstalling this module. This module uses a declarative DB scheme. Once the module is uninstalled the DB tables will be lost. |
Step 1 (Magento 2 Community and Enterprise)
Command Line Installation
- Backup your web directory and store database
- Download the RMA installation package
- Upload contents of the RMA installation package to your store root directory
- In SSH console of your server navigate to your store root folder:
cd path_to_the_store_root_folder |
run the following command:
php bin/magento module:enable Aheadworks_Rma |
then:
php bin/magento setup:upgrade |
after:
php bin/magento setup:static-content:deploy -f |
5. Flush store cache; log out from the backend and log in again
|
Make sure the installation is done from the FTP administrator account. Otherwise, set 775 permissions to the store root directory after the extension is deployed. |
Composer Installation
If you are installing an extension from Aheadworks for the first time, you need to add our composer repository to your Magento store:
1. Login to your ssh console and navigate to your store folder:
cd path_to_the_store_root_folder |
Run the following command:
composer config repositories.aheadworks composer https://dist.aheadworks.com/ |
After the command was executed successfully, you can use the composer to install the products.
To install the extension:
2. Login to your ssh console and navigate to your store folder:
cd path_to_the_store_root_folder |
3. Run the following command to install the latest version of the extension:
composer require aheadworks/module-rma |
if you need to install a specific version, run this command:
composer require aheadworks/module-rma:<version> |
|
Specify the version of the extension in <version> |
When prompted, enter Public Key (Username) and Private Key (Password):
.png?version=1&modificationDate=1613637093011&cacheVersion=1&api=v2&width=450)
Both Public Key (Username) and Private Key (Password) can be found in My Projects and Licenses in your personal account on our site:
 |
4. Enable the extension:
php -f bin/magento module:enable <Module_Name> |
|
Add the product name in <Module_Name> |
Next, register the extension:
bin/magento setup:upgrade |
Recompile your Magento store if you are in the Production mode:
bin/magento setup:di:compile |
To verify that the extension is enabled, run this command:
bin/magento module:status |
Clean store cache, by running the following command:
bin/magento cache:clean |
Log out and Log in the backend again.
To upgrade the extension:
5. To update or upgrade an extension:
Download the updated extension file. Take note of the module-name and version. Export the contents to your Magento root.
If a composer package exists for the extension, run one of the following.
Update per module name:
composer update aheadworks/module-rma |
Updater per version:
composer require aheadworks/module-rma:<version> |
Run the following commands to upgrade, deploy, and clean the cache.
php bin/magento setup:upgrade --keep-generated |
Step 2 - Disable native RMA
For seamless experience with the present RMA module and Magento 2.3 Enterprise Edition / Cloud Edition, make sure the native Magento 2 RMA is disabled. Refer to the following steps to do so:
- Navigate to Stores > Configuration > Sales> Sales;
- Set Enable RMA on Storefront and Enable RMA on Product Level to 'No'.
|
Get Data Migration Tool by clicking on the following links: https://media.aheadworks.com/migration-tools/RMA/rma-data-migration-tool-2.1.x.zip https://media.aheadworks.com/migration-tools/RMA/rma-data-migration-tool-2.2.x.zip |
Installing Hyvä Theme Compatibility Module
Starting from RMA version 1.9.0 and its Hyvä Compatibility Module version 1.1.0, the Hyvä Compatibility Module is available only via the Aheadworks Composer repository.
Older versions of the Hyvä Compatibility Module can still be accessed via GitLab.
Installing Hyvä-compatibility module 1.1.0 and newer
To install Hyvä Compatibility Module 1.1.0 or newer via Aheadworks Composer, run the following command:
composer require aheadworks/module-rma-hyva
Installing older versions of Hyvä-compatibility module
To install an older version of the Hyvä Compatibility Module, use the following command:
composer require hyva-themes/magento2-aheadworks-rma
Hyvä-compatibility Modules with CSP Compliance
Starting from Hyvä Compatibility Module version 1.1.0, all Hyvä compatibility modules are CSP compliant. Older versions remain non-CSP compliant.
Note: The CSP-compliant modules may not be compatible with older versions of Hyvä Theme (1.3.9 and older). Before updating, please verify which version of the Hyvä Theme your store is using.
Uninstalling M2 RMA
Since Magento introduced declarative Database you need to be very carefull when uninstalling or disabling the module.
|
NOTE: Please be very careful when uninstalling/disabling this module. This module uses a declarative DB scheme. Once the module is uninstalled the DB tables will be lost. |
Manual Removal
-
Run command:
|
It will remove data patch wilth module sample data so you can install it again in future.
2. Disable extension:
|
3. Run setup upgrade:
|
It will remove module related tables from the system
4. Remove module files manually:
|
Compatibility
|
Module Version |
Magento Version |
|
1.6.0 and earlier versions |
2.3.Х - 2.3.6 2.4.0 - 2.4.3 |
|
As of version 1.6.1 |
2.3.7-p3+ 2.4.0 - 2.4.4 |
|
As of version 1.6.2 |
2.3.7-p3+ 2.4.0 - 2.4.5 |
|
As of version 1.7.0 |
2.4.3 - 2.4.5 |
|
As of version 1.7.1 |
2.4.4 - 2.4.6 |
|
As of version 1.8.5 |
2.4.6 - 2.4.8 |
|
As of version 1.10.1 |
2.4.6 - 2.4.9 |
The PHP version depends on your current Magento version. Please, refer to your Magento version release notes.
Introducing M2 RMA
The Magento 2 RMA extension handles all the key aspects of return merchandise management:
- RMA request creation & monitoring in both the frontend and backend;
- Custom RMA fields for the RMA request form;
- Per-item control (for multi-product returns);
- Message thread with file attachments and admin notes;
- Email alerts configured individually per RMA status;
- Configurable canned responses.
Integrations
Extension Logic
In the backend, the module generally consists of 4 grids and the configuration page. Store admins can create/monitor return requests, configure email alerts along with canned responses, exchange messages with customers in the dedicated thread (and optionally leave internal notes not visible to requesters and attach files to the thread), and add custom fields to the request form. On the storefront, customers can monitor their requests from a separate section, create new requests as well as use the same message thread functionality as in the admin area.
Getting Around
The Magento 2 RMA extension comes ready for work right after installation. Once installed, it introduces the 'My Returns' section to a customer account page and the 'Create New Return' link to the store footer. By following both of the links, you can create a new RMA request.
Now, let's request the return from the 'My Returns' section. To do this, click on the Create New Return button.
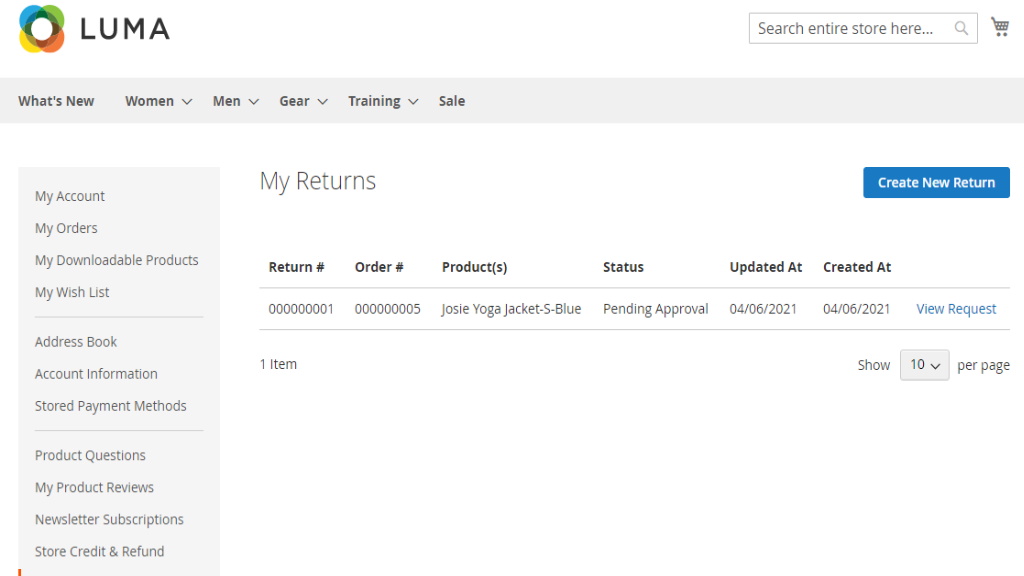
Along with the 'My Returns' section and the 'Create New Return' link, customers can request a return from the order view page in the 'My Orders' account section. To do this, they should click on the 'Request Return' active link on the order details page.
|
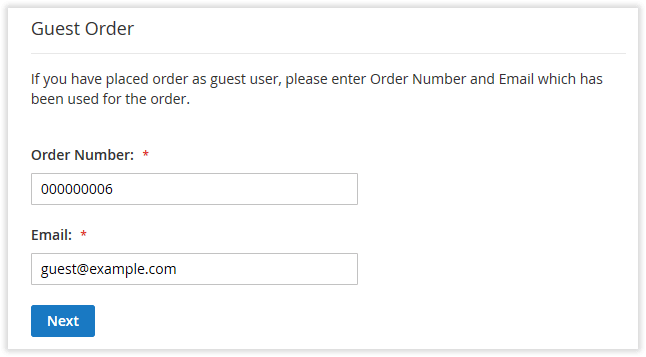
Thanks to the RMA extension, you can allow your guest customers to ask for a return. To create a return request, a guest customer should click on the 'Create New Return' active link in the store main page's footer. Here the module adds the 'Guest Order' section where the guest should specify their email address used to place the order and the order number.
|
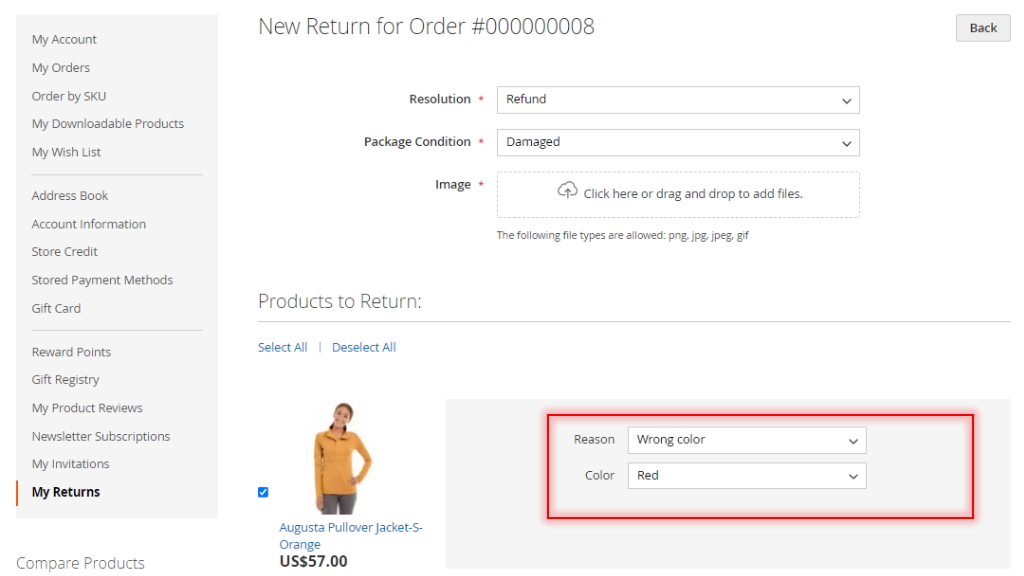
Next, select the item(s) you want to return and specify the item quantity (if you need to return several items). Choose the Resolution for the return and Package Condition. Those are the custom fields that come with the RMA extension by default.
|
You can add other custom fields or edit the existing ones in the corresponding backend section. |
Once done, click on the Next button to proceed to the next step.
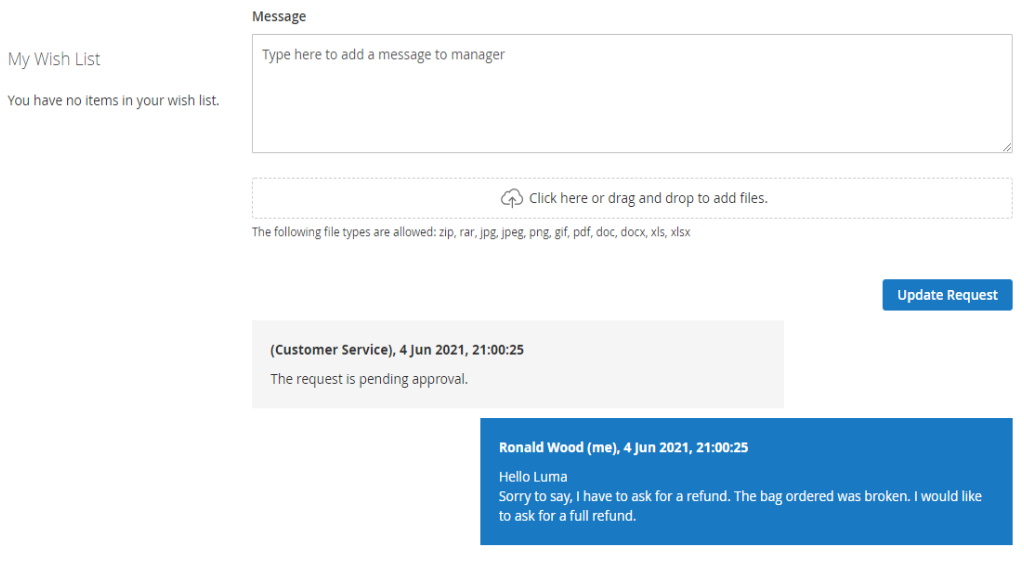
When the items are selected and custom fields are filled in, you can add a message to your request. The message will be emailed to an admin.
|
Both customer and admin messages are combined in a thread that can be found under the corresponding RMA request.
Once done, click on the Submit Request button. The request is submitted. All the request-related information along with the message thread can be found in the 'My Returns' section. |
|
Currently, products from canceled RMA requests are not available for a new RMA request. |
Extension Settings
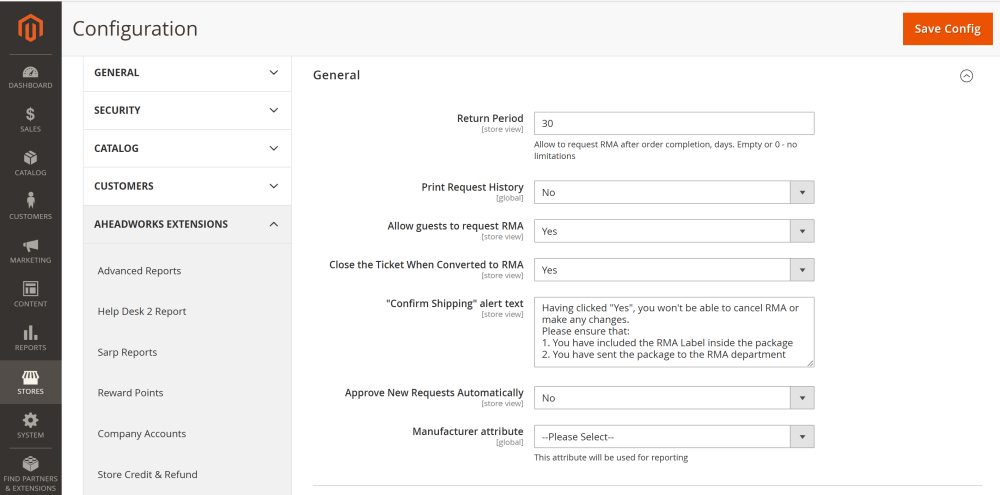
General
In the 'General' setting section, you can adjust the basic extension parameters:
-
Return Period - defines how many days after placing the order the customer can ask for the return;
-
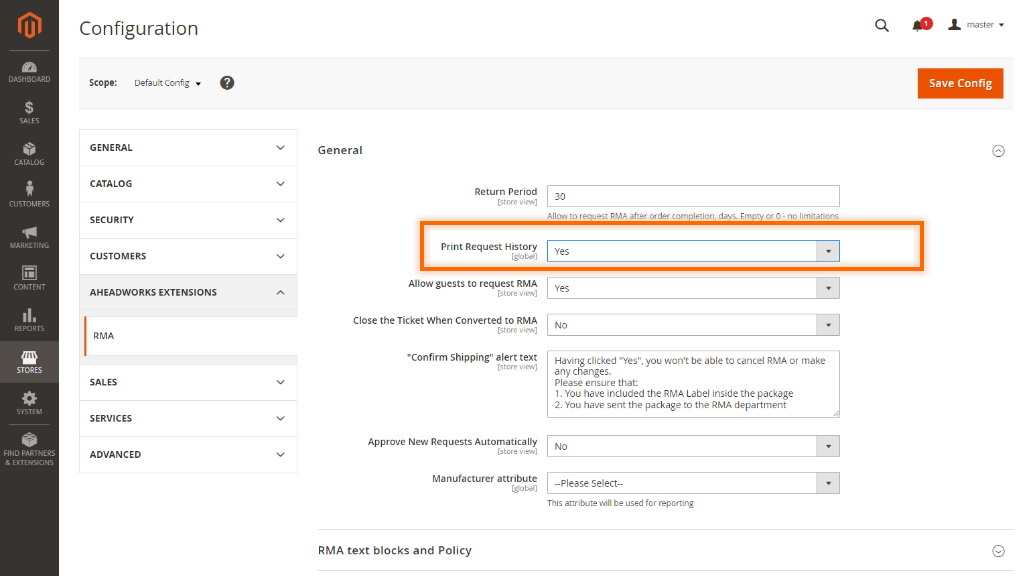
Print Request History – defines whether the RMA request history is included when printing RMA labels. If set to "Yes," the history of messages in the request will be printed. Images attached to messages will also be printed, while other file types are ignored.
-
Allow guests to request RMA - defines if guest customers can ask for the refund (email and order ID are required);
-
* Close the Ticket When Converted to RMA – specifies whether the related support ticket should be automatically closed when it is converted into an RMA request.
-
Confirm Shipping" alert text - edits the 'Confirm Shipping' pop-up notification;
-
Approve New Requests Automatically - defines if the incoming return requests should be approved automatically.
| Note: The option marked with an asterisk (*) is available only when the RMA extension is integrated with the Help Desk Ultimate extension. |
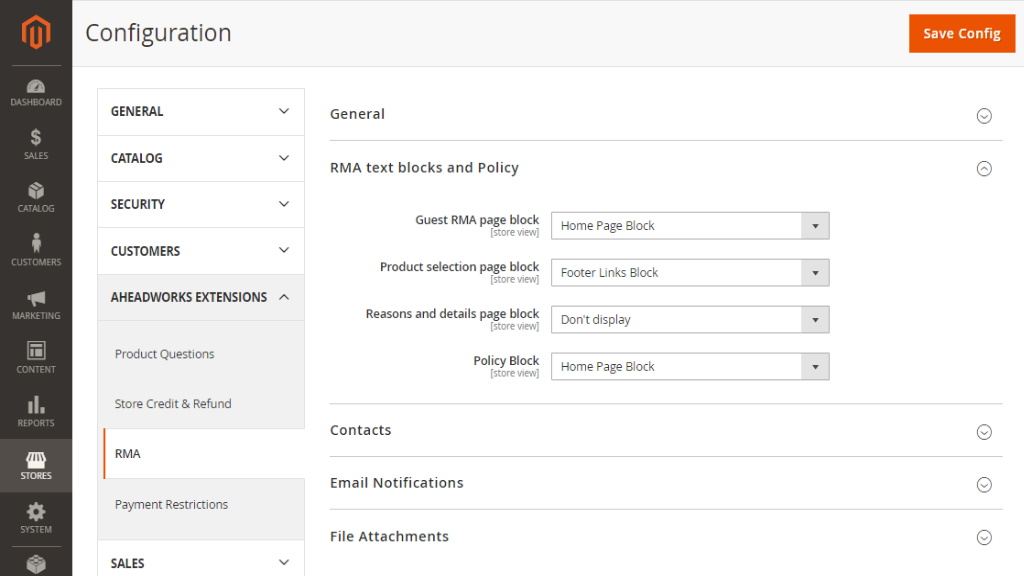
RMA Text Blocks and Policy
This setting section displays CMS blocks at the specific RMA request steps.
Every field represents the corresponding step with the box of all CMS blocks available in the store.
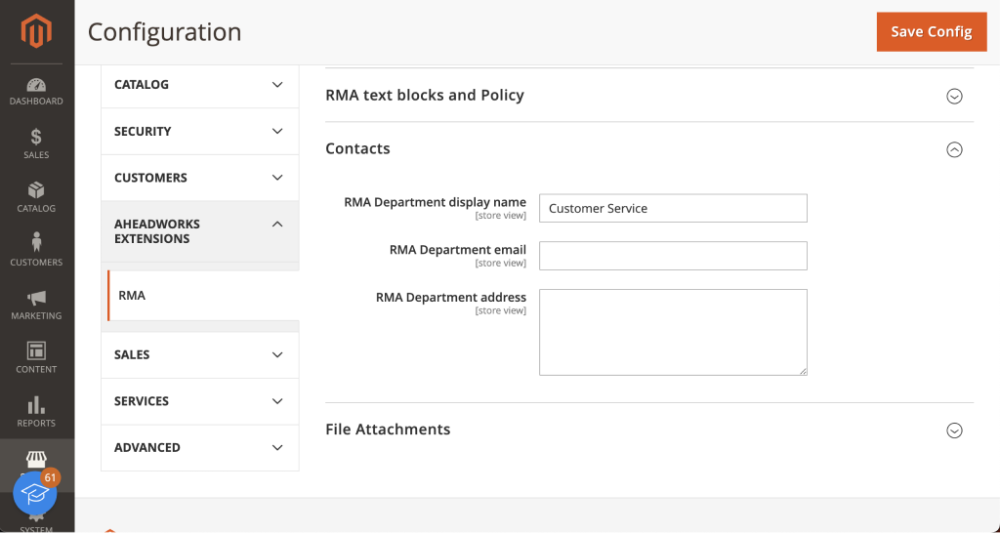
Contacts
This setting section defines your RMA department credentials such as the name displayed, email, and address.
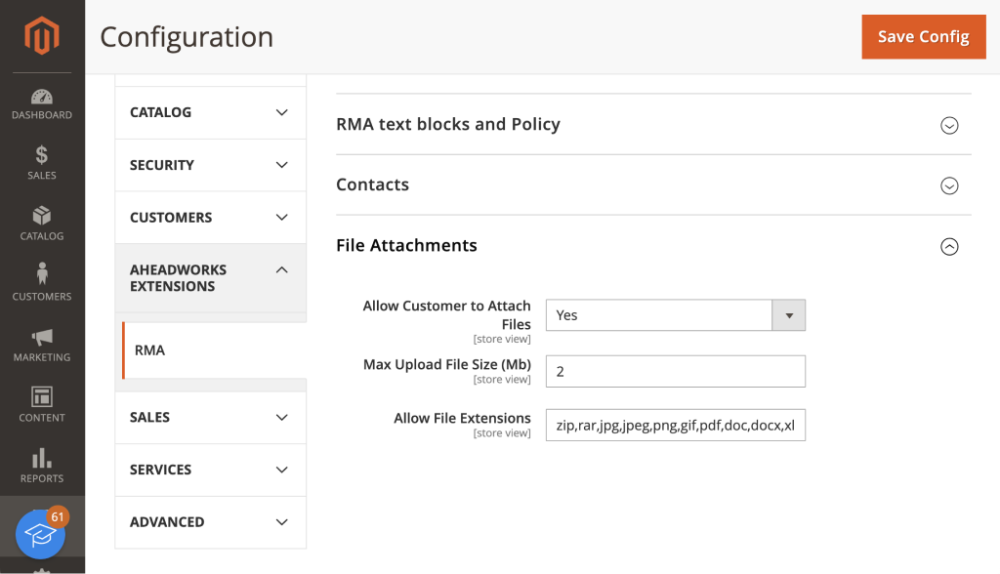
File Attachments
This setting section makes it possible for customers to attach files to their return requests. Here you can also specify the maximum size of the uploaded files in megabytes and available file extensions.
Backend Configuration
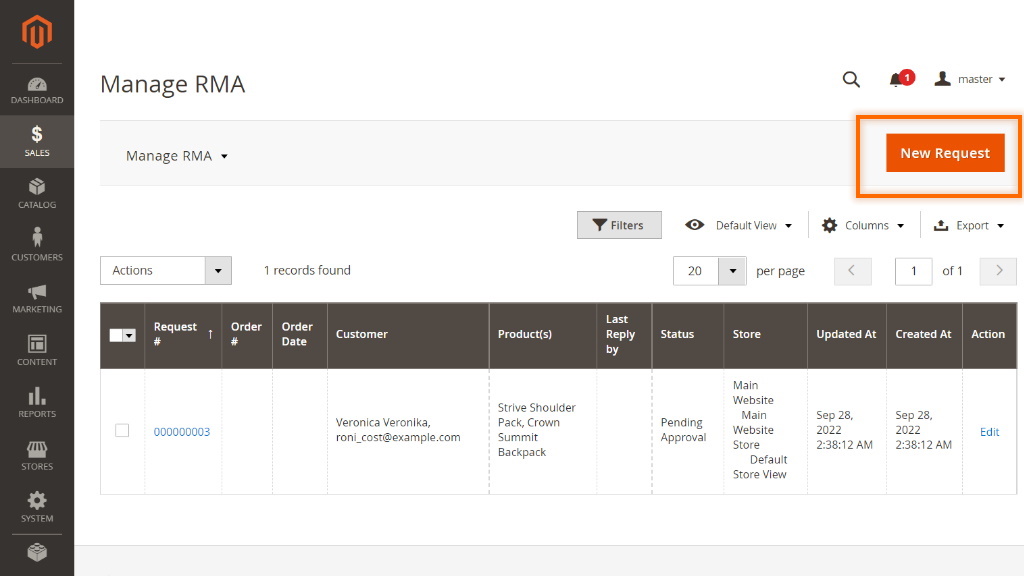
Manage RMA
Manage RMA is the main section of the extension.
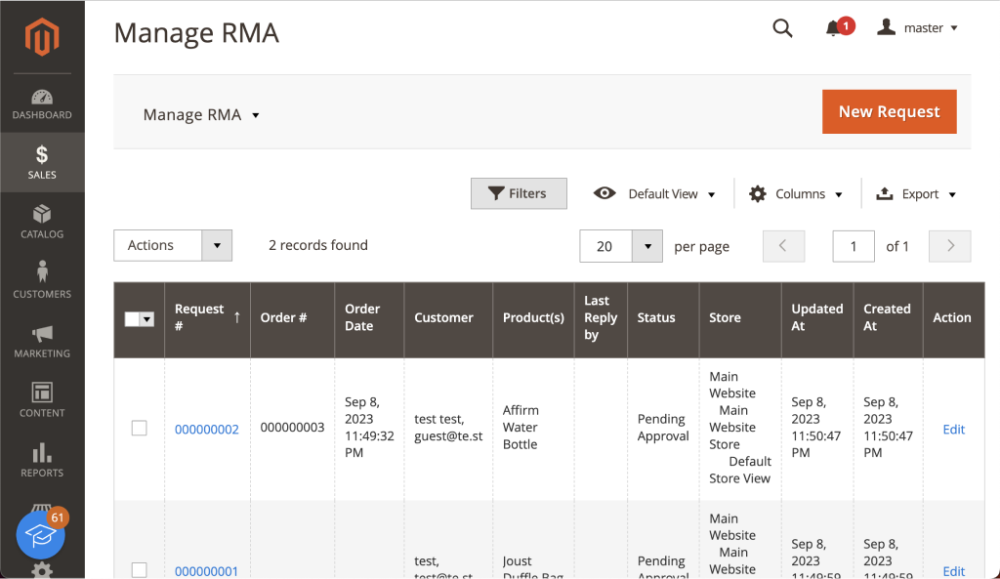
Here you can manage all the RMA requests submitted by you and your customers. With the 'Actions' box above the grid, you can change the request status individually or massively to:
- Approved;
- Canceled;
- Closed;
- Issue refund;
- Package received;
- Package sent;
- Pending approval.
Here, you can also export selected request or the whole list in CSV/Excel.
|
Currently, products from canceled RMA requests are not available for a new RMA request. |
Creating RMA Requests from the Backend
To create a new return request, click on the New Request button above the grid.
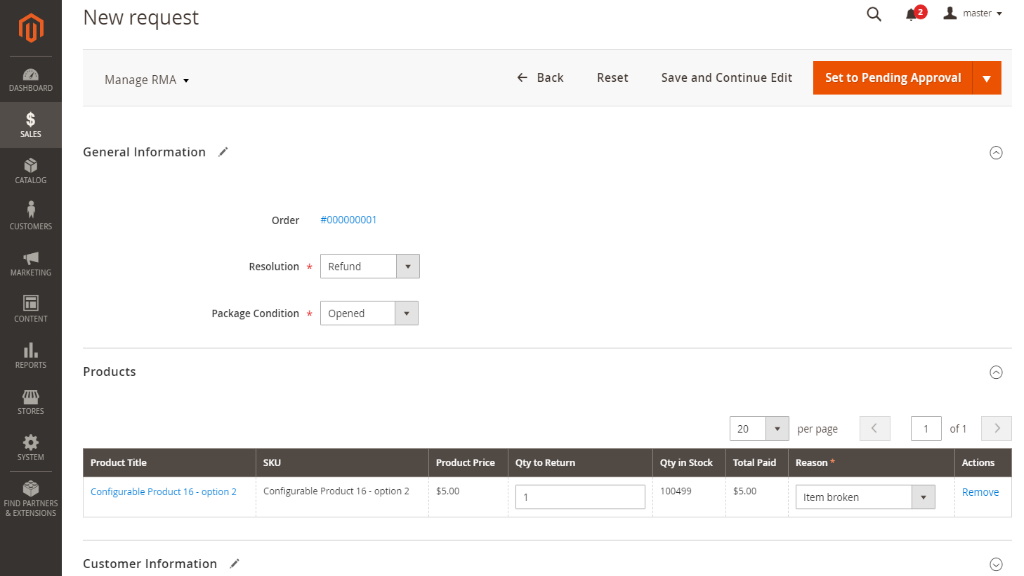
The 'New Request' page consists of several sections:
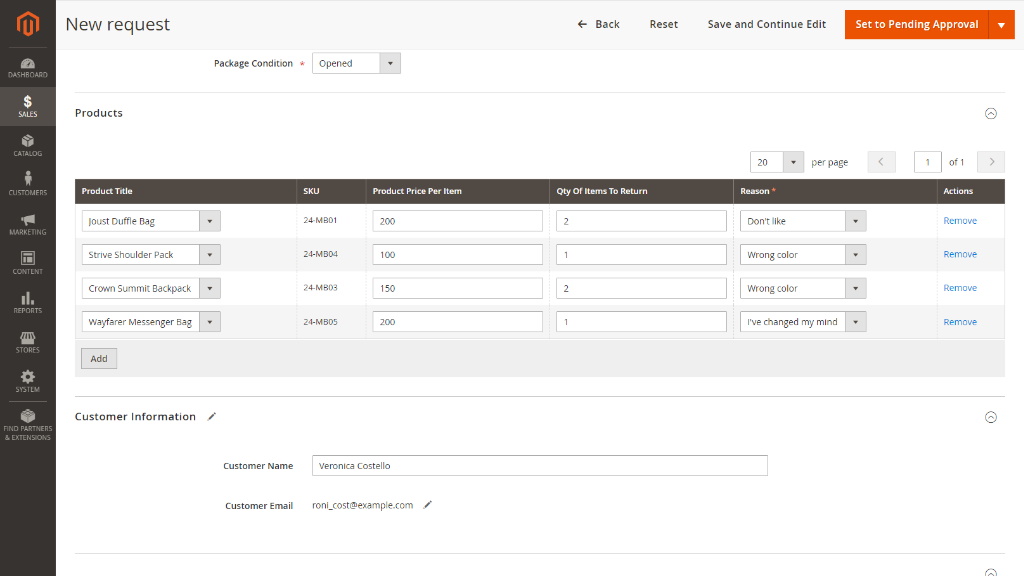
- General Information. With these options, you can select the order the request relates to. Next, you should select the Resolution you want to apply and Package condition reported by a customer if you use the above custom fields for your request forms.
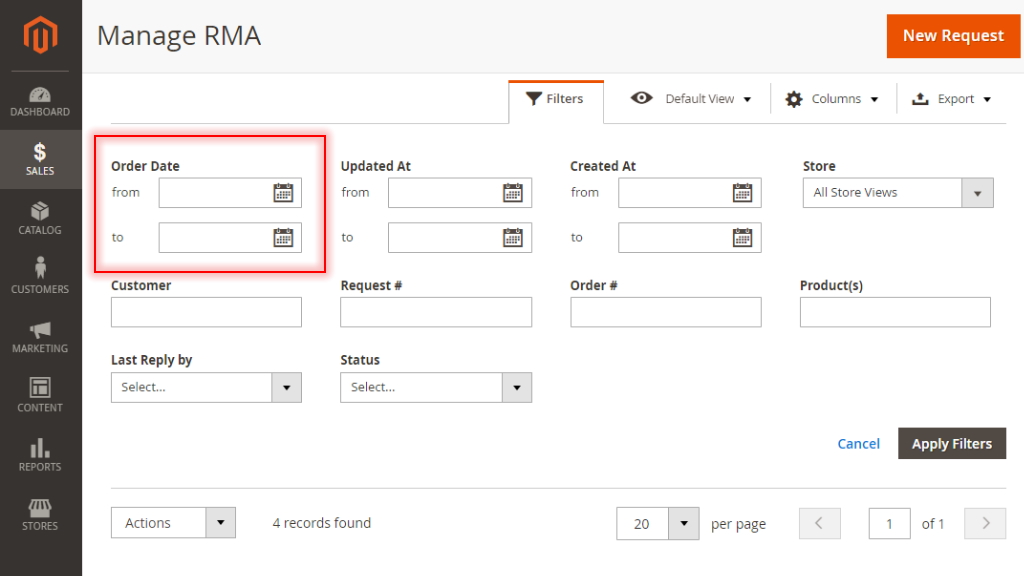
Order Date - the column with order date. Admin can select/deselect the order date to show in the columns and filter by order date.
|
Note: You can create RMA requests for completed orders only. |
- Products. Products included in the order. From the 'Products' grid, you can amend the number of returned items and the reason to send them back individually for each item. You can also remove certain products from the grid if you don't want them to be included in the request.
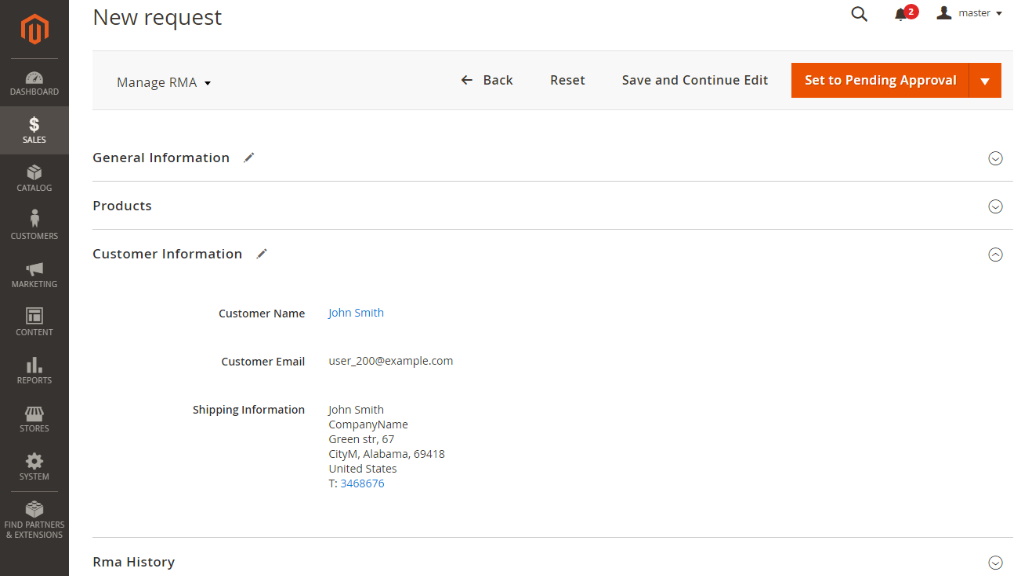
- Customer Information. The information about the customer is automatically taken from the order.
- RMA History. Here admin can exchange messages with the customer and attach files if necessary.
|
Integration with Coupon Code Generator Coupon Code Generator extension, when installed along with RMA by Aheadworks, allows admin to create a coupon right from an RMA request. Select the rule from the drop down list and click on the 'Generate Coupon' button. |
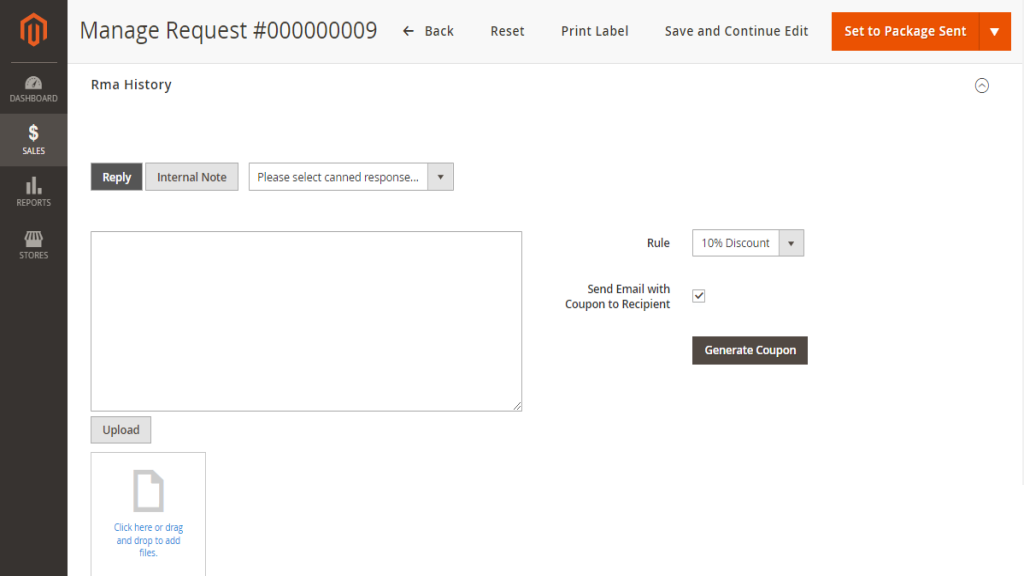
Messaging is possible in several ways.
- You can write an individual notification for the customer by specifying the message in the text area and clicking Reply above the area;
- You can leave an internal note for other admins. For this purpose, click Internal Note. The whole text area below will turn yellow to make you sure that the message is for internal use only;
- Finally, you can select a canned response to be sent to the customer in response to their particular actions.
|
Canned responses are customizable values. Configure them from the 'Canned Responses' page. |
In addition to messages, you can also attach files to the newly created request.
|
In Magento 2.3.0 installed on PHP 7.2, the files can't be uploaded to the RMA request form in the admin area. The problem relates to the bug in the 2.3.0 version. To fix it, apply the following patch: https://github.com/magento/magento2/pull/19249 |
As soon as the new RMA request is created, you can manage it the same way as the requests created by customers.
Print Request History
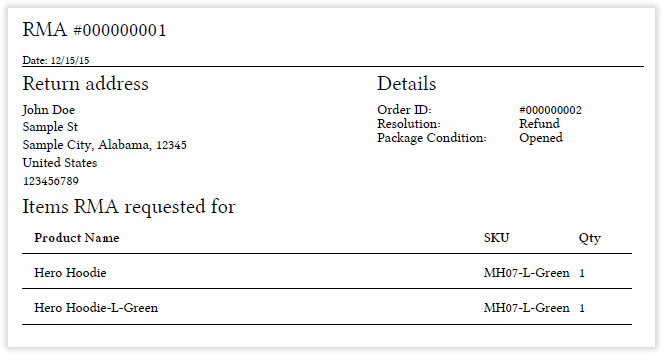
Merchants can print RMA labels with RMA History included, so they could document what steps need to be taken to resolve the RMA issue.
To print RMA History go to Stores > Configuration > Aheadworks Extension > RMA > General and set Print Request History to ‘Yes’.
Print Request History - when the Print Request History setting is enabled, the history of messages in the request will be printed. If images are attached to messages, they will also be printed, all other file types will be ignored.
Creating RMA Requests without attaching it to an order from the Backend
As of 1.7.0 version, merchants are able to create requests from the backend without attaching it to an order, so they can handle requests purchased on a reseller website.
Steps:
1. To create a new return request, click on the ‘New Request’ button above the grid;
2. Click on the ‘Select Products’ button;
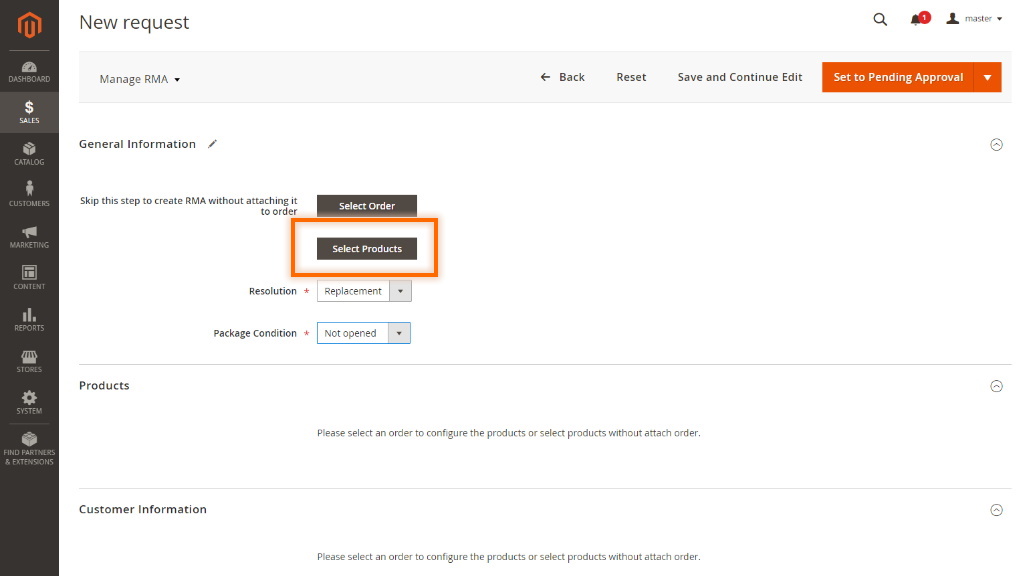
3. Choose products from the list using checkboxes and click on the ‘Add Selected Products’ button;
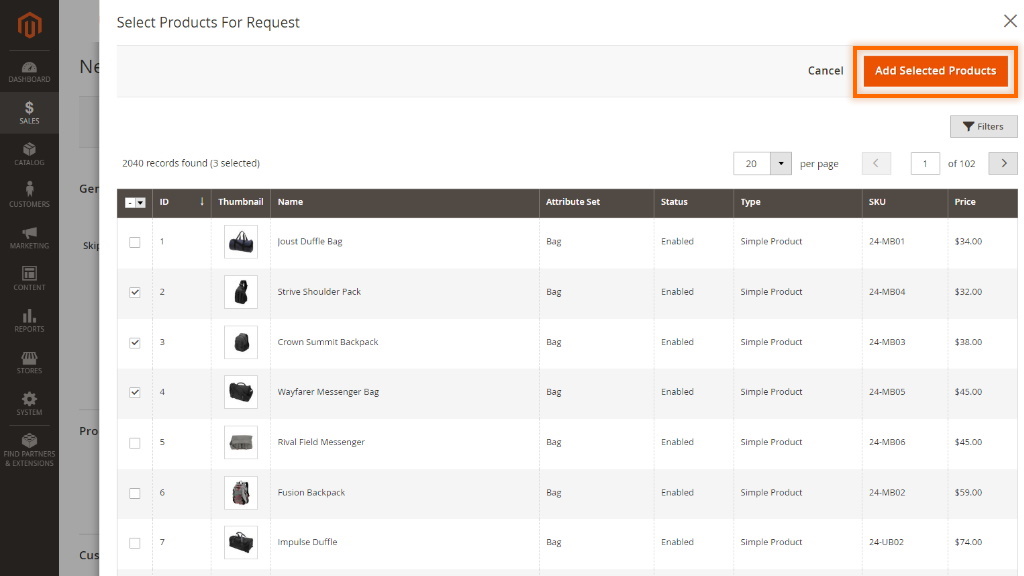
4. Enter Products and Customer data: Product Price Per Item, Qty Of Items To Return, Reason, Customer Name and Customer Email.
Managing RMA Requests
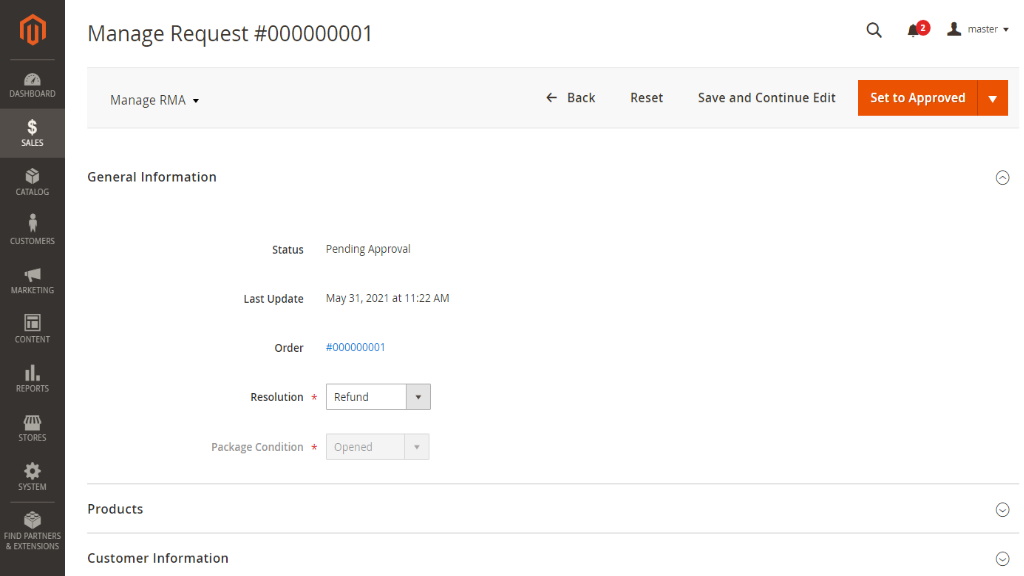
Click the Request's id (all id's are presented as active links in the 'Request #' column) to proceed to the 'Manage Request' page. The page looks almost the same way as the 'New Request' page. The only difference is that the 'Status' and 'Last Update date' parameters are presented there.
On this page, you can close, cancel, and approve the requests pending approval.
|
With version 1.4.0, we've added the ability to arrange a non-linear workflow. Now you can change request statuses according to your business needs and increase the effectiveness of your specific RMA model. |
Approving a Request
Approve the request by clicking Approve.
Now the email notifying the customer about the new reply and request status update will be sent.
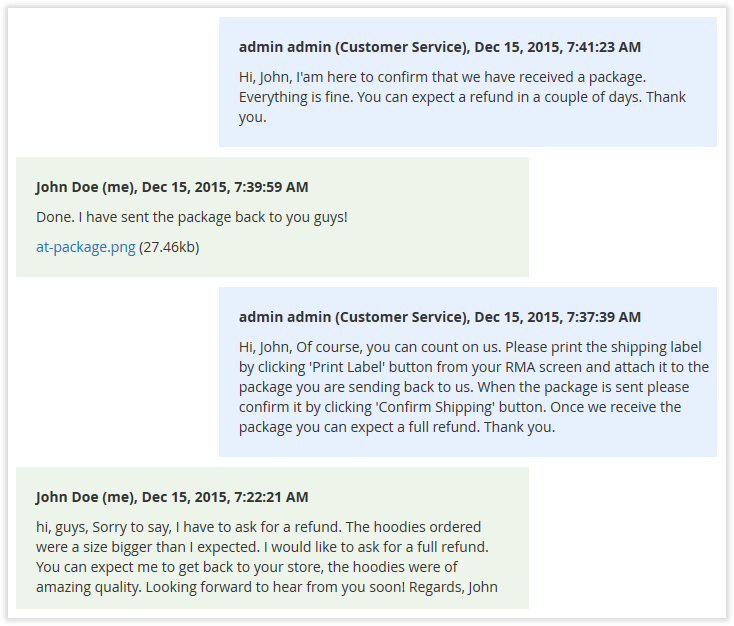
Customers will now have the option to print shipping labels (to be included in the RMA package) and notify the admin (via chat message) that the package has been sent back to your store.
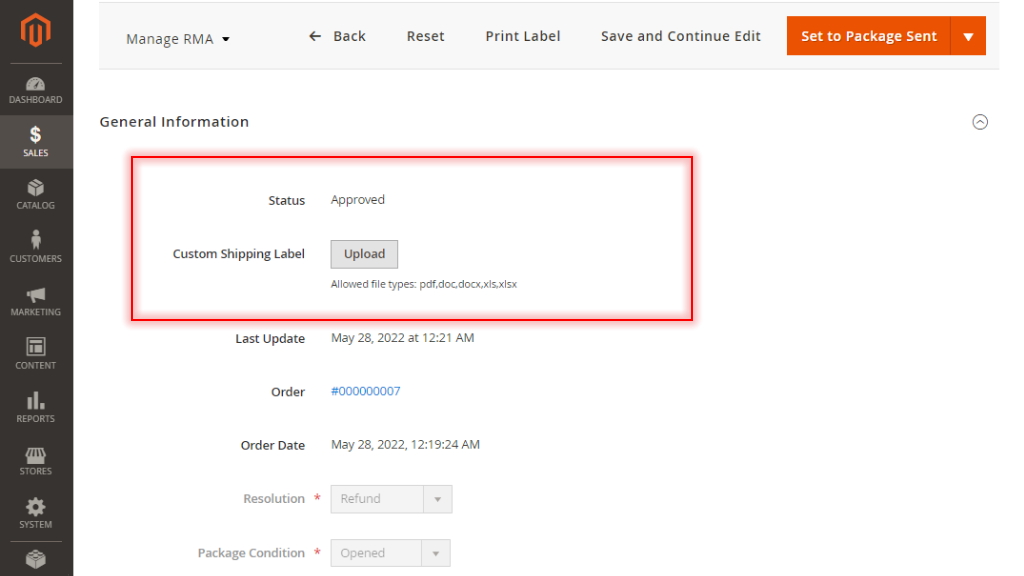
Uploading label
Once the request is approved, the admin gets the "Upload Shipping Label' button available. Then the customer gets an additional 'Download Shipping Label' button on the frontend. The button is only available to the customer on 2 conditions:
- request is approved
- there is a file uploaded by admin
If any of the conditions is not met, the customer doesn’t see the download button.
Printing Label
Label printing is now available from the backend so that you can use the label for working with warehouses.
Confirming Package Receiving
After the request has been approved, and the customer has confirmed that the package had been sent back to your store, you will need to confirm the receipt. Do this by clicking Confirm Package Receiving.
Creating a Replacement Order
As soon as the 'Package Received' status is applied, you can create a replacement order for the requests requiring a replacement.
Issuing a Refund
For the requests requiring a refund, you can create a credit memo right from the 'Manage Request' page.
Closing a Request
Finally, you can close the request as soon as the item is replaced or refunded.
That's it. The RMA request is successfully resolved. Let's proceed to the RMA extension's settings.
|
The Magento 2 RMA extension doesn't offer any refunding or postal services. Refunds are processed manually by any means necessary. |
Tracking returns at customer page in the backend
The extension adds a corresponding tab to a customer page in the backend where you can refer to when it's needed to follow the RMA requests of a particular user.
Statuses and Email Templates
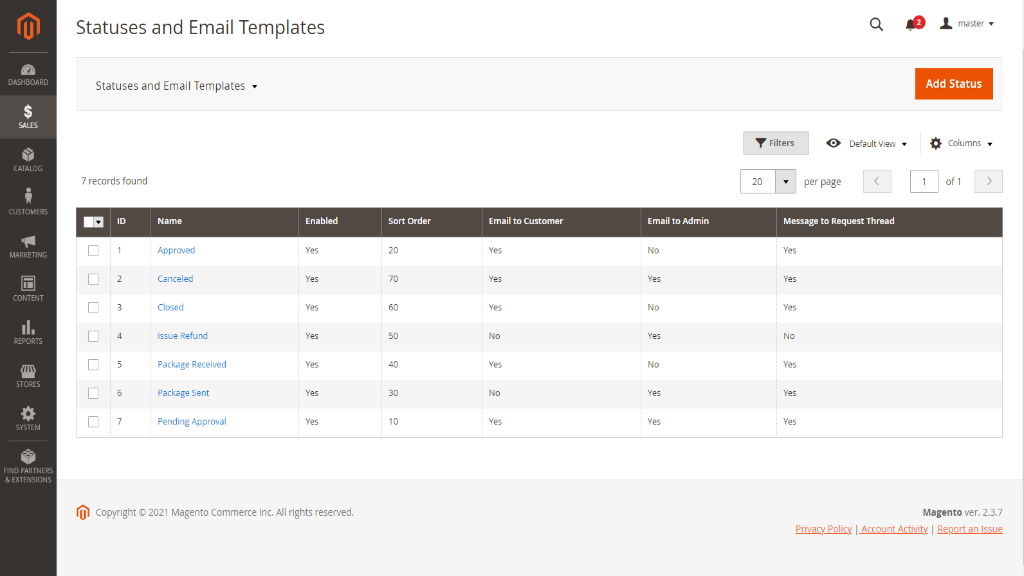
As it was previously mentioned, the RMA extension comes set up and ready for work right after the installation. If required, you can always adjust RMA request statuses and edit the notification emails.
Statuses
There are 7 predefined RMA request statuses, each defining a particular stage of the RMA process.
|
Status |
Event |
|
Pending Approval |
Assigned to the new return request automatically |
|
Approved |
Assigned upon the request's approval |
|
Package Sent |
Assigned by the customer confirming package sending |
|
Package Received |
Assigned upon package receipt confirmation |
|
Issue Refund |
Assigned upon issuing a refund |
|
Closed |
Assigned upon closing a request either by you or customer |
|
Canceled |
Assigned upon the request's cancellation |
If you need you can create a new unique status by clicking 'Add New Rule' at the Statuses an Email Templates page.
After the Magento 2 RMA 1.4.0 release, you are able to assign priority to statuses in your store. You can sort statuses according to their priority and see the sequence of your RMA stages.
Templates
Depending on the request's type, it is also possible to send an email notification to the customer, store administrator, or both.
Along with defining templates for email notifications, you can edit the request thread's message to be displayed upon the request obtaining a particular status.
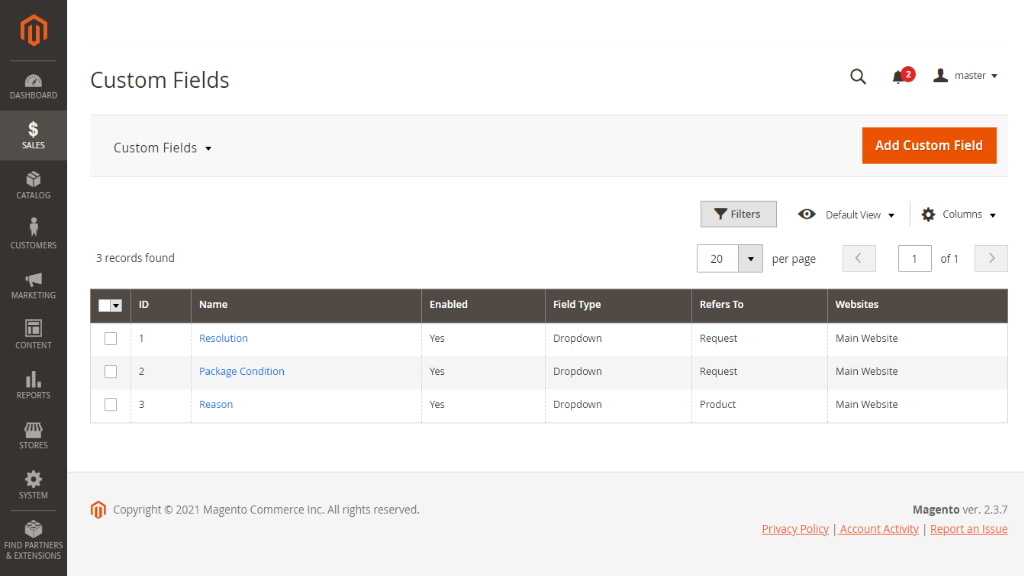
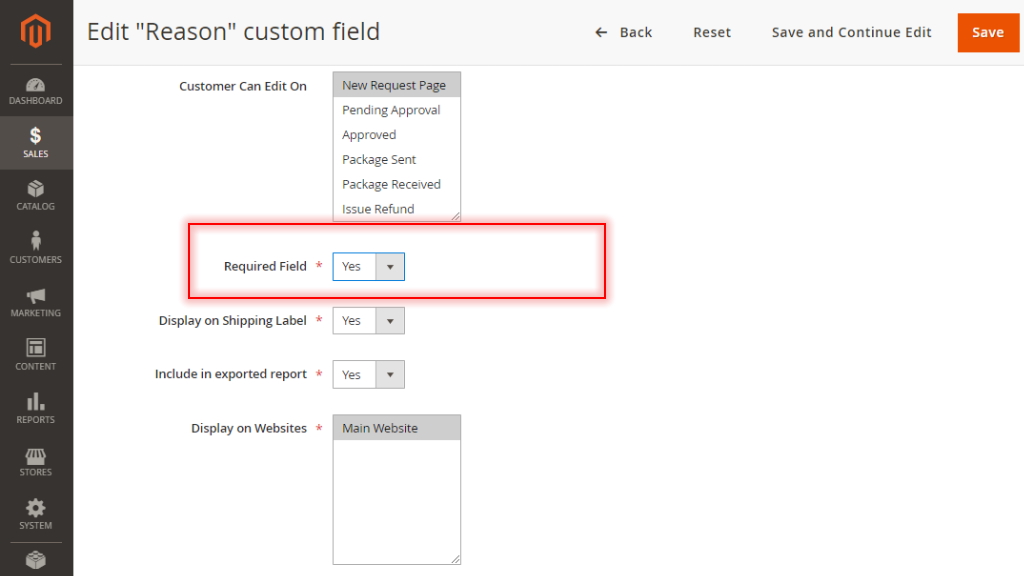
Custom Fields
As we already described in the Getting Around section, when submitting the request, you are suggested to fill in the 'Resolution', 'Package Condition', and 'Reason' sections to ask for the return.
All those are the predefined custom fields that come with the RMA extension by default. They can be edited in the 'Custom Fields' section.
To make sure that the customer sends an image of the product, there is a Custom Field that must be added per request. The Сustom Field allows clients to upload images on the frontend (multiple images) and admins to see and upload them in the backend. This option is only available per request (never per item).
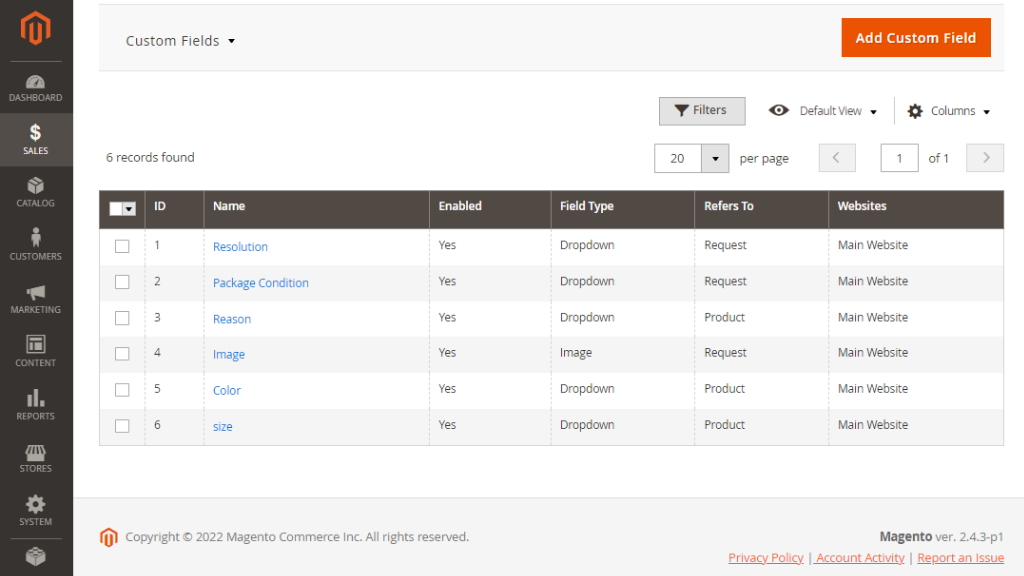
Along with editing custom fields, you can also create additional ones depending on the products or services you are offering.
To create a new custom field, click Add Custom Field:
- Define the name (for internal identification purposes) of the custom field and the field type: text field, text area, dropdown, multi-select;
- Decide if the custom field should refer to the RMA request on the whole or to the item(s) previously ordered;
- Set the return status upon which you and your customers can edit/view the field;
- If necessary, make the field required (customers will not be able to submit the request without filling this field);
- Add the custom field to the shipping label (this might help to identify the parcel);
- Choose the website the custom field should be displayed at.
- Adjust the field's frontend label (the title that will be displayed to customers).
- Add options (attribute values available for the 'Dropdown' and 'Multiselect' field types) if you want the customer to select from the predefined set of attributes.
Actions Tied to Custom Fields
If the type of the field is 'Dropdown' or 'Multiselect', each option of the field can be configured as follows:
- Is Default - the radio-box to identify the option to be shown in the field by default;
- Enabled - the check-box to define is the option is enabled within the field;
- Admin - the title of the option as it will appear on the Backend;
- Action - one of the two actions can be assigned to an option of the field: Create a Replacement Order or Create a Credit Memo;
- Statuses - the drop-box with order statuses;
- Default Store View - the name of the option on the store-front (view-dependent).
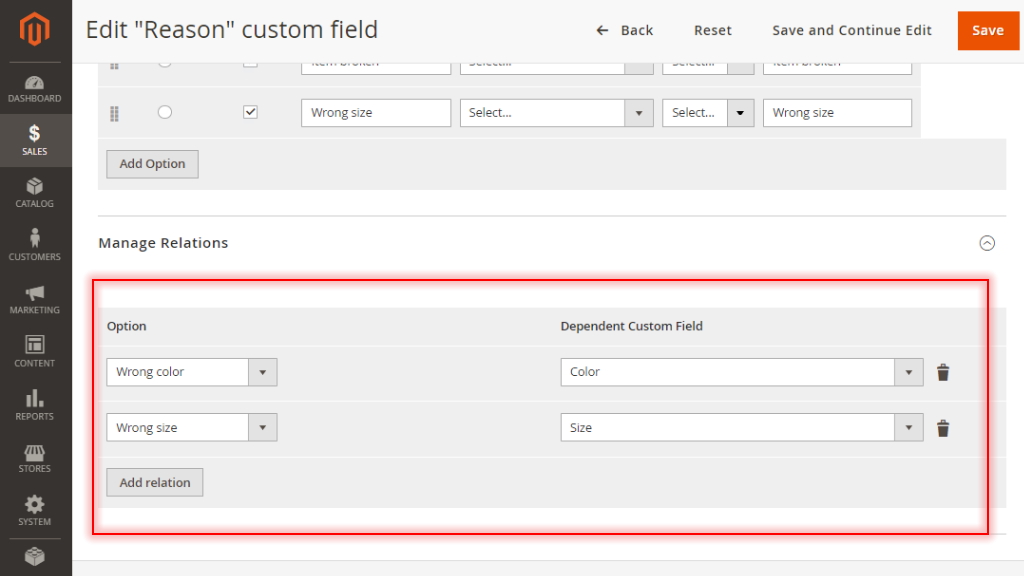
Custom Field Specification Dependencies
Whenever admin is setting up an option and it’s values it will be able to manage dependencies. So no other option fields will be shown to the customer until the admin specified they should be visible whenever this value is selected.
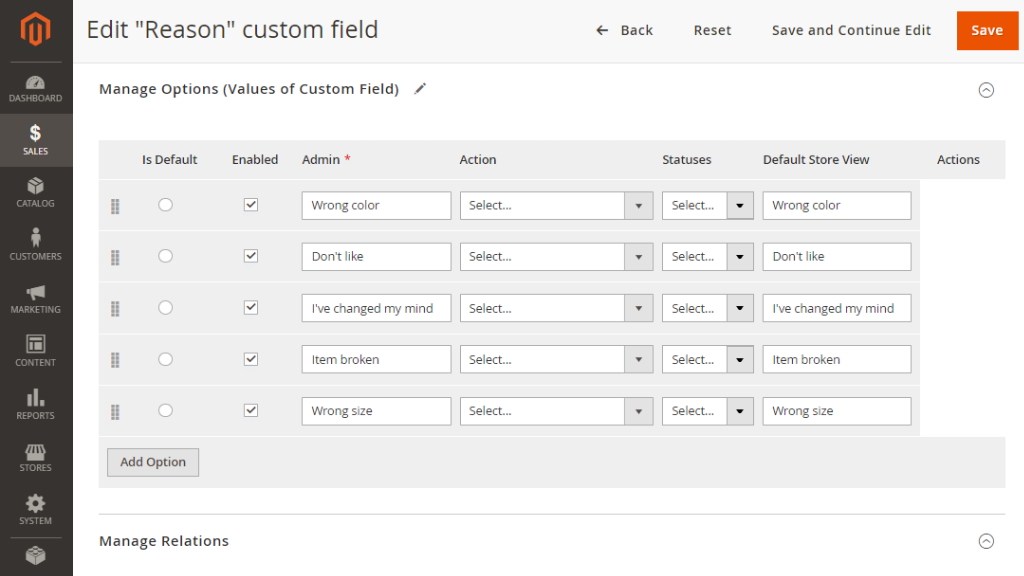
You can also decide when a custom field is mandatory to fill in. Whenever the field becomes mandatory - it is mandatory to fill that in both from the frontend and from the backend.
Configuring custom fields in the above way means that when the order is in one of the specified for the option statuses the Manage Request [Order Number] page on the Backend will feature either (or both) the Create a Replacement Order or Create a Credit Memo button. These can be used by the Admin to either create a replacement order in response to the request or initiate a refund.
Canned Responses
From the 'Canned Responses' grid, you can create fast responses that can be used for status updates and other simple messages sent to customers. You can manage the existing responses either individually or massively and create new canned responses.
With the 'Select' box in the 'Action' column, you can edit or delete the selected responses, while the 'Actions' box above the grid makes it possible to change the status or delete the selected response(s).
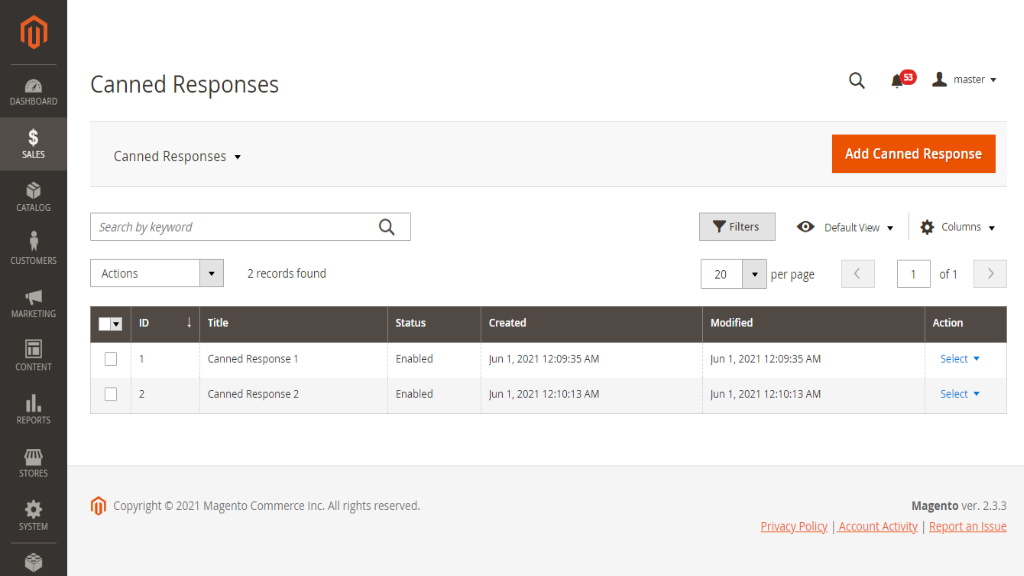
Creating a New Canned Response
To add a new canned response, click Add Canned Response above the grid. On the following page, you can enable the response, provide its title, select the appropriate store view and specify its content.
|
Note: Only enabled canned responses can be used for answers. |
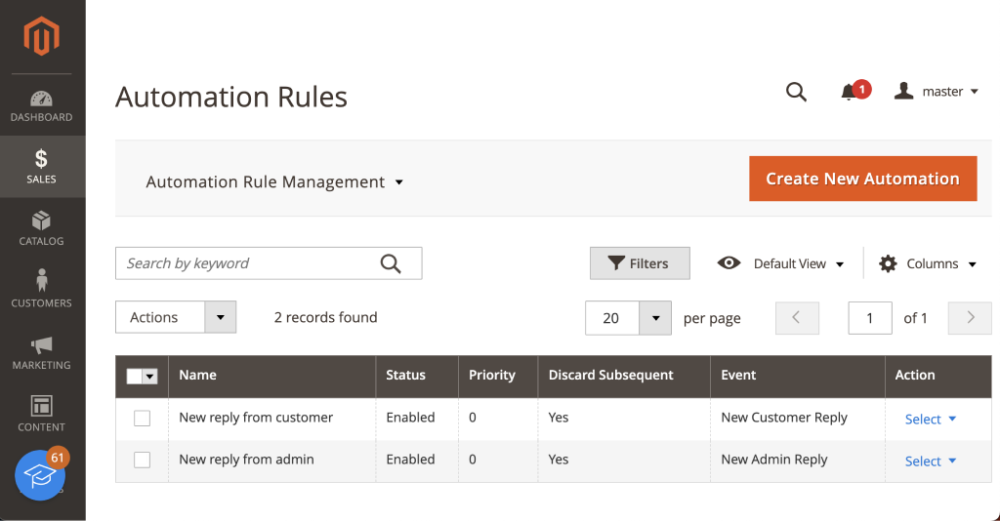
Automation Rule Management
Automation Rule Management are RMA rules which regulate the use of automatic actions against some pre-set conditions. Automations are meant to save time on routine RMA management operations, including those: New Task, Recurring Task, New Admin Reply and New Customer Reply.
Go to Sales → RMA → Automation Rule Management to browse, add, delete, and automations.
Automation Rule Grid
By default, the Automations grid lists two rules. These rules define automatic emailing of notifications upon reaching a certain event.
The grid shows data within the following columns:
-
Name - the name of the automation
-
Status - the status of the automation (Enabled / Disabled)
-
Priority - the priority (0 is the highest one) of execution of automations in case of overlapping conditions thereof
-
Discard Subsequent - the setting that determines whether, in the case of overlapping conditions with other automations, this automation should take precedence and prevent subsequent automations with the same trigger event from executing
-
Event - the trigger event for the automation
-
Action - an active link to select between actions: Edit, Delete
|
Delete or Edit the statuses of the automations individually or in bulk with the help of the Actions dropbox above the grid. |
Automation rules work in compliance with the following pattern:
1) Cron prompts the event and launches the rules of automation;
2) The extension checks if any of the requests match the conditions of the event;
a) If the conditions of the event are met, the extension launches the action of automation;
b) If the conditions of the event are not met, the extension stops executing the automation and does not trigger it up until the next cron launch.
3) The extension stops executing the rule and does not trigger it up until the next cron launch
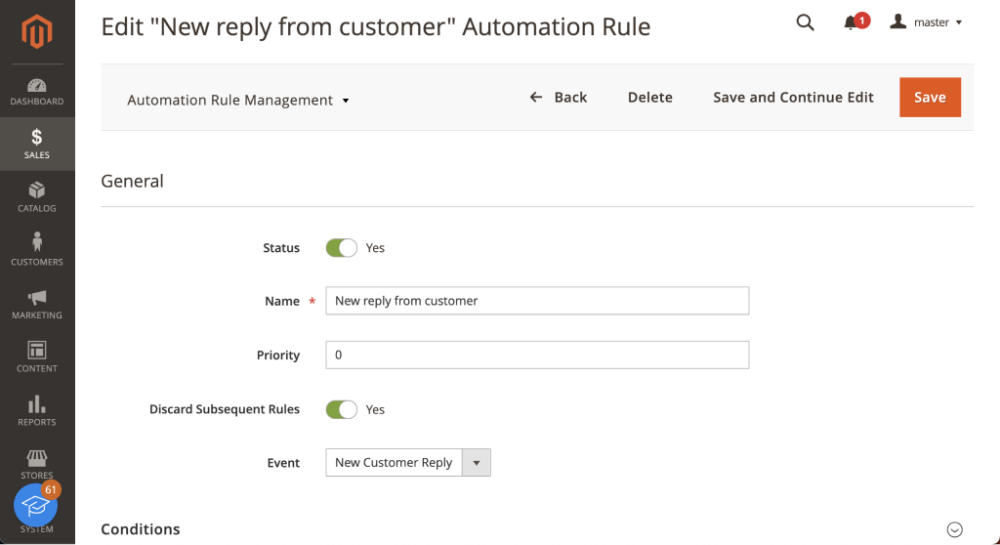
Create/Edit Automation
To edit automation, click on the name of thereof in the grid. To create an automation rule, click the Create New Automation button. You will be redirected to the Create/Edit Automation Rule page.
The Create New Automation page comes in three blocks as follows:
The General block of configuration options:
-
Status - set to Enabled to enable the automation for operation
-
Name - suggest the name of the operation
-
Priority - indicate a whole numeric value to tell the priority of the automation (for situations when conditions of multiple automations overlap)
-
Discard Subsequent Rules - set to Yes to discard the execution of any subsequent rules on execution of the present automation. Switcher discards rules only with the same ‘Event’
-
Event - select an event to trigger the automation. The following events are available for choice:
-
New Return - the Customer submits a new return;
-
Recurring Task - a recurring task that will be executed by the extension upon every cron launch;
-
New Customer Reply - the Customer replies to the return;
-
New Admin Reply - the Admin replies to the return;
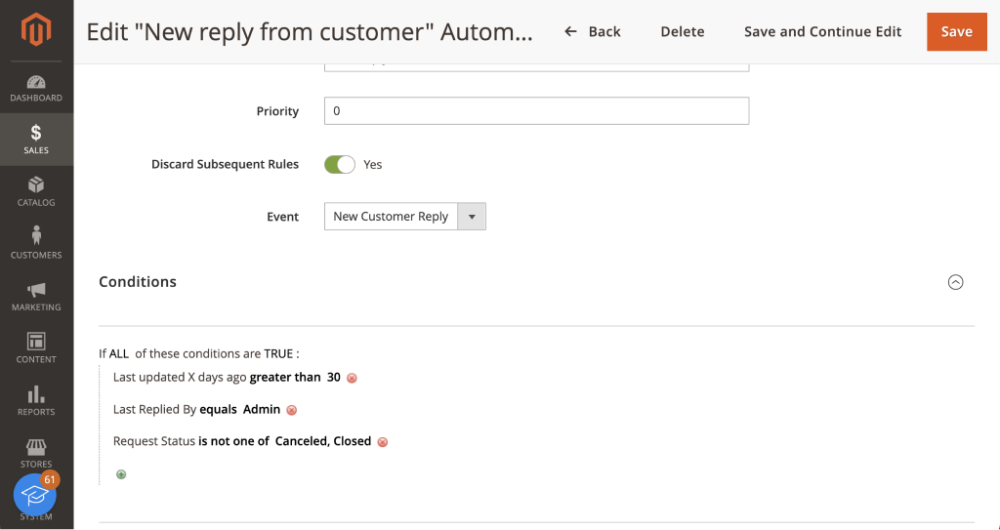
The Conditions block prompts to specify the conditions for the event to call for the automation. A condition herein is the following pattern:
|
If VARIABLE + LOGICAL CONNECTIVE + VALUE then... |
Each event comes with a specific set of variables, meaningful for the event. Various variables fetch various logical connectives and values, meaningful for the variable.
The connectives are: is / is one of / equals / is equal to / less than / greater than / equals or less than / equals or greater than etc.
To add a condition, click on the green plus icon (multiple conditions can be added). To complete the condition, refer to the dropbox on the left hand side and opt for a variable first. The dropboxes of connectives and values will get updated. Complete the condition by connecting the variable with its value.
To delete a condition, click on the red cross icon on the right to the value drop box.
In the Actions section, specify which actions are to be taken upon meeting the specified condition(s).
Each event comes with a specific set of actions. Each action fetches a specific set of objects of action.
Actions include sending email notifications to both the Customer and Admin, Changing return status and Messaging to the Request Thread.
To activate an action, use a switcher to turn it on.

Once done, click Save in the top right or Save and Continue Edit to return to configuring the automation without page reload.
Automation Use Case
|
Requirement |
Resolution and Configuration |
|
As an Admin, I want to set the Canceled status to the abandoned requests. |
Request status is to get Canceled. Automation configuration: Event: Recurring Task; Conditions: Last updated X days ago greater than 30 Last Replied By equals Admin Request Status is not one of Canceled, Closed Action: Change Status To Canceled |
Reporting
|
Note: Please, make sure you also install and enable module-rma-reports, which will provide the integration between RMA and Advanced Reports modules. |
Sales > RMA by Aheadworks > RMA Reports
Top 10 return items are shown at the top of the chart. Report is split into 2 tables. From a higher level report to a very detailed report per product. You can select the custom date range of the report.
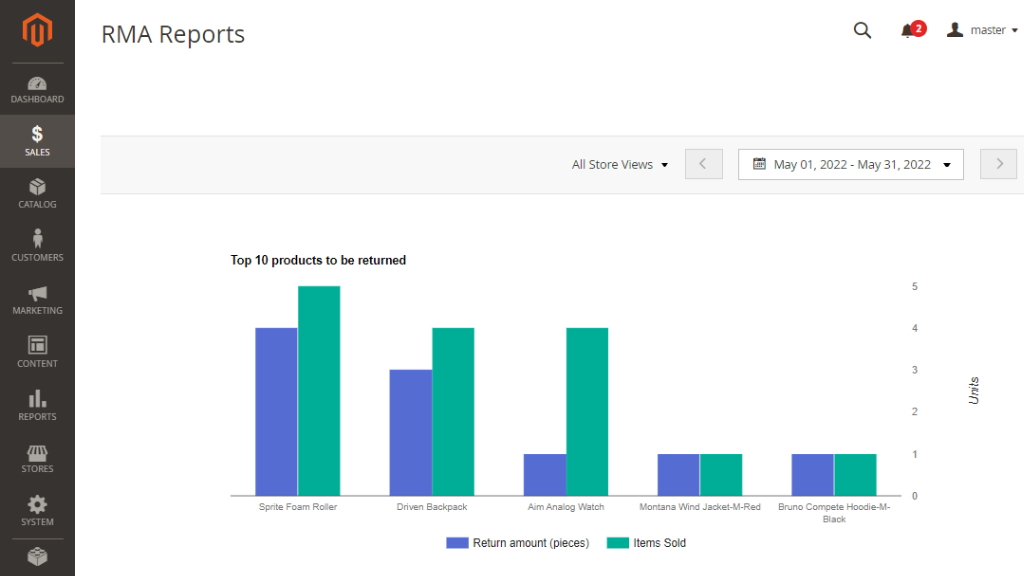
By pressing the hyperlink of the product it shows a detailed product report.
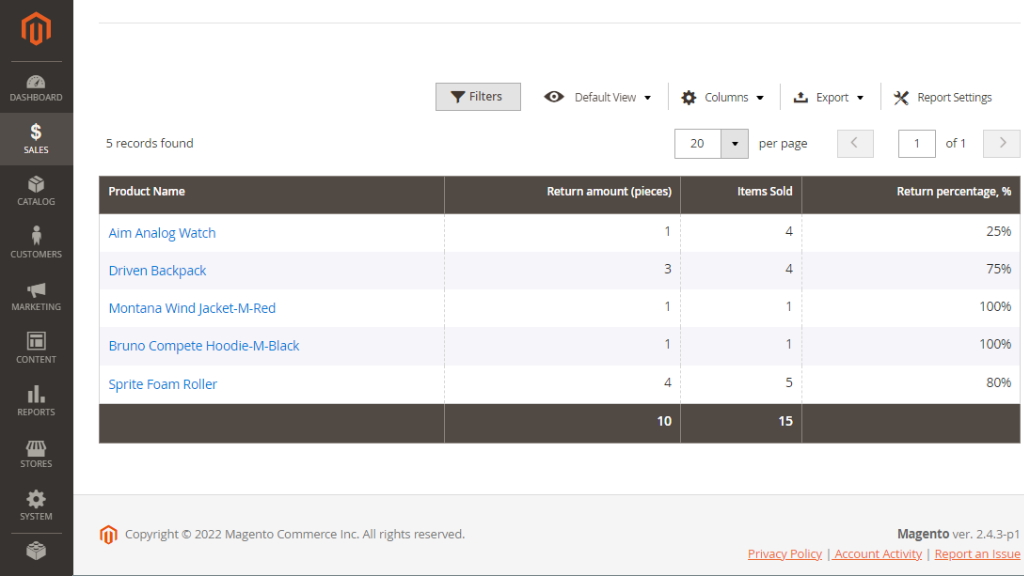

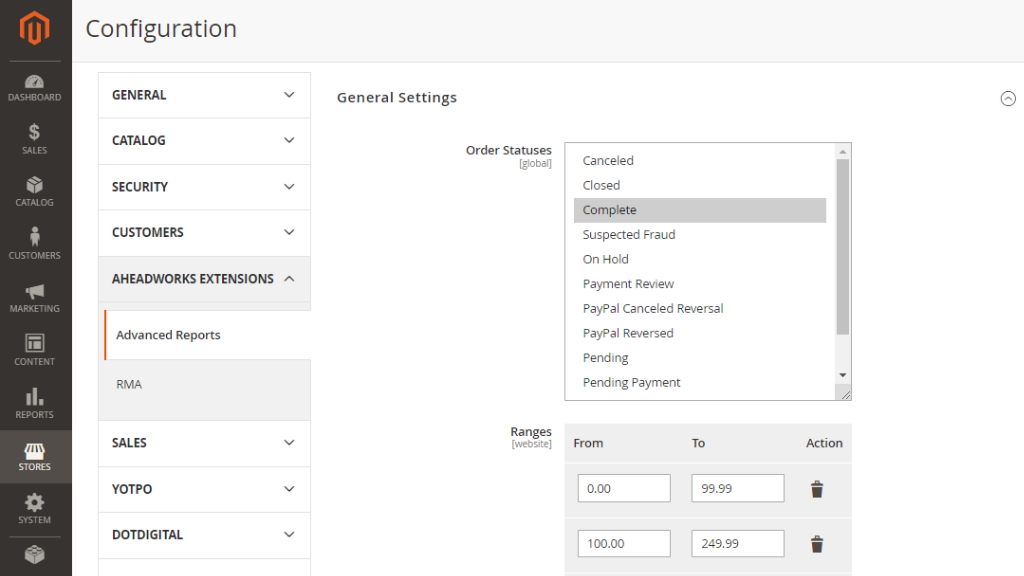
Order Statuses - allows to identify which orders will be considered to set up a report.
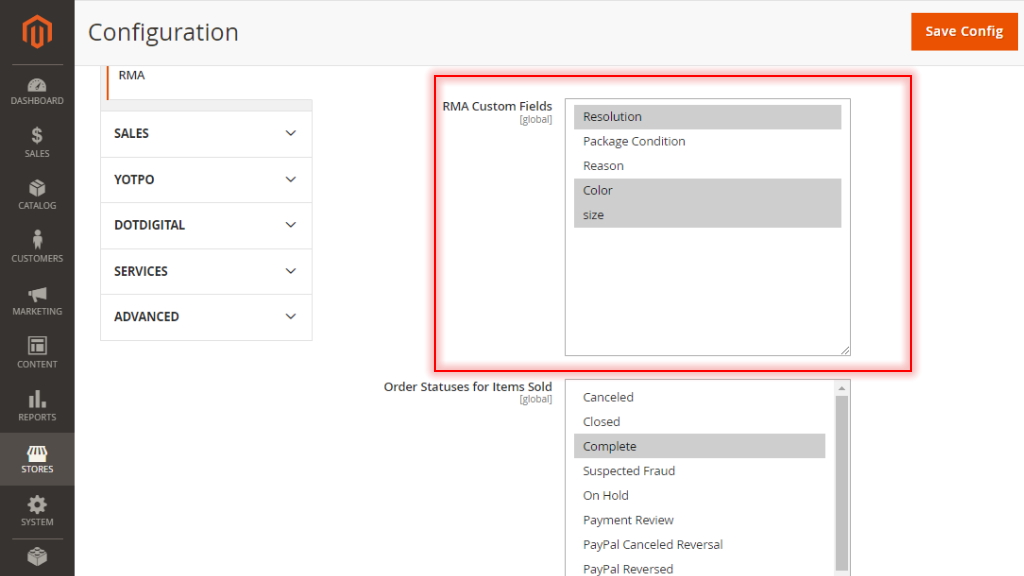
RMA Custom Fields - allows to select the field on the basis of which the report will be generated. You can select multiple fields, the first field will be displayed in the first column, the second field in the second column.
Please note: Every return request has the date of creation and date of last modification. The report only includes requests on the date of completion. Subsequently if a request is canceled it does not appear in reports.
Order Page Improvements
Returns Section
If you want to see all return requests created for a particular order, you can do this right from the order view page. The 'Returns' section enumerates all the created requests in the dedicated grid. In order to manage a certain request, you need to click the active link with the ID of the request in the 'Request #' column.
With New Return above the grid, you can create return requests on the spot.
In order to see all the products in the list and indicate the reason for each product individually, the customer can add lines to the table. For each line customer is able to select an item for return, its quantity and the reason for return.
![]()
Already used our product?
We would appreciate your feedback. Please, leave a review.