User Manual - Order Success Page
- Installing Order Success Page
- Uninstalling Order Success Page
- Compatibility
- Getting Around
- Backend Configuration
Order Success Page for Magento 2 makes the order success page highly customizable via adding additional blocks, basing on customer segment or and order details. The content of the order success page is managed by the rules configured in the backend. Also, the module allows displaying cross-sells, checkout registration and newsletter signup blocks, and the links to the pages in social networks.
Installing Order Success Page
Command Line Installation
- Backup your web directory and store database
- Download the Order Success Page installation package
- Upload contents of the Order Success Page installation package to your store root directory
- In SSH console of your server navigate to your store root folder:
cd path_to_the_store_root_folder |
run the following command:
php bin/magento module:enable Aheadworks_OrderSuccessPage |
then:
php bin/magento setup:upgrade |
after:
php bin/magento setup:static-content:deploy -f |
5. Flush store cache; log out from the backend and log in again
|
Make sure the installation is done from the FTP administrator account. Otherwise, set 775 permissions to the store root directory after the extension is deployed. |
Composer Installation
If you are installing an extension from Aheadworks for the first time, you need to add our composer repository to your Magento store:
1. Login to your ssh console and navigate to your store folder:
cd path_to_the_store_root_folder |
Run the following command:
composer config repositories.aheadworks composer https://dist.aheadworks.com/ |
After the command was executed successfully, you can use the composer to install the products.
To install the extension:
2. Login to your ssh console and navigate to your store folder:
cd path_to_the_store_root_folder |
3. Run the following command to install the latest version of the extension:
composer require aheadworks/module-order-success-page |
if you need to install a specific version, run this command:
composer require aheadworks/module-order-success-page:<version> |
|
Specify the version of the extension in <version> |
When prompted, enter Public Key (Username) and Private Key (Password):

Both Public Key (Username) and Private Key (Password) can be found in My Projects and Licenses in your personal account on our site:
 |
4. Enable the extension:
php -f bin/magento module:enable <Module_Name> |
|
Add the product name in <Module_Name> |
Next, register the extension:
bin/magento setup:upgrade |
Recompile your Magento store if you are in the Production mode:
bin/magento setup:di:compile |
To verify that the extension is enabled, run this command:
bin/magento module:status |
Clean store cache, by running the following command:
bin/magento cache:clean |
Log out and Log in to the backend again.
To upgrade the extension:
5. To update or upgrade an extension:
Download the updated extension file. Take note of the module name and version. Export the contents to your Magento root.
If a composer package exists for the extension, run one of the following.
Update per module name:
composer update aheadworks/module-product-question |
Updater per version:
composer require aheadworks/module-product-question:<version> |
Run the following commands to upgrade, deploy, and clean the cache.
php bin/magento setup:upgrade --keep-generated |
Uninstalling Order Success Page
Since Magento introduced declarative Database you need to be very carefull when uninstalling or disabling the module.
|
NOTE: Please be very careful when uninstalling/disabling this module. This module uses a declarative DB scheme. Once the module is uninstalled the DB tables will be lost. |
Manual Removal
1. Disable the module by executing the following commands:
php bin/magento module:disable Aheadworks_OrderSuccessPage |
2. Remove the extension files from the following folder:
app/code/Aheadworks/OrderSuccessPage |
Automatic Removal (via Composer)
1. Disable the module by executing the following commands:
php bin/magento module:uninstall Aheadworks_OrderSuccessPage |
Compatibility
|
Module Version |
Magento Version |
PHP |
|
1.0.5 and earlier versions |
2.3.Х - 2.3.6 2.4.0 - 2.4.3 |
7.4 and earlier versions |
|
As of version 1.0.6 |
2.4.3 - 2.4.4 |
7.4, 8.1 |
|
As of version 1.0.7 |
2.4.4 - 2.4.6 |
8.1 |
Getting Around
Extension Logic
The Order Success Page extension adds its own blocks to the native Magento Order Success Page. The blocks can be divided into two types: Standard (see General Settings section) and Rule-based (see Rule section). Standard blocks are always displayed for all customers, while rule-based are shown only if the order complies rule settings.
|
Order Summary block is not displayed when the Customer uses "Check Out with Multiple Addresses" at Checkout. |
Tracking codes
Because the extension uses the native page as a base, all tracking codes you may have on that page should continue working as they did before the installation.
Layout
The extension offers 4 positions for the notification blocks:
- Page Top
- Page Bottom
- Content - Left Column
- Content - Right Column
Some blocks like “Order Summary” and “Cross-Sell” can only be set to Page Top or Page Bottom positions, because of their size.
By default, the blocks are placed the following way:
|
Page Top |
|
Content - Left Column | Content - Right Column |
|
Page Bottom |
As you can see, if you would like to use a single-column layout, you can use only Page Top and Page Bottom positions.
To set an order of the Blocks, use the Priority field. This setting respects the layout position, so it is very easy to set the right order in every position of the page.
Backend Configuration
General Settings
- Title of the success page is an h1 tag, the main title of the page;
- Text below the page title is an optional text you may want to display. With the settings above, you will get the following result:
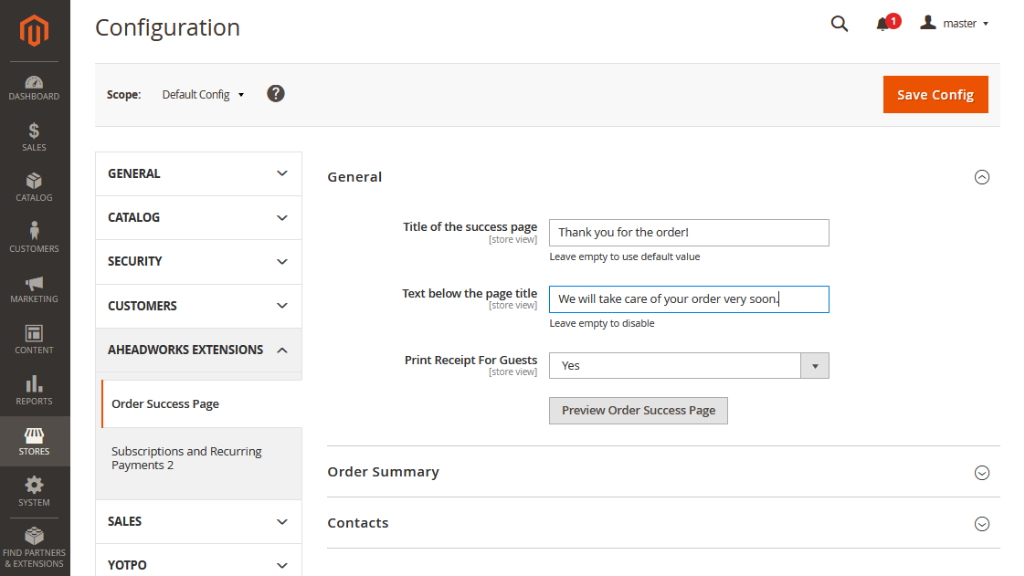
- Print Receipt For Guests controls whether guests can print their order Receipt from the Order Success Page or not;
- Preview Order Success Page button allows quickly previewing any changes on the page.
|
Note, because the preview button uses an actual order data, make sure that you’ve got at least one order placed in the store view which you want to preview. |
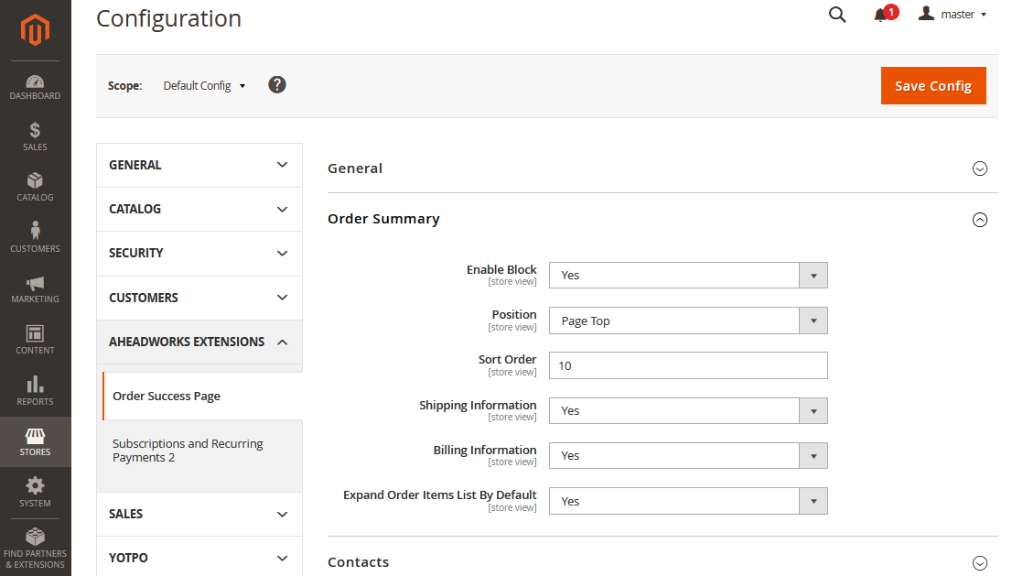
Order Summary
- Enable Block to place the Order Summary block to the Order Success Page;
- Position to choose between top and bottom positions of this block;
- Sort Order to assign the block priority;
- Shipping Information to add the shipping details to this block;
- Billing Information to enable the billing data displaying;
- Expand Order Items List By Default to allow/disallow this option.
|
Order Summary block is not displayed when the Customer uses "Check Out with Multiple Addresses" at Checkout. |
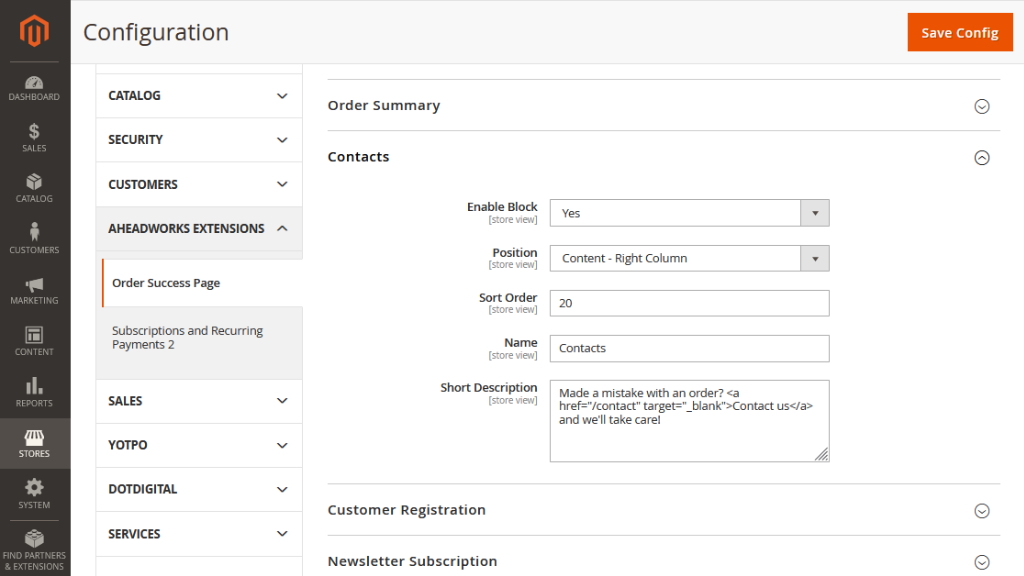
Contacts
- Enable Block to place the Contacts block to the Order Success Page;
- Position to choose between top/bottom/left/right positions of this block;
- Sort Order to assign the block priority;
- Name to customize the title of this block;
- Short Description to create the text message relevant to your intends.
|
Note that while this block is intended for showing a link to your 'Contact us' page, generally, you can use it for any purpose, when you just need to show some text to all of your customers. |
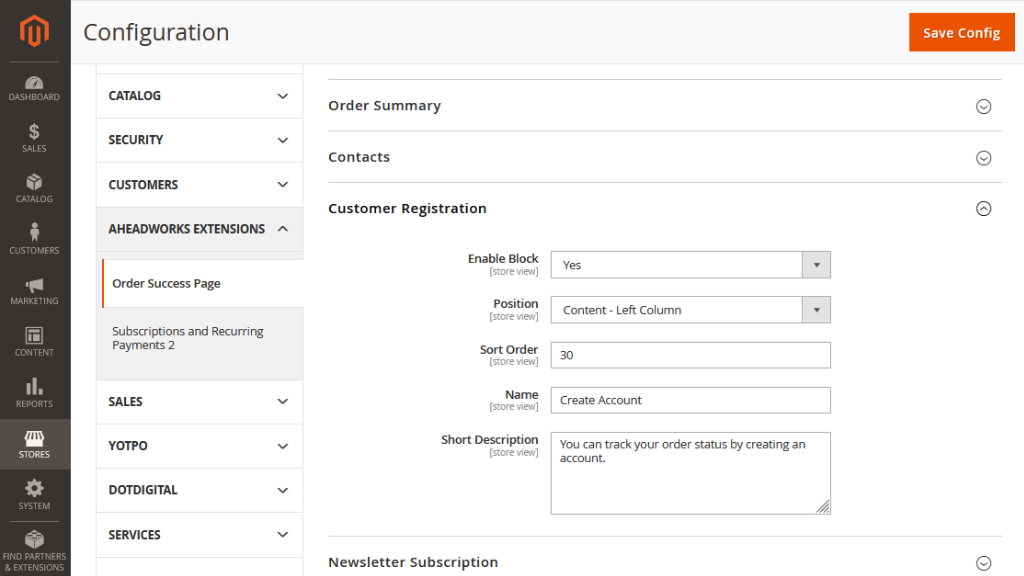
Customer Registration
- Enable Block to display the Checkout Registration block on the Order Success Page;
- Position to choose between top/bottom/left/right positions of this block;
- Sort Order to assign the block priority;
- Name to create a special title of this block;
- Short Description to type the text message which encourages customers to create the account.
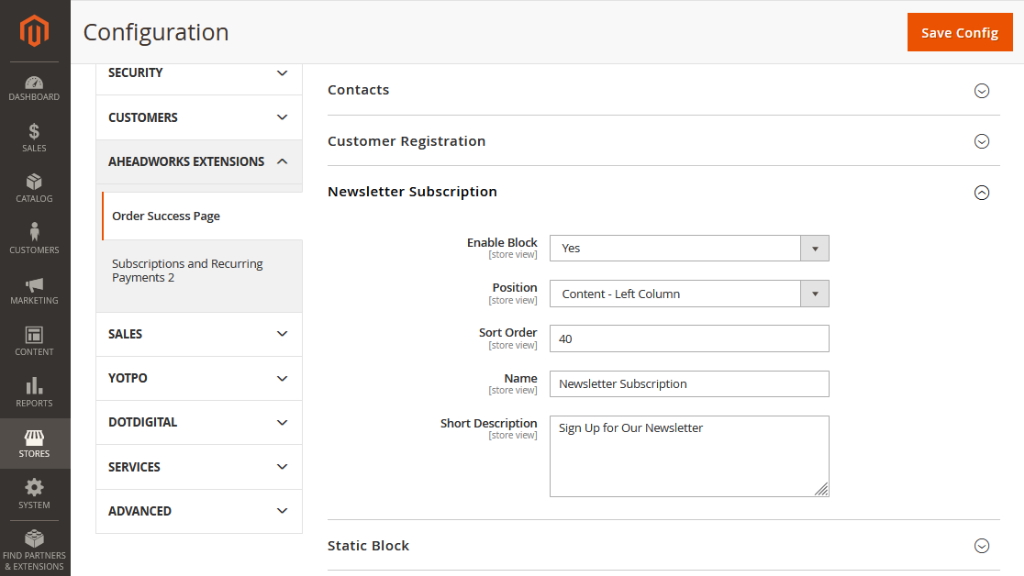
Newsletter Subscription
- Enable Block to allow customers to subscribe to the newsletter;
- Position to choose between top/bottom/left/right positions of this block;
- Sort Order to assign the block priority;
- Name to create a special title of this block;
- Short Description for the message which invites shoppers to subscribe to the newsletter.
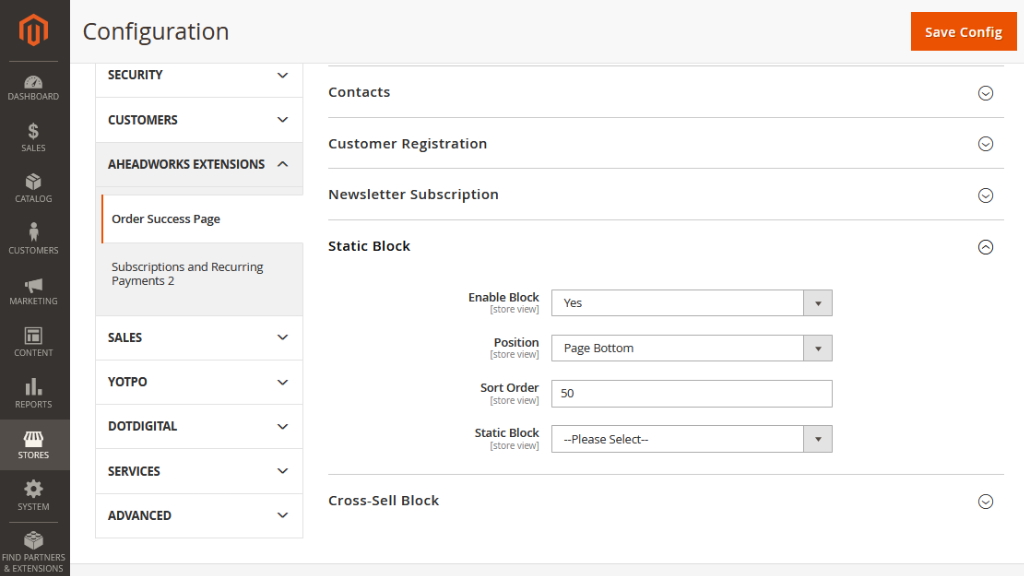
Static Block
- Enable Block to place any block on your order success page;
- Position to choose between top/bottom/left/right positions of this block;
- Sort Order to assign the block priority;
- Static Block to choose the block you need to display additionally basing on your primary goals.
|
Note that this block is visible for all customers by default. Use the Rules for more targeted content. |
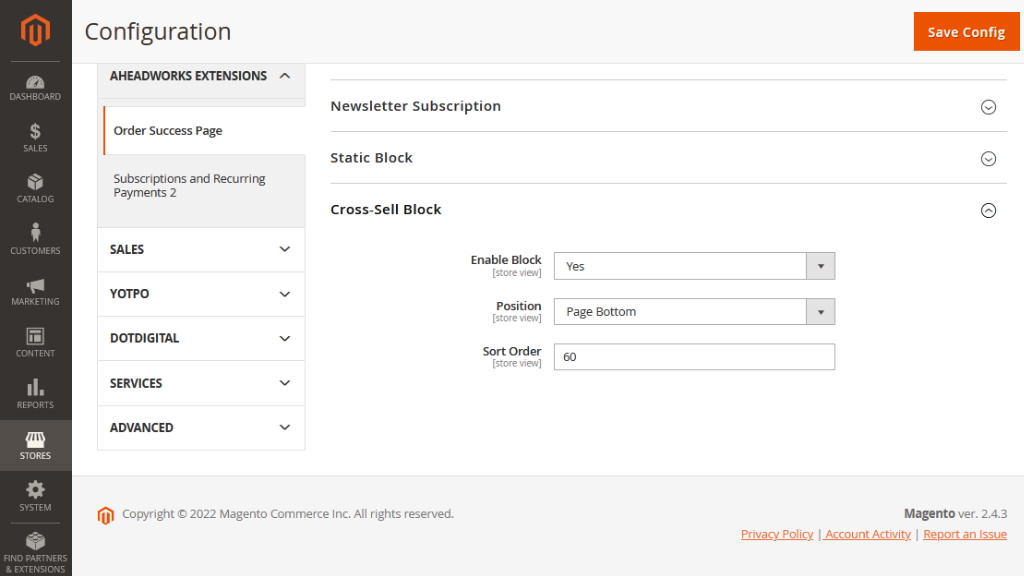
- Enable Block to demonstrate native cross-sells configured in the settings of the definite products;
- Position to choose between page top/bottom position;
- Sort Order to assign the block priority.
|
Note that the Cross-Sell block displays 5 products by default. |
Rules
General Information
Find the Rules section following the pass Content → Order Success Page by Aheadworks → Rules. Here you can see a standard grid with the list of the rules. The rules can be filtered and enabled/disabled/deleted in bulk.
- Enable Rule to make the rule active;
- Name the Rule to easily find and manage the rules created;
- Description contains a summary of the rule functionality;
- Store View is a scope of application of the rule created;
- Customer Group includes different customergroups for you to choose from;
- Customer Segment includes different customer segments to choose from (this field appears when Customer Segmentation is installed);
To enable the integration of Order Success Page and Customer Segmentation, navigate to Configurations > Aheadworks Extensions > Customer Segmentation and set "Yes" in the "Enable compatibility with frontend extensions" field.

- Active From / Active To options allow scheduling the rule duration.
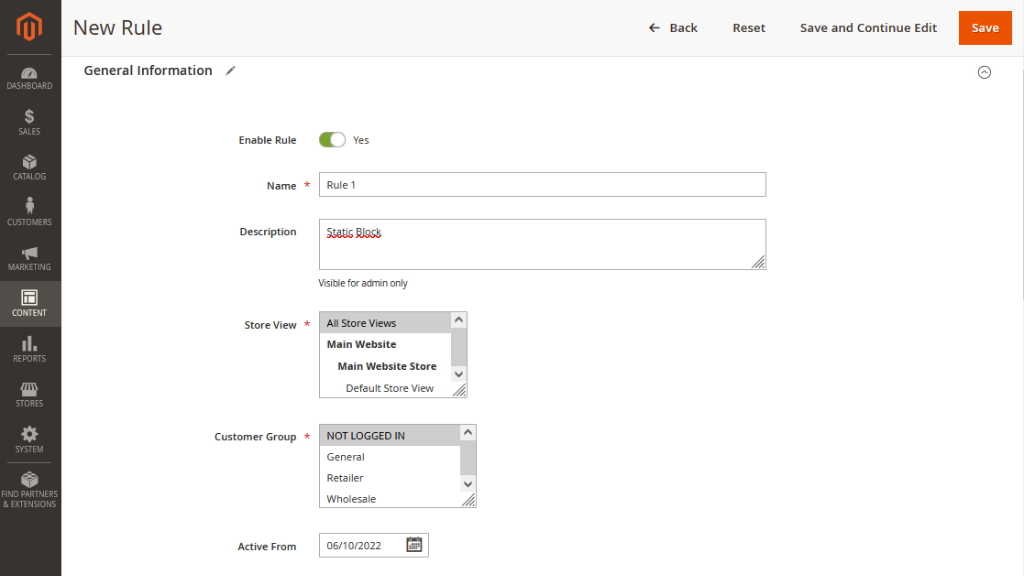
Rule setup examples
Each rule can display one of the following block types:
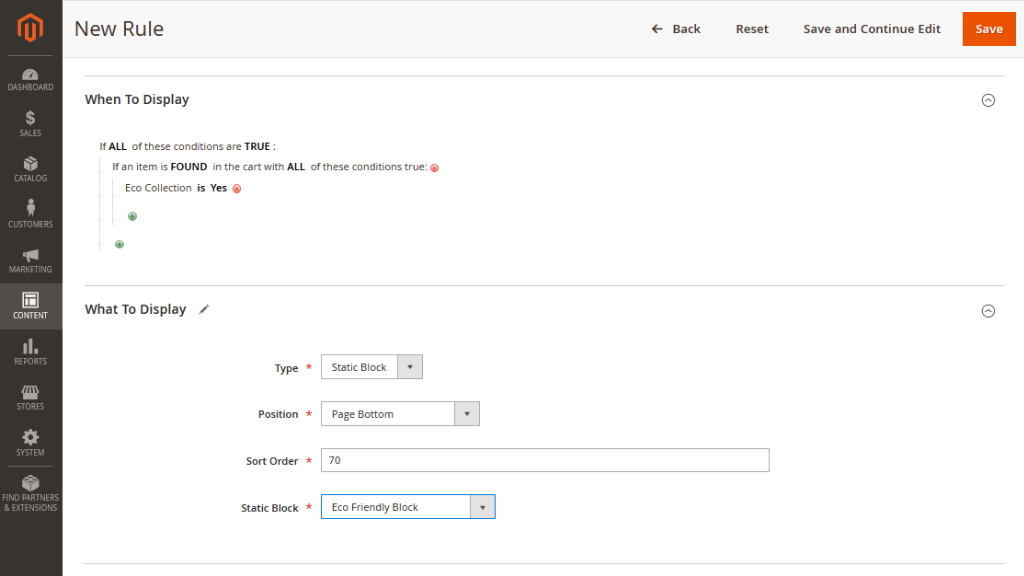
- Text / Html - a basic type of the block; the content is configured right in the rule, in the WYSIWYG editor;
- Static block - a static block created beforehand in Content-> Elements-> Blocks;
- FAQ Category - a list of articles from a selected FAQ category. Requires FAQ extension by Aheadworks to be installed.
- Blog Category - a list of blog posts from a selected Blog category. Requires Blog extension by Aheadworks to be installed.
a) If you want to add a static block
b) If you want to display a text message when a customer chooses a certain shipping method

c) If you want to display a coupon code when a purchase is made at a certain price

Already used our product?
We would appreciate your feedback. Please, leave a review.


