User Manual - Requisition List
- Installing Magento 2 Requisition Lists
- Uninstalling Requisition Lists
- Compatibility
- Introducing Magento 2 Requisition Lists
- Requisition Lists on Backend
- Requisition Lists on Frontend
- Integrations
Magento 2 Requisition Lists delivers enhanced native Magento 2 B2B functionality into your Magento 2 CE stores. This functionality is disclosed in enabling customers to collect products into requisition lists, alike wish-lists, to create orders at a later date. Customers can create requisition lists of items they order frequently and use them to periodically re-order the items. Unlike wish-lists requisition lists can be created in plenty and can be stored for as long as customers wish, even after being used to place orders. It is a particular feature of the present extension that two modules by Aheadworks, Company Accounts and Easy Reorder, can be summoned to further enhance the functionality of Requisition Lists and showcase a comparative advantage against the native Magento 2 B2B functionality.
API documentation link
Installing Magento 2 Requisition Lists
Command Line Installation
1. Backup your web directory and store database
2. Download the Requisition Lists installation package
3. Upload contents of the Requisition Lists installation package to your store root directory
4. In SSH console of your server navigate to your store root folder:
cd path_to_the_store_root_folder |
run:
php bin/magento module:enable Aheadworks_RequisitionLists |
then:
php bin/magento setup:upgrade |
after:
php bin/magento setup:static-content:deploy -f |
5. Flush store cache; log out from the backend and log in again
|
Make sure the installation is done from the FTP administrator account. Otherwise, set 775 permissions to the store root directory after the extension is deployed. |
Composer Installation
If you are installing an extension from Aheadworks for the first time, you need to add our composer repository to your Magento store:
1. Login to your ssh console and navigate to your store folder:
cd path_to_the_store_root_folder |
Run the following command:
composer config repositories.aheadworks composer https://dist.aheadworks.com/ |
On successful execution of the command, you will be able to use the composer to install the products.
To install the extension:
2. Login to your ssh console and navigate to your store folder:
cd path_to_the_store_root_folder |
3. Run the following command to install the latest version of the extension:
composer require aheadworks/module-requisition-lists |
if you need to install a specific version, run this command:
composer require aheadworks/module-requisition-lists:<version> |
|
Specify the version of the extension in <version> |
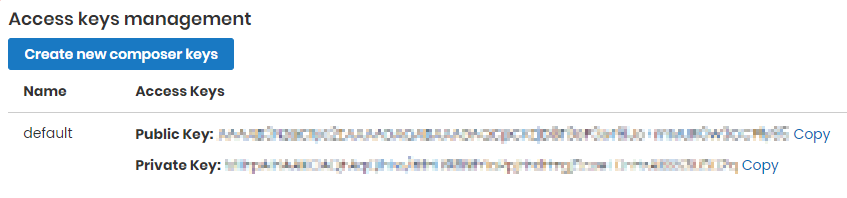
When prompted, enter Public Key (Username) and Private Key (Password):

Both Public Key (Username) and Private Key (Password) can be found in My Projects and Licenses in your personal account on our site:
Run the following command to install Requisition Lists GraphQl:
composer require aheadworks/module-requisition-lists-graph-ql |
4. Enable the extension:
php -f bin/magento module:enable Aheadworks_RequisitionLists |
Next, register the extension:
bin/magento setup:upgrade |
Recompile your Magento store if you are in the Production mode:
bin/magento setup:di:compile |
To verify that the extension is enabled, run this command:
bin/magento module:status |
Clean store cache, by running the following command:
bin/magento cache:clean |
Log out and Log in the backend again.
|
Want to use the Hyvä theme module? To install the Hyvä theme module, you need to install the module via composer using command: composer require hyva-themes/magento2-aheadworks-requisition-lists |
To upgrade the extension:
5. To update or upgrade an extension:
Download the updated extension file. Take note of the module-name and version. Export the contents to your Magento root.
If a composer package exists for the extension, run one of the following.
Update per module name:
composer update aheadworks/module-requisition-lists |
Updater per version:
composer require aheadworks/module-requisition-lists:<version> |
Run the following commands to upgrade, deploy, and clean the cache.
php bin/magento setup:upgrade --keep-generated |
Uninstalling Requisition Lists
Since Magento introduced declarative Database you need to be very carefull when uninstalling or disabling the module.
|
NOTE: Please be very careful when uninstalling/disabling this module. This module uses a declarative DB scheme. Once the module is uninstalled the DB tables will be lost. |
Manual Removal
1. Disable the module by executing the following commands:
php bin/magento module:disable Aheadworks_RequisitionLists |
2. Remove the extension files from the following folder:
app/code/Aheadworks/RequisitionLists |
Automatic Removal (via Composer)
1. Disable the module by executing the following commands:
php bin/magento module:uninstall Aheadworks_RequisitionLists |
Compatibility
|
Module Version |
Magento Version |
PHP |
|
1.1.2 and earlier versions |
2.3.Х - 2.3.6 2.4.0 - 2.4.3 |
7.4 and earlier versions |
|
As of version 1.1.3 |
2.3.7-p3+ 2.4.0 - 2.4.5 |
7.4, 8.1 |
|
As of version 1.1.4 |
2.4.4 - 2.4.6 |
8.1 |
Introducing Magento 2 Requisition Lists
Requisition Lists for Magento 2 is an extension to support customer procurement operations on your Magento 2 stores. It enables customers to collect frequently bought products into multiple requisition lists and use them at a later date to place orders. Each item on a requisition list is associated with a catalog entry and has the following attributes: Product Name, Image, SKU, Size, Color (other configurable parameters of a product), Current Product Price. The extensions makes it possible to edit both the requisition lists and the products on the lists. Editing products presumes updating product configuration and quantity, as well as removing products from the list, individually or in bulk. Furthermore, customers are able to move or copy products from list to list. Selected products can be added to Cart in one click. The module can be integrated with Company Accounts and Easy Reorder, the modules that together provide for full-fledged corporate experience in eCommerce procurement. The key-features of the present extension can be shortlisted as follows:
- Multiple requisition lists
- Adding products to lists from various places
- Explicit management options on the storefront
- Updating products individually and in bulk
- Converting list to Cart
- Integration with Company Accounts, Easy Reorder
Requisition Lists on Backend
Configuration Options
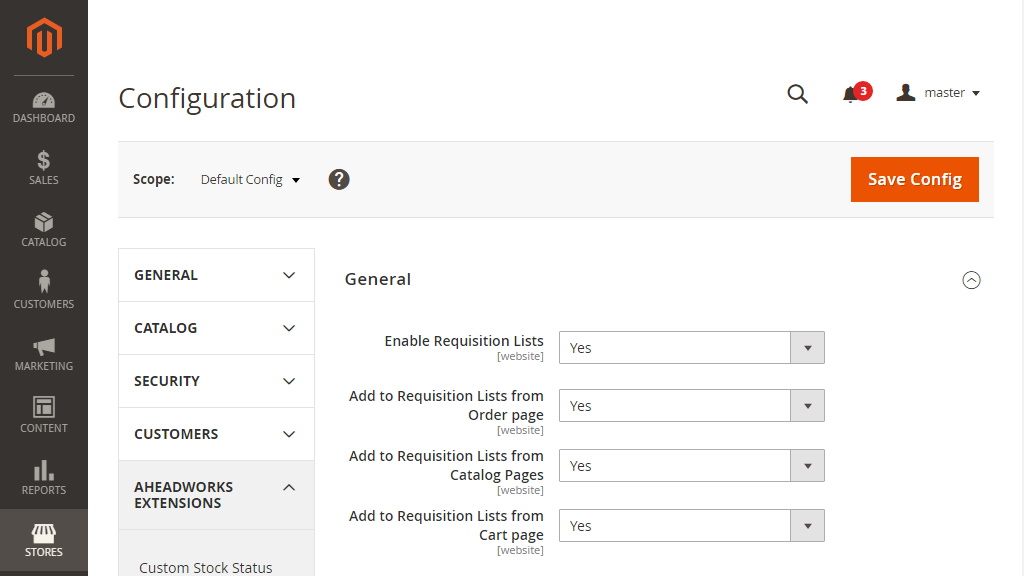
To enable the extension go to Stores → Configuration → Aheadworks Extensions → Requisition Lists.
- Enable Requisition Lists - set to Yes this option allows customers to add a product to a requisition list on the product page;
- Add to Requisition Lists from Catalog Pages - set to Yes to display the Add to Requisition Lists button on Category pages under every product, the user does not need to open the product page;
- Add to Requisition Lists from Order page - set to Yes to display the Add to Requisition Lists button on the Order page of My Account, after clicking on it, the whole order will be added to Requisition Lists;
- Add to Requisition Lists from Cart page - set to Yes to display the Add to Requisition Lists button on the Cart Page under every item.
Requisition Lists on Frontend
Quick Bar
Customers can access the My Requisition Lists page from any page on the store using the Quick Bar. Clicking on the customer name therein will unfold the list of navigation alternatives, where My Requisition Lists are to be chosen. The Customer will be redirected to the My Requisition Lists page in My Account.
Adding Products
It is possible to get to My Requisitions Lists from the Order page, Catalog Pages, Cart page.
When the Requisition Lists from Order page option is enabled from the backend, it will be displayed on the Order page.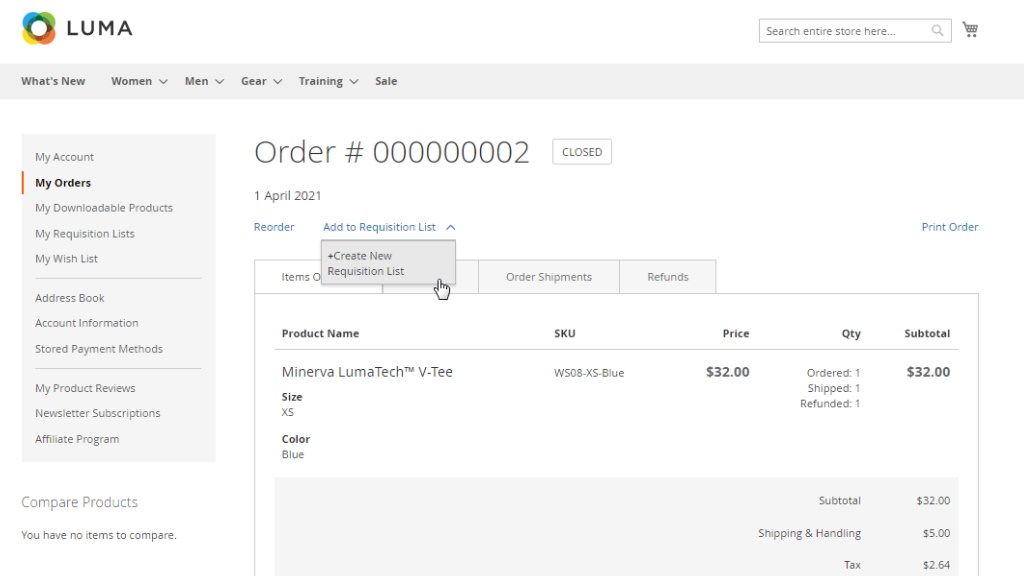
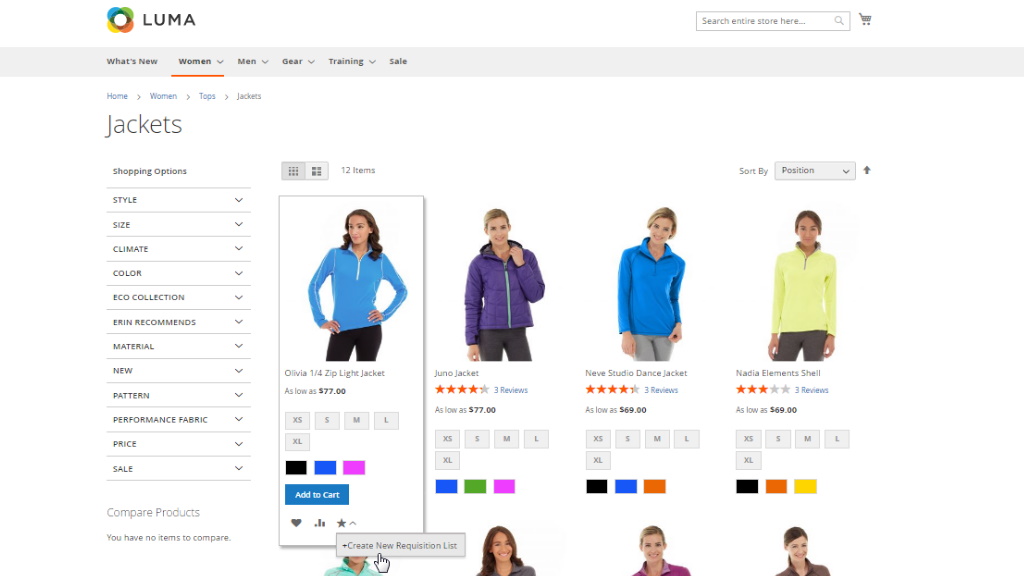
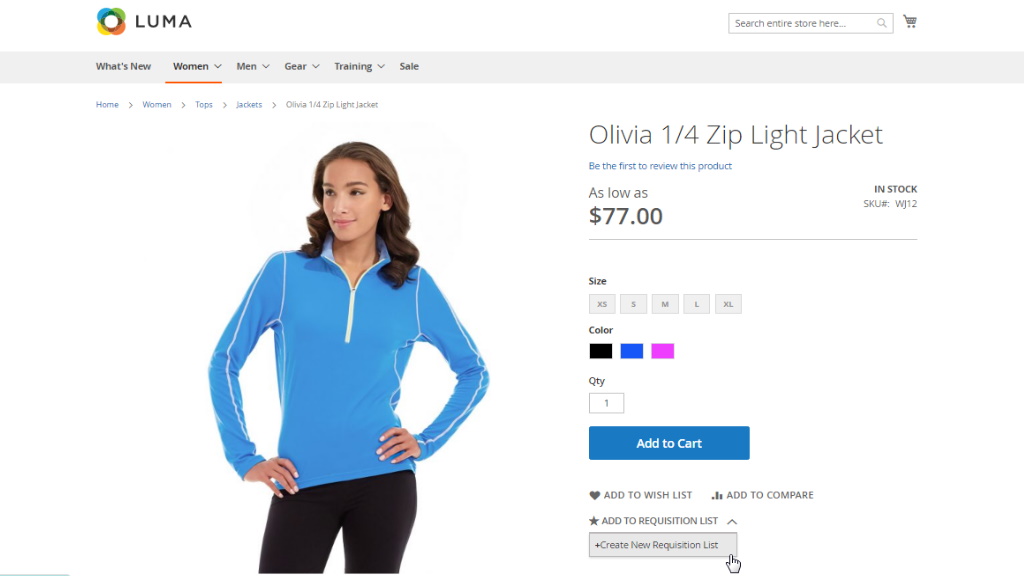
When the Requisition Lists button on Catalog Pages is enabled it will be displayed under every product. When a customer clicks on an arrow or icon dropdown with “+Create New Requisition List” and a list of created requisition lists is displayed.
When on a product page customers make use of the Add to Requisition List option next to the native Magento Add to Wish List and Add to Compare. It is only on a product page that items can be added to a requisition list when browsing the store. (Other options are available in My Account).
It is essential that customers first configure the product (if any parameters are given) and indicate its quantity. The latter can later be updated on the Requisition List page in My Account. Leaving the configuration options blank will result in a notification on the error ('This field is required') and will not add the product to the requisition list. Clicking on the Add to Requisition List option will unfold a drop-down of available requisition lists and the Create New Requisition List alternative.
To add a product to a requisition list, customers select a requisition list from the Add to Requisition List drop-down on the product page. The product will be added to the chosen list, leaving the Customer on the product page.
If the Customer is logged out, the Add to Requisition List option will show only the Create New Requisition List alternative. Clicking on it will take the Customer to the Sing-in page. On successful sign-in or registration, the Customer will be redirected to the My Requisition Lists page.
|
Are the same products merged on a requisition list? When products are added to a requisition list from a product page, the same products are not merged on the list. |
Customers can Add to Requisition Lists from the Cart page.
Creating and Monitoring Requisition Lists
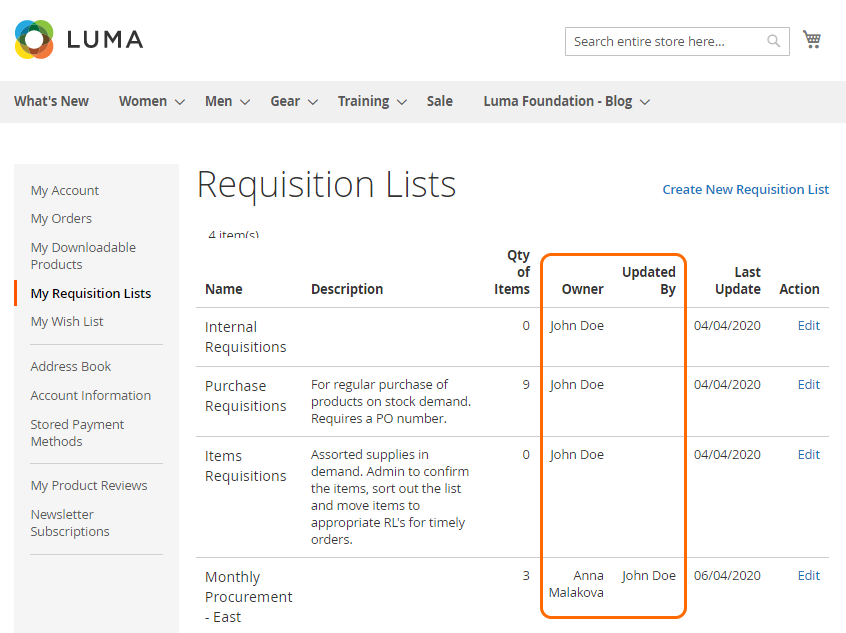
When on the My Requisition Lists page in My Account, customers are able to monitor and browse their requisition lists, as well as to create new ones. The page collects existing requisition lists into a grid of the following columns:
- Name - the name of a requisition list;
- Description - the description of a requisition list;
- Qty of Items - the number of items on a list;
- Last Update - the date of the last update made to a list;
- Action - the Edit active link to lead to a Requisition List page.
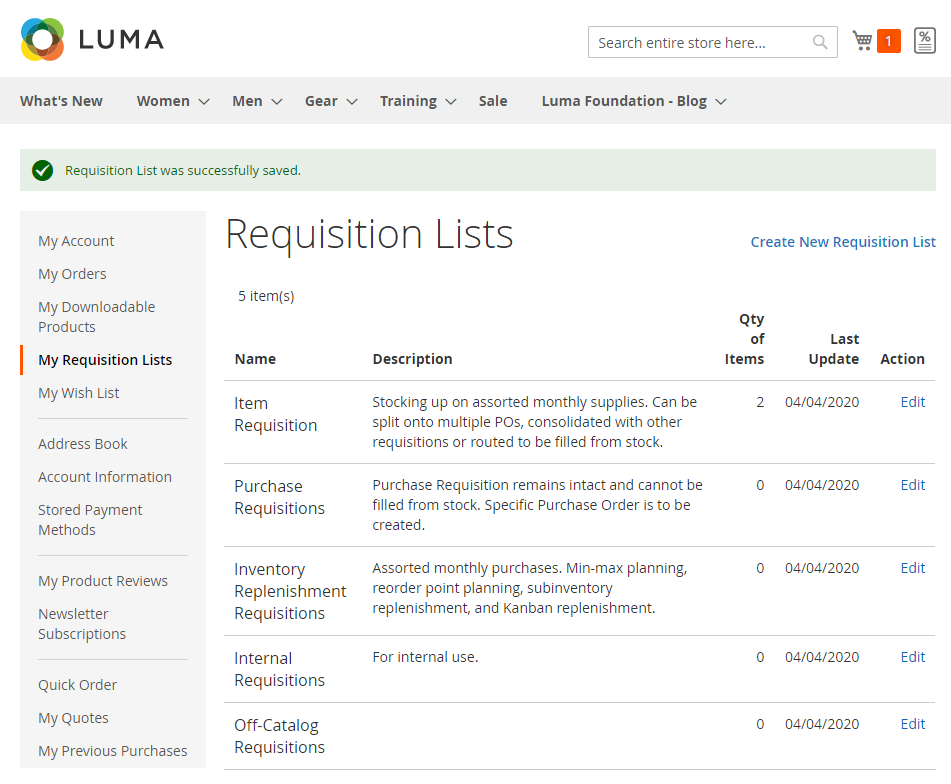
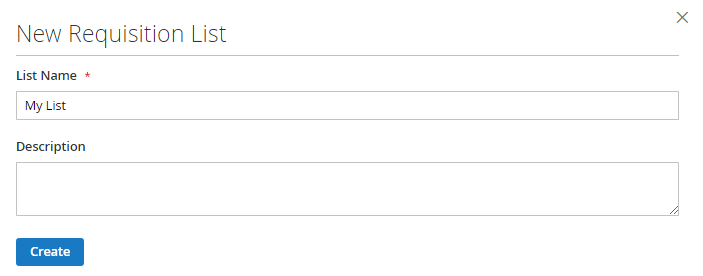
To create a requisition list, click on the Create New Requisition List active link above the grid. The New Requisition List pop-up will emerge. The pop-up will prompt customers to fill-in two fields: List Name (mandatory) and Description (optional and empty by default). On completing the fields, click the Create button in the bottom left corner of the pop-up. The new list will appear on the My Requisition Lists grid, and a notification ('Requisition List was successfully saved') will appear on the top of the page.
When clicking Create new list on a product or category you will simply create a new list. To add a product to it, this new list must be selected from the others lists.
Editing Requisition Lists
To reach to the Requisition List page, click on the Edit active link in the corresponding cell of the Actions column of the My Requisition Lists grid.
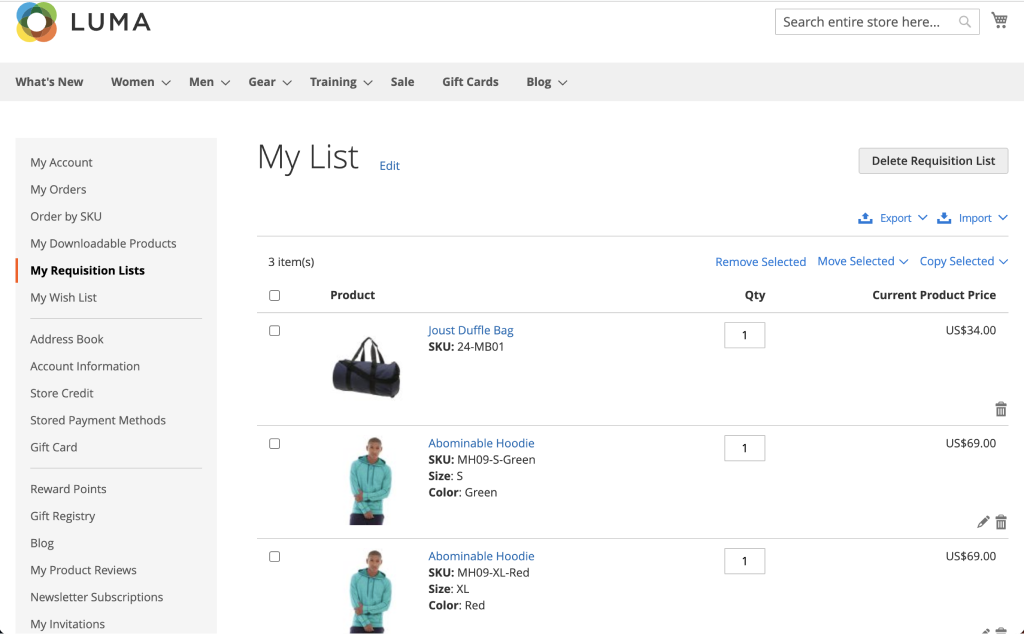
The Requisition List page will feature the following:
- the name of the list;
- the description of the list;
- the Edit (Requisition List) active link;
- the Delete Requisition Link button;
- the grid of products on the list;
- the number of items on the list;
- Export / Import options. Exporting data in either CSV or XML format, and importing data only in CSV format;
- The Remove / Move / Copy Selected options to process selected products in a chosen way;
- Update (Product) Quantity and Add to Cart buttons.
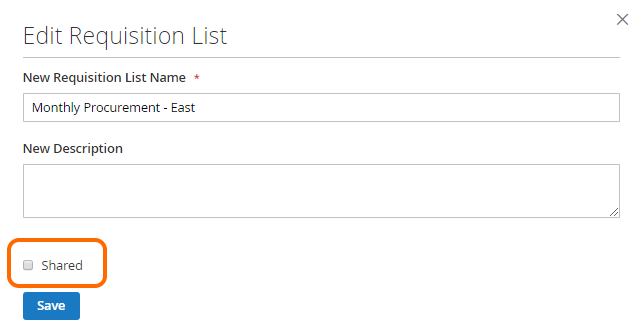
To edit the list, click on the edit active link on the right of the name of the list. The Edit Requisition List pop-up will emerge, similar to the Create Requisition List one but featuring relevant data on the chosen requisition list. On completing the update, click the Save button at the bottom of the pop-up.
To delete the list, click on the Delete Requisition list button on the right of the Edit active link. A pop-up will appear for the Customer to confirm his/her action.
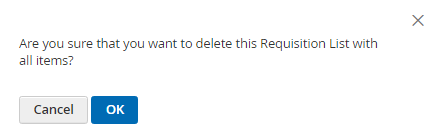
On clicking the OK button, the requisition list will be removed from the grid and will no longer be available on the storefront too. Currently, it is not possible to recover deleted requisition lists.
The grid of products on a requisition list contains the following columns:
- Product - to feature a thumbnail image of the product, product name (active link to the corresponding Product page, SKU and product configuration)
- Qty - the text-box to bear a whole numeric value indicating the quantity of a product on the list;
- Current Product Price - the up-to-date price of the product in the currency of the store-view;
- Bucket Icon - the active icon to remove an item from the list;
- Pencil Icon - the active icon to edit an item (if the chosen product is configurable).
|
The extension allows for bulk operations with products on a requisition list. Customers use the check-boxes on the left of the product thumbnail image to select the products they wish to apply a mass action to. The check-boxes are available in the product grid on a Requisition List page. |
Customers can do the following operations with the items selected on a requisition list:
-
Remove selected items → Click the “Remove Selected” button to delete selected items from the list → A success message will appear: “{Number} items have been successfully removed from {Name of current Req. List} list”.
-
Move selected items to another Requisition list → Click on the “Move Selected” button → A drop-down with all available requisition lists will appear → Choose a list → The items selected will be moved to this list and removed from the original (current) one -> A success message will appear: “{Number} items have been successfully moved to {Name of new Req. List} list”.
-
Copy selected items to another Requisition list → Click on the “Copy Selected” button → A drop-down with all available requisition lists will appear → Choose a list → The items selected will be copied to this list → A success message will appear: “{Number} items have been added to {Name of new Req. List} list”.
To update the quantity of a product on a requisition list, customers alter the whole numeric value of the Qty text-box and click on the Update Qty button below the grid to confirm the change. Only on clicking the Update Qty button will the changes take place. A success message will appear: “{Number} items have been updated in {Name of current Req. List} list”.
To delete an item from the requisition list, click on the Bucket icon below the price of the product.
To change product configuration or product options, click on the Pencil icon next to the Bucket icon. A popup will appear prompting customers to select product configuration/options. On completing the configuration, click on the Confirm button at the bottom of the pop-up.
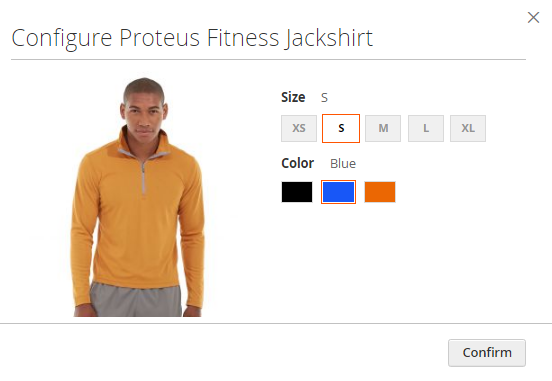
The pop-up will close, and the product configuration will get updated on the requisition list. A success message will appear: “{Name of item} item has been successfully updated in {Name of current Req. List} list”.
|
What options of product configuration are available on the pop-up? The pop-up will feature most options of product configuration but for those of the following types of an attribute:
|
To add items to Cart, select items on the requisition list and click on the Add to Cart button. The items will be copied to Cart, the customer will be redirected to Cart. A success message will appear: "{Number of items copied} of {Number of items selected} item(s) successfully added to Cart". The requisition list will remain integral, no items will be removed.
|
Are same products merged in Cart? When selected on a requisition list items are added to Cart, same products are merged in Cart. |
Integrations
Company Accounts
Install the Magento 2 Company Accounts module to enable corporate customers to share requisition lists between company sub-accounts, and see who updated the lists last.
When Company Accounts is installed two columns are added to the My Requisition Lists grid:
- Owner - displays the Name of the person who created the list;
- Updated By - displays Name of the person who updated this list last time.
The Company Account Admin has absolute rights over the requisition lists created by company members.
The Admin can edit the lists of the members like his/her own ones. It means that the Admin can change the quantity of the products, product options, delete and add new products; change the name of the list; share of hide the list for the members.
To share a requisition list between the company members, the Customer proceeds to the Edit Requisition List pop-up and ticks the Shared checkbox. The Company Admin will have access to all requisition lists, whether they were shared or not.
When the Company Admin is browsing the store, the Add to Requisition List option on a product page will feature all requisition lists created within the company ( both those of the Admin and company members). The requisition lists owned by the Admin will be at the the top of the Add to Requisition List drop-down. Company sub-accounts will see the lists they own, as well as the lists that were shared among the company.
Easy Reorder
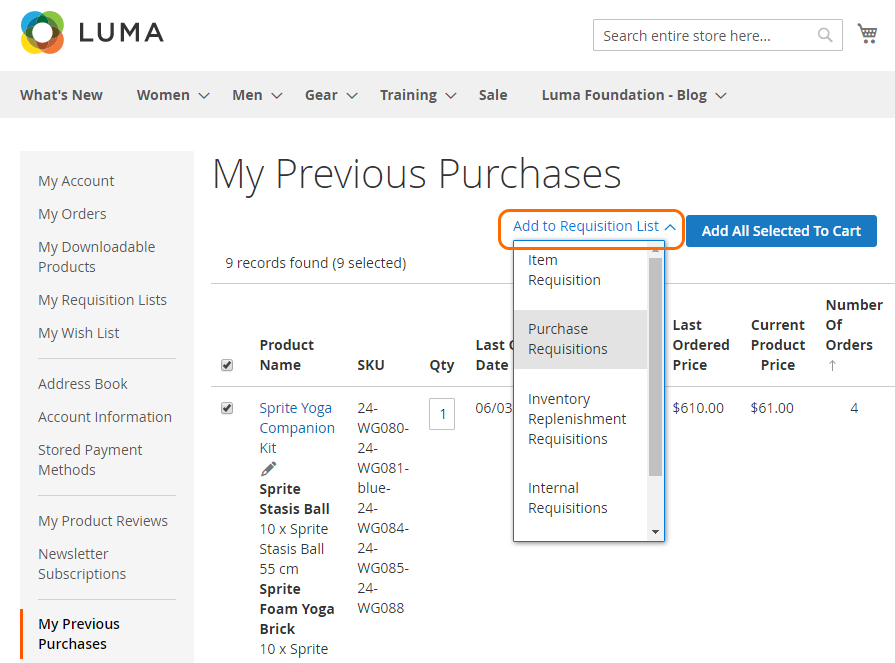
Install the Magento 2 Easy Reorder module to let customers add products to requisition lists from the My Previous Purchases grid.
When Easy Reorder is installed, the My Previous Purchases page will display the Add to Requisition List active link next to the Add All Selected to Cart button. Clicking on the link will open a drop-down to feature Customer's requisition lists. Next, clicking on a requisition list will add the items selected to the list.
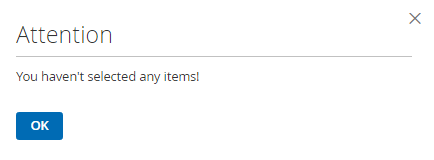
If no items are selected and the Customer clicks on the Add to Requisition List active link, a popup with the title “Attention” and text “You haven’t selected any items” will appear. Clicking the OK button at the bottom of the pop-up will close the pop-up.
![]()
Already used our product?
We would appreciate your feedback. Please, leave a review.