Subscriptions Management
- Monitoring & bulk-editing subscriptions
- Browsing & editing individual subscriptions
- Editing next order date
- Editing subscription plan (subscription page)
- Editing product quantity
- Manage subscription status in customer’s account
- Create free trial subscriptions from backend
- Cancel free trial subscription
- Retry failed transaction
- Apply Lowest Possible Price on Recurring Orders
- Customer group rules
- Placing a subscription order from backend
Monitoring & bulk-editing subscriptions
Once the plans have been assigned to the product, it becomes available for purchase as a subscription. To monitor all active subscribers, go to Sales → Advanced Subscription Products by Aheadworks → Subscriptions.

The 'Subscription' grid contains the data about all the subscribers as arranged into the following columns:
- ID - an ID of a subscription;
- Subscription Profile ID - an ID of a subscription profile;
- Customer - the name of a subscriber;
- Email - subscriber's email address;
- Group - the group the subscriber is assigned to;
- Plan - the plan purchased by the subscriber;
- Status - the current subscription status (active, suspended, or canceled);
- Store view - the store view to show the subscription;
- Created At - the date and time of subscription creation;
- Start Date - the date when the subscriber started the subscription;
- Last Order - the ID of the latest order;
- Last Order Date - the date of the latest order;
- Last Order Grand Total - actual total for the most recent order (May also contain fees for non-subscription items and/or items from other subscriptions when charged together with the chosen one);
- Next Order Date - the date of the next order;
- Next Order Grand Total - actual total for the next order;
- Products - the products assigned to the subscription.
From the 'Actions' box above the grid, you can change the status of the selected subscription(s).
|
How to manage subscriptions left after customers' deleting their accounts? In case a customer deletes their account, his/her active subscriptions will not be suspended or canceled. Instead, those subscriptions will be marked as made by guests. They can later be merged if the merging conditions (see Extension Settings section) are fulfilled. This is the only case when guest orders can be merged. How not to miss a thing when editing subscriptions? If you edit a subscription order and do not want the old subscription to create new orders, please make sure to cancel it manually since, out of the box, both subscriptions will continue working together. |
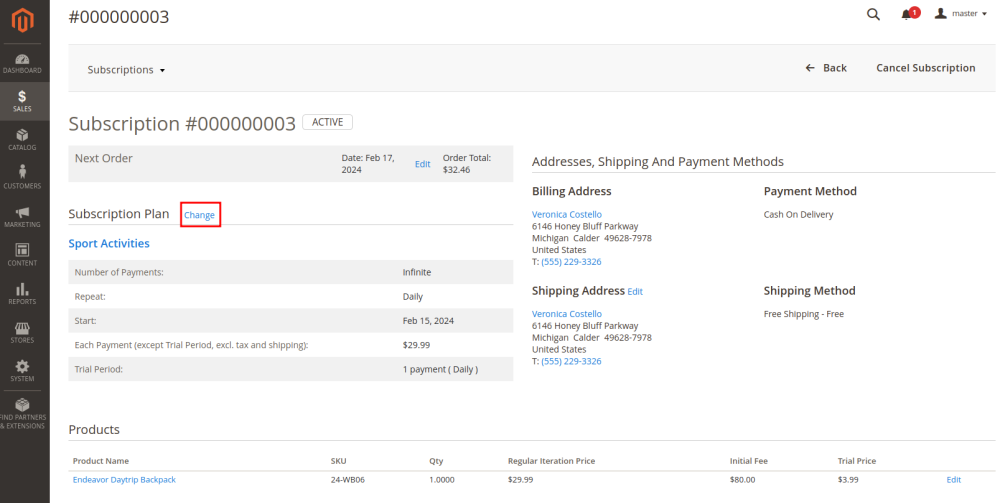
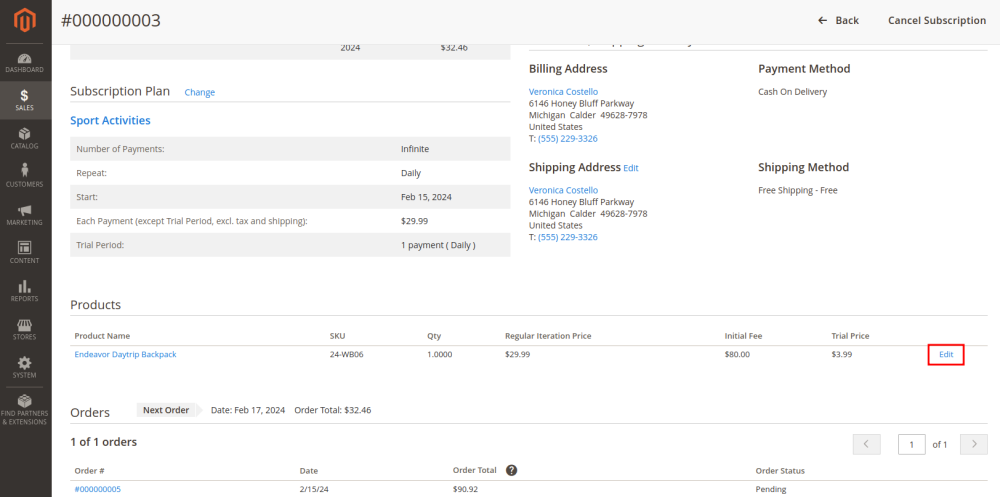
Browsing and editing individual subscriptions
To view the details of a subscription, click on the correspondent subscription profile ID (each id in the grid is an active link to the related subscription profile page).
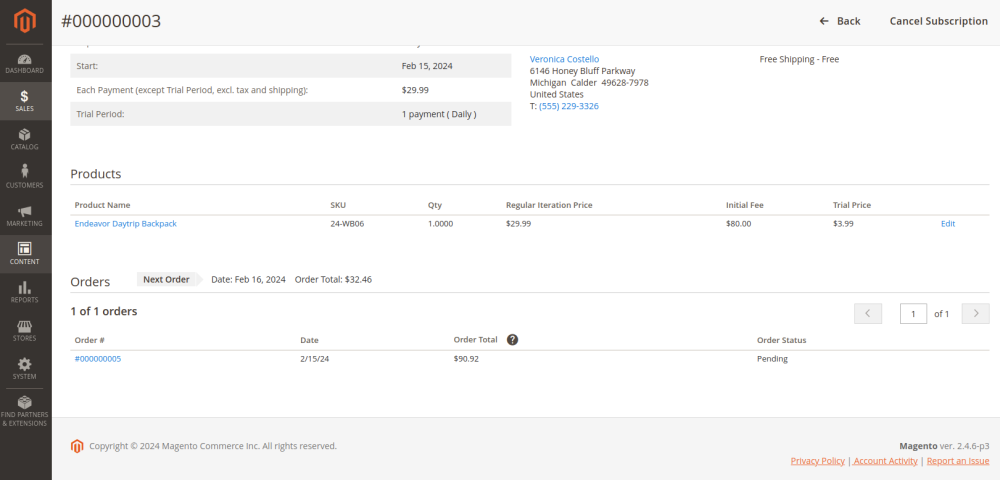
This is where you can browse the following:
- Next order details;
- Subscription status;
- Subscription plan information;
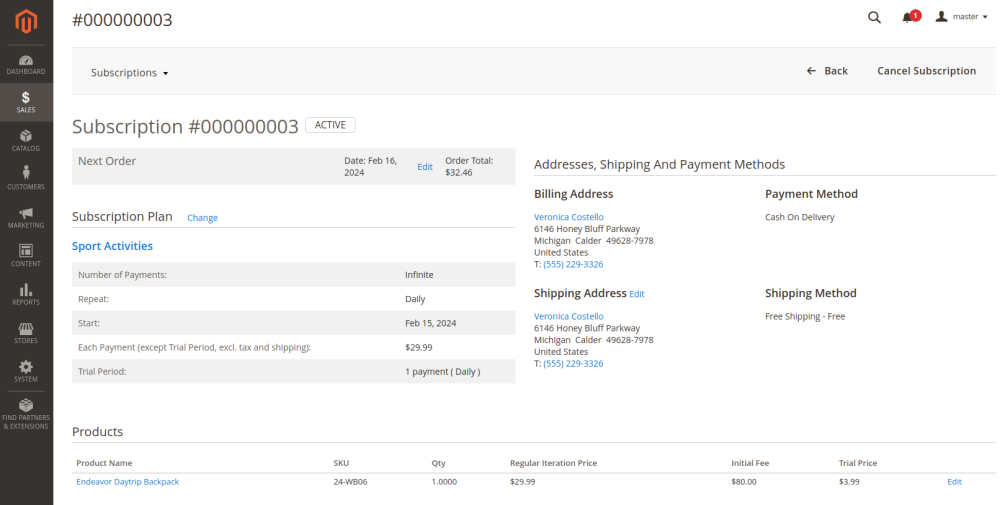
- Products assigned to the subscription;
- Buyer's address, shipment and payment methods;
- Order details to contain the subscription.
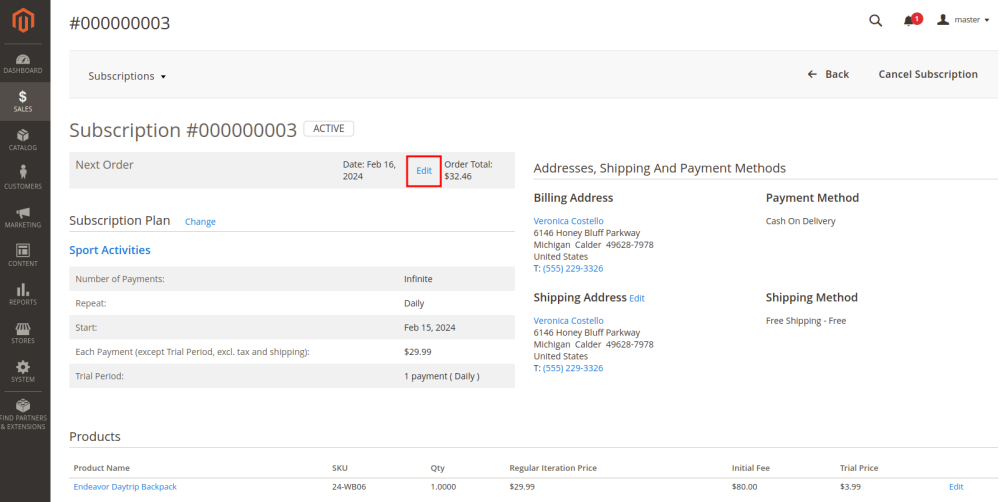
Editing next order date
Merchant can Edit Next Order Date from the backend, for instance, when the Customer is going on holiday and will not be at home during shipment period. To change click on the Edit link right after the next order date.
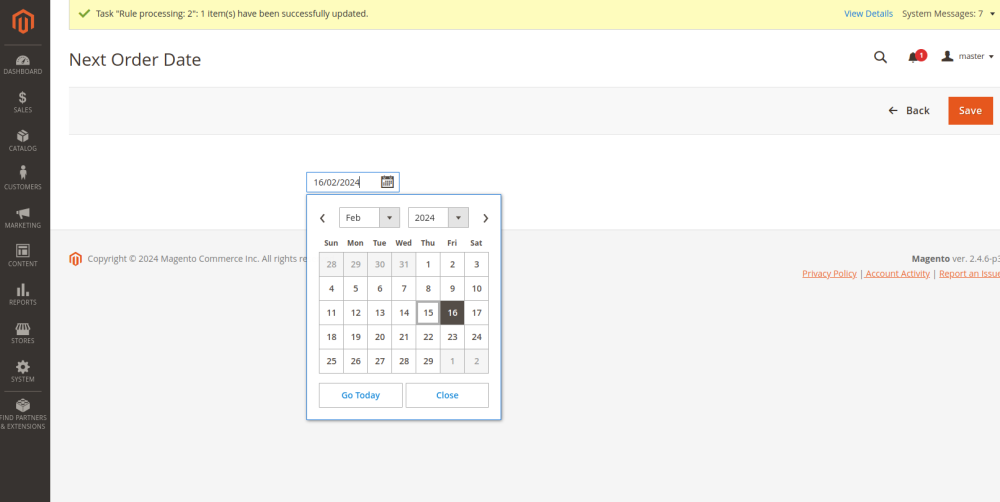
After clicking the new page appears where you need to select the new next order date. Click on the Save button. Back button - returns to the Subscription Profile ID page without any changes. When the Merchant clicks on the Save button message appears “ Are you sure you want to save the changes?” OK - save changes. Cancel - back to the previous page.
Editing subscription plan (subscription page)
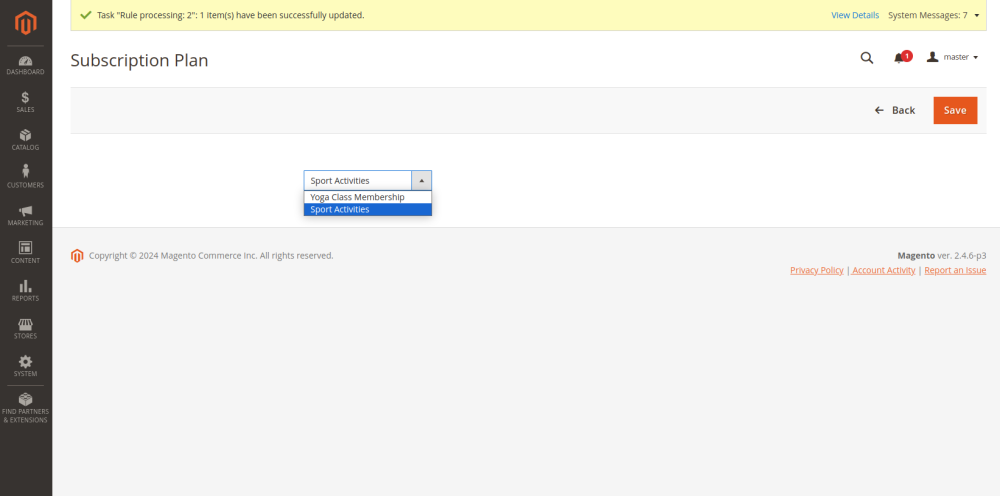
The Merchant can in a few clicks manage the Subscription Profiles and help Customers in their requests to edit profiles. Click on the Change link, a new page appeared.
On the new page, The Merchant can select the Subscription Plan using the dropdown menu. There are only plans in the dropdown that are connected to the main subscription product of the profile. After clicking on one of the buttons:
- Save button - saves changes and returns to the Subscription Profile ID page.
- Back button - returns to the Subscription Profile ID page without any changes.
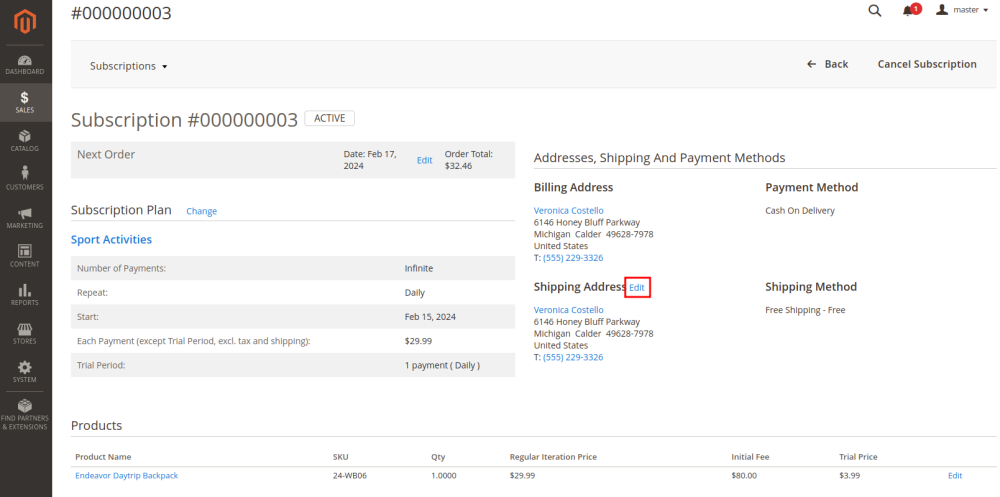
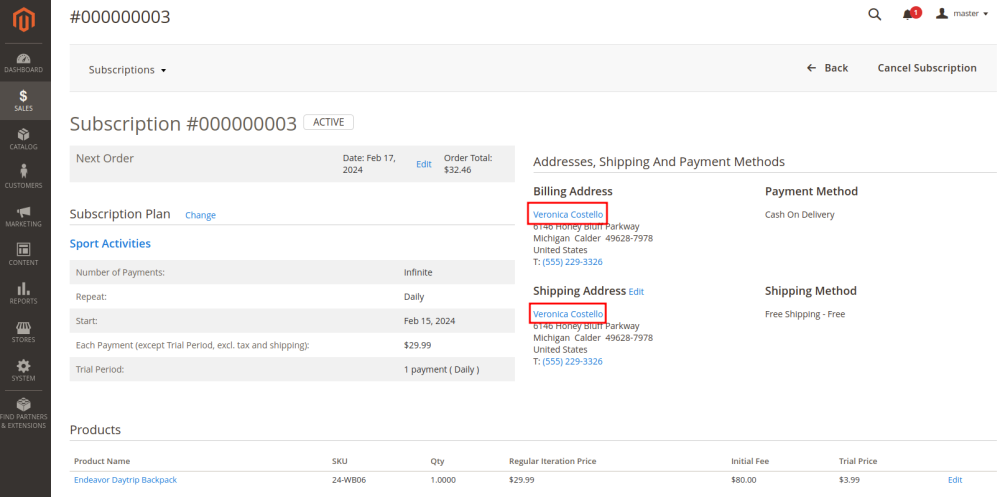
Editing shipping address
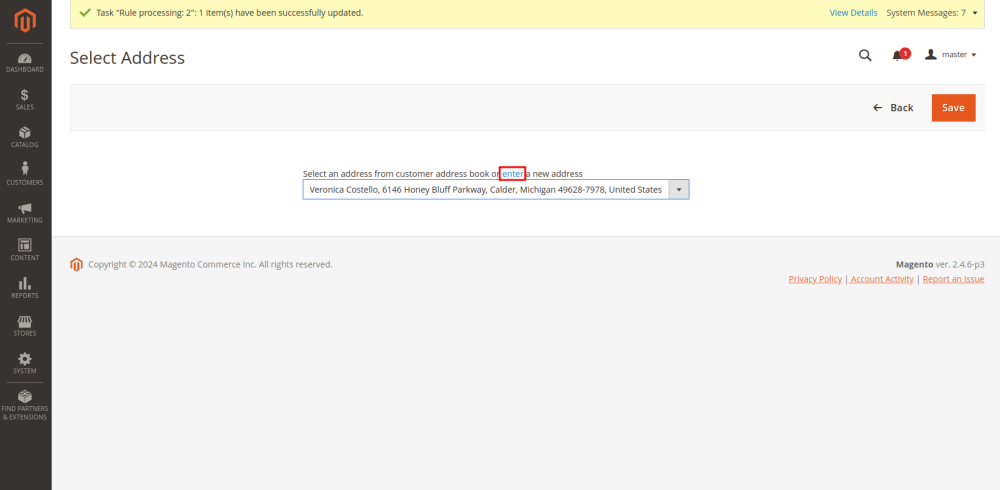
The Merchant can change the addresses from the backend and manage the Subscription Profiles and help Customers in their requests to edit profiles. Click on the Edit button near the Shipping Addresses, new Page appears.
The Merchant can choose an address in the Dropdown menu. If the Merchant clicks on the enter link then the link is directed to the Customer’s Account Page / Addresses Tab.
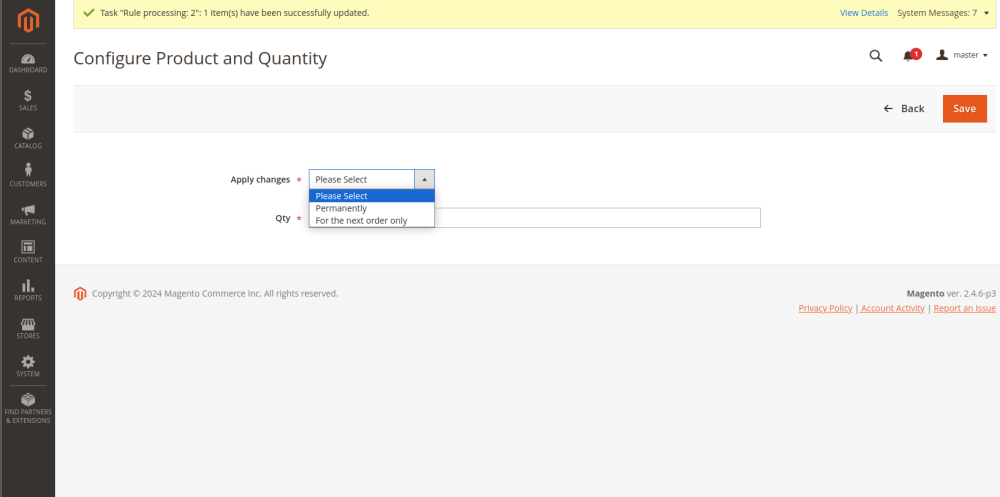
Editing product quantity
You can change the product amount from the backend. Click on the Edit link on the product grid of the Subscription Profile.
On the new page you can configure Product and Quantity. From here apply changes: Permanently or For the next order only. Also here you can change product quantity. Do not forget to click Save.
Manage subscription status in customer’s account
You can use a link to the customer's account in their subscription profile. After clicking on the link you will navigate to the customer's account.
Depending on the status of the subscription, a few actions are possible herein:
Active subscriptions can be canceled. To do so, click on Cancel Subscription in the top right of the page. The page will be reloaded, the subscription will receive the status "Canceled", and the Cancel Subscription option will change to Resume Subscription.
Canceled subscriptions can be resumed. To renew a subscription, click on Resume Subscription in the top right of the page. The page will get reloaded, the subscriptions will receive the status "Active".
Expired subscriptions can be extended. To extend a subscription, click on the Extend Subscription in the top right of the page. The page will get reloaded, the subscription will receive the status "Active".
|
What is the expiration time for the Resume action? For services mode, the action allows resuming subscriptions while the services mode is still active. When the services mode period is expired, the option to resume will not be displayed. For physical products, there is no time limit and the subscription with the Canceled status can be resumed at any time, even when the initially scheduled next payment date is already in the past. |
|
What is the expiration time for the Extend action? The Extend Subscription button is displayed only for the length of the billing cycle. E.g. for a monthly subscription, the Extend action is available during a month after the final billing. |
On successful extending of a subscription the following arrangements will take place:
- there will be added as many billing cycles as configured within the subscription plan;
- the subscription will continue on the same schedule as before (if regular payments happened every Monday, then after extending the subscription they will take place every Monday too, disregarding on what day the subscription was extended);
- the price of each new billing cycle will be Regular (no initial fees, no trials).
Create free trial subscriptions from backend
Admins have the option to offer free trial subscription orders with a zero total, which can be a powerful tool for marketing purposes.
To set up a free subscription trial from the backend, admins can follow these steps:
- Configure the desired trial plan as usual.
- Assign the trial plan to products where it should be available.
- Proceed to generate an order using the standard workflow: select or create a new customer, choose a product, and configure it accordingly.
This allows admins to place orders on behalf of customers without requiring their payment details.
NOTE
The payment will be valid until the subscription is with zero total. Respectively if we set up a free trial for 6 months, orders will be with zero total for six months and all this time this payment will be valid.
If a customer wants to switch to it - it is not possible since the payment is not available for selection to customers.
Cancel free trial subscription
Admin can cancel free trial subscriptions in case no valid payment details are input, after the trial period and three attempts to charge them fail.
After creating a Free subscription trial for customers from the backend using Free Trial payment and when the trial period expires, so the system makes three attempts to charge the subscription and then automatically gets canceled. If the customer did not input his valid payment details in between the tries. Customers will get an email notification about subscription cancellation.
Retry Failed Transaction
The 'Retry Failed Transaction' functionality enables the admin to retry failed subscription payments from the backend. If the subscription status is Suspended due to the payment error (e.g. expired card) or due to the out of stock products, then the ‘Retry Failed Transaction' button appears on the subscription page in the admin panel.

Once the transaction is successful, the subscription status will be updated to Active, and all subsequent payments will be processed as usual. However, if the transaction fails, you can attempt to make the payment again.
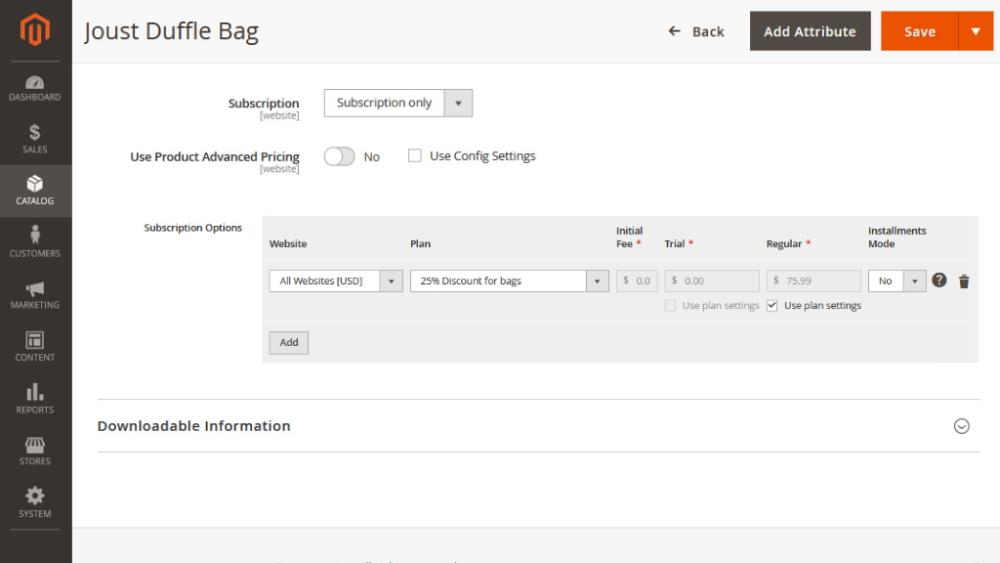
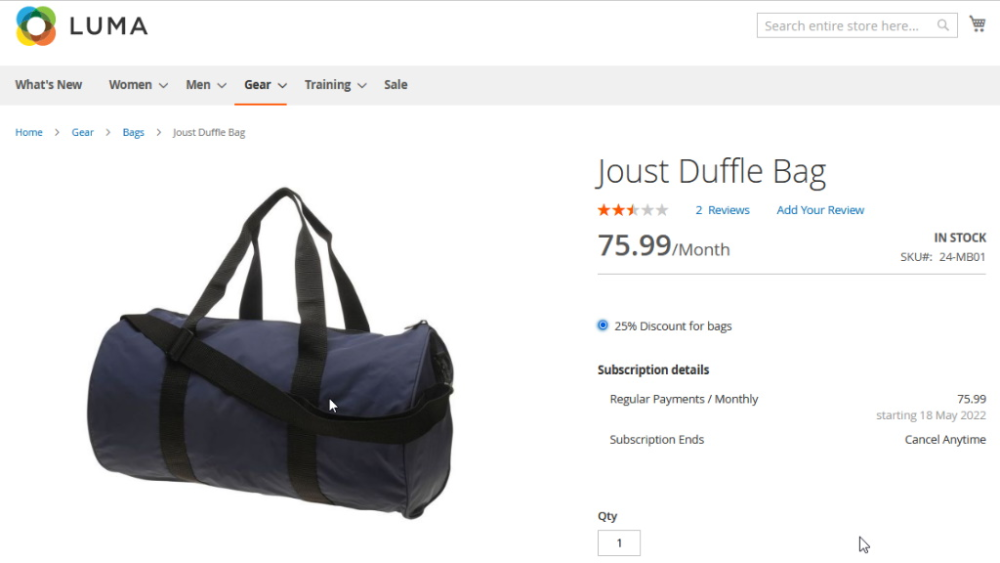
Apply Lowest Possible Price on Recurring Orders
Option Apply Lowest Possible Price on Recurring Orders allows merchants to offer the lowest price that can currently be applied to the product.
The system only uses Discounts and Cart Price Rules that are valid at the moment of charge generation.
Please note: Apply Lowest Possible Price on Recurring Orders is only for native Magento Cart Price Rules, Catalog Price Rules, Advanced Pricing.
|
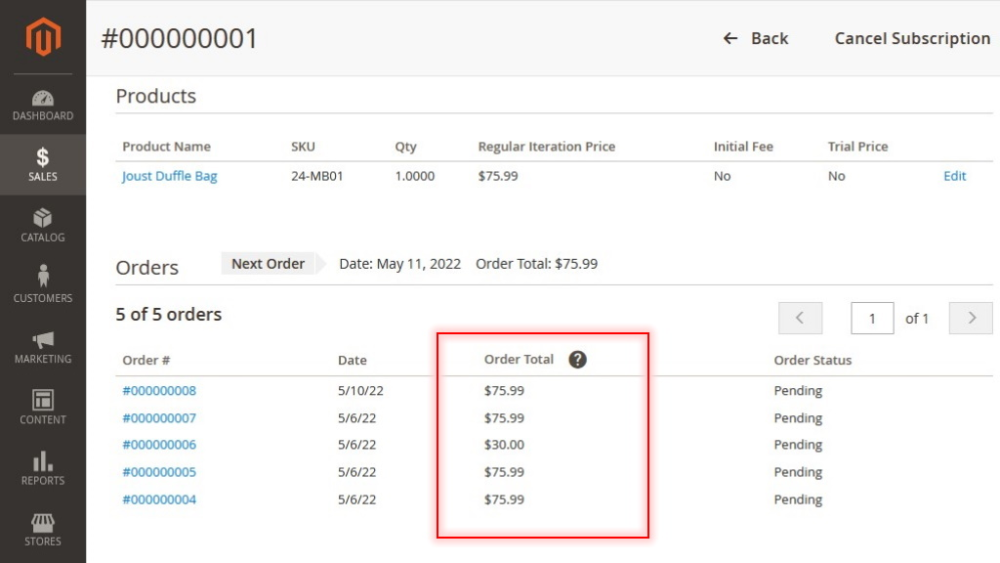
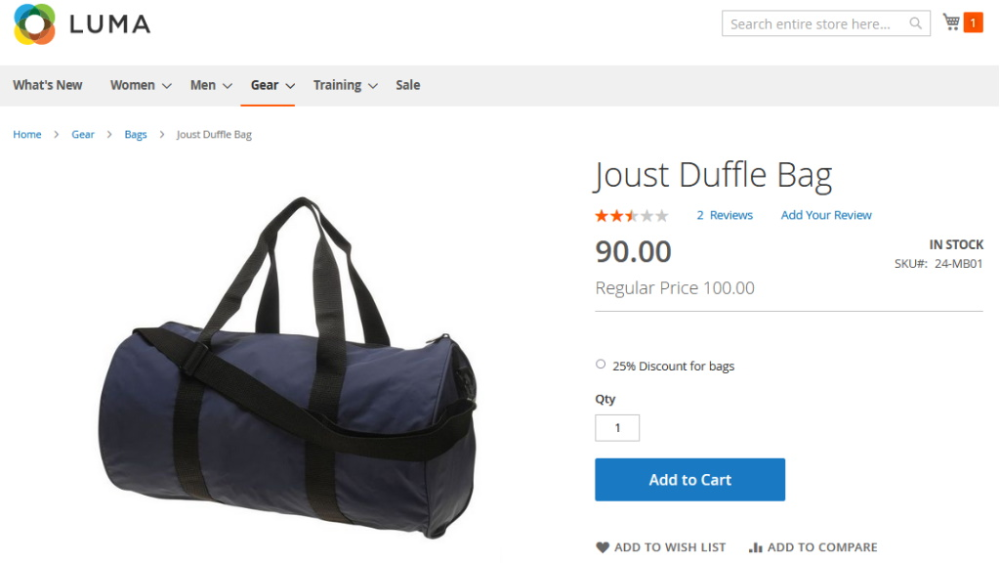
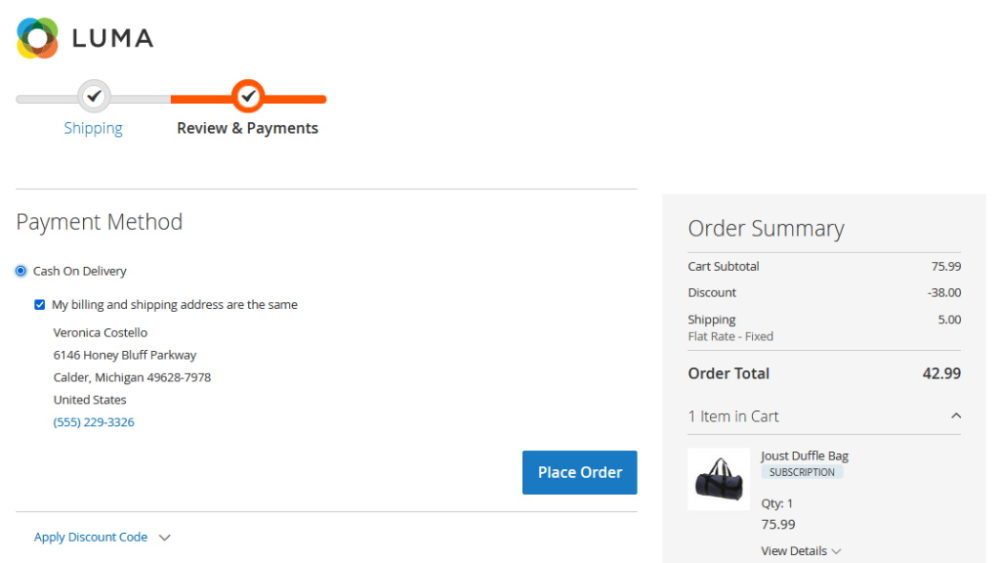
Example: Joust Duffle Bag costs 100 dollars. Plan discount is 25%, so Subscription Price is 75.99 dollars (because Price Rounding is set up to XX.99). |
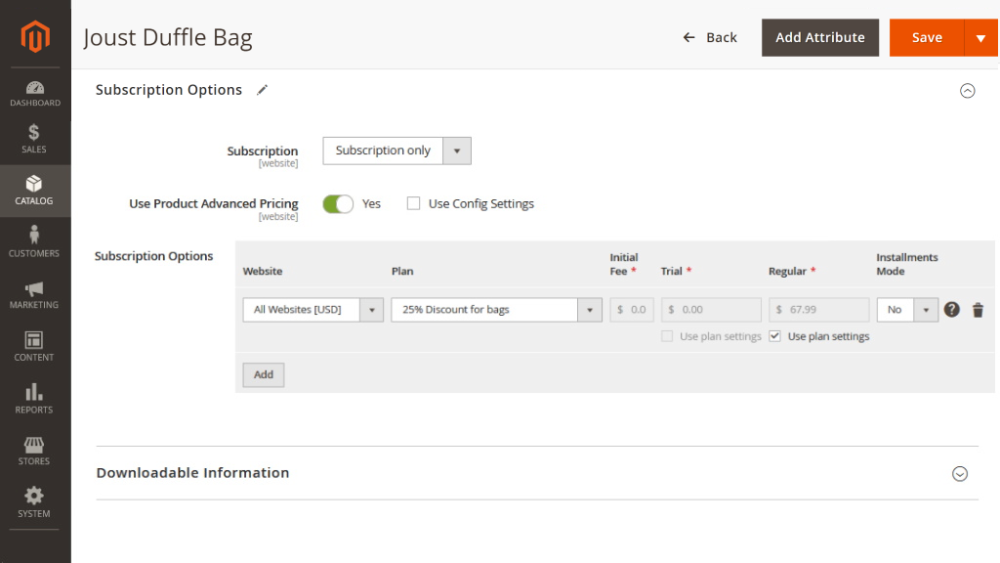
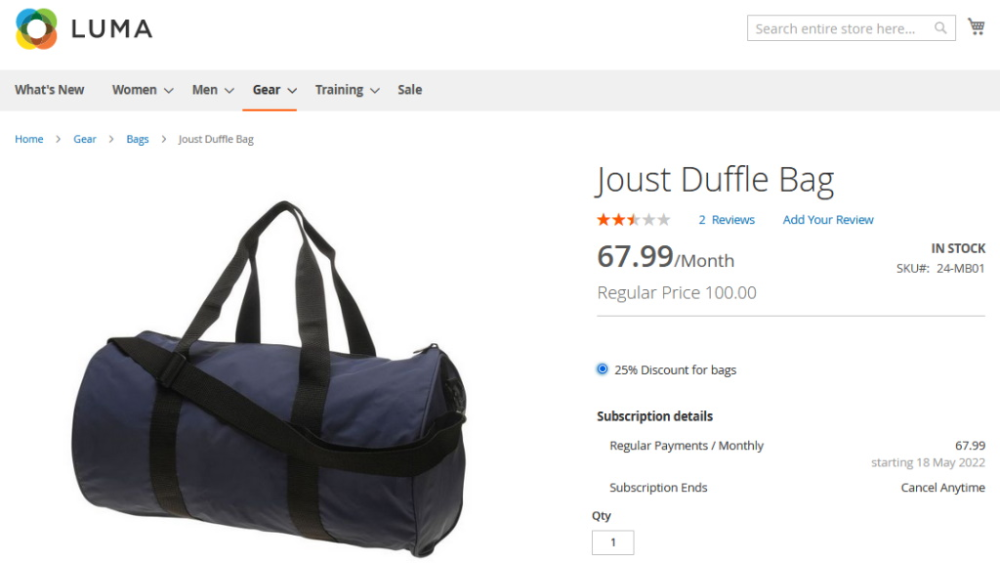
When Advanced Pricing is enabled from the backend, then The Subscription Plan discount is applied on top of the Advanced Pricing.
|
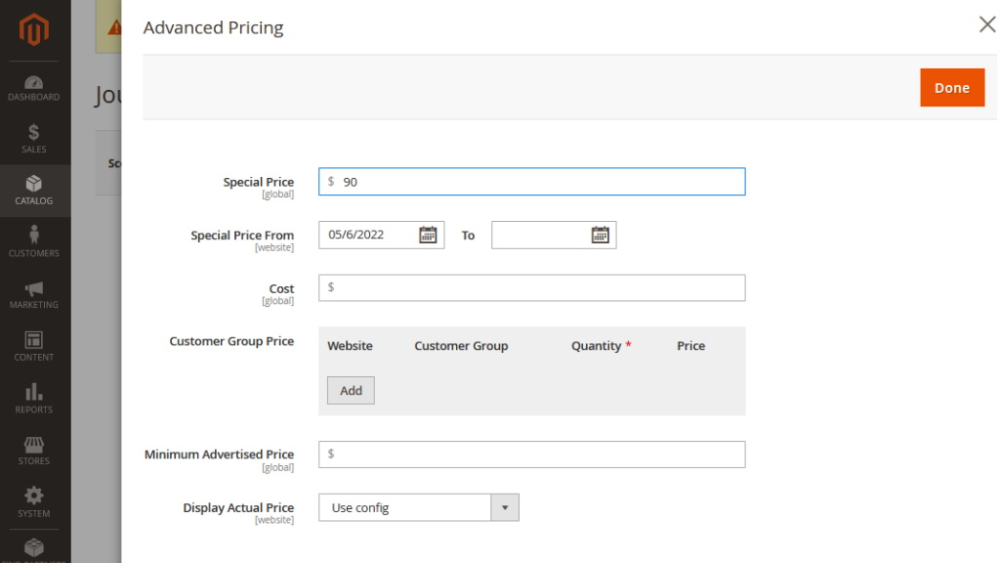
Example: If Advanced Price (for ex. Special Price) is 90 dollars, then Subscription Price is 90$-25% = 67,99$. |
When Advanced Pricing is set to Yes and Apply Lowest Possible Price on Recurring Orders is set to Enable at the same time, then the Subscription Price for the recurring order will be calculated as follows:
|
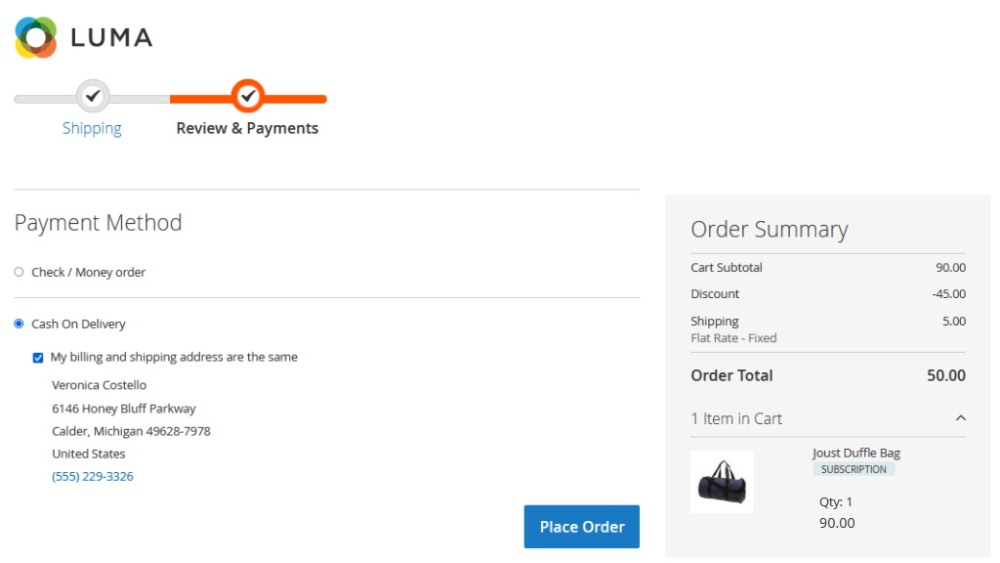
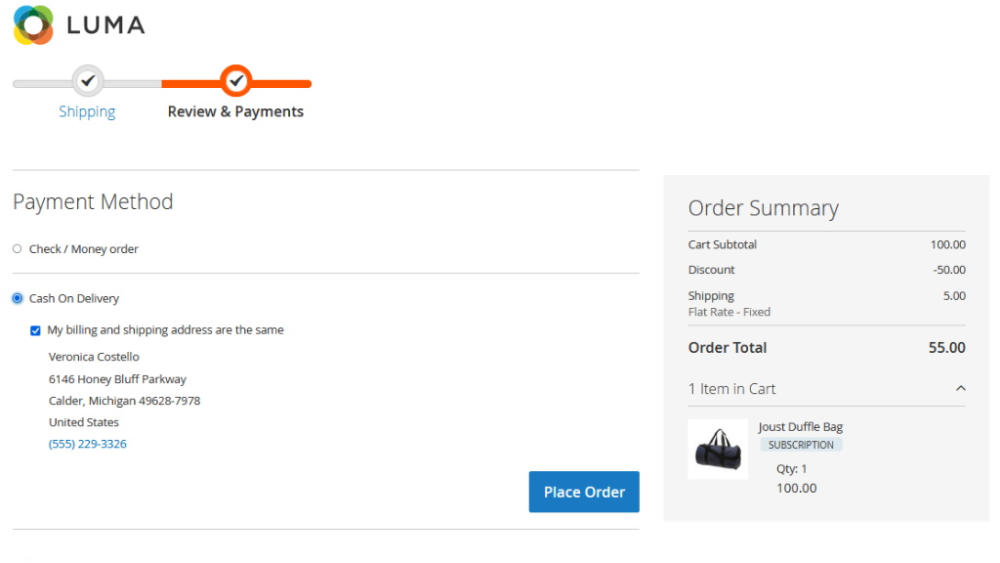
Example: Special Price is 90$, Plan discount is 25%, Cart Price Rule discount is 50% Cart Price Rule discount > Plan discount (50% over 25%), then the system chooses the best price So the Subscription Price for the subsequent payment is 90$-50%=45$ |
In case the discount is set up with Cart Price Rules, then the system will choose the best price: either Product Price + Subscription Plan Discount or Product Price + Cart Price Rule Discount.
An option to Apply Lowest Possible Price on Recurring Orders works for subsequent subscription payments that are made automatically according to the plan (except for the very first order).
This means that the first order is considered initial. And the discount set in the Cart Price Rule is applied on top of the plan price.
|
Example of payment for the first order: Joust Duffle Bag costs 100 dollars. Plan discount is 25%, so Subscription Price is 75 dollars. Cart Price Rule discount is 50%, so the total Subscription Price for the first payment should be - 100$-25%-50%= 37.99$ |
Subscription Price for subsequent payments according to the plan will be calculated as follows:
|
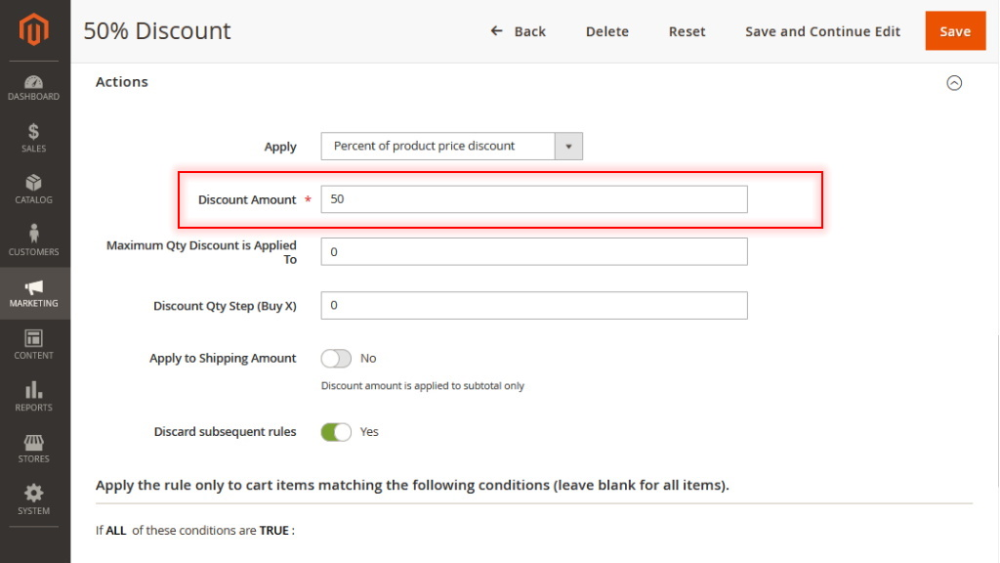
Example: Joust Duffle Bag costs 100 dollars. Plan discount is 25%, Cart Price Rule discount is 50%. Cart Price Rule discount > Plan discount (50% over 25%), then the system compares discounts and chooses the best price. So Subscription Price for the subsequent payment is 100$-50%= 50$ |
Otherwise, when Plan discount is greater than Cart Price Rule discount, then Cart Price Rule discount is ignored and only Plan discount is applied to the product price.
Customer Group Rules
Customer Group Rules grid
This is where you may view, and edit the group rules as well as add new ones.
The Rules are allocated into a table with 6 columns: Rule ID, Rule Name, Status, Priority, SKU, and Product Name, which represent some most important details of rule settings. The table is easily customizable and searchable with the 'Columns', 'Default View', and 'Filters' active elements on the top right of the page.
You may enable, disable, or delete available Rules individually or in bulk. Tick the boxes next to the chosen segments on the left of the table, click the 'Actions' folding list, and opt for an operation.
To add a new segment click the 'Add New Rule' button on the top right of the page. These operations will take you to the Edit/New Rule page.

New Rule and Edit Rule Pages
The New Rule and Edit Rule pages look identical, the name suggests the operation you are to do with the Rule. This is where you may alter or add all the details of the segment and define groups for the rule.
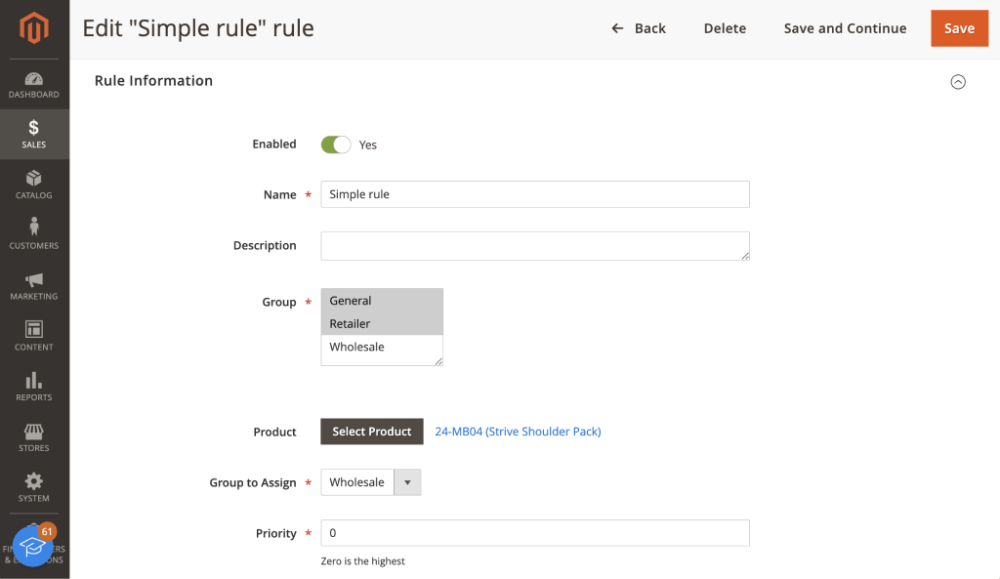
The image below reflects some basic details you are suggested to provide for each rule. They are as follows:
- Enabled - enable or disable the rule here;
- Name - provide a name for the rule;
- Description - give details on the rule;
- Group - determines the specific customer segment affected by the rule;
- Product - specifies the item the rule applies to;
- Group to assign - define the group of customers to which the rule will be assigned
- Priority - the decimal numeric for sorting the overlaying rules.
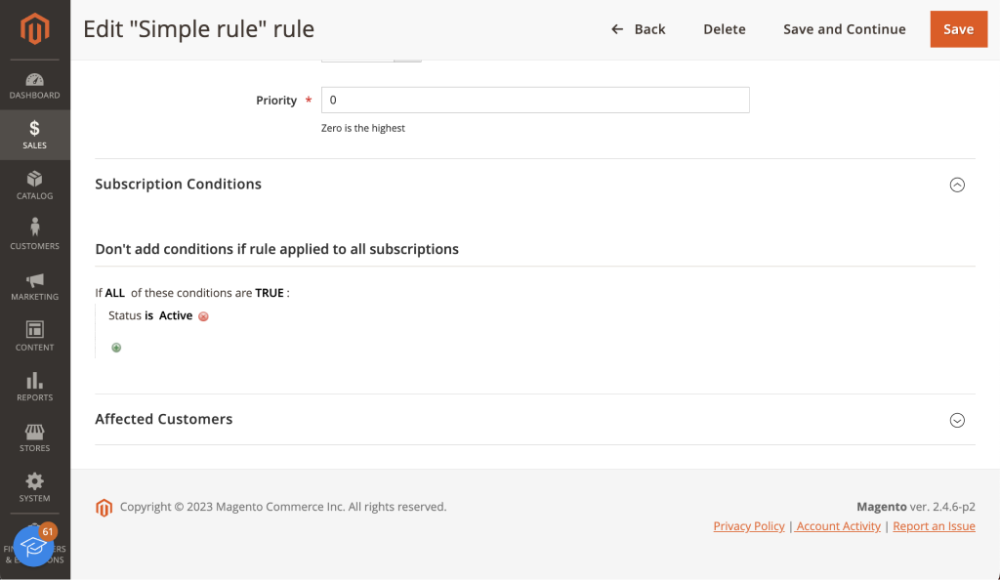
Prior settings of the rule sorted, you may now proceed to the Subscription Conditions block of the rule.
Conditioning the rule
The Conditions block of the Edit/New Rule page allows customizing rules.
To add a condition, click the green "Cross" button and choose an attribute for conditioning. For further configuration proceed to the 'ALL', 'TRUE', 'IS' parameters to alter them in accordance with your rule.
To delete a condition click on the Delete (red cross) button.
Once the rule is set and saved, you will be able to check the customers who match the filter at the bottom of the page in a separate grid in the Affected Customers tab.
As soon as the rule is created and the toggle switch is enabled, the extension automatically moves Customers fit this rule to the appropriate Group.
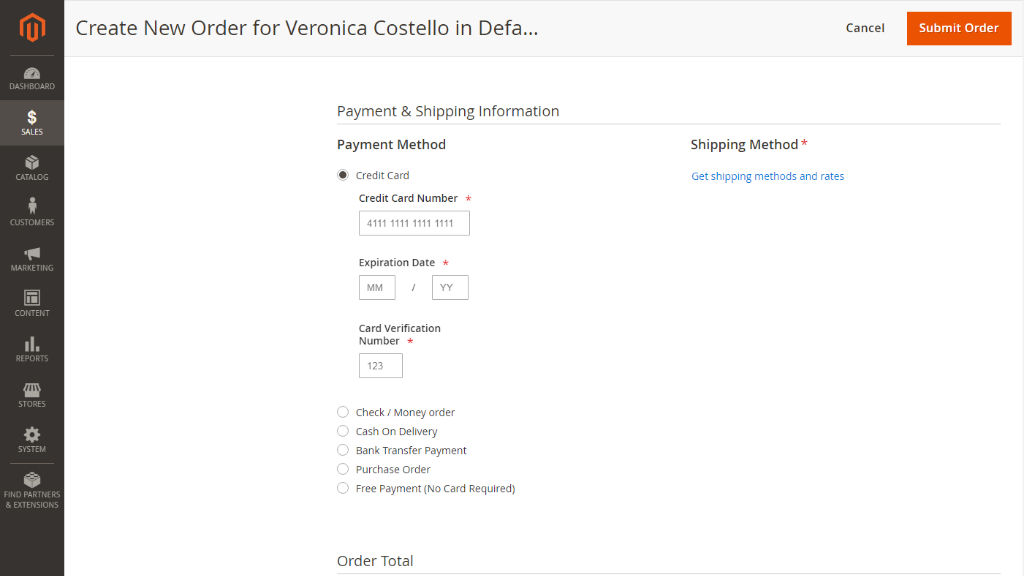
Placing a Subscription Order from Backend
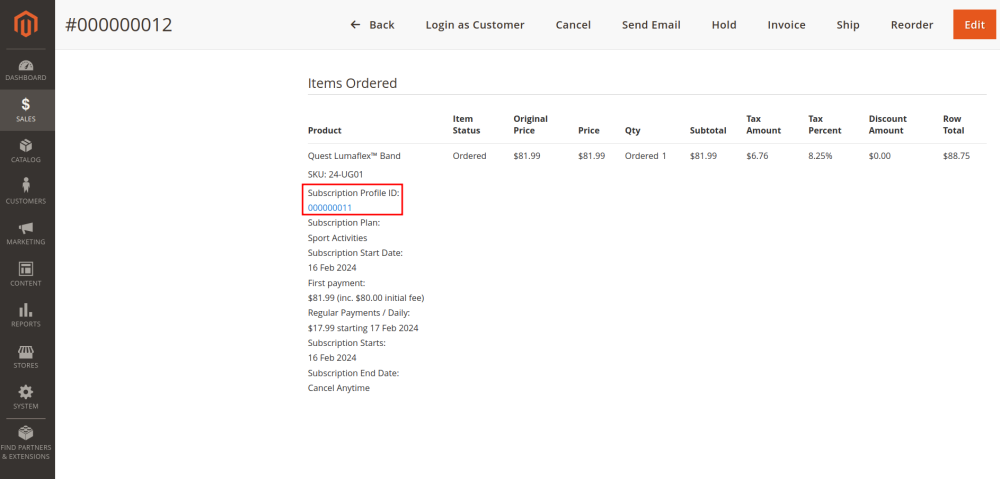
Admins have the ability to place a subscription order on behalf of a customer. To do so, navigate to Sales > Subscriptions > Create New Subscription. On the New Order page, select the desired products and a customer for the order. Finally, choose a valid payment method to complete and submit the order.
From this page, you can open the order which was created by Advanced Subscription Products for Magento 2. Under the section “Items Ordered” in the Product column, find a line: “Subscription Profile ID: XXXXXXXXX” right below the SKU. “Subscription Profile ID: XXXXXXXXX” - is a link to a corresponding Subscription Profile page.
| Note: Refunds for subscription payments and refunds for non-subscription products are the same (they have the same workflow), and the subscription payment refund will not affect the subscription in any way (it will not be canceled and subsequent payments will continue to be created). |
Want to learn more about Advanced Subscription Products? Read the following articles:
Already used our product?
We would appreciate your feedback. Please, leave a review.