
User Manual - Follow Up Email
- Installing Follow Up Email
- Set up cron
- Uninstalling Follow Up Email
- Compatibility
- Reference Table
- Introducing Follow Up Email
- Backend Configuration
- Campaigns
- Events
- Email Actions
- Scheduled Emails
- Mail Log
- Troubleshooting
Magento 2 Follow Up Email organizes targeted email campaigns with customizable content and the A/B email testing tool. Store owners can define when emails should be sent by choosing among eight trigger events available. For more precise timing of each email, the module provides the email scheduling feature. By viewing email stats, merchants can evaluate the efficiency of individual campaigns and timely implement the necessary corrections to them.
Installing Follow Up Email
Command Line Installation
- Backup your web directory and store database
- Download the Follow Up Email installation package
- Upload contents of the Follow Up Email installation package to your store root directory
- In SSH console of your server navigate to your store root folder:
cd path_to_the_store_root_folder |
run the following command:
php bin/magento module:enable Aheadworks_Followupemail |
then:
php bin/magento setup:upgrade |
after:
php bin/magento setup:static-content:deploy -f |
5. Flush store cache; log out from the backend and log in again
|
Make sure the installation is done from the FTP administrator account. Otherwise, set 775 permissions to the store root directory after the extension is deployed. |
Composer Installation
If you are installing an extension from Aheadworks for the first time, you need to add our composer repository to your Magento store:
1. Login to your ssh console and navigate to your store folder:
cd path_to_the_store_root_folder |
Run the following command:
composer config repositories.aheadworks composer https://dist.aheadworks.com/ |
After the command was executed successfully, you can use the composer to install the products.
To install the extension:
2. Login to your ssh console and navigate to your store folder:
cd path_to_the_store_root_folder |
3. Run the following command to install the latest version of the extension:
composer require aheadworks/module-followupemail2 |
if you need to install a specific version, run this command:
composer require aheadworks/module-followupemail2:<version> |
|
Specify the version of the extension in <version> |
When prompted, enter Public Key (Username) and Private Key (Password):
.png?version=1&modificationDate=1613637317951&cacheVersion=1&api=v2&width=450)
Both Public Key (Username) and Private Key (Password) can be found in My Projects and Licenses in your personal account on our site:
 |
4. Enable the extension:
php -f bin/magento module:enable <Module_Name> |
|
Add the product name in <Module_Name> |
Next, register the extension:
bin/magento setup:upgrade |
Recompile your Magento store if you are in the Production mode:
bin/magento setup:di:compile |
To verify that the extension is enabled, run this command:
bin/magento module:status |
Clean store cache, by running the following command:
bin/magento cache:clean |
Log out and Log in the backend again.
To upgrade the extension:
5. To update or upgrade an extension:
Download the updated extension file. Take note of the module-name and version. Export the contents to your Magento root.
If a composer package exists for the extension, run one of the following.
Update per module name:
composer update aheadworks/module-followupemail2 |
Updater per version:
composer require aheadworks/module-followupemail2:<version> |
Run the following commands to upgrade, deploy, and clean the cache.
php bin/magento setup:upgrade --keep-generated |
|
It is important, you see Troubleshooting after updating the module. |
Set up cron
If you have already configured cron jobs for your Magento installation, then you can skip this step. Read the following instructions on setting cron job for your Magento store: Magento user guide.
Generally it would be enough to run in the SSH console of your server:
crontab -e |
And insert the following line:
*/3 * * * * php -c <ini-file-path> <your Magento install dir>/bin/magento cron:run |
Don't forget to confirm saving request when exit.
Uninstalling Follow Up Email
Since Magento introduced declarative Database you need to be very carefull when uninstalling or disabling the module.
|
NOTE: Please be very careful when uninstalling/disabling this module. This module uses a declarative DB scheme. Once the module is uninstalled the DB tables will be lost. |
Manual Removal
-
Run command:
|
It will remove data patch wilth module sample data so you can install it again in future
2. Disable extension:
|
3. Run setup upgrade:
|
It will remove module related tables from the system
4. Remove module files manually:
|
Automatic Removal (via Composer)
1. Disable the module by executing the following commands:
php bin/magento module:uninstall Aheadworks_Followupemail |
Compatibility
|
Module Version |
Magento Version |
|
2.2.6 and earlier versions |
2.3.Х - 2.3.6 2.4.0 - 2.4.3 |
|
As of version 2.2.7 |
2.3.7-p3+ 2.4.0 - 2.4.5 |
|
As of version 2.3.0 |
2.4.3 - 2.4.5 |
|
As of version 2.3.1 |
2.4.4 - 2.4.6 |
|
As of version 2.5.1 |
2.4.5 - 2.4.7 |
|
As of version 2.5.2 |
2.4.6 - 2.4.8 |
|
As of version 2.5.4 |
2.4.6 - 2.4.9 |
The PHP version depends on your current Magento version. Please, refer to your Magento version release notes.
Reference Table
- Email event – the general condition under which a follow-up is sent;
- Event trigger – the action a customer takes to trigger an email event;
- Email template – the body of the corresponding follow-up email;
- Follow-up / Email – the message that is sent to the customer after the email event was triggered.
Introducing Follow Up Email
Magento 2 Follow Up Email is a smart marketing solution that sends emails based on customer operations at the store:
- Abandoned checkout;
- Order status changed;
- Customer registration;
- Last customer activity;
- Newsletter subscription;
- Customer review submission;
- Wishlist changes.
Extension Logic
The module offers eight event triggers to send correspondent emails ad hoc. Every event covers a particular aspect of customer activity on the store: registration, placing orders, and more.
When the event is triggered, an email message is sent to the email address of the customer. You can create multiple email templates for a single event specifying the subjects, bodies, and signatures.
Each event email can be scheduled to a specific time. For example, you might want to schedule the 'Abandoned Checkout' email 30 minutes after a customer left the cart or two weeks after the order was shipped to ask for a product review.
Integrations
Backend Configuration
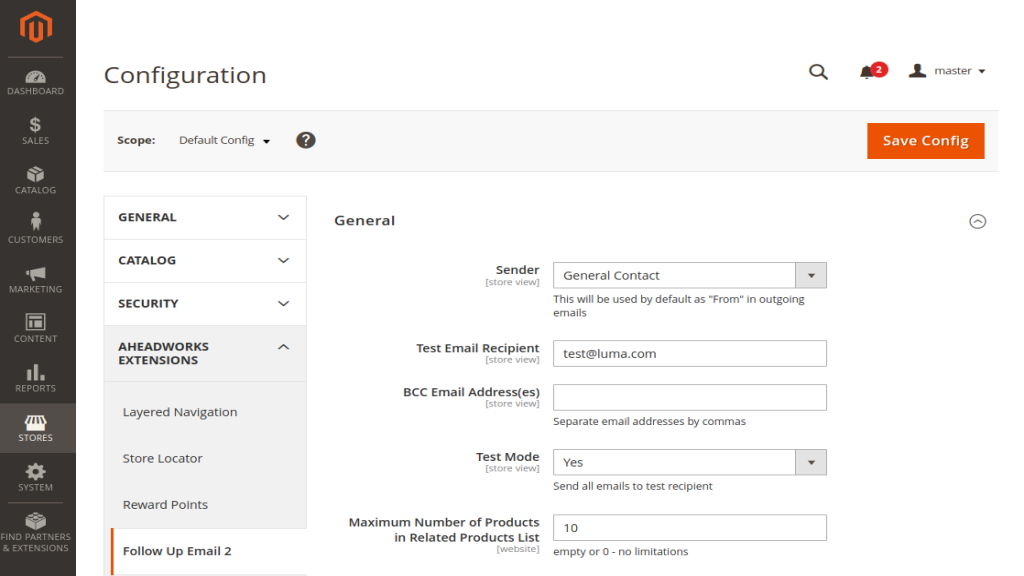
We advise you to start with the extension's configuration under Stores → Configuration → AHEADWORKS EXTENSIONS → Follow Up Email 2.
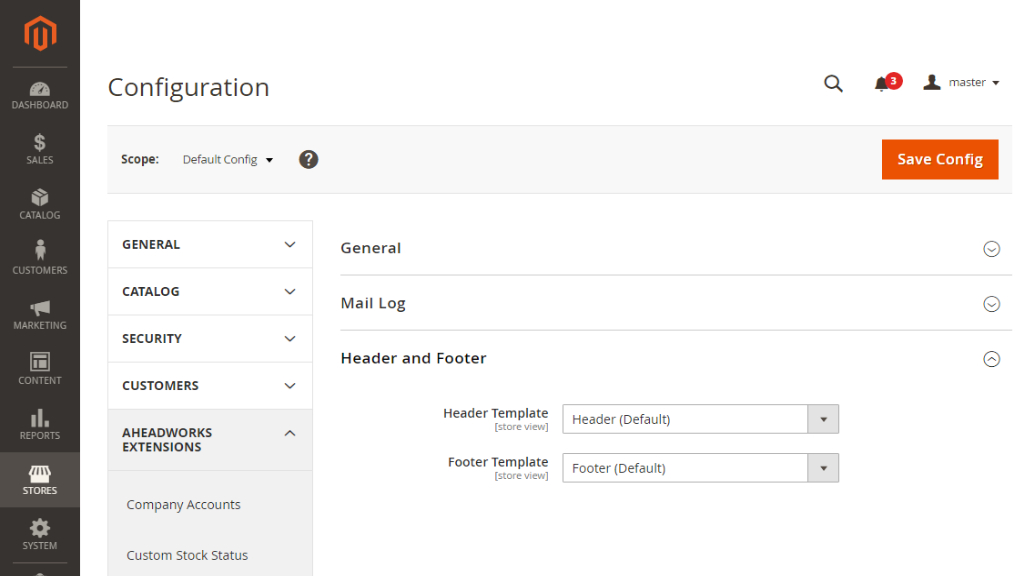
The configuration screen is split into three sections: General, Mail Log, and Header and Footer.
The 'General' section is represented with the following options:
- Sender – the email sender of follow-ups;
- Test Email Recipient – works in conjunction with the 'Enable Test Mode' option. If the latter is enabled, all test emails go to the defined recipient;
- BCC Email Address(es) – the email address(es) where BCC emails should be sent to;
- Enable Test Mode – here you are suggested to enable the test mode of the extension;
- Maximum Number of Products in Related Products List - restrict the number of Related Products in emails.
|
Whenever a customer triggers a particular event (abandons a cart, places an order, etc.), the follow-up is sent to the test email recipient instead of the end customer. Thus, you can test out follow-ups without disturbing customers. |
The 'Mail Log' section has a single option:
- Keep Emails For, days – how long the extension will keep the mail history.
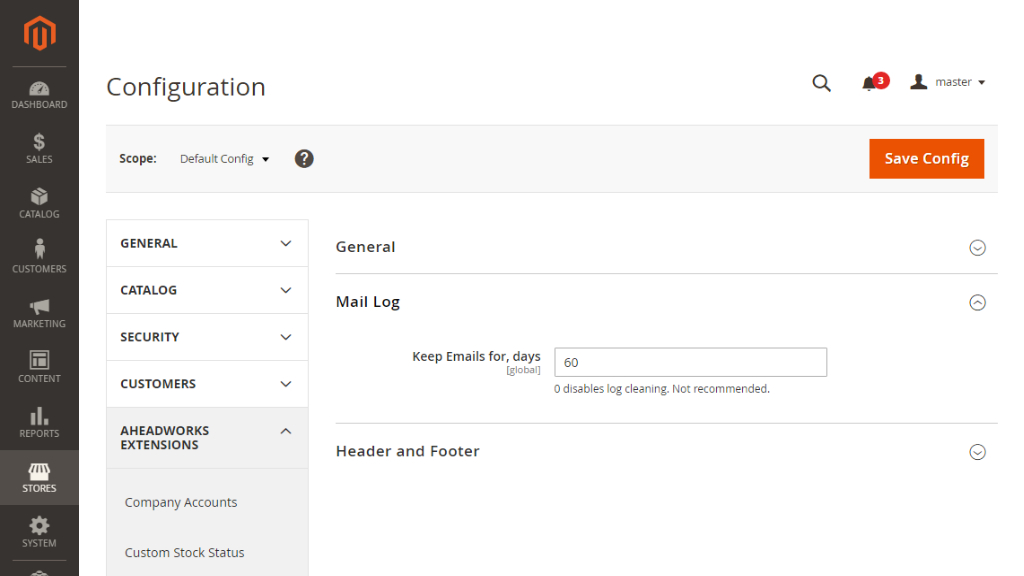
With the last section - 'Header and Footer' - you can separately define the header and footer templates for your follow-up emails. To indefinitely record email history, set the ‘0’ value in the field.
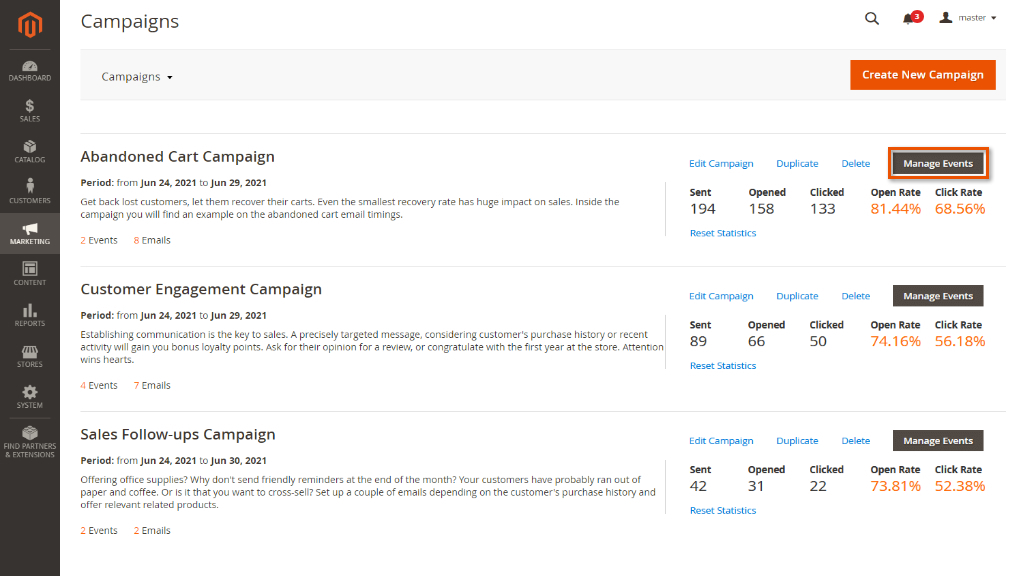
Campaigns
The 'Campaigns' page is the management center of the extension. Here you can monitor the performance stats of each particular campaign as well as manage campaigns one by one.
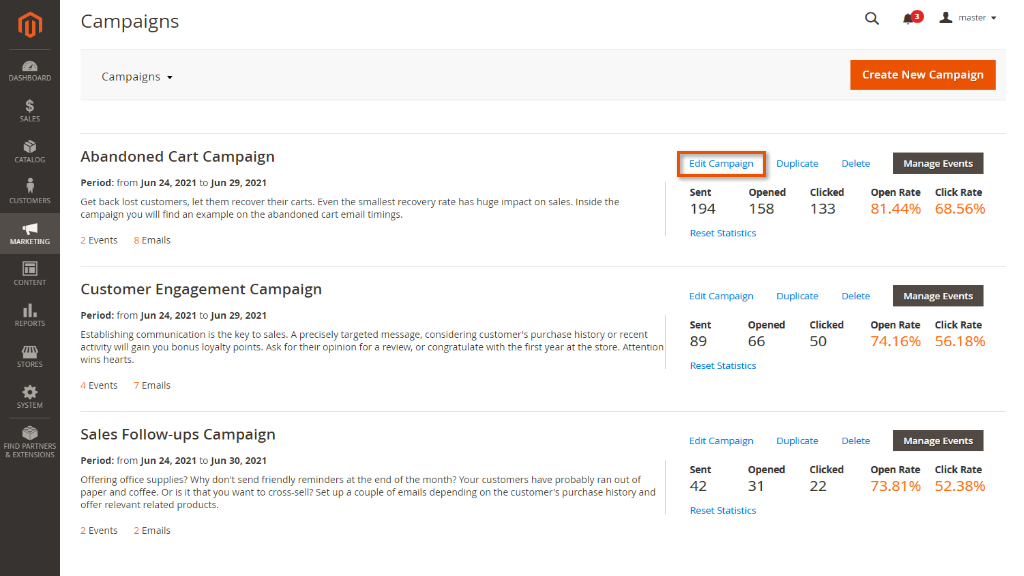
To edit the main campaign parameters, click on the 'Edit Campaign' active link above the corresponding campaign's stats.
You will be redirected to the campaign settings page.
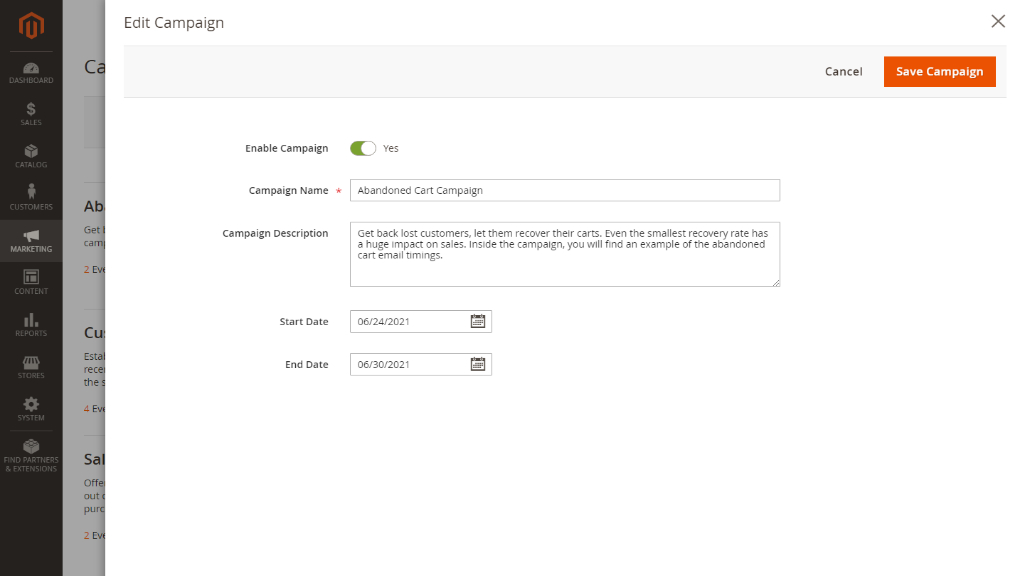
In the provided 'Edit Campaign' menu, you can:
- Enable/disable the campaign;
- Specify the name of the campaign;
- Provide the description of the campaign;
- Indicate the duration of the campaign (start and end dates).
To save the applied changes, click on the Create New Campaign button at the top right of the page.
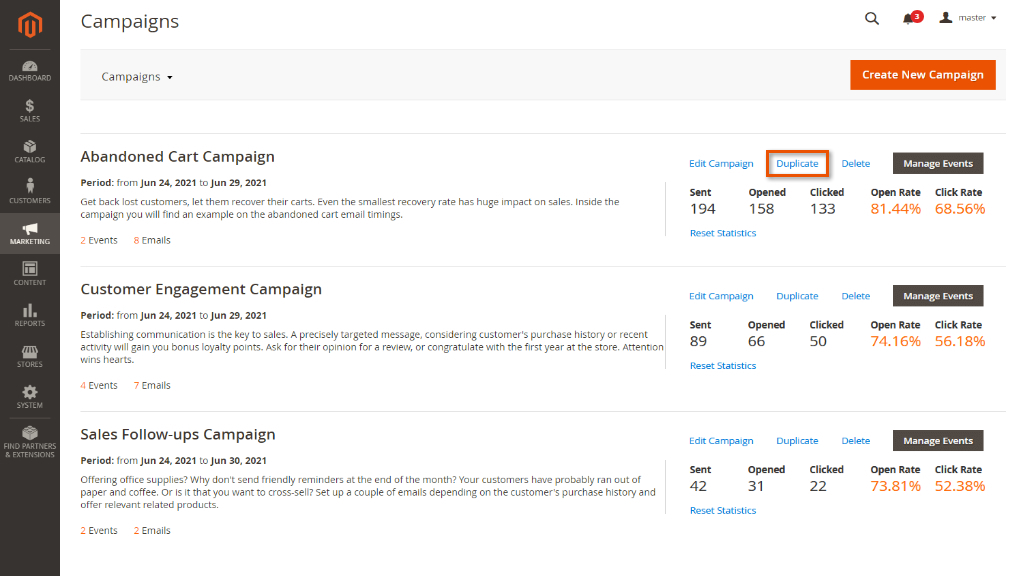
Besides editing the campaign, you can make its copy with all the previously configured parameters. For this purpose, click on the 'Duplicate' active link above the corresponding campaign's stats.
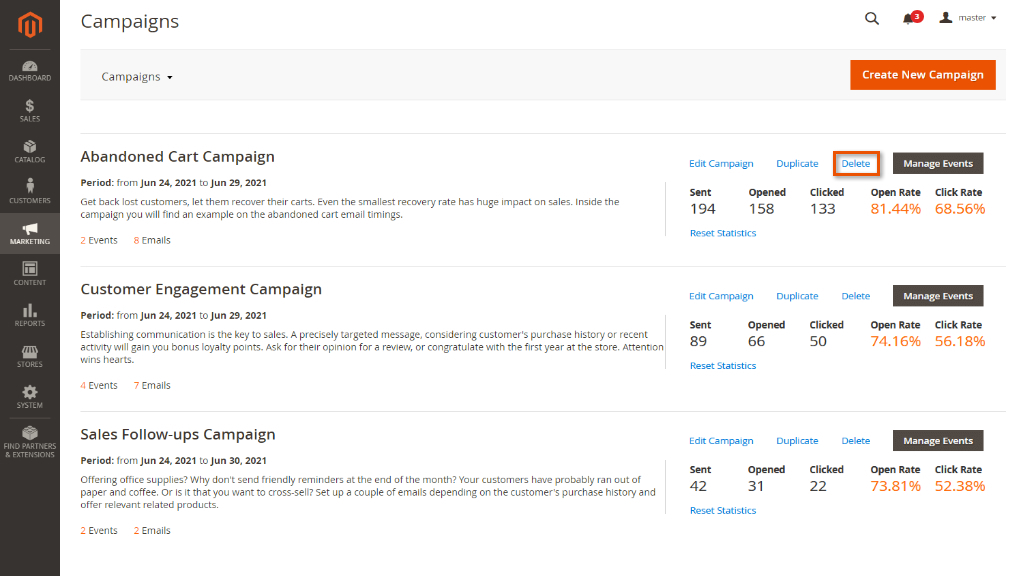
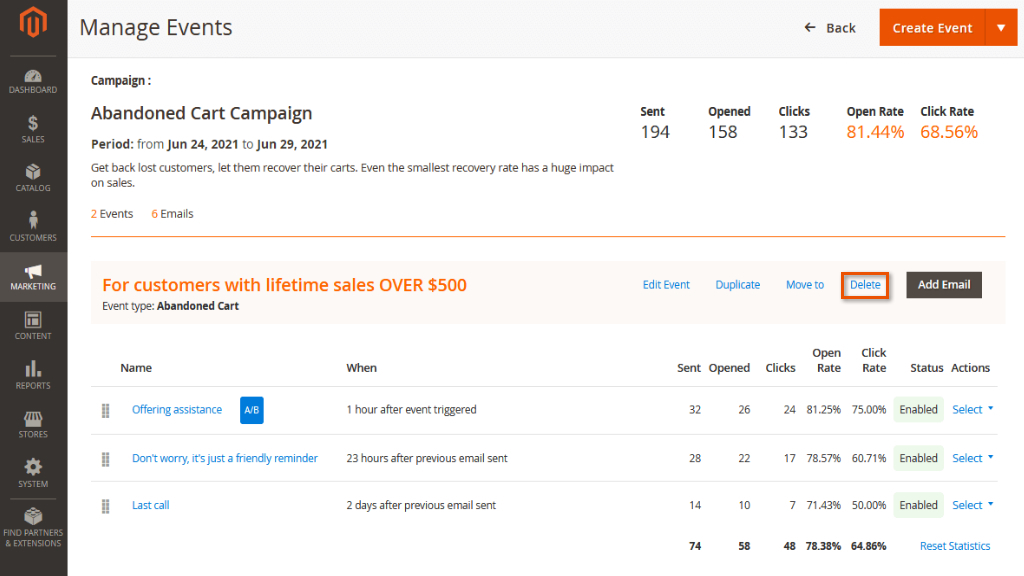
To delete a campaign, click on the 'Delete' active link above the corresponding campaign's stats.
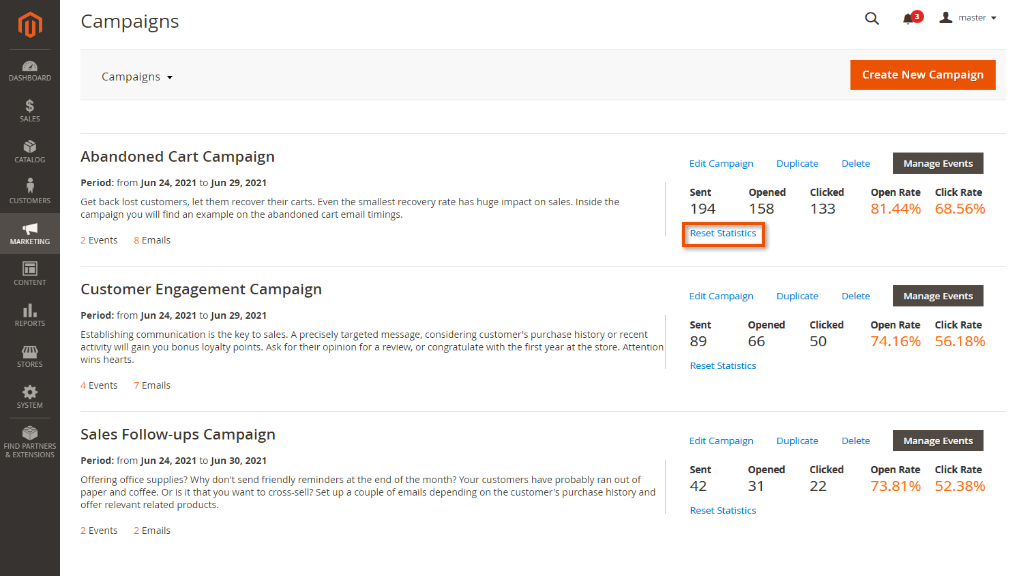
To erase all the current campaign's performance data, click on the 'Reset Statistics' active link below the corresponding campaign's stats.
To create a new campaign, click on the Create New Campaign button at the top right of the 'Campaigns' page.
Now, let's proceed to the event management stage by clicking on the Manage Events button above the corresponding campaign's stats.
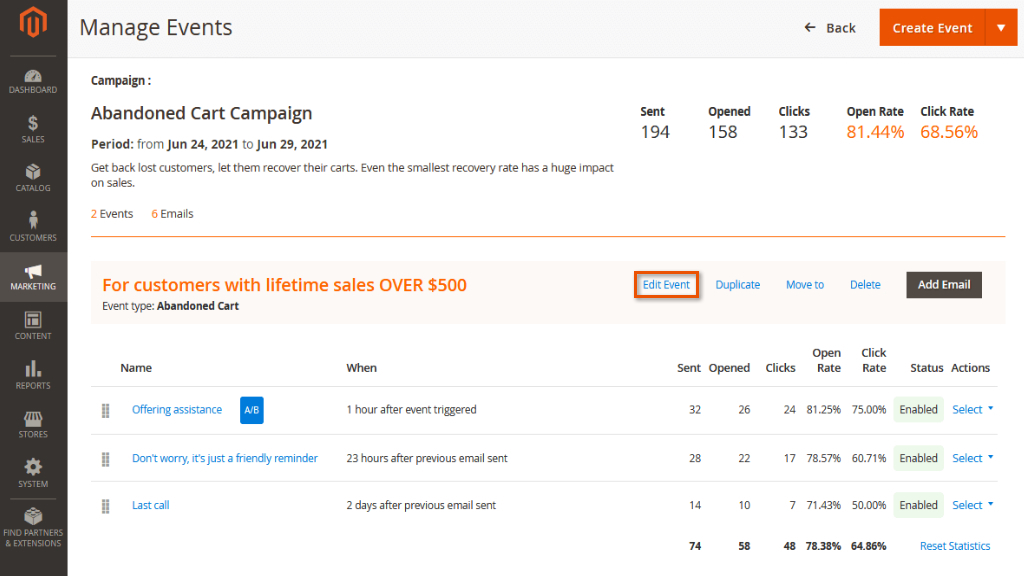
Events
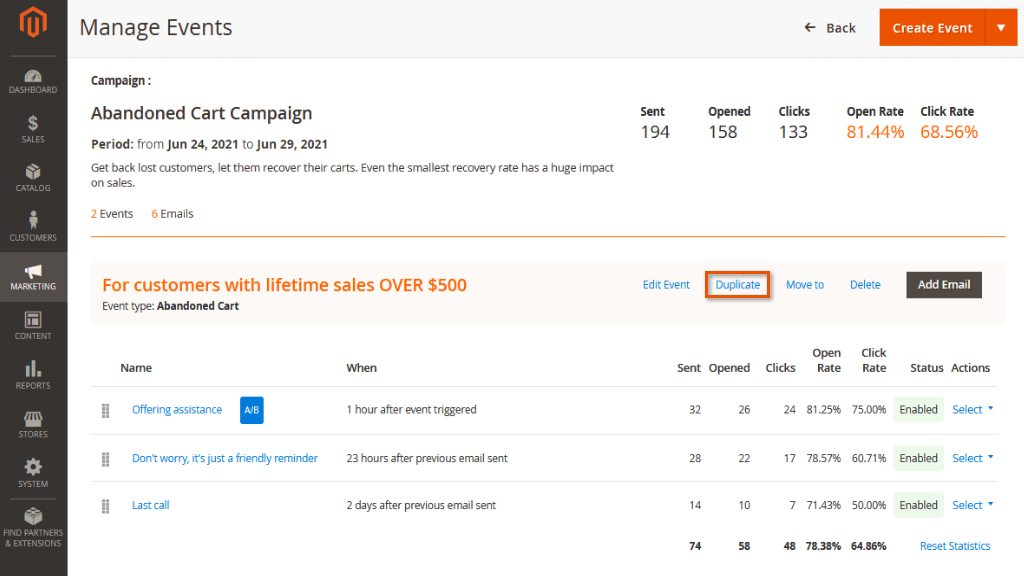
The 'Manage Events' page illustrates all the campaign-related events split by emails. Here you can view the stats separately for each email.

To view and manage the event parameters, click on the 'Edit Event' active link next to the corresponding event's title.
From the 'Edit Event' menu, you can:
- Enable/disable the event;
- View the type of the event (not editable);
- Define the name of the event;
- Indicate the address(es) for BCC emails;
- Decide whether to send newsletters to subscribers only.
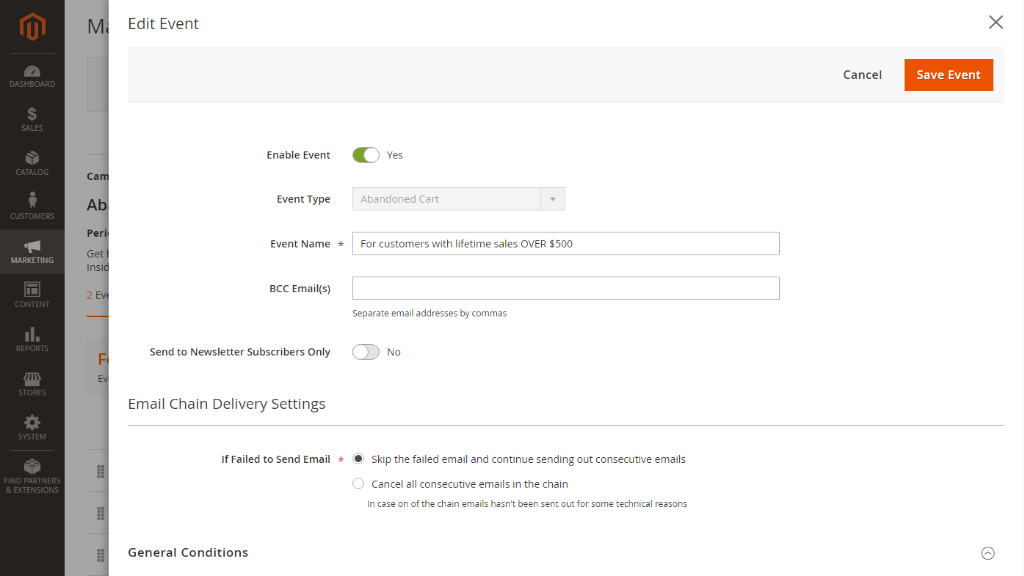
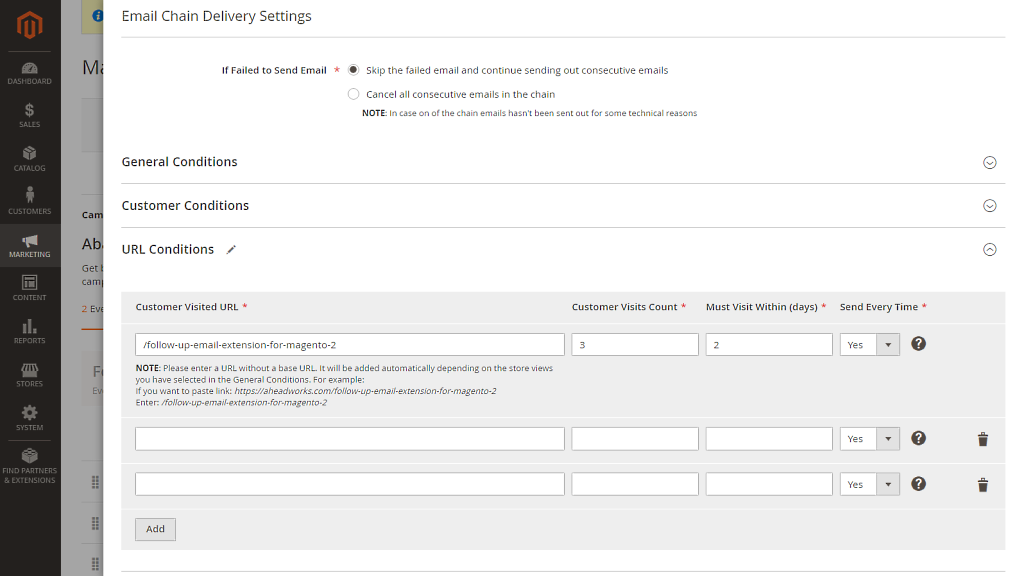
Additionally, you can manipulate with the Chain Email Delivery Settings by defining the logic for failed emails in chains.
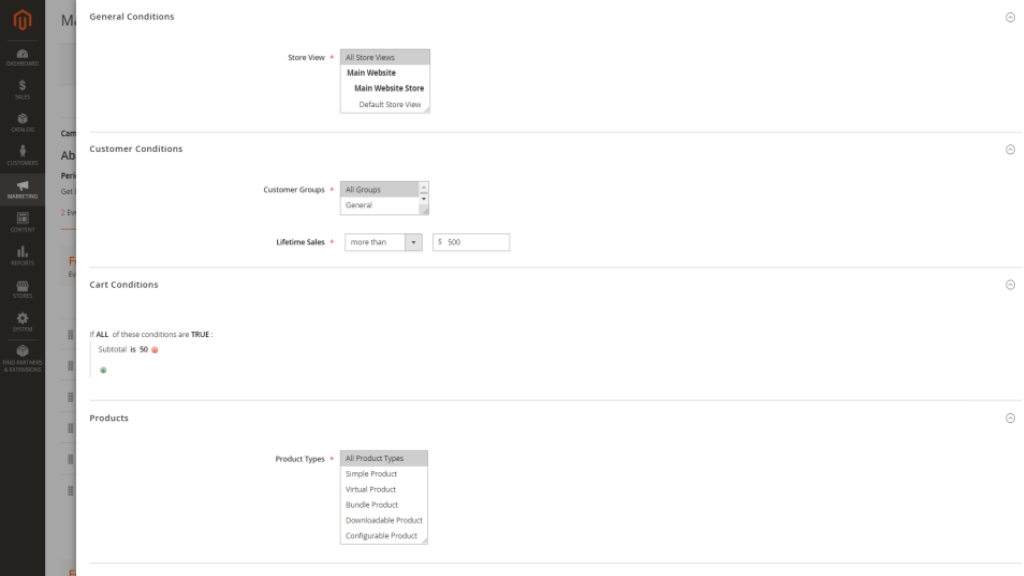
Event conditions precisely target campaign emails, provided the store views are specified alongside the customer groups and segments (with particular lifetime sales), cart conditions, and product types.
|
Customer segments get available here when the Customer Segmentation for Magento 2 is preinstalled. |
|
How event conditioning works: For example, you set up the following conditions for the 'Abandoned Checkout' event:
Under such conditions, the abandoned checkout follow-up will only be sent to the customer from the General group who added a red item with the price of at least $100 to the cart at the Store #1. |
URL Conditions
The URL Conditions tab is displayed only for the “Customer visited page” event type. Complete the following fields to configure the “Customer visited page” event:
-
Customer Visited URL - a link to the page that the customer must visit in order to trigger an email from the event.
-
Customer Visits Count - number of customer visits required to trigger the event.
-
Must Visit Within (days) - defines the number of days after which the statistics will be reset and an email will be sent again.
-
Send Every Time - set to Yes to send an email every time when the specified number of times is reached.
|
NOTE: Please enter a URL without a base URL. It will be added automatically depending on the store views you have selected in the General Conditions. For example: If you want to paste link: https://aheadworks.com/follow-up-email-extension-for-magento-2 Enter: /follow-up-email-extension-for-magento-2 |
To duplicate the event with all the previously configured settings, click on the 'Duplicate' active link next to the corresponding event's title.
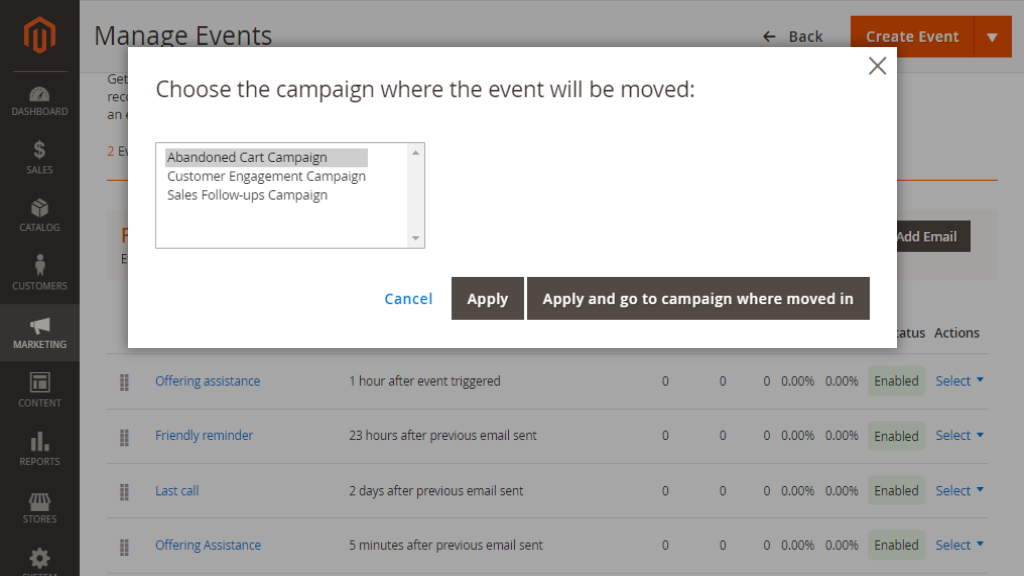
To move the event with all its options and related emails to another campaign, click on the 'Move to' active link next to the corresponding event's title.
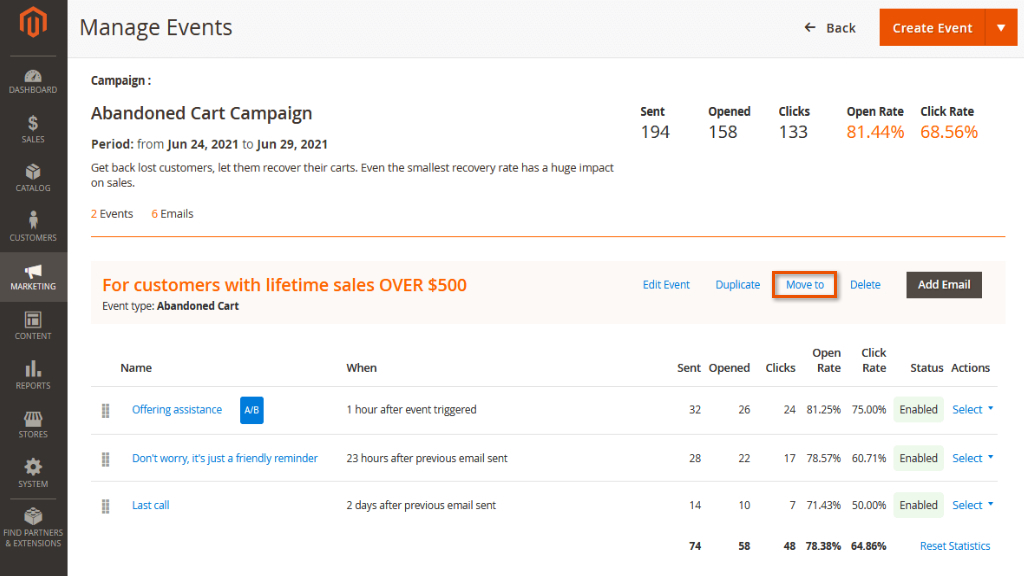
Then you will be suggested to select the campaign where the event should be moved.
To delete the event, click on the 'Delete' active link next to the corresponding event's title.
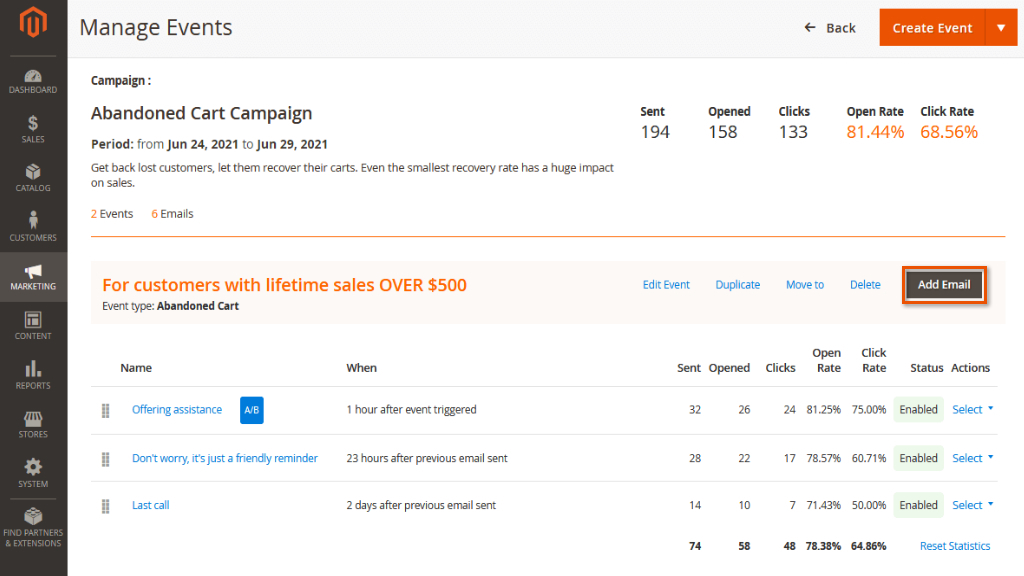
To add a new email to the event, click on Add Email next to the corresponding event's title.
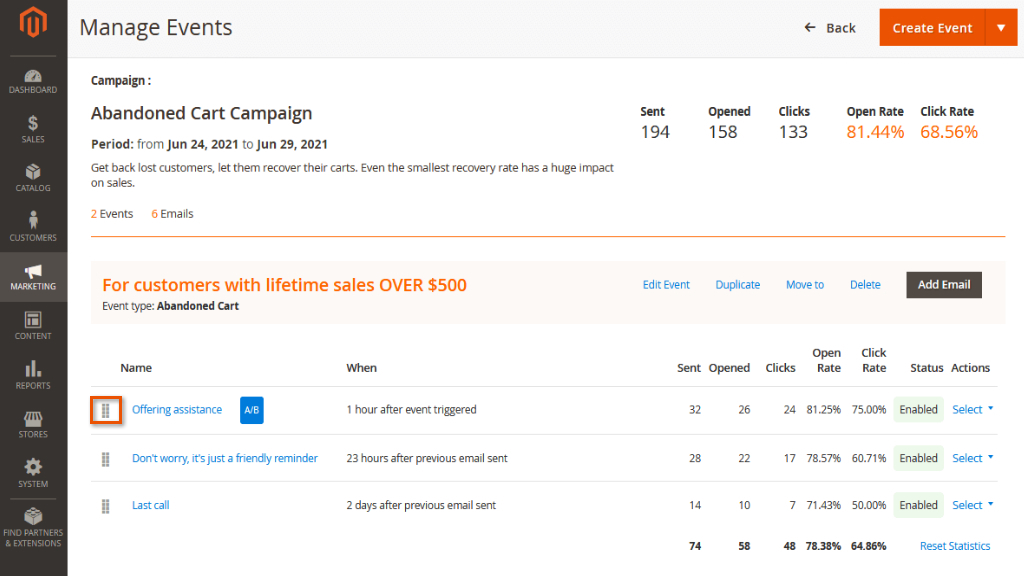
The emails in lists are presented in exactly the same order in which they will be sent. Use the drag & drop functionality to change the sending order of emails within the corresponding campaign (if required).
To edit a particular email, click on the appropriate email's name in the list of event emails.
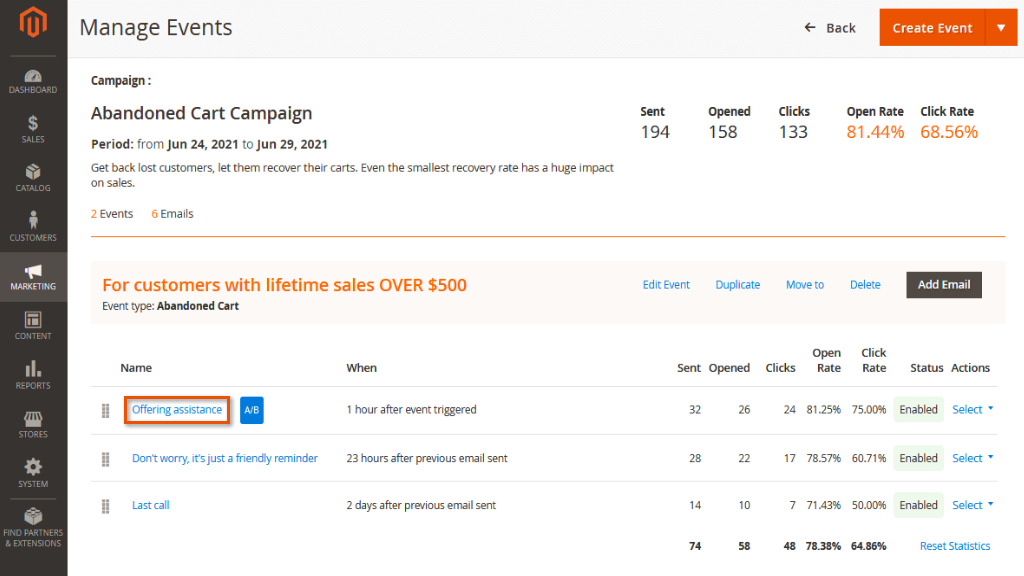
In the 'Edit Email' menu, you can enable/disable the email, provide its name, and pinpoint its timing.
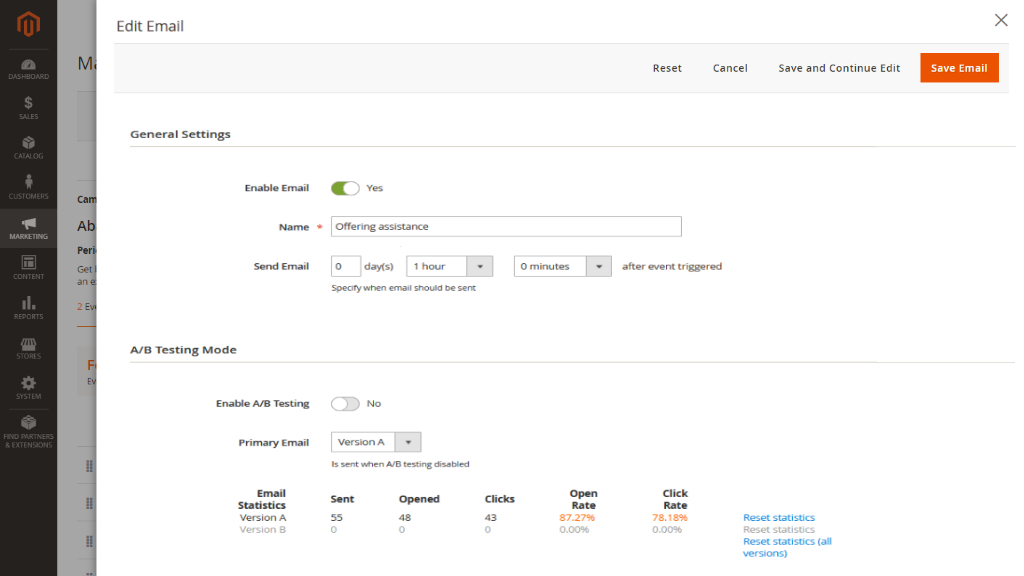
Besides the general settings, you can enable the A/B testing mode for your emails to experiment with different email versions. The provided stats indicate which version performs better.
If the A/B testing mode is disabled, you need to indicate the Primary Email to be sent.
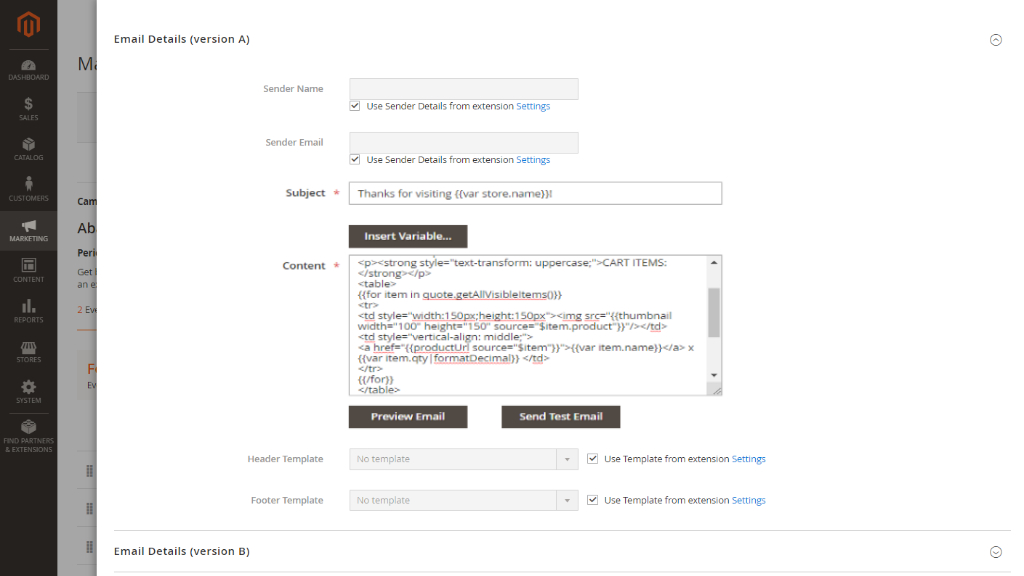
Thanks to the tools provided within the module, you can precisely determine the content of each email, including:
- Sender name;
- Sender email;
- Email subject;
- Email content;
- Header/footer templates.
Besides, you can add variables to your email content, preview ready emails, and send them to test recipients.
Email Variables
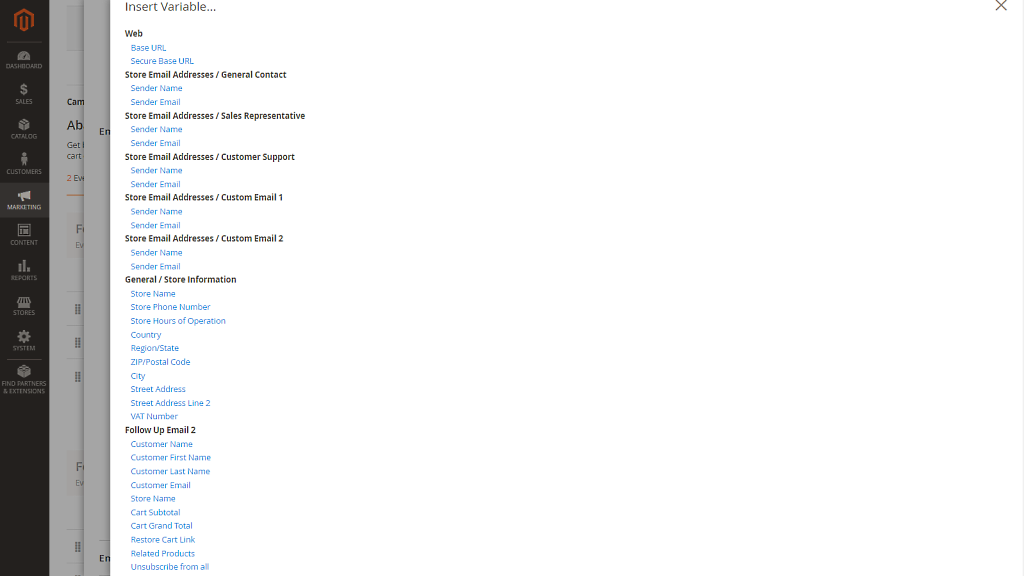
For quick email composing, you can use the native Magento variables along with the ones introduced by the module.
To insert a variable, click on Insert Variable above the main email content area. You will access the list of all supported variables.
To learn more about accessing objects in the emails follow the Magento documentation on how to customize email templates.
Links
In addition to the standard "fixed" links, you can insert dynamic links into the emails (e.g., a link to the product a customer has purchased). Using the standard Magento methods, you can include dynamic links to virtually any Magento frontend area. The approach is based on using the store directive (which returns www.your_domain.com/ if used) supplied with the URL postfix and optional parameters.
For example, you can insert a direct link to a product page (the productURL directive gives the base part, and the var gives the product ID you need):
|
<a href="{{productUrl source="$item"}}">{{var row_item.name}}</a> |
Do not insert your store's URL in the code above.
Here "$item" is a sales order item or quote item (depends on the event, for which the email is used). 'item' is a random title for a variable here. You may use a different name, but make sure it is the same along the lines of the template code when referred to the same object, like in the 'for' loop below.Do not insert your store's URL in the code above.
|
There have been registered reports that the child products links from emails may lead to the 404 page. This happens when grouped products are added to cart with simple child items that are not visible individually on Frontend. If this is the case with you, open the email template and replace https://aheadworks.com/catalog/product/view/ with {{productUrl source="$item"}}.
|
Examples of use:
- Prompt customers to leave a review to the product. Use the link to redirect customers to the product page:
<a href="{{productUrl source="$item"}}">Product reviews</a>
|
2. Prompt registered customers to reorder. Use the link to redirect customers to the product page:
<p> Please follow the <a href="{{productUrl source="$item"}}">link</a> and reorder.</p>
|
This link will work for any order-related rule. It can also be used for order failure notifications ("Order Obtained 'Cancelled' Status"), etc. Using this approach, you can reproduce almost all the links used by Magento on the front-end.
|
The availability of the given URL parameter depends on the type of the rule you use the template for. For instance, item.product_id can only be used for product-related events. |
|
Finally, the directive can work with product id or product object as a source for URL. At the same time, to avoid the 404 error, it is suggested order item and quote item are used to retrieve URLs. |
'for' Directive
Order, Cart, or Wishlist IIem Display
With the 'for' directive, you can 'walk' through any object collection that can be iterated (typically, it's intended to walk through the item collection of the Order, Cart, or Wishlist objects (depending on the current rule and the event context) ).
The directive syntax looks as follows:
{{for item in object_name}}
|
Object_name is an item collection object that will be iterated (typically, an item collection of the Order, Cart, or Wishlist (depending on the rule context) ). Item parameter is the name of the object presenting the item inside of the iteration.
For example, if you want to list order items, then your code might look like this:
{{for item in order.all_visible_items}}
|
If you want to list quote items, then your code might look like this:
{{for item in quote.all_visible_items}}
{{var item.qty_ordered|formatDecimal}} x {{var item.name}}
{{/for}}
Formatting Values
The extension changes the representation of certain variable values. See below for details on the available formatting options
Price Values
The new formatPrice variable modifier formats the value given with the current store currency setting according to its locale. The usage of the formatPrice is quite simple:
{{var price|formatPrice}}
|
Decimal Values
The new formatDecimal variable modifier formats the given value. The usage of the formatDecimal looks as follows:
{{var number|formatDecimal}}
|
The modifier accepts either zero, one, or three parameters (not two):
If no parameters are given, the number will be formatted without decimals, but with a comma (",") between every group of thousands.
If one parameter is given, the number will be formatted with decimals with a dot (".") in front, and a comma (",") between every group of thousands.
If three parameters are given, the number will be formatted with decimals, dec_point instead of a dot (".") before the decimals, and thousands_sep instead of a comma (",") between every group of thousands. Note that only the first character of thousands_sep is used.
Integration with Google Analytics
There is the integration with Google Analytics. The following URL can be used to redirect users from an email to either the main page or the checkout/cart page and Google Analytics will be able to track these redirects:
<a href="{{var url_restore_cart}}?utm_source=fue&utm_medium=cta&utm_campaign=abandoned_cart">LINK</a>
Automatic Related Products Integration
When ARP extension is installed on the store, it becomes possible to configure Related Products Rules. The new ARP rules can be created from the 'Manage Rules' section. To create a new rule, go to the Marketing > Manage Rules and follow the steps in the ARP manual.
To enable the Related Products block to the emails (only for the Abandoned Checkout and Order Status Change events), you need to add a variable to the template:
{{var related_products|raw}}
Only those related products that are set in the product itself will be displayed in the email, and the related products that are displayed under the Related products Rules will not be displayed.

Email Actions
From the 'Manage Events' page, you can perform particular actions with individual emails. For this purpose, expand the 'Select' box under the 'Actions' column.

If required, you can disable, duplicate, or delete individual emails in chains.
Email Trigger Events
To create a new event, expand the 'Create Event' box at the top right of the 'Manage Events' page.
Each event is responsible for a particular customer action at the store followed up by a corresponding email.
|
The emails are NOT retroactive. They cannot be sent for any customer activity/orders that take place prior to the application installation. |
Currently, the Follow Up Email module offers a set of eight events:
|
Event background |
Event background |
| Abandoned Checkout |
This event sends email reminders to the customers who added any amount of products to their shopping cart and for some reason left it without a purchase
The shopping cart is considered abandoned an hour since the last customer's activity at the store, such as clicking links, browsing, etc.; When creating an email for the event, consider the one hour delay. This time period after which the abandoned checkout email will be sent equals: one hour + time scheduled |
| Order Status Changed |
This event sends emails to customers upon any change in the order status
Under the conditions section, it is possible to define the order status(es) for the emails to fire |
| Customer Registration |
This event sends emails to the newly registered customers
This event has no particular technical peculiarities that one should primary consider |
| Any Customer Activity |
This event sends emails to the customers depending on their last visit to your store
This event works for all customer activities at your store: browsing pages, clicking links, placing orders, etc. |
| Newsletter Subscription |
This event sends emails to the customers who subscribed to the newsletter at your store
When configuring the event conditions, you need to indicate only the general (store views) and customer-related (customer groups) ones |
| Customer Submitted a Review |
This event fires emails to all those who submitted reviews
This event has no particular technical peculiarities that one should primary consider |
| Wishlist Content Has Been Changed |
This event sends emails to those customers who edited their wishlists
This event has no particular technical peculiarities that one should primary consider |
| Customer Birthday |
This event sends birthday greetings to the store customers
Please pay close attention to the ‘Specify when email should be sent’ setting. With this event, you can define how many days/hours/minutes BEFORE the customer's birthday the email should be sent |
| Customer visited page |
This event is designed to send emails to customers after they have visited a specific URL of the store |
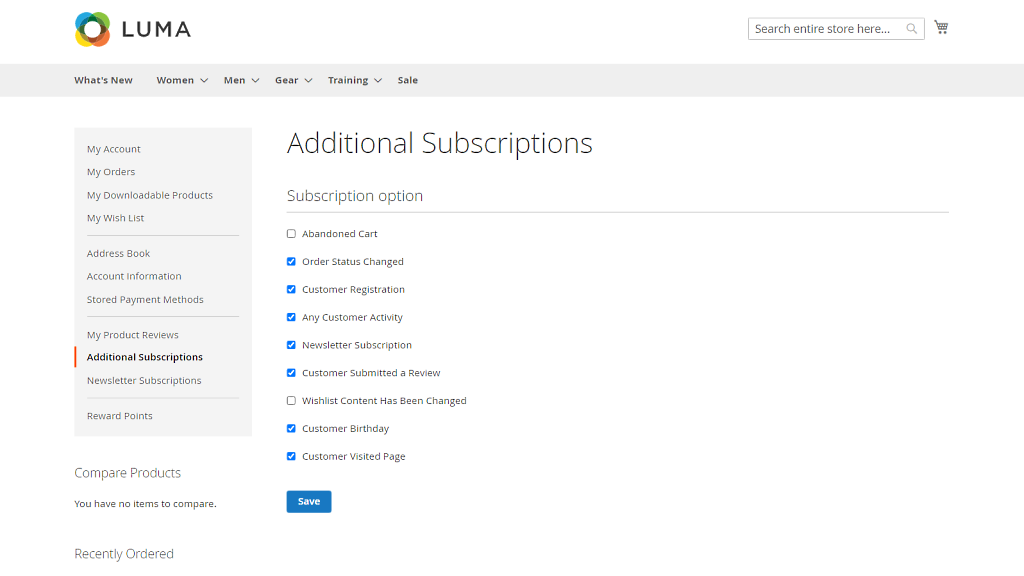
Unsubscribing from emails
To unsubscribe from the emails sent by FUE, go to the Storefront > My Account > Additional Subscriptions. Select options using checkboxes and click one the ‘Save’ button.
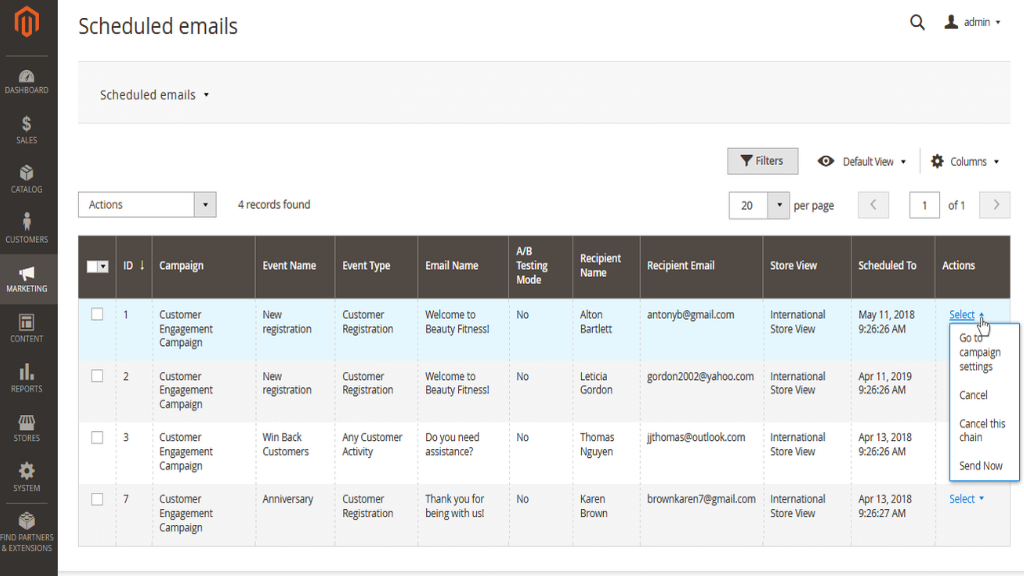
Scheduled Emails
With the 'Scheduled emails' grid, you can manage automated email chains in one place.
The data in the grid is split into the following columns:
- ID - an id of a email;
- Campaign - a campaign the email relates to;
- Event Name - the name of the corresponding trigger event;
- Email Name - the name of the email;
- A/B Testing Mode - the column indicates whether the A/B testing mode is enabled for the email;
- Recipient Name - the name of the recipient;
- Recipient Email - the email address of the recipient;
- Store View - the store view the email is assigned to;
- Scheduled To - the date the email is scheduled to;
- Actions - from this column, you can:
- Access the campaign settings of the selected chain;
- Cancel individual emails from chains;
- Cancel the selected chain;
- Immediately send the selected scheduled email.
With the 'Actions' box above the grid, you can perform the same actions (except for the first one) massively to the selected email(s).
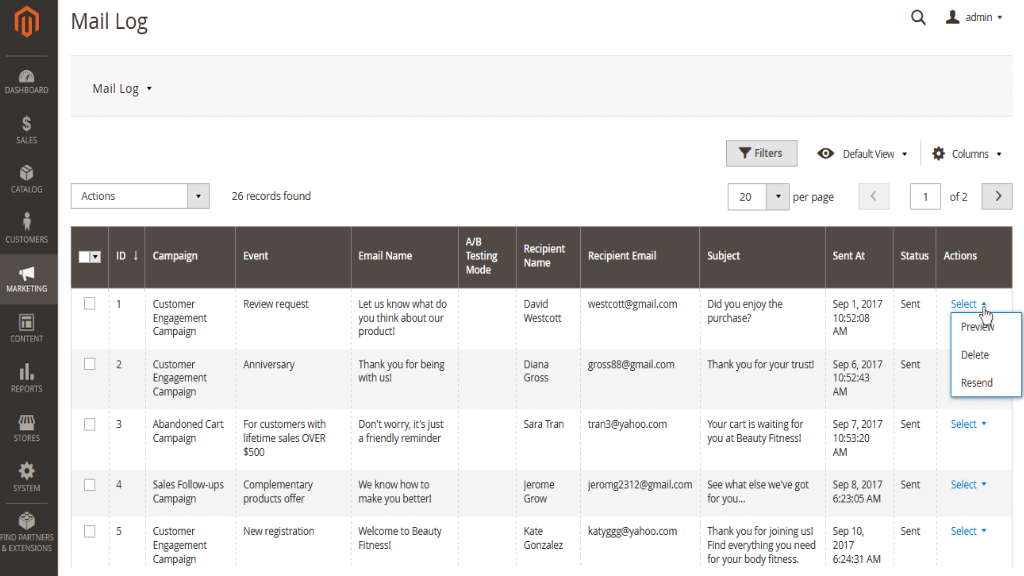
Mail Log
The 'Mail Log' page is the place where the entire email sending history is stored.
- ID - an id of a email;
- Campaign - a campaign the email relates to;
- Event - the name of the corresponding trigger event;
- Email Name - the name of the email;
- A/B Testing Mode - the column indicates whether the A/B testing mode is enabled for the email;
- Recipient Name - the name of the recipient;
- Recipient Email - the email address of the recipient;
- Subject - the subject of the email;
- Sent At - the date when the email was sent;
- Status - the status of the email;;
- Actions - from this column, you can:
- Preview follow-ups;
- Delete follow-ups;
- Resend the previously sent follow-ups.
You can delete/resend follow-ups both individually and in bulk (via the 'Actions' box above the grid).
Troubleshooting
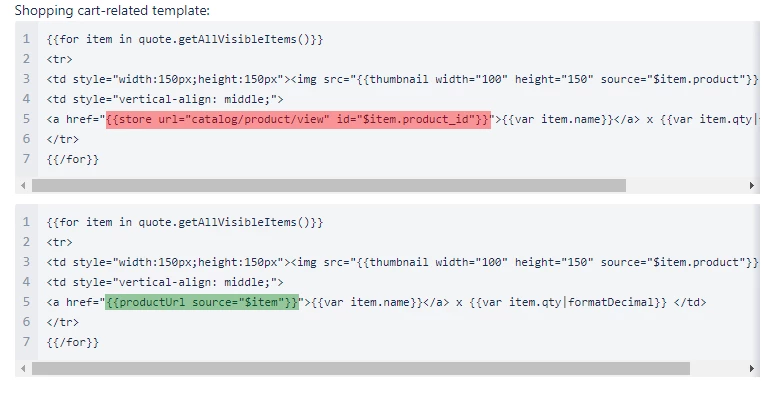
Version 2.2.0 saw an error in the “Offering assistance“ email template in the default Abandoned Cart campaign.
The error is reproduced on updating the module to version 2.2.3 too. To fix the error, do the following:
- go to Admin - Marketing - Follow Up Email 2 by Aheadworks - Campaigns
- opt for Abandoned Cart Campaign and click on the “Manage Events” button
- opt for the "For customers with lifetime sales UNDER $500" set of emails and click on “Offering assistance“
- find the “Content“ field in the Email Details (version A) section and change <a href="{{productUrl source="$item"}}"> to <a href="{{productUrl source="$item"}}">
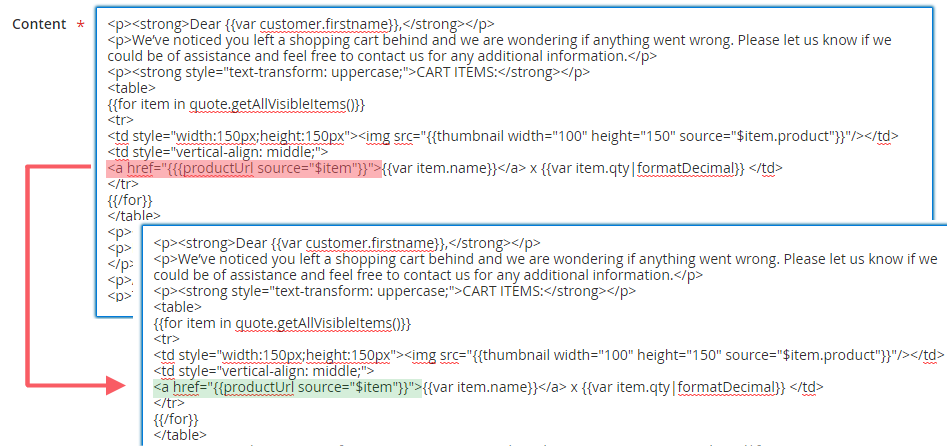
The error is NOT reproduced if the module of version 2.2.3 is installed first time on the store, that is when there have been no previous versions of the module installed on the store.
![]()
Already used our product?
We would appreciate your feedback. Please, leave a review.