
User Manual - Gift Card
- Installing Gift Card
- Installing Hyvä Theme Compatibility Module
- Set up cron
- Uninstalling Gift Card
- Migrating from Magento 1 Gift Card
- Compatibility
- Introducing M2 Gift Card
- M2 Gift Card Glossary
- Configuring M2 Gift Card
- Creating a gift card product
- Gift card codes
- Gift Card Pools
- Importing gift codes
- Email templates
Magento 2 Gift Card generates virtual, physical, and combined gift card products with custom layout, content, configurable amounts, delivery dates, etc. Virtual cards are delivered to users by email and used as gift codes at checkout. The physical ones are sent by post and can be applied as a gift code on a retail website or in a specified location. Finally, combined carts are given both by post and email.
API documentation link
Installing Gift Card
|
Installing mPDF Library composer require mpdf/mpdf |
Command Line Installation
- Backup your web directory and store database
- Download the Gift Card installation package
- Upload contents of the Gift Card installation package to your store root directory
- In SSH console of your server navigate to your store root folder:
cd path_to_the_store_root_folder |
run the following command: :
php bin/magento module:enable Aheadworks_Giftcard |
then:
php bin/magento setup:upgrade |
after:
php bin/magento setup:static-content:deploy -f |
5. Flush store cache; log out from the backend and log in again
|
Make sure the installation is done from the FTP administrator account. Otherwise, set 775 permissions to the store root directory after the extension is deployed. |
Composer Installation
If you are installing an extension from Aheadworks for the first time, you need to add our composer repository to your Magento store:
1. Login to your ssh console and navigate to your store folder:
cd path_to_the_store_root_folder |
Run the following command:
composer config repositories.aheadworks composer https://dist.aheadworks.com/ |
After the command was executed successfully, you can use the composer to install the products.
To install the extension:
2. Login to your ssh console and navigate to your store folder:
cd path_to_the_store_root_folder |
3. Run the following command to install the latest version of the extension:
composer require aheadworks/module-giftcard |
if you need to install a specific version, run this command:
composer require aheadworks/module-giftcard:<version> |
|
Specify the version of the extension in <version> |
When prompted, enter Public Key (Username) and Private Key (Password):

Both Public Key (Username) and Private Key (Password) can be found in My Projects and Licenses in your personal account on our site:
 |
Need to use with Klarna payment method?
Make sure the official module of the payment gateway is installed and proceed with a corresponding command:
composer require aheadworks/module-giftcard-klarna-addon (for Magento 2.3.* and 2.4.3 and below) |
Run the following command to install Gift Card GraphQl:
|
composer require aheadworks/module-giftcard-graph-ql |
4. Enable the extension:
php -f bin/magento module:enable <Module_Name> |
|
Add the product name in <Module_Name> |
Need to use with Klarna payment method?
Make sure the official module of the payment gateway is enabled and proceed with a corresponding command:
bin/magento module:enable Aheadworks_GiftcardKlarnaAddon (for Magento 2.3.* and 2.4.3 and below) |
Next, register the extension:
bin/magento setup:upgrade |
Recompile your Magento store if you are in the Production mode:
bin/magento setup:di:compile |
To verify that the extension is enabled, run this command:
bin/magento module:status |
Clean store cache, by running the following command:
bin/magento cache:clean |
Log out and Log in the backend again.
To upgrade the extension:
5. To update or upgrade an extension:
Download the updated extension file. Take note of the module-name and version. Export the contents to your Magento root.
If a composer package exists for the extension, run one of the following.
Update per module name:
composer update aheadworks/module-giftcard |
Updater per version:
composer require aheadworks/module-giftcard:<version> |
Run the following commands to upgrade, deploy, and clean the cache.
php bin/magento setup:upgrade --keep-generated |
Installing Hyvä Theme Compatibility Module
Starting from Gift Card version 1.8.5 and its Hyvä Compatibility Module version 1.1.0, the Hyvä Compatibility Module is available only via the Aheadworks Composer repository.
Older versions of the Hyvä Compatibility Module can still be accessed via GitLab.
Installing Hyvä-compatibility module 1.1.0 and newer
To install Hyvä Compatibility Module 1.1.0 or newer via Aheadworks Composer, run the following command:
composer require aheadworks/module-giftcard-hyva
Installing older versions of Hyvä-compatibility module
To install an older version of the Hyvä Compatibility Module, use the following command:
composer require hyva-themes/magento2-aheadworks-giftcard
Hyvä-compatibility Modules with CSP Compliance
Starting from Hyvä Compatibility Module version 1.1.0, all Hyvä compatibility modules are CSP compliant. Older versions remain non-CSP compliant.
Note: The CSP-compliant modules may not be compatible with older versions of Hyvä Theme (1.3.9 and older). Before updating, please verify which version of the Hyvä Theme your store is using.
Set up cron
The gift cards are sent to recipients with the cron launch.
If you have already configured cron jobs for your Magento installation then you can skip this step. Read the following instructions on setting cron job for your Magento store: Magento user guide.
Generally, it would be enough to run in SSH console of your server:
crontab -e |
And insert the following line:
*/3 * * * * php -c <ini-file-path> <your Magento install dir>/bin/magento cron:run |
Remember to confirm on exit the request to save the changes.
Uninstalling Gift Card
Since Magento introduced declarative Database you need to be very carefull when uninstalling or disabling the module.
|
NOTE: Please be very careful when uninstalling/disabling this module. This module uses a declarative DB scheme. Once the module is uninstalled the DB tables will be lost. |
Manual Removal
1. Disable the module by executing the following commands:
php bin/magento module:disable Aheadworks_Giftcard |
2. Remove the extension files from the following folder:
app/code/Aheadworks/Giftcard |
Automatic Removal (via Composer)
1. Disable the module by executing the following commands:
php bin/magento module:uninstall Aheadworks_Giftcard |
Migrating from Magento 1 Gift Card
Important Notes
|
Read carefully the information below, should you decide for migration. Carelessness here may result in accidental data loss. |
-
The Magento Data Migration Tool is required for migration.
Instal the Magento Data Migration Tool. Please note, the migration script relies heavily on the Magento Data Migration tool. Understanding the principles of the tool may turn useful in carrying out flawless migration. -
Backup Magento 2 databases before migration to ensure safe recovery, if need be.
Migration Process
Below, you can find a detailed guide on migration
-
Log into your Magento server as file-owner and navigate to the directory where you have your Magento 2 store installed
|
For example:
|
- Install the Magento Data Migration Tool
The instructions on installing the Magento Data Migration Tool along with some basic information can be found here: http://devdocs.magento.com/guides/v2.0/migration/migration-tool-install.html
Magento provides two ways of installing the Magento Data Migration Tool:
Once the installation is complete, you may navigate to vendor/magento/ to make sure the Migration Tool has been installed successfully.
- Run the following command to install migration module:
|
composer require aheadworks/module-giftcard-migration |
-
Сopy the example file from data-migration-tool/etc.
-
Оpen the example file to edit.
Add settings for migrating data from the Gift Card module. An example of settings is located in vendor/aheadworks/module-giftcard-migration/etc/config.xml.dist.
Please find more information on the values of the tags, and learn which of them are to be used, here: Magento Data Migration Tool configuration instructions.
|
NOTE: Pay close attention to the <aw_giftcard_map_file>, <aw_giftcard_groups_file> tags. The options group must contain <aw_giftcard_map_file>, <aw_giftcard_groups_file> tags. |
-
Run the migration script in the console
Run the following command considering the path to config.xml to start the migration process:
|
bin/magento migrate:data [-r|--reset] {<path to config.xml>} |
-
Data migration is complete. Make sure to migrate images.
Compatibility
|
Module Version |
Magento Version |
|
1.4.7 and earlier versions |
2.3.Х - 2.3.6 2.4.0 - 2.4.3 |
|
As of version 1.4.8 |
2.3.7-p3+ 2.4.0 - 2.4.5 |
|
As of version 1.5.0 |
2.4.3 - 2.4.5 |
|
As of version 1.5.1 |
2.4.4 - 2.4.6 |
|
As of version 1.8.1 |
2.4.5 - 2.4.7 |
|
As of version 1.8.3 |
2.4.6 - 2.4.8 |
|
As of version 1.10.2 |
2.4.6 - 2.4.9 |
The PHP version depends on your current Magento version. Please, refer to your Magento version release notes.
Introducing M2 Gift Card
About M2 Gift Card
The Gift Card extension by Aheadworks introduces the gift card functionality for Magento 2 stores. The gift cards act as regular Magento 2 products with some specific settings, that control the gift card behavior. In comparison to the default Magento 2 Commerce gift card functionality, the extension offers much more flexibility and management options for the gift card products:
- Three types of gift cards: virtual, physical, combined;
- Gift card import and export;
- Gift card patterns;
- Gift card pool for convenient distribution and management;
- Delivery date;
- Personal notes;
- Email notifications;
- Responsive design.
Integrations
- Smart One Step Checkout
- Advanced Reports
- Magento API and GraphQL support
|
Aheadworks didn't define 'processorPool' for 'Magento\Sales\Model\Order\ProductOption'. Gift card data is saved in product_options. Thereby, the items within the order do not show the details of gift cards used. Add 'processorPool' to di.xml to fix this issue.
|
M2 Gift Card Glossary
- Gift card - a gift card product that can be purchased from the store;
- Gift card code/gift code - a unique number of the gift card that can be entered at the checkout;
- Gift card pool - a set of the gift card codes combined by certain criteria. The pool can be assigned to the gift card product so all gift card codes will be drawn from it.
Configuring M2 Gift Card
Once installed the Gift Card extension introduces its sections to Products → Gift Card by Aheadworks and Stores → Configuration → Aheadworks extensions → Gift Card.
Gift Card by Aheadworks section contains all sections for the gift card management, while Gift Card settings section defines default behavior of the extension.
Before creating gift cards it is advised to configure the extension settings first, as these control overall extension performance
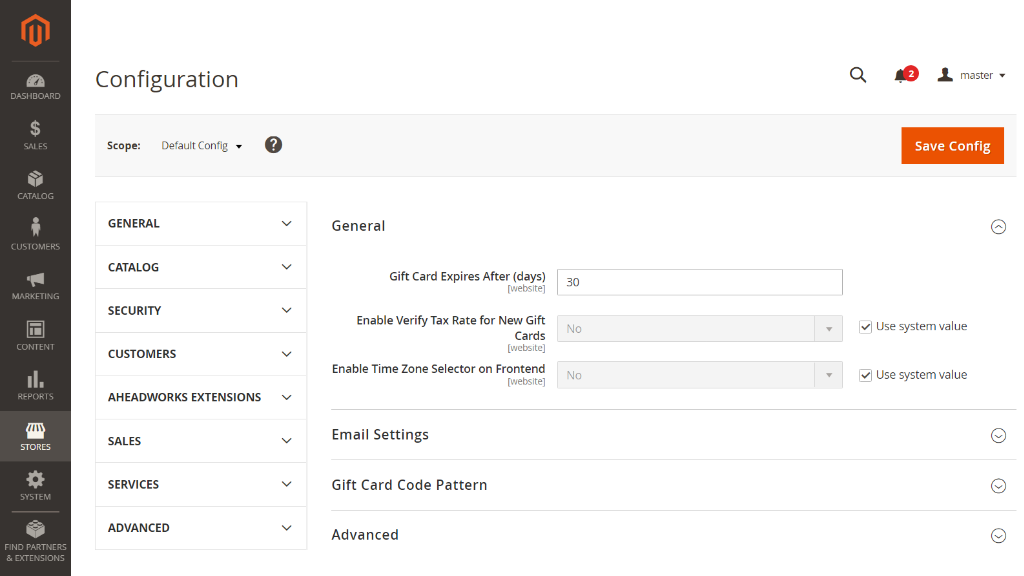
General settings
To access general extension settings proceed to Stores → Configuration → Aheadworks extensions → Gift Card. General settings are represented with a single field Gift Card Expire After (days). It controls after how many days from the order completion the gift card will not be available for use.
Enable Time Zone Selector on Frontend - Set to 'Yes' to enable timezone selector on the frontend. Set to 'No' to use a default timezone.
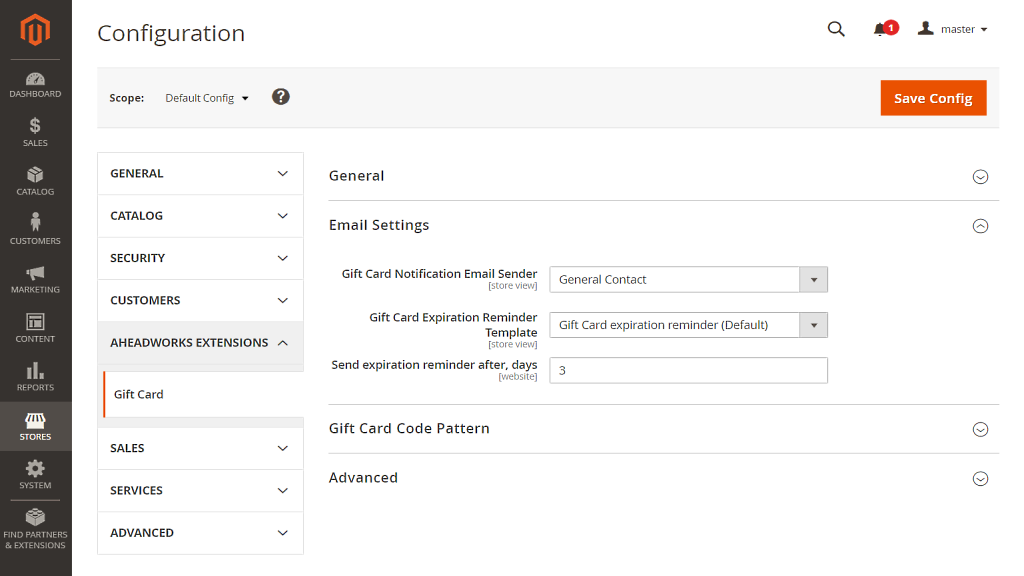
Email Settings
Gift Card Notification Email Sender defines from which email address available at the store all notifications will be sent.
Gift Card Expiration Reminder Template - drop down that includes the templates to send customers in case of expiration of their period of using gift cards. When the time of using a gift card expires, the store automatically sends a message according to the chosen template.
Drop down consists of following templates text messages:
- Gift Card expiration reminder (Default);
- Christmas
- St. Valentines day;
- Happy New Year;
- Halloween;
- Birthday.
Send expiration reminder after, days - set a specific number of days before the expiration of the gift card, after which customers receive a reminder notification.
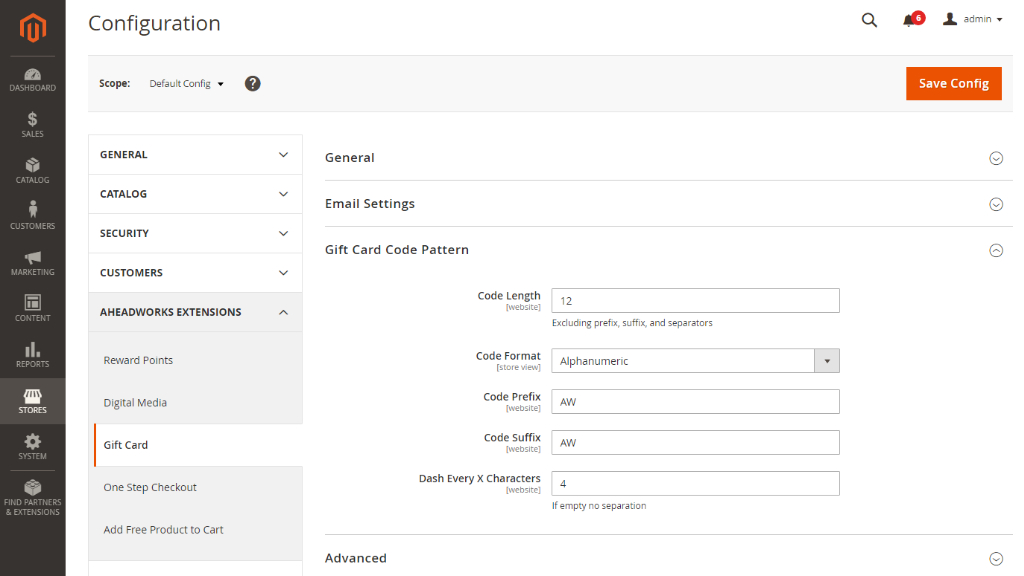
Gift Card Code Pattern
Gift Card Code Pattern section defines according to which pattern ALL gift card codes are created at the store, if not overridden on gift card pool level. The following settings are available:
- Code Length - defines how many symbols the gift card code will contain;
- Code Format - defines the format:
- Alphanumeric;
- Alphabetic;
- Numeric.
- Code Prefix - defines the first symbols of EVERY gift card code generated;
- Code Suffix - defines the last symbols of EVERY gift card code generated;
- Dash Every X Characters - defines if the symbols of the gift card code are separated by a dash, every X symbols.
Gift Card Code Pattern is also available from the Gift Card Pool settings. When reading about Gift Card Pools consider these options.
|
Gift Cards do not support Customizable Options of native Magento 2 products. |
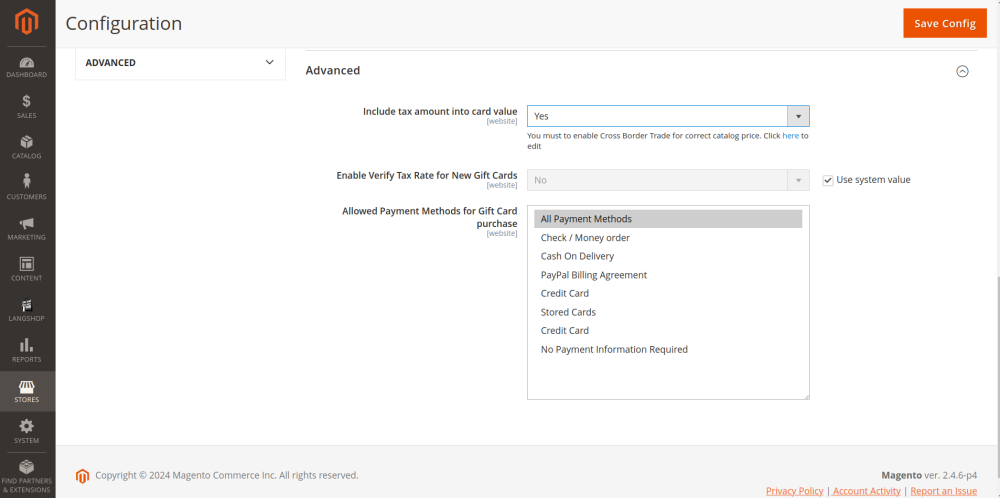
Advanced
Advanced area defines settings of Include tax amount into card value and Enable Verify Tax Rate for New Gift Cards.
Include tax amount into card value. There are some rules of the following configuration: by default, it is set to No, thus tax is not included in the price of a gift card, and the rules of using a gift card is similar to Magento gift cards. If it is set to Yes, tax is included in the price of the gift card which means when a customer pays the order the entire amount is applied. Please note that Enable Cross Border Trade must always be set to Yes. This configuration can be found by clicking on the link under dropbox or by proceeding Stores → Configuration → Tax → Calculation Settings → Enable Cross Border Trade.
|
The voucher can only be used for goods or services at a single rate of VAT. |
|
The feature does not apply to Gift Сart Codes generated by the Admin if they are not attached to the Gift Card Product. |
Enable Verify Tax Rate for New Gift Cards enables the system to calculate and apply the appropriate tax rate for the new gift card purchases.
How Include tax amount into card value work?
For example,
The Customer purchased a gift card of 20 euros with an included tax of 1,82 euros. When the Customer buys a 50 euros book and applies for the 20 euros gift card, where the tax for the book is 4,55 euros. Then the Customer is left to pay 30 euros and the tax of purchase is only applied to this leftover 30 euros amount, where the tax will be 2,73 euros.
Together with tax amount, here you can also specify Allowed Payment Methods for Gift Card purchase.
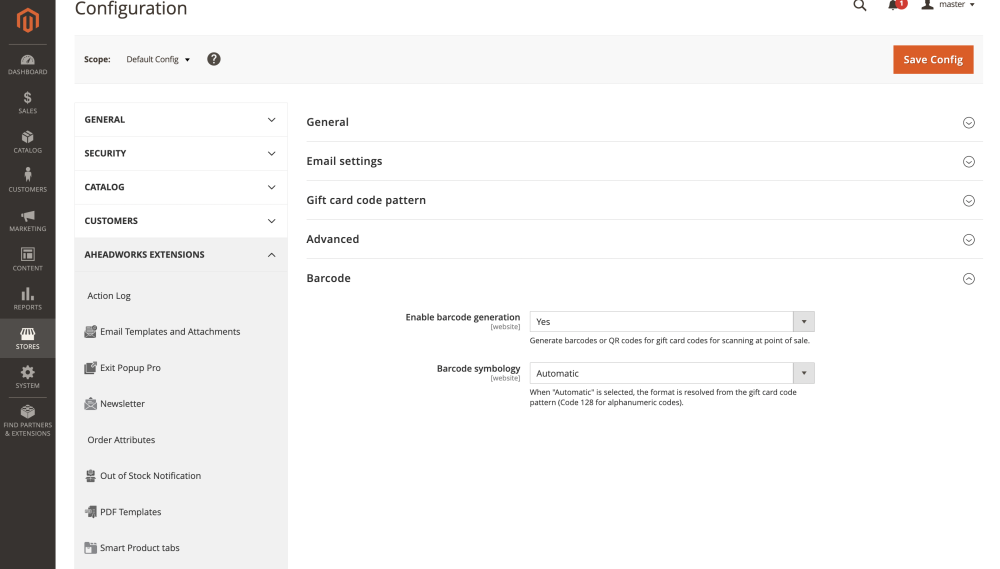
Barcode
Use this section to configure scannable codes for your gift cards, making it easier to process them at physical points of sale.
-
Enable barcode generation – set to Yes to automatically generate a barcode or QR code for every gift card code created in the system. These codes can be scanned directly from a customer's mobile screen or a printed PDF.
-
Barcode symbology – defines the format of the generated code. You can choose between:
-
Automatic – the system automatically selects the best format based on the gift card code pattern.
-
Code 128 / Code 39 – standard 1D barcode formats.
-
QR Code – format for quick scanning with mobile devices or scanners.
|
How Include tax amount into card value work? For example, The Customer purchased a gift card of 20 euros with an included tax of 1,82 euros. When the Customer buys a 50 euros book and applies for the 20 euros gift card, where the tax for the book is 4,55 euros. Then the Customer is left to pay 30 euros and the tax of purchase is only applied to this leftover 30 euros amount, where the tax will be 2,73 euros. |
Creating a gift card product
There are two ways of creating Gift Card Products: from the Products → Catalog screen or Products → Gift Card by Aheadworks → Gift Card Products.
For the purpose of demonstration, we will only describe creating gift cards from the Gift Card Product grid.
Gift Card Product grid
Gift Card Product grid is the management center of all gift card products created.

Whether you want to create a gift card product or check how well your gift card products perform - you can do it right from here.
To add a new gift card product, click on the Add Gift Card Product button.
Adding gift card product
The gift card product shares all the setting a native Magento product has, with the exception of a single section. First, configure the product just as you did with every other Magento product. Then, proceed to the Gift Card Information section.
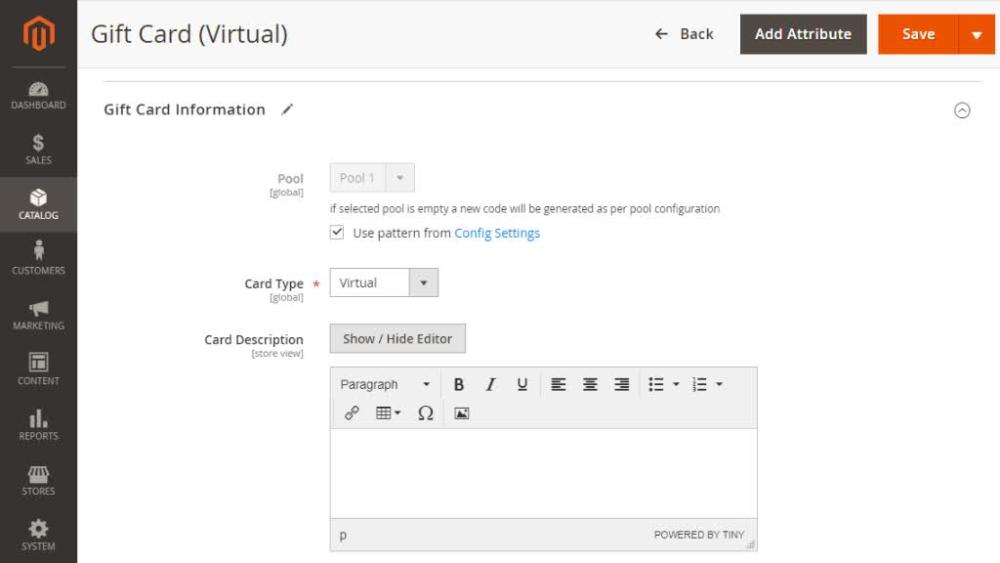
Gift Card Information section contains numerous gift card settings. For convenience purposes these settings will be split into two blocks in the other they appear.
- Pool - defines a Gift Card Pool the gift card code will be taken from. If no pull is specified, the gift card will be generated according to the extension settings;
- Card Type - defines the type of the card:
- Virtual - when purchased the gift card is sent via email;
- Physical - requires to be shipped and delivered to a customer, no email sent;
- Combined - requires to be shipped to the customer and is sent via email.
- Card Description - defines the gift card product description - it is displayed below the product short description before gift card options.
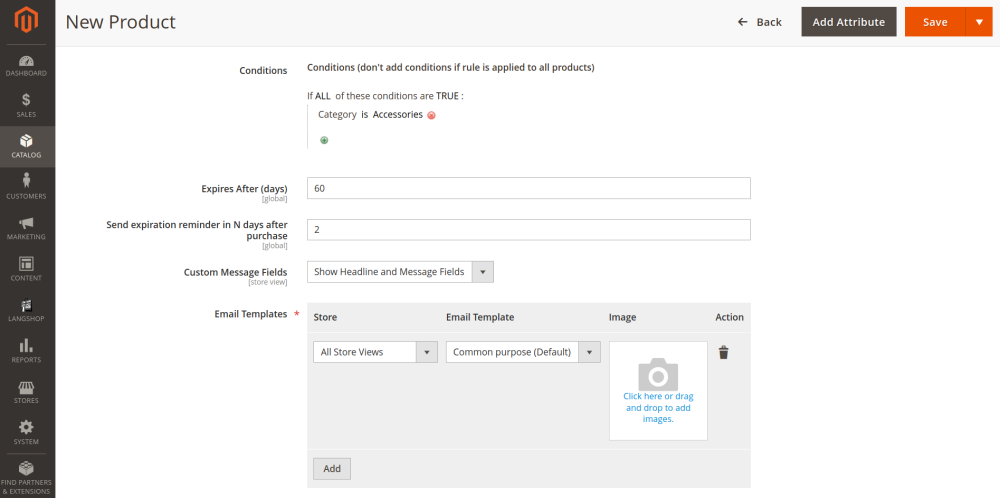
- Conditions - specify which products are eligible for purchase with a gift card. Don’t add conditions if rule is applied to all products;
- Expires After (days) - defines after how many days from order completion the gift card becomes inactive, overrides extension settings if specified;
- Send expiration reminder in N days after purchase - determines the number of days after purchase of the gift card, upon which will be sent a message about expiration of the gift card. When Send Expiration Reminder in N Days After Purchase equals 0 it means that the notification is sent once when certificate expires.
- Custom Message Fields - defines if the field to submit a custom message to the gift card is available for a customer;
- Email Templates - a single gift card product can feature different gift card images and email templates to cover different occasions (you can refer to the demo store as an example). Each template added defines new gift card image and text.
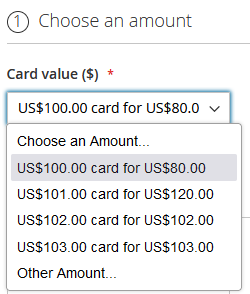
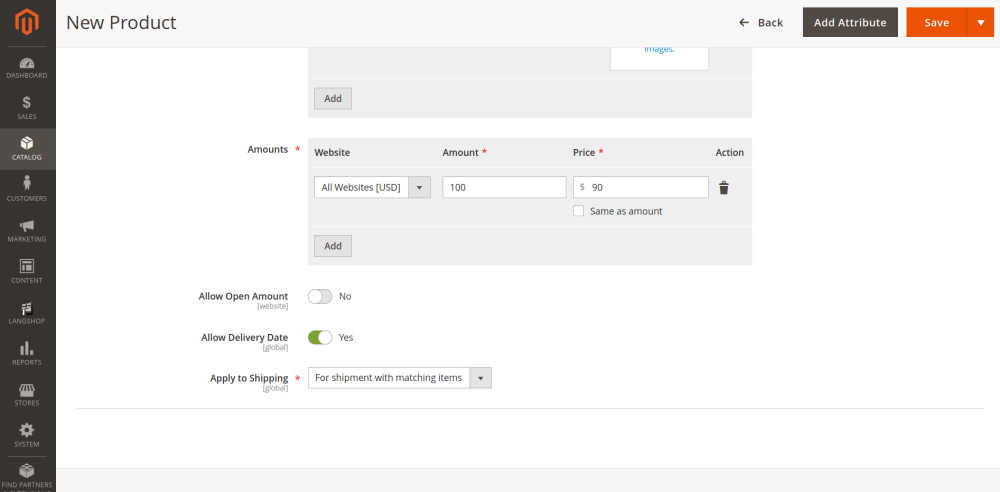
- Amounts - defines the amounts for purchasing with the gift card. Uncheck the ‘Same as amount’ box to set price lower or higher than the gift card balance (can be used as special offer for loyal customers);
Note: In case of refund of a gift card, the Price is refunded, not the Amount. In case of refund of purchases made with a gift card, the Amount is refunded.
- Allow Open Amount - defines if customers can specify gift card amount manually, comes with the limitation options - Open Amount Min/Max Value. Use Open Amount Discount (%) to offer gift cards at prices lower than their balance. When customers manually set the amount, a dynamically calculated discounted price is displayed below the gift card value;

- Apply to Shipping - specify whether the gift card can be used to cover shipping costs. Choose from three options: No, For matching items only and For shipment with matching items.
Once done with the gift card options click on Save button. Congratulations! The gift card product has been created and is now available at the store.
|
How Discounts are Applied to Gift Cards in the Admin Area If you order gift card products from the backend 'Orders' page with the 'Custom Price' parameter enabled, the following logic is implemented:
|
Refunding Priority for the Gift Card Balance
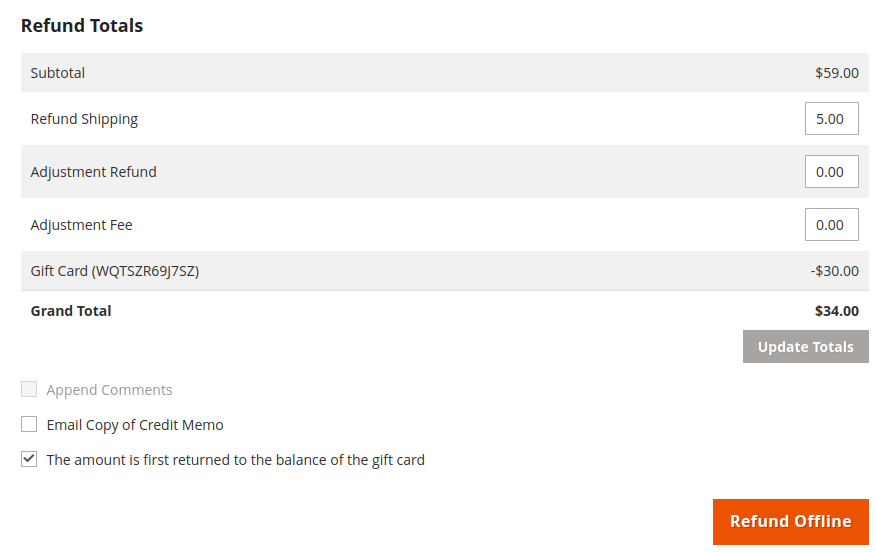
The refunding priority option allows the configuration of the order in which refund amounts are returned during partial refunds.
To configure the priority for the Gift Card Balance, tick the "The amount is first returned to the balance of the gift card" checkbox on the order page during the refund process. This action will enable the feature, ensuring that the refund amount is returned to the Gift Card balance as the first priority during partial refunds.
If you return money to a credit card first, then calculating the refund amount does not include how much was paid with the gift card. We return the amount of the paid order. Also, during the subsequent refunds, the validation of returned items with a gift card is disabled.
The checkbox for selecting the refund priority is not displayed in the following cases:
-
The entire order was paid with a gift card.
-
Only 1 item was ordered.
-
A full refund is being processed.
-
There is an available balance > $0 for a refund via gift card.
Gift card codes
When the gift card product is purchased a gift card code is created. It is not the only way to create a gift card code though. The gift card codes can be created manually from the Products → Gift Card by Aheadworks → Gift Card Codes grid and via Gift Card Pools. This section covers gift card management at the Gift Card Codes grid.

Gift Card Codes grid comes with the same control elements as Gift Card Product grid with the addition of Import and Export buttons, that, as comes from their names, allow importing and exporting gift card codes.
Gift Card Codes grid offers an overview of all the gift card codes available. Here you can find the required gift card code, check its balance, see the order the card has been applied to and customer details. This section offers all the information the store administrator might need to gift card management.
To create a gift card code click on the Add Gift Card Code button.
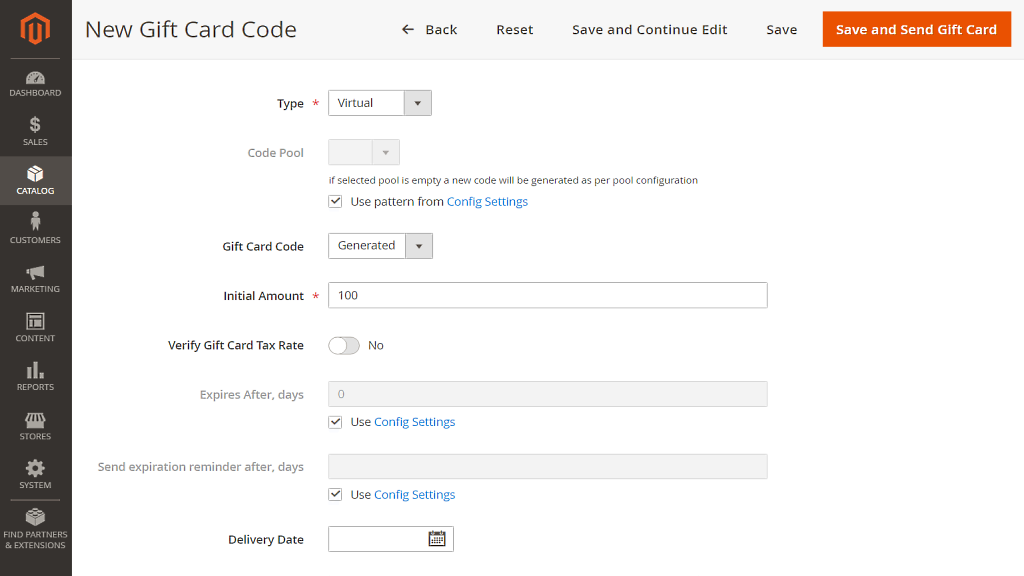
Creating gift card code
Gift card codes share some of the settings with the gift card products, refer to the Adding Gift Card product section for reference. However, some settings, as the sender and recipient are unique as gift cards are supposed to belong to the particular customer.
The logic of Gift Card extension is that it generates a code after a physical card purchase:
- Gift Card extension generates gift card codes for future physical cards.
- Merchants print out the physical cards with generated codes.
- Merchants sell these physical gift cards at stores using special POS integrator modules to connect to Magento and send data about transactions with physical cards.
As for virtual cards, they are sent to customers’ emails, and then customers can print them out (PDF format is also supported, but mPDF Library must be installed).
Gift Card Code - choose either Manual or Generated way. If Manual is selected, an input field will appear to enter the Gift Card Code. Only for the new Gift Card.
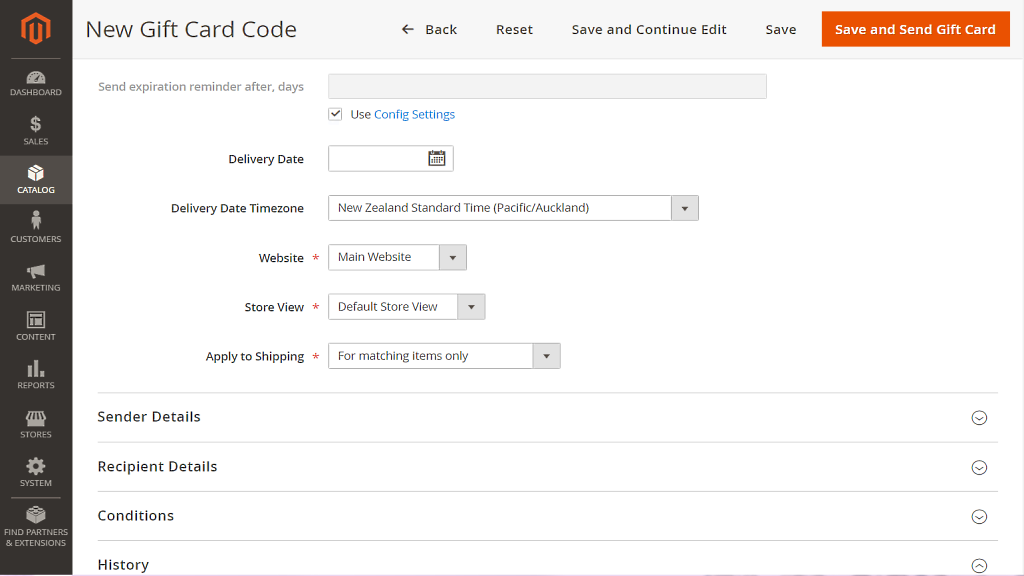
Delivery date
This section controls when the gift card is delivered.
- Delivery Date - defines the date of the card delivery;
- Delivery Date Timezone - defines the timezone of the delivery date to consider time differences if you are working worldwide;
- Website - defines the website of the gift card;
- Store View - defines the store view of the gift card;
- Apply to Shipping - determines whether customers can use gift cards for the shipping costs of an order.
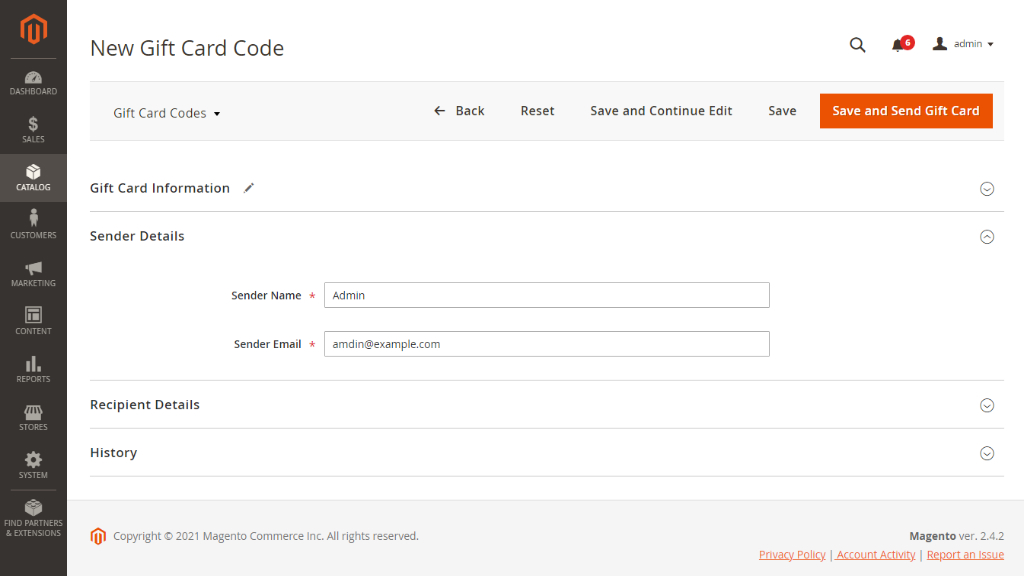
Sender Details
This section controls from which email address and from whom the gift card is sent. For example, you want to congratulate your customer on holidays or edit the existing gift card for the recipient.
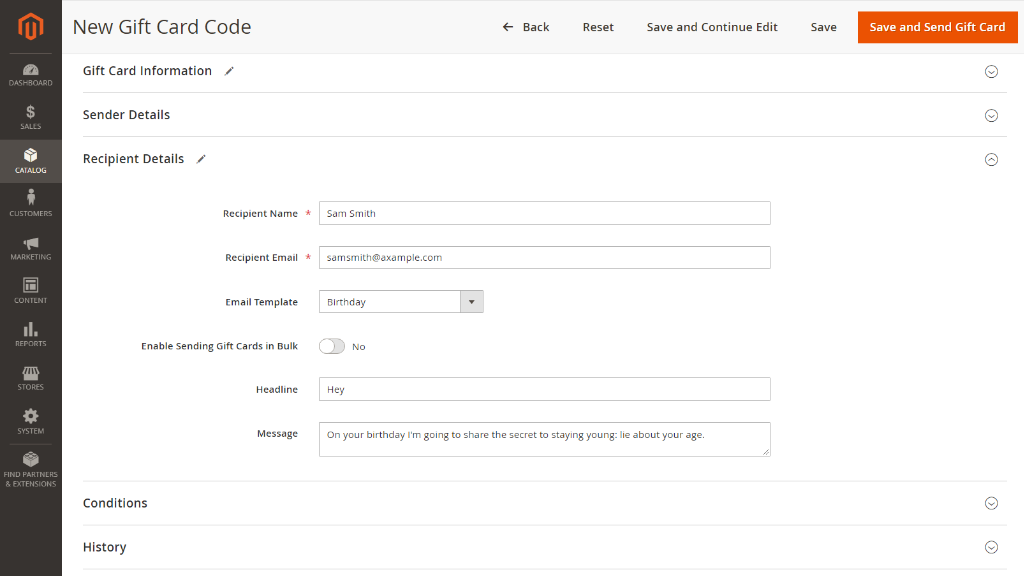
Recipient Details
Here the store owner is suggested specifying all the recipient details, editing message and selecting email template the gift card code is sent with.
Enable Sending Gift Cards in Bulk - enable to upload a list of recipients and emails for bulk sending of the gift cards. Choose the file to download the list of data (Excel or CSV file format).
Once done setting up the gift card code, there are several options, the store administrator can:
- Save and Send Gift Card;
- Save;
- Save and Continue Edit;
- Reset;
- Back.
Barcode Display
If barcode generation is enabled in the global configuration, a unique barcode or QR code is automatically assigned to the generated gift card.
The barcode is integrated into the following areas:
-
Email Templates: The barcode image is embedded in the gift card email sent to the customer. High-resolution rendering ensures the code remains scannable when printed or saved as a PDF.
-
Customer Account: In the My Gift Cards section, the barcode is displayed next to the code. On mobile devices, it automatically shifts below the card details for easier scanning.

-
Admin Panel: The image is visible on the Gift Card Information page.

Gift Card Pools
Gift Card Pools are sets of gift card codes, that may differ by the code pattern, event, or any reason you want. For example, you can have a pool of cards you will be selling for Christmas, a pool for Valentine's day, and a pool of cards you have distributed in your physical store.
Using Gift Card Pools
The main reason for using gift card pools is management - instead of having a long list of all the gift cards for different occasions, different balance, etc., you can combine gift cards into pools.
Click on the Add Code Pool button to create a code pool.
- The pool settings override extension settings in terms of the gift card code pattern. In the Code Pattern, you specify the look of the codes that will belong to this particular pool.
- Next, you can import codes from the .csv file, in case you have a set of already generated codes, and you want them to belong to this pool.
- Next, you can set the condition for applying gift card codes only to the specific products according to the rules.
- The last section of the code pool is Manage Pool Codes, here you can find and delete codes belonging to the pool.
Once the pool is created it can be assigned to the gift card products. When the gift card product with an assigned pool is purchased, a gift card code is taken from the pool. When the pool is empty the new codes will be generated according to the pool's pattern. If you want to prevent new codes from being generated it is advised to set gift card product quantity equal to the number of codes available in the pool.
Importing gift codes
If you have previously issued gift card codes for your physical store, or while using a third-party extension, you can import these codes to the extension.
There are two ways to import gift card codes, to the gift card code grid, and to a particular pool. The process behind importing codes is similar to both scenarios. For the user guide purposes, we will refer to the gift card pool import.
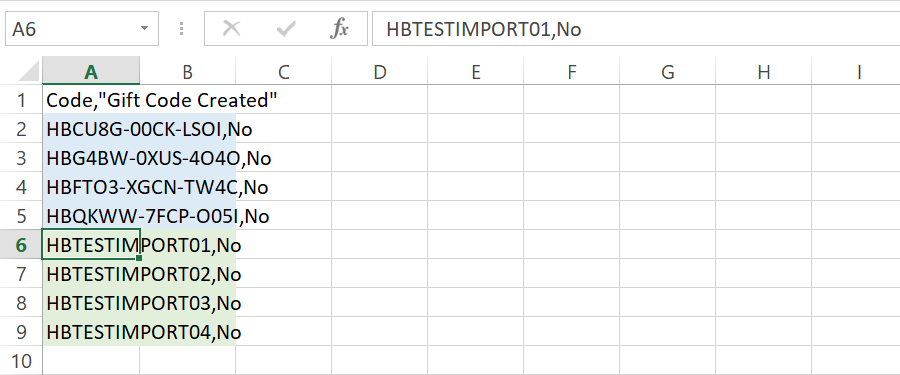
Importing existing code(s)
All codes are imported via .csv files. Depending on whether you are importing to the Gift Card Code grid or to the Gift Card Pool, .csv files will differ.
|
Make sure you specify the following columns: 'Type' to help the module to retrieve the code list correctly. To avoid unwanted mistakes use the easiest way of composing the gift card codes which is to export existing codes first.
|
Email templates
Depending on gift card product settings, every gift card can be assigned a particular email template. The extension offers a set of sample email templates that can be edited in the Marketing → Communication → Email Templates.
There are two peculiarities with the Gift Card email templates and Magento templates in general.
First
Gift Card images are introduced to the email templates with the following variable:
|
Language = xml
|
Language = xml |
Second
Due to a Magento issue variable "var logo_url" in the backend preview always returns the Luma logo instead of an active logo. This may be confusing.
That's why we suggest updating the store with the following fix: https://github.com/magento/magento2/issues/6275
The issue does NOT affect the actual emails sent, only the store logo in the preview.
![]()
Already used our product?
We would appreciate your feedback. Please, leave a review.