User Manual - Add Free Product to Cart
- Installing M2 Add Free Product to Cart
- Set up cron
- Uninstalling M2 Add Free Product to Cart
- Compatibility
- Getting Around
- M2 Add Free Product to Cart On Backend
- M2 Add Free Product to Cart On Frontend
- FAQ
Add Free Product to Cart for Magento 2 automatically adds to cart discounted or free products of various types and visibility attribute: simple, configurable, downloadable, "not visible individually". This functionality is governed by scenario rules, pre-configured on the backend. Customers get informed on active promo campaigns via customizable banners and popups. Admins track the success of their promo campaigns with the help of the comprehensive dashboard of the extension.
API documentation link
Installing M2 Add Free Product to Cart
|
Starting from v. 1.5.3 if a store contains Klarna module it’s necessary to install Aheadworks AfptcKlarna module which is included in the zip.file that customers download from Aheadworks store and it is available via composer. |
Command Line Installation
- Backup your web directory and store database
- Download the Add Free Product to Cart installation package
- Upload the contents of the Add Free Product to Cart installation package to your store root directory
- In the SSH console of your server, navigate to your store root folder:
cd path_to_the_store_root_folder |
run:
php bin/magento module:enable Aheadworks_Afptc |
then:
php bin/magento setup:upgrade |
after:
php bin/magento setup:static-content:deploy -f |
5. Flush the store cache, log out from the backend, and log in again
|
Make sure you have the rights of the FTP administrator to proceed with the installation. Otherwise, set 775 permission to the store root directory once the extension is deployed. |
Composer Installation
- If you are installing an extension from Aheadworks for the first time, you need to add our composer repository to your Magento store:
Login to your ssh console and navigate to your store folder:
cd path_to_the_store_root_folder |
Run the following commands:
composer config repositories.aheadworks composer https://dist.aheadworks.com/ |
On successful execution of the commands you will be able to use the composer to install the extensions.
2. To install the extension:
Login to your ssh console and navigate to your store folder:
cd path_to_the_store_root_folder |
3. To install the latest version of the extension:
composer require aheadworks/module-afptc |
if you need to install a specific version, run this command:
composer require aheadworks/module-afptc:<version> |
|
Specify the version of the extension in <version> |
When prompted, enter Public Key (Username) and Private Key (Password):
.png?version=1&modificationDate=1613637317951&cacheVersion=1&api=v2&width=450)
Both Public Key (Username) and Private Key (Password) can be found in My Projects and Licenses in your personal account on our site:
 |
Run the following command to install Add Free Product to Cart GraphQl:
composer require aheadworks/module-afptc-graph-ql |
Need to use with Klarna payment method?
Make sure the official module of the payment gateway is installed and proceed with a corresponding command:
composer require aheadworks/module-afptc-klarna(for Magento 2.3.* and 2.4.3 and below)

composer require aheadworks/module-afptc-mm-klarna(for Magento 2.4.4 and above)
4. Enable the extension:
php -f bin/magento module:enable Aheadworks_Afptc |
Need to use with Klarna payment method?
Make sure the official module of the payment gateway is enabled and proceed with a corresponding command:
bin/magento module:enable Aheadworks_AfptcKlarna (for Magento 2.3.* and 2.4.3 and below)

bin/magento module:enable Aheadworks_AfptcMmKlarna (for Magento 2.4.4 and above)
Next, register the extension:
bin/magento setup:upgrade |
Recompile your Magento store if you are in the Production mode:
bin/magento setup:di:compile |
To verify that the extension is enabled, run this command:
bin/magento module:status |
Clean store cache, by running the following command:
bin/magento cache:clean |
Log out and Log in the backend again.
|
Want to use the Hyvä theme module? To install the Hyvä theme module, you need to install the module via composer using command:
|
To upgrade the extension:
5. To update or upgrade an extension:
Download the updated extension file. Take note of the module-name and version. Export the contents to your Magento root.
If a composer package exists for the extension, run one of the following.
Update per module name:
composer update aheadworks/module-afptc |
Updater per version:
|
Run the following commands to upgrade, deploy, and clean the cache.
php bin/magento setup:upgrade --keep-generated
php bin/magento setup:static-content:deploy
php bin/magento cache:clean
|
Set up cron
If you have already configured cron jobs for your Magento installation then you can skip this step. Read the following instructions on setting cron job for your Magento store:Magento user guide.
Generally, it would be enough to run in SSH console of your server:
crontab -e |
And insert the following line:
*/3 * * * * php -c <ini-file-path> <your Magento install dir>/bin/magento cron:run |
Remember to confirm the Save request when exiting the installation.
Uninstalling M2 Add Free Product to Cart
Since Magento introduced declarative Database you need to be very carefull when uninstalling or disabling the module.
|
NOTE: Please be very careful when uninstalling/disabling this module. This module uses a declarative DB scheme. Once the module is uninstalled the DB tables will be lost. |
Manual Removal
1. Disable the module by executing the following commands:
php bin/magento module:disable Aheadworks_Afptc php bin/magento setup:upgrade |
2. Remove the extension files from the following folder:
app/code/Aheadworks/Afptc |
Automatic Removal (via Composer)
1. Disable the module by executing the following commands:
php bin/magento module:uninstall Aheadworks_Afptc |
Compatibility
|
Module Version |
Magento Version |
PHP |
|
1.5.8 and earlier versions |
2.3.Х - 2.3.6 2.4.0 - 2.4.3 |
7.4 and earlier versions |
|
As of version 1.5.9 |
2.3.7-p3+ 2.4.0 - 2.4.4 |
7.4, 8.1 |
|
As of version 1.6.0 |
2.3.7-p3+ 2.4.0 - 2.4.5 |
7.4, 8.1 |
|
As of version 1.8.0 |
2.4.3 - 2.4.5 |
7.4, 8.1 |
|
As of version 1.8.1 |
2.4.4 - 2.4.5 |
8.1 |
|
As of version 1.8.3 |
2.4.4 - 2.4.6 |
8.1 |
|
As of version 1.10.0 |
2.4.6 |
8.1 |
Getting Around
The Add Free Product to Cart extension for Magento 2 has a rule-based performance. Admins can create, edit and delete the rules on the backend to describe campaign scenarios. The scenarios get triggered when customers top-up their carts with some products which are associated with the rules. These products are then either added to the carts automatically or are displayed to shoppers via a popup giving an option of choice of a promo product.
|
It is important to note here, that with respect to the logic of the extension, and mainly that of tracking rejected offers, auto-adding doesn't work on the Cart page. |
Integrations
M2 Add Free Product to Cart On Backend
Extension Settings
|
The Text in the Popup Header option will be applied only if all items in the popup are offered against the same rule. In case of multiple rules, the text from ‘Stores->Config’ will be used. |
To configure the extension proceed to Stores > Configuration > Aheadworks Extensions > Add Free Product to Cart.
- Default Title Of Popup - the title of the popup to be displayed in case of several active promo offers;
- Hide options of configurable products - the Yes/No option ('Yes' makes sense if your offer contain both configurable and simple products);
- Where to display promo popup - the place of the popup display (on cart and checkout pages only, or on any page as soon as the contents of the cart are associated with the rule);
- Validate subtotal - allows including or excluding taxes from the subtotal of the cart when working out the rule.
- Do not Offer Promos for Products with Special Price -the Yes/No option (if set to 'Yes' promo rules are not applying to products with special price and parent product of this child).
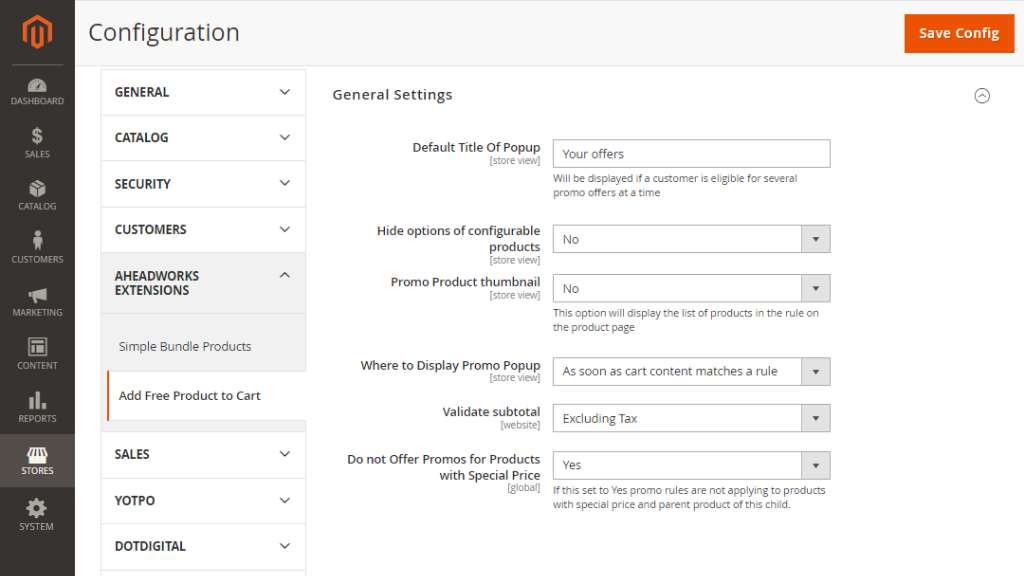
To complete the settings, click the 'Save Config' button on the top right.
Dashboard
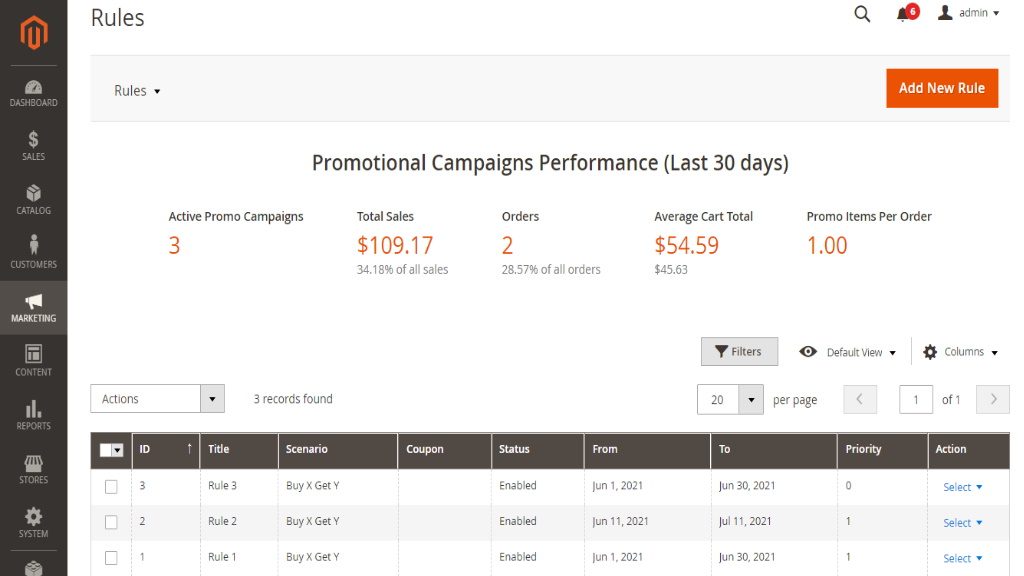
To manage the scenario rules of the campaigns and track their performance proceeds to Marketing > Add Free Product to Cart > Rules. This is where you will see the Scenario grid as well as the board with some financial indicators of thereof.
|
Only invoiced orders are considered in Total Sales, Average Cart Total, Promo Items Per Order. |
The dashboard displays the following info:
- Active promo campaigns - the number of active promos;
- Total sales - the total amount of all orders with at least 1 promo item, $$;
- N% of all sales - the percentage of total sales which were stimulated by the promos;
- Orders - the total number of orders with at least 1 promo item;
- N% of all orders- the percentage of the total of orders stimulated by promos;
- Avg cart total of orders with promo items, $$;
- Avg cart total of all orders, $$;
- Promo Items per order - the average quantity of promo items per order.
|
Note that when the admin filters the grid against a website, the dashboard displays information about that website only, in the currency of the website. |
The rule grid features the following columns:
- id - the identification number of the scenario;
- Title - the title of the rule;
- Scenario - the title of the scenario;
- Coupon - the name of the coupon, if part of the scenario;
- Status - indicates whether the scenario is enabled or disabled;
- From / to - the dates of promo activity;
- Priority - the decimal numeric for sorting the overlaying rules;
- Action - select an active link with two alternatives: Edit and Delete.
The functionality of the grid makes it possible to enable, disable and delete the rules both in bulk and individually. For the former, select the rules and use the Actions dropbox on the top left of the grid.
To edit the rule click Select in the corresponding Action cell, and select Edit. Alternatively, click on the row of the chosen rule.
To design a new rule, click the Add New Rule button on the top right of the page.
Creating Rules
The New Rule page is made of four blocks: General Settings, Rule Settings, Popup Settings, and Promo Settings.
General Settings
The General Rules block features the following parameters for set-up:
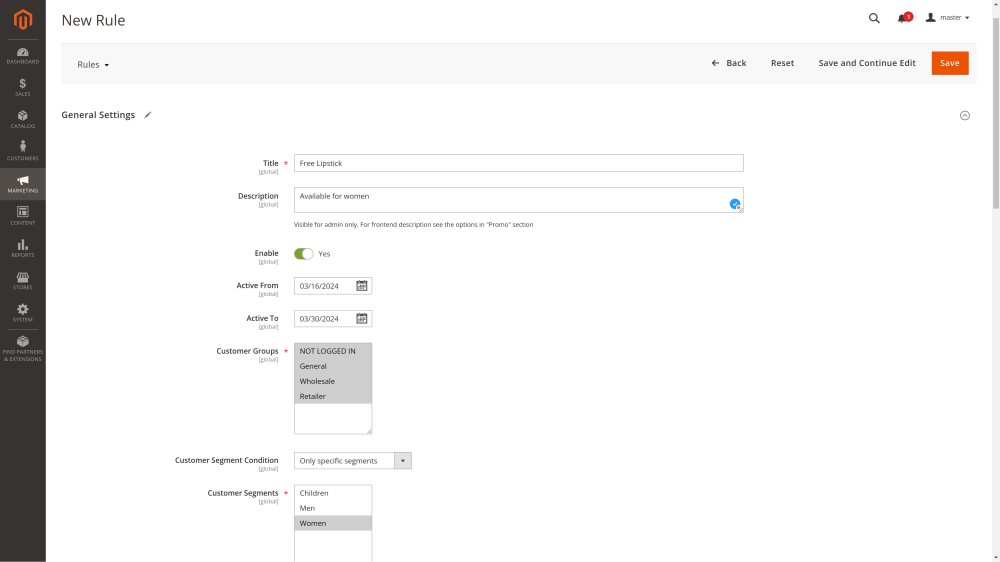
- Title - the name of the rule;
- Description - the description of the rule (visible only on the backend);
- Enable - the Yes/No alternative;
- Active From / To - the dates of validity of the promo;
- Customer Groups - restriction on the customer groups to fall under the promo campaign;
- Customer Segment Condition - define what customers will participate in the promo campaign: All visitors, Only specific segments or Exclude specific segments;
- Customer Segments - select customer segments to include in or exclude from the promotional campaign;
|
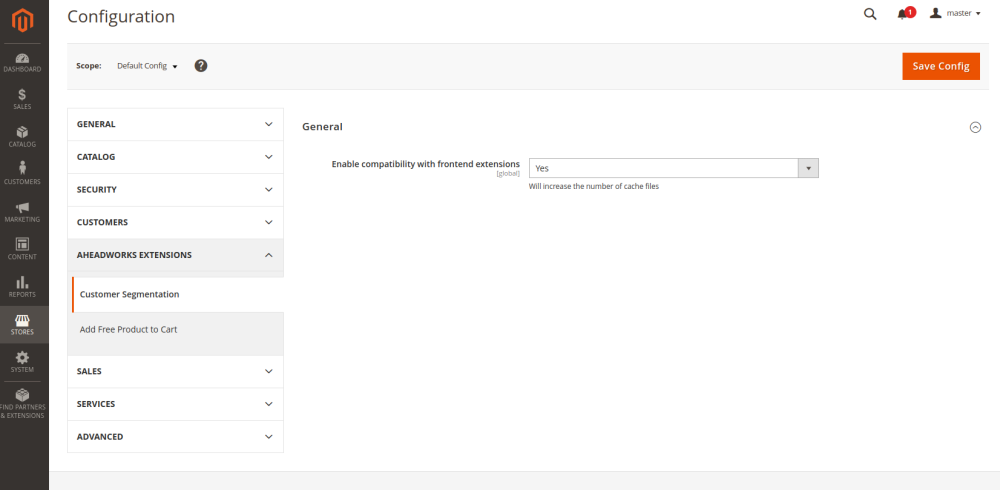
The Customer Segment Condition is available only when the Customer Segmentation extension is installed. Make sure to Enable compatibility with frontend extensions in Store Configurations > AHEADWORKS EXTENSIONS > Customer Segmentation.
|
- Rule Priority - the decimal numeric to prioritize overlapping promos (zero is a top priority);
- Discard Subsequent Rules - the Yes/No alternative;
- Offer only those products which are in stock - the Yes/No alternative.
|
If the Offer Only Those Products Which Are In Stock functionality is enabled, customers will see only those products which are in stock (Qty> 0) regardless of whether the backorder is enabled or not. It means that you are able to offer only those items which are available now. |
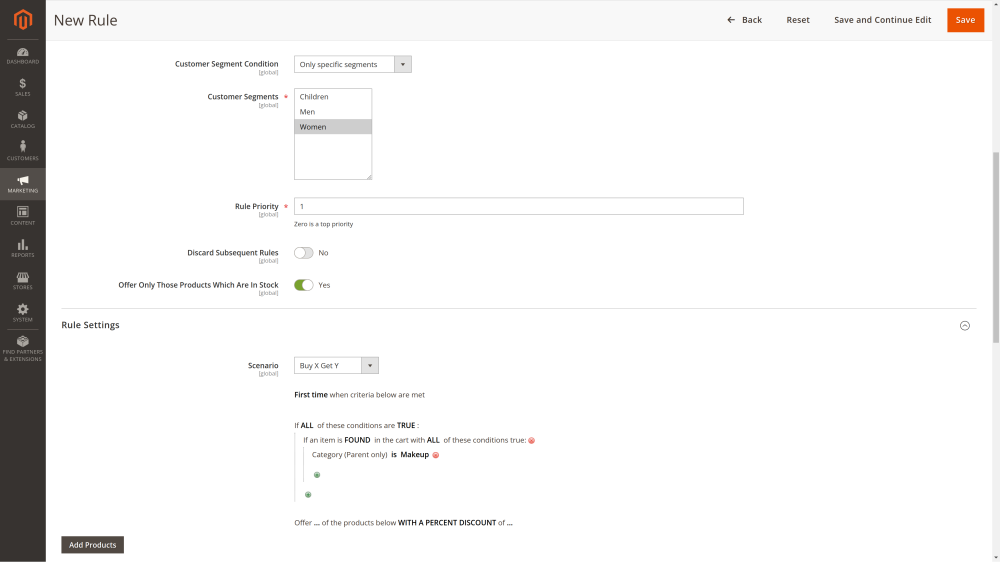
Rule Settings
This is where you opt for a scenario: "Buy X get Y", "Spend X Get Y", "Buy X get Y Free", "Coupon", set frequency of response, select products to participate in the campaign and decide on either a fixed-value- or %-discount.
Depending on the chosen scenario the block features a combination of the following parameters for set-up:
- Scenario - the Buy X Get Y, Spend X Get Y, Buy X get Y Free, Coupon alternatives;
- Every time / First Time / Every Nth Time - the frequency of response of the scenario to the rule;
- When a user entered this coupon code - the text of the promo code;
- The "If" block - the conditions to define the scenario;
- For a Fixed Amount / With A Percent Discount - the character of the discount, and the number of products to fall under the discount;
- The "Products" block - the native Magento "Add Products" functionality to add products to the campaign.
The first four parameters are different for different scenarios. The other two stay the same.
The discount condition allows setting the (decimal integer) number of products (in the Products promo list ) which fall under the discount, the % or fixed-value character of the discount and the value of the discount/promo price. Clicking on the number here will open a text box to alter that number, clicking the character of the discount will open a swtich-box to choose between the two alternatives.

|
Conditions in our extension work the same as native Cart Price Rules. Non-application of discounts to the selected product in the “Product” block when adding two items to the cart is correct behavior. |
The Product block herein allows adding products to the promo, as well as removing them from it. Furthermore, you can configure selected parent-products.
The Products grid features the following columns:
- id - the identification number of the product;
- Name - the name of the product;
- SKU - the stock keeping unit number of the product;
- Thumbnail - the image of the product;
- Configuration - the active link to the Product Configuration popup (available for parent-products only);
- Actions - the Remove action link.

To add a product to the rule, click the Add Products button on the top left of the grid. The Select Products popup will appear on the page.

Select the products for the rule using the tick-boxes in the first column of the grid and click the Add Selected Products button on the top right. Bundle, Group and Gift Card products are not supported as promo products.
Should you choose a parent-product, you will later be able to configure it with the help of the Configure active link in the Product grid (see the previous picture).

The Configure Product popup allows setting the desired size and color of the product. The SKU and price of the configured product will get updated in the Products grid automatically. Click OK to finalize the configuration.
Buy X Get Y
This scenario defines a situation when you want customers to get the Y product for free or with a discount should they get interested in product X.
This is the only block where the frequency of response of the scenario to the rule makes sense.
- First time - customers will get the promo item or offer only for the first time when the conditions of the rule are met. E.g. A customer receives a promo product only for the first product X, disregarding how many Products X they are buying;
- Every time - customers will get the promo item or offer every time when the conditions are met. E.g. With every Product X a customer can get Product Y;
- Every Nth time- customers will get the promo item or offer every second, third or Nth time. E.g. For every 3 Products X a customer will get 1 Product Y.
To add a condition to the scenario click the green "Cross" button and choose one of the following:
- Product Attribute Combination - opens up the "If an item is FOUND in the cart with ALL of these conditions true" condition and allows selecting a product attribute to define the item;
- Products Subselection - opens up the "If total quantity is ... for a subselection of items in cart matching ALL of these conditions:" and allows selecting a product attribute to define the item;
- Conditions Combination (default condition) - opens up the "If ALL of these conditions are TRUE:" and allows choosing one of the conditions herein.
Use the 'ALL', 'TRUE', 'IS', '...' and other clickable parameters to choose a meaningful variation and shape up the condition to your needs.
|
A Note From A Developer When "total quantity" condition with "Every time" and "Every Nth time" is created the behavior is the same as when "First Time" is chosen. Moreover, when in "Every Nth time" "N" is greater 1, a promo product isn't offered. To set a promo-product "N" should be equal 1. |
To delete a condition click the red "Cross" button.

Spend X Get Y
This scenario defines a situation when you want customers to get the Y product for free or with a discount should the sum in the cart run over $X.

The default condition is the same here. At the same, alongside the product attributes it allows car item attributes and cart attributes to define the condition.
Buy X get Y Free
This scenario adds an identical (to product Х) free product (Y) to the cart if all conditions of the rule are met.
|
Note: Please, choose the conditions carefully as we do not support Bundle, Grouped, Gift Card product types as a promo. |
Please note, that there is no “Popup Settings” section in the rule settings, as the promo product will always be automatically added to the cart when all conditions of the rule are met.
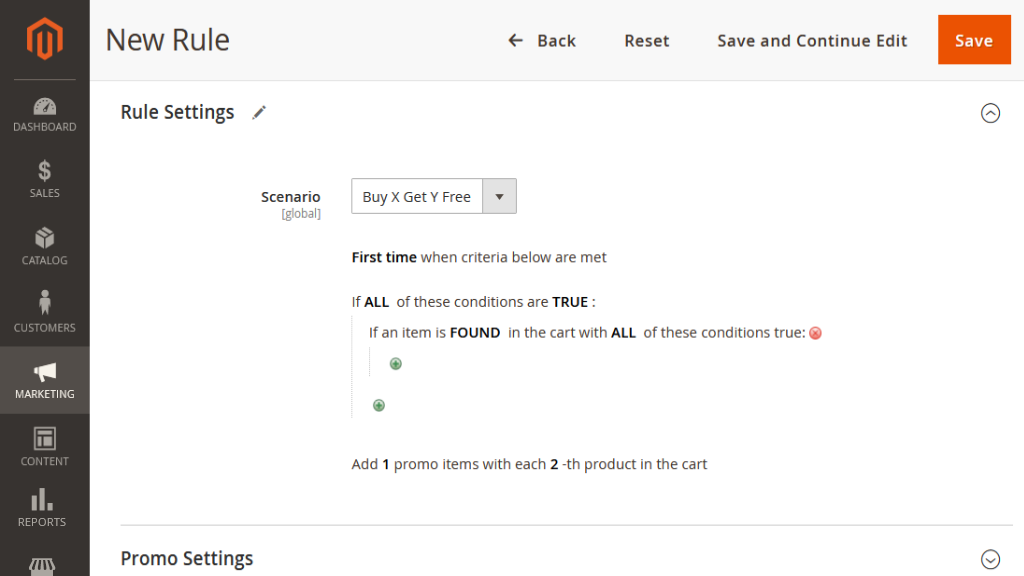
Coupon
This scenario defines a situation when you want (selected) customers to use a predefined coupon at cart to get a discount on the items in it.

The conditions configuration is the same here. The only difference is that the name of the Coupon has to be suggested to make things work.
Popup Settings
This is where you set the parameters for the popup which will bear the promo:
- How to offer promo products - the two alternatives: Show Popup and Auto-add promo product to cart, if possible;
- Text in the Popup Header - the alternative text to the deafult one, indicated in the Settings.

|
The How to offer promo products applies to a single promo product of a simple type and without options. For other product types and quantities a popup will always be displayed. |
Promo Settings
This block is available only when the "Buy X Get Y" or "Buy X get Y" Free scenario is chosen. This is where you can configure the promo described by the scenario rule.
|
Most features here (marked with an asterix (*) in the list below) are integrated from the Product Labels extension. If you do not have Product Labels preinstalled, these features will not be available here for configuration. |
The block presents the following parameters for set-up:
- Promo Text - the message to reflect the promo call to action;
- Image - the image that will be displayed next to the promo items in the popup;
- Image Alt - the alternate text for an image;
- Header - the text for the header of the promo popup;
- Description - the brief description of your current promo that your customers will see if they click on the promo image;
- URL - the link to the page you want to redirect your customers to, should they want to read more information on the campaign;
- URL Text - the message to encourage customers to follow the above-mentioned link.

|
If scenario conditions are set as excluding (e.g. cart does not contain .... ) - the Promo block will be displayed on all products in the store. Thereby, the merchant may want either to disable the promo options or reconfigure the rule so that it doesn't contain any excluding conditions at the top level. |
Sample Rules
a) Buy X Get Y - SKU condition
I want to offer discounted Y products or grant complimentary Y ones to the customer who has topped-up his/her cart with one of the X products. The customer may use this promo only once.

b) For a number of products
I want to offer the Y product with a 30% discount to those customers who have topped up their carts with at least 5 items of the X category.


M2 Add Free Product to Cart On Frontend
The frontend functionality of the extension is intuitive and does not require customers to configure any settings or carry out any special cart management.
Let's consider the following sample campaign to see the embodiment of the features above on the storefront:
| Campaign: Offer the Affirm Water bottle for just 1 USD to customers who intend to buy a Jupiter All-Weather Trainer (of any size and color).
Scenario: Buy X Get Y Rule: Every time the customer adds a Jupiter All-Weather Trainer into the cart, never mind other products there, offer one Affirm Water bottle, and not anything else, for just 1 USD. |
In the picture below: Once the product X has been added to cart a gift icon with a numeric '1' appears in the top right corner of the page, next to cart.
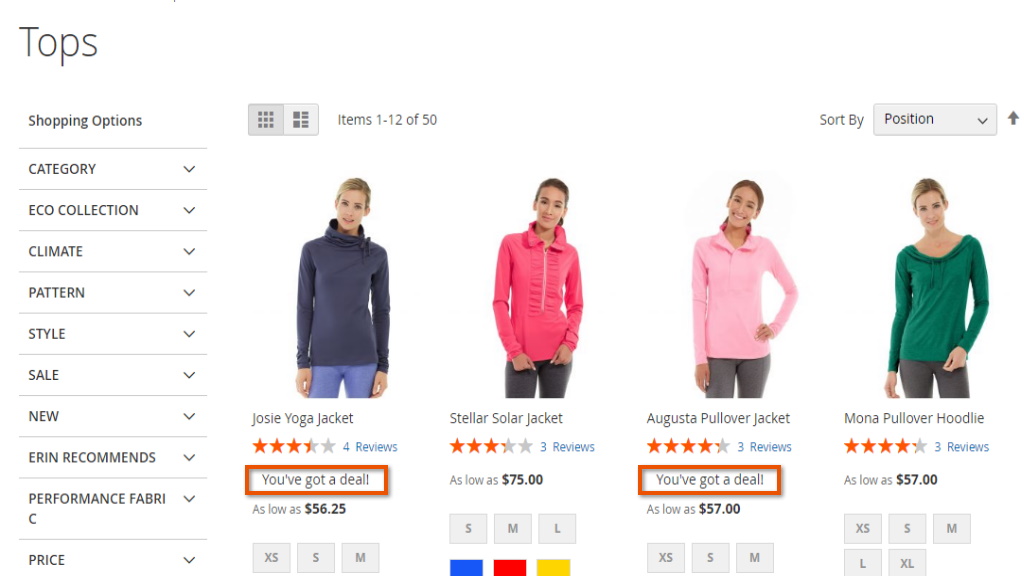
Clicking the gift icon or proceeding to the cart, the customer will see a popup with the promo product and supporting information on the offer. The customer will be able to decline the offer or add the product to cart.
|
Rule (continue): The promo is available only for the registered customers. It has the highest priority, above all other current promos, and is valid until the Y product is in stock. No labels and/or special descriptions are to be used to support the popup layout. |
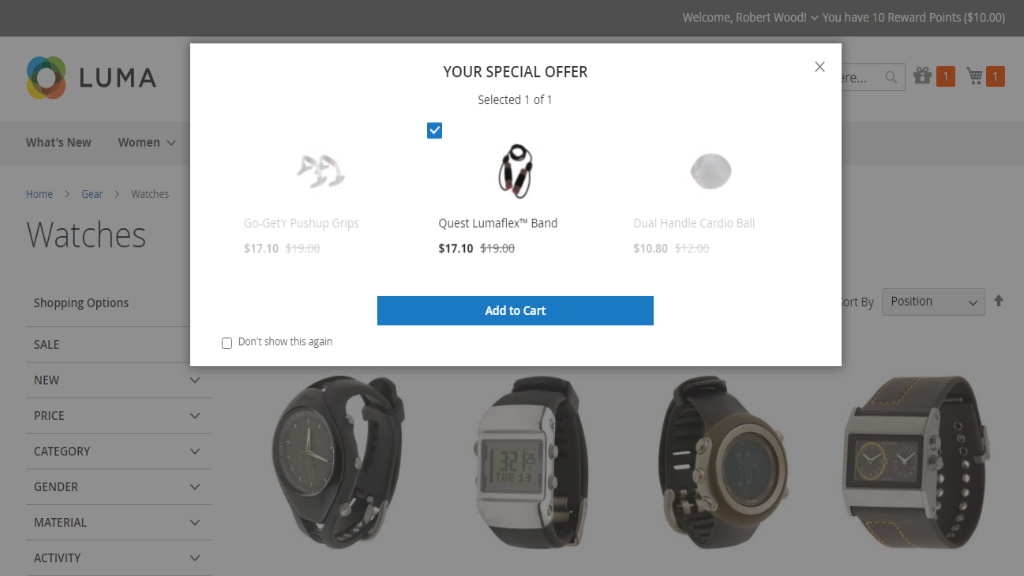
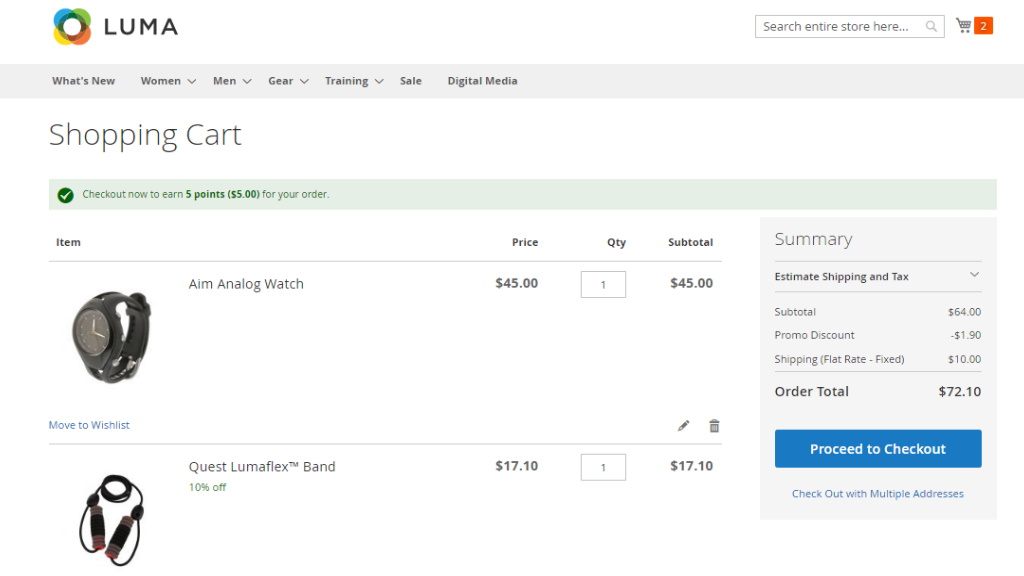
Once the customer adds the promo product to cart, he/she will see in the Cart Summary the subtotal, the discounted price (-$6 in the example, which makes the price of the bottle the target $1) and the total order price.
|
Rule (continue): The Y products is offered only via a popup, no auto-add to cart is to be configured. |
Scenario: Buy X Get Y

As of version 1.6.0 merchants are able to display an image of a promo products on the product page.

FAQ
-
Why the information about the promo is displayed in the order but invoices and credit memos contain the least of it? In Magento 2.2.6 there are no extension points in invoices and credit memos, unlike in orders. If they are added later, we will also add the necessary information to the invoices and other documents.
- Why have the rules been separated from the cart price rules?
It allowed us to bypass some pitfalls and make a more user-friendly and cleaner interface. The cart price rules already have a lot of settings, and we are sure that adding our options to that extension would make up an enormous challenge for the admin.
Already used our product?
We would appreciate your feedback. Please, leave a review.


