Integrations
- Reward Points for Magento 2
- Company Accounts for Magento 2
- Advanced Reports for Magento 2
- Simple Bundle Products for Magento 2
Reward Points for Magento 2
The extension is integrated with Magento 2 Reward Points, which enables customers to earn points from purchases containing subscriptions and to spend points towards orders with subscriptions.
| It is advisable you update Reward Points to the version 1.6.1 to ensure explicit compatibility with Advanced Subscription Products. |
Company Accounts for Magento 2
The integration with Magento 2 Company Accounts (starting from version 1.8.0) gives the store Admin access to manage Roles and Permissions for subscriptions, as well as regulate actions carried out by child-accounts regarding items/subscriptions.
To access Roles and Permissions, navigate to My Account > Roles and Permissions tab.
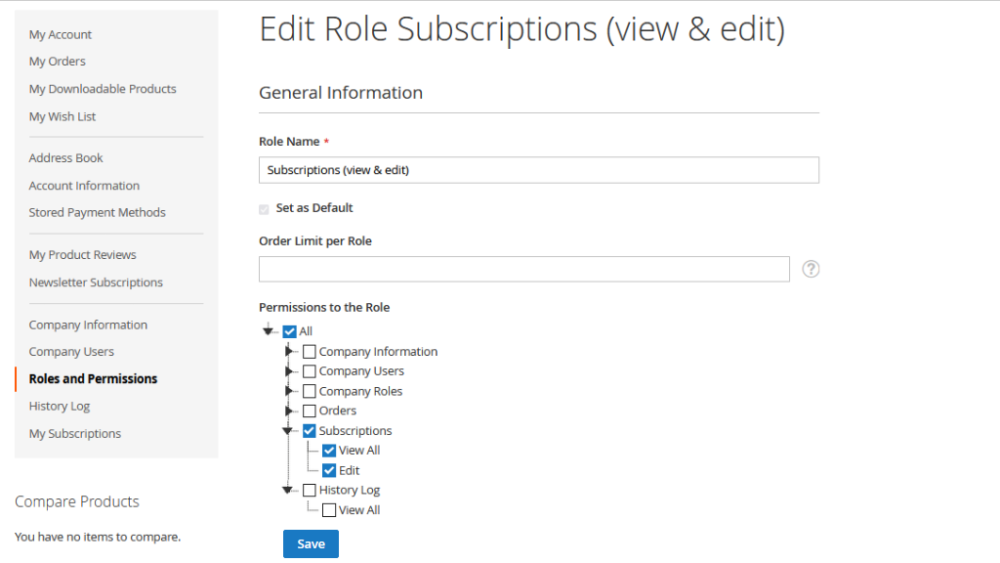
The following fields are available:
- Role Name: Company Admin/User should provide a name for the role (required field).
- Order Limit per Role (visible only to the Company Admin): Allows the Company Admin/User to set thresholds for order subtotals. Users of this role require approval if the subtotal exceeds the set limit.
- Permissions for the Role: The Company Admin/User decides the access levels for the role: Company Information, Company Users, Company roles, Orders, Subscriptions, and History logs. Access levels can be set for viewing, adding, and editing purposes.
If a company user lacks access to the company's subscriptions, they can only view and edit their own subscriptions.
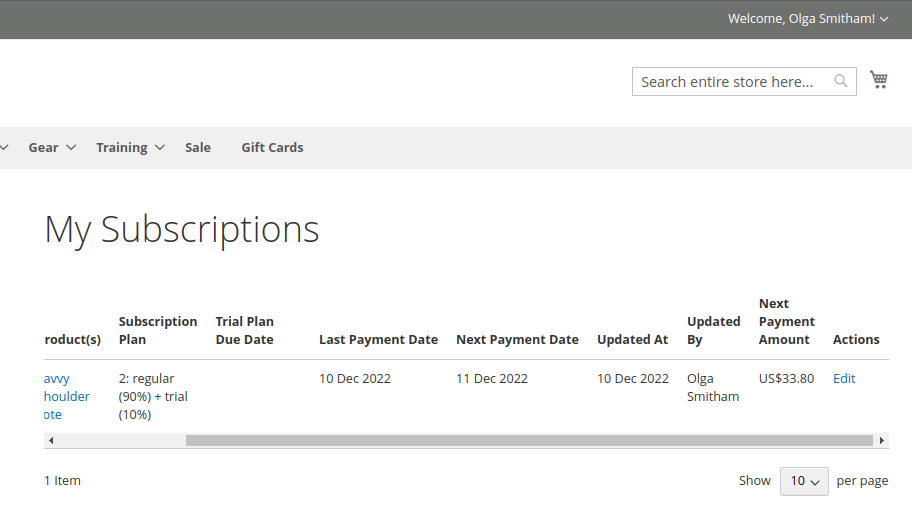
| If a company user with active subscriptions is deactivated by a company admin, the admin or users with appropriate permissions can view and edit all subscriptions. However, subsequent payments will not process, and subscriptions will be marked as "Suspended." |
| Company admins or users with sufficient permissions can only choose shipping addresses saved by the customer who originally purchased the subscription; adding their own or selecting another user's address is not possible. |
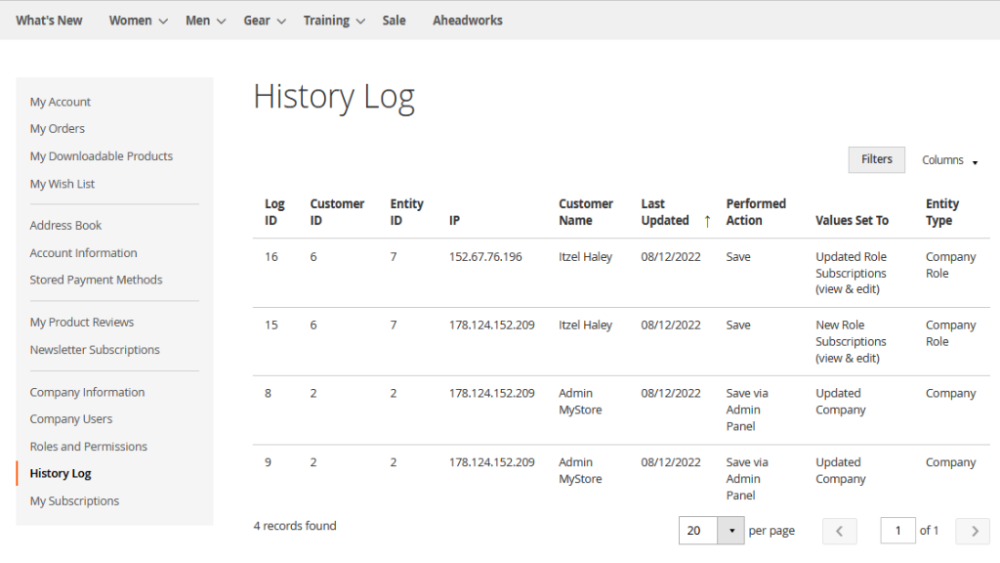
Store Admins and authorized users can monitor actions taken by child accounts on items/subscriptions via the History Log tab. Entries are sorted by the "Last Updated" column by default.
Logs are cleared during cron execution (frequency set in Configuration - Daily, Weekly, Monthly). If History Log is disabled, records are not cleared even if cron has been run.
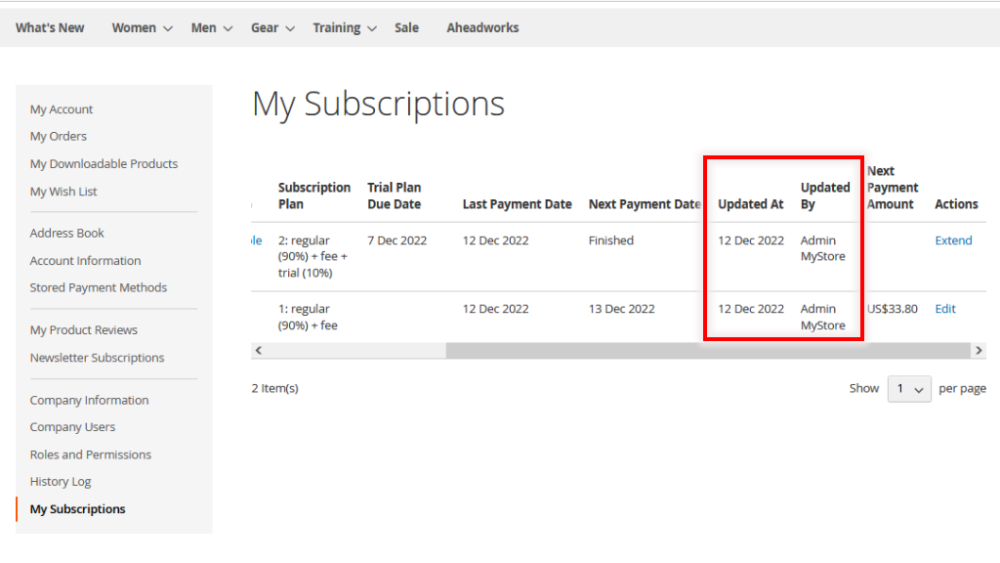
When the History Log is enabled, new columns "Updated At" and "Updated By" are added to the My Subscriptions grid.
Advanced Reports for Magento 2
When the Advanced Subscription Products is in integration with Advanced Reports for Magento 2, it becomes possible to overview the statistics.
If you haven't installed the Advanced Reports module, please refrain from installing module-sarp2-reports package.
| Note: Please, make sure you also install and enable module-sarp2-reports, which will provide the integration between Advanced Subscription Products and Advanced Reports modules. |
Dashboard: Analytics & Metrics
Dashboard reporting is a visual representation of your company's key performance indicators. It is an ability to have all valuable information and metrics concerning subscription business in one place. Merchants can quickly overview all subscription business statistics without opening too many tabs and getting deeper into each report.
From the backend go to Reports > Advanced Subscription Products by Aheadworks > Dashboard.
This page consists of charts and metric widgets. Admin can change each widget by clicking on the triangle at the top right corner of the widget.

The extension offers analytical reports to provide you with some meaningful information on the performance of the subscription business.
1. Initial vs Recurrent Sales Report
The Initial Vs Recurrent report shows the Initial and Recurrent Orders Sales dynamics.
This graph features data against such metrics as Initial Orders, Initial Qty,Initial Total, Initial Invoiced, Recurrent Orders, Recurrent Qty, Recurrent Total and Recurrent Invoiced.

For simple segmentation, the reports come with filtering options. Those include the store view and customer group filters.
The date range can be selected in the flexible calendar:

In the provided calendar, you can specify any date or date range either by clicking the required dates or by indicating the interval manually. Once the date has been selected, click Apply to refresh the report page.
Below the graph, you can see the reporting table providing metrics of Initial and Recurrent Orders.

2. Growth Rate Report
The Growth Rate Report shows an increase in the number of subscriptions compared to the initial period.
This report features data against such metrics as Subscriptions at the Beginning, Subscriptions at the End and Growth Rate.
Subscriptions at the End – total amount of all active subscriptions at the end of the period.
Subscriptions at the Beginning - total amount of all active subscriptions at the beginning of the period.
Growth Rate - the percentage change of new subscribers within a specific time period. If a quantity of subscriptions at the beginning equals “0“ (zero), then the growth rate will always be “0%“ (because “0” is in the denominator of the formula).
For simple segmentation, the reports come with filtering options. Those include the store view and customer group filters.
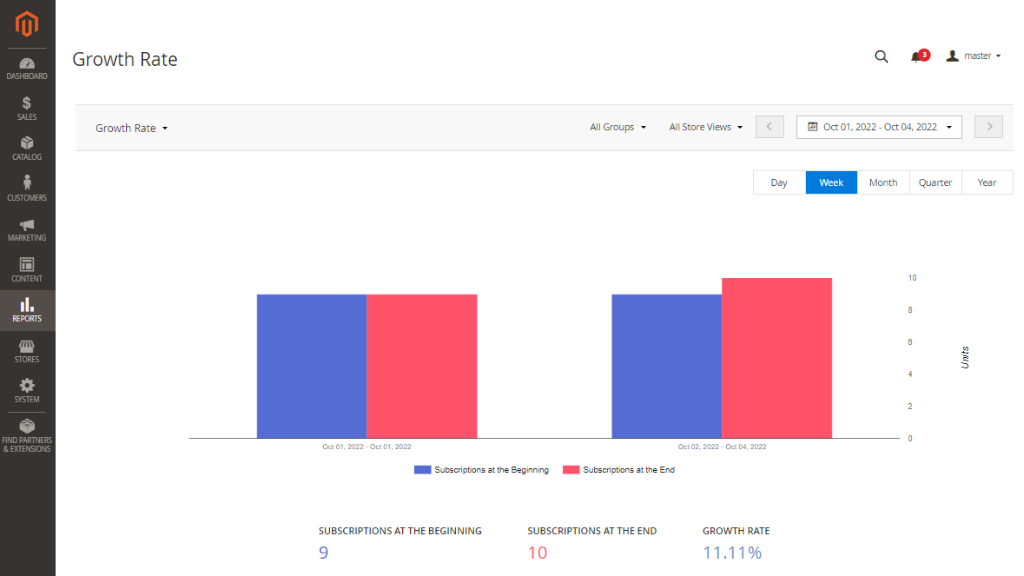
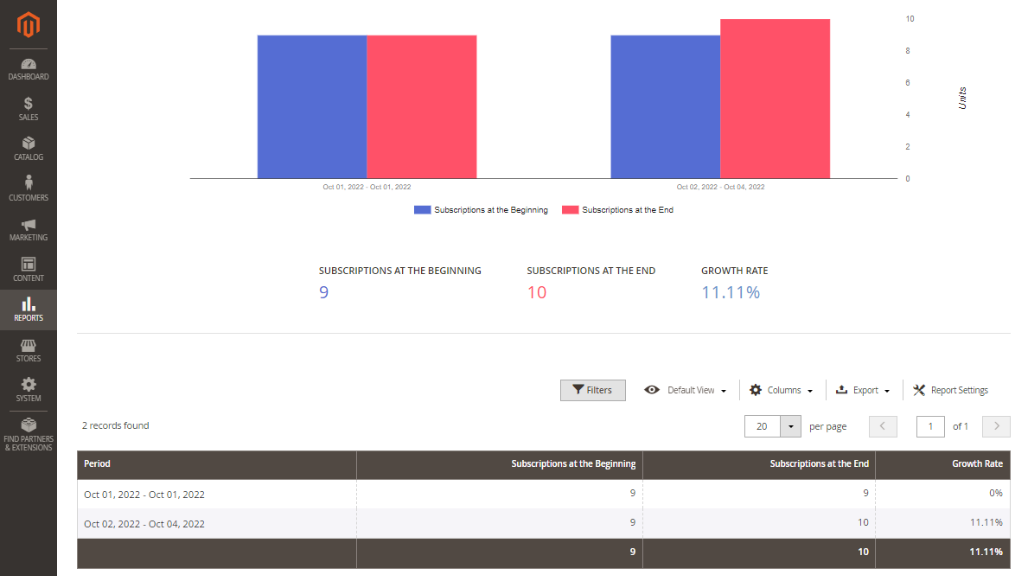
Below the graph, you can see the reporting table providing metrics of Subscriptions at the Beginning, Subscriptions at the End and Growth Rate.
Total data show arithmetic average result of selected period. Total data depends on a selected period in the calendar (it is not an arithmetic average result in column).
3. Churn Rate Report
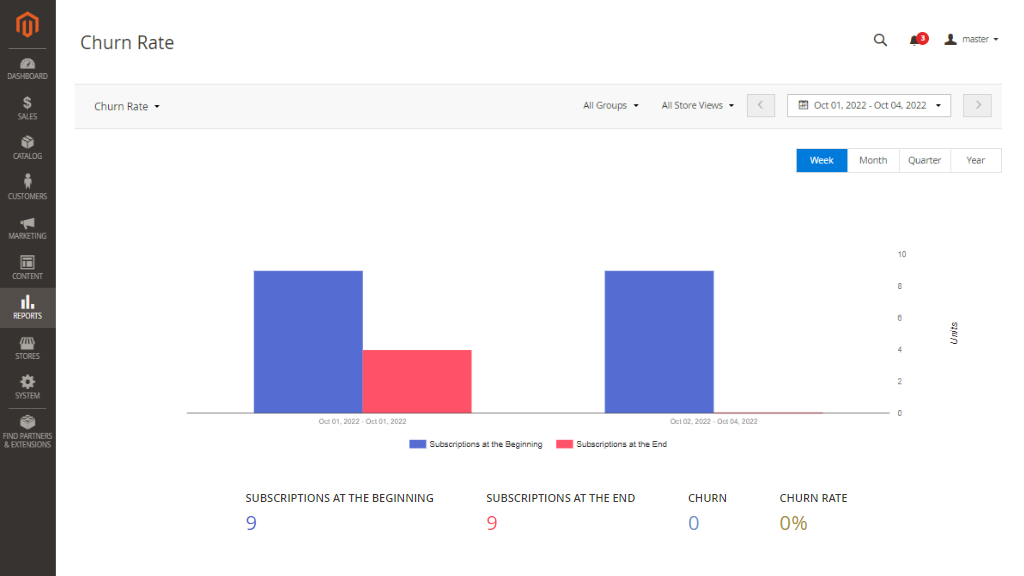
The Churn Rate Report shows churn rate from the selected start date to the selected end date.
This report features data against such metrics as Subscriptions at the Beginning, Subscriptions at the End, Churn, Churn Rate.
Subscribers at the Beginning - the number of subscribers at the beginning of the selected period.
Subscribers at the End - the number of subscribers at the end of the selected period.
Churn - amount of canceled/expired subscriptions.
Churn Rate - the percentage of increased or decreased subscriptions.
The Total statistics below chart reflects data from the period selected in the calendar and these results don’t depend on data in the grid.
For simple segmentation, the reports come with filtering options. Those include the store view and customer group filters.
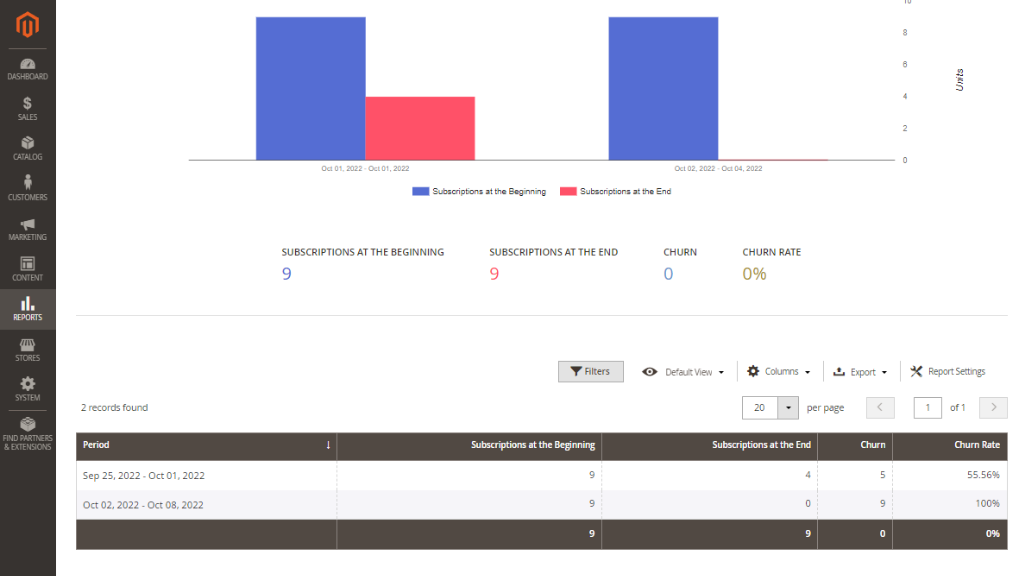
Below the chart, you can see the reporting table providing metrics of Subscriptions at the Beginning, Subscriptions at the End, Churn, Churn Rate.
Data in the grid reflects data from the selected period aggregated by week, month, quarter, year.
The last row in the grid shows statistics from totals and it doesn’t depend on previous rows.
4. Number of active subscribers Report
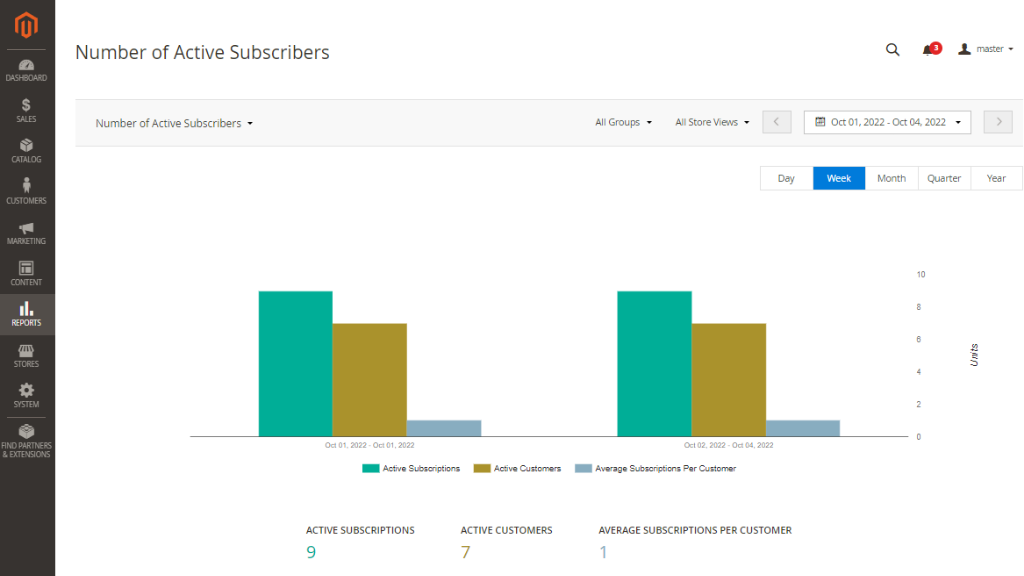
Number of Active Subscribers Report shows the number of customers who have active subscription profiles at a certain period.
This chart features data against such metrics as Active Subscriptions, Active Customers, Average Subscriptions Per Customer.
Average Subscriptions Per Customer - number of profiles divided per number of customers.
Active Subscriptions - subscriptions for which payments are currently being processed.
Active Customers - customers who have (at least) one active subscription.
For simple segmentation, the reports come with filtering options. Those include the store view and customer group filters.
Totals data shows the arithmetic average result of selected period.
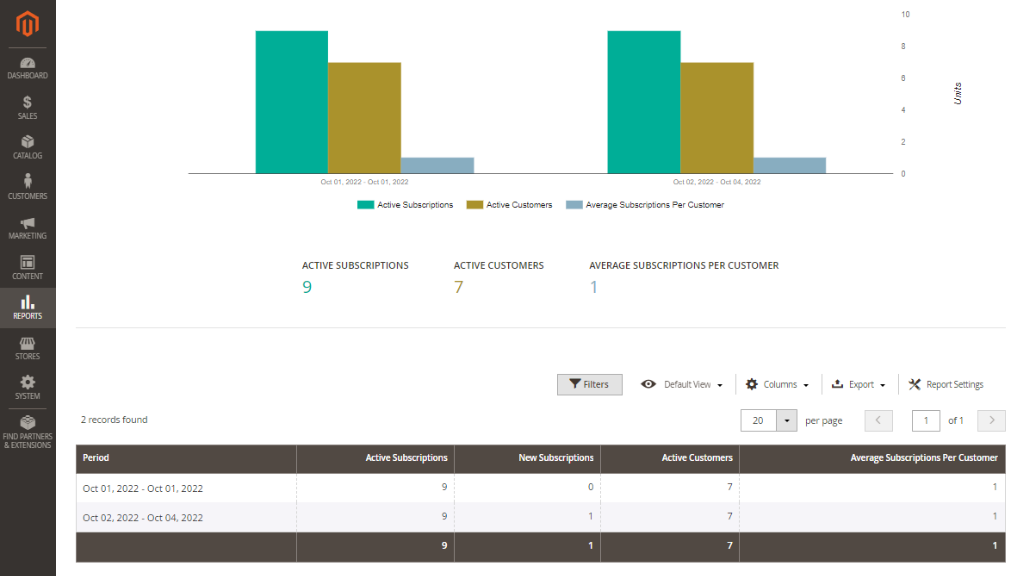
Below the chart, you can see the reporting table providing metrics of Active Subscriptions, New Subscriptions, Active Customers, Average Subscriptions Per Customer.
5. Average Revenue Per Customer Report (ARPC)
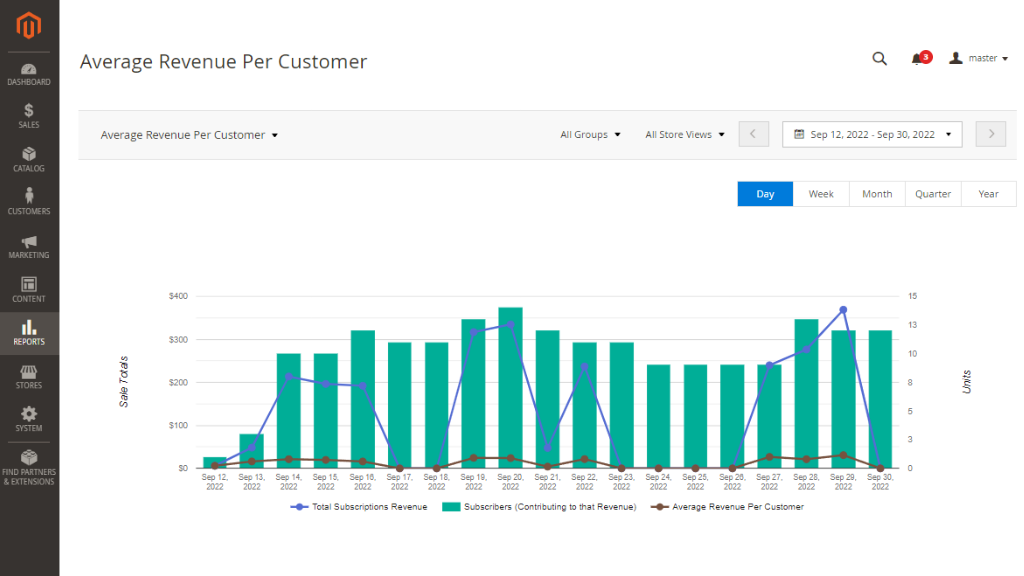
The Average Revenue Per Customer Report shows the total revenue generated by all customers during a certain period divided by the total number of customers.
This graph features data against such metrics as Total Subscriptions Revenue and Subscribers (Contributing to that Revenue).
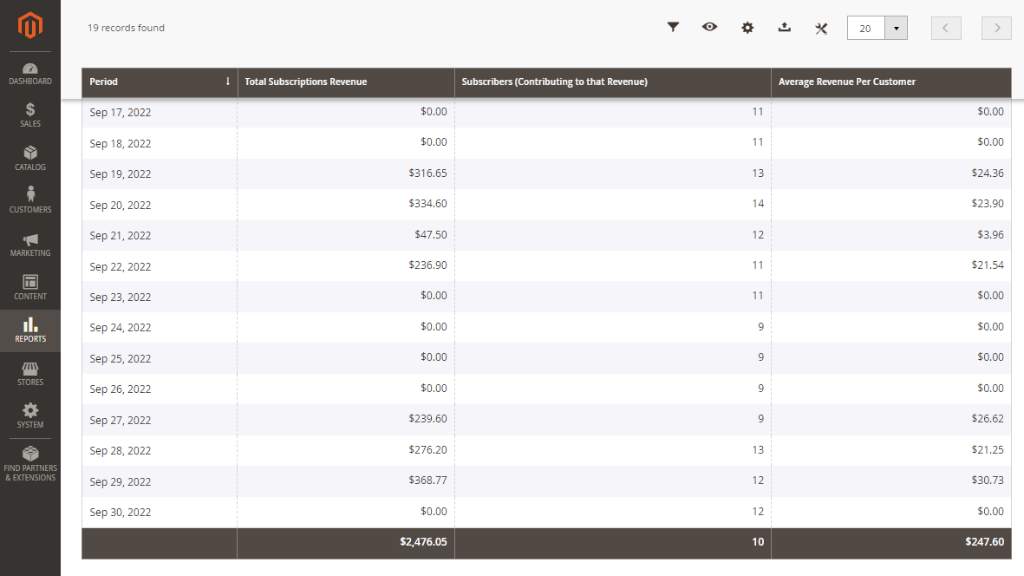
Below the graph, you can see the reporting table providing metrics of Total Subscriptions Revenue and Subscribers (Contributing to that Revenue).
6. LTV Report (Lifetime Value)
Lifetime Value Report shows the revenue you earn from a customer, subtracting out the money spent on serving them.
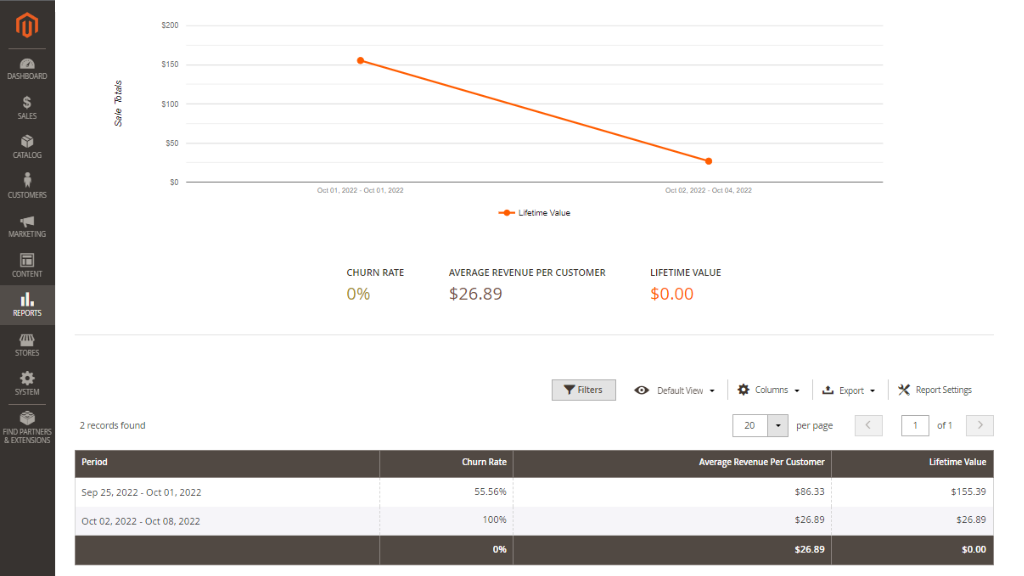
This graph features data against such metrics as Churn Rate, Average Revenue Per Customer and Lifetime Value.
Churn Rate - the percentage of increased or decreased subscriptions.
Average Revenue Per Customer - the average amount received from one user per subscription.
Lifetime Value - an average amount that shows how much money each user brings until their subscription ends.
For simple segmentation, the reports come with filtering options. Those include the store view and customer group filters.
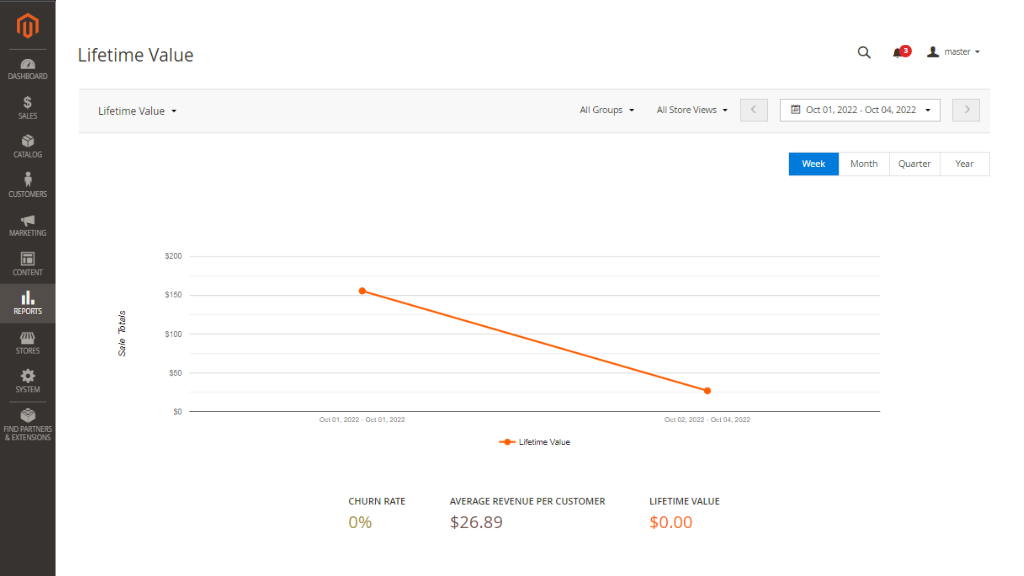
Below the graph, you can see the reporting table providing metrics of Churn Rate, Average Revenue Per Customer and Lifetime Value.
7. Monthly Recurring Revenue Report (MRR)
Monthly Recurring Revenue Report shows how much revenue subscriptions generate during each month. You can see if the subscription business is growing in terms of revenue and roughly estimate future sales based on the graph.
This graph features data about Total Recurring Revenue.
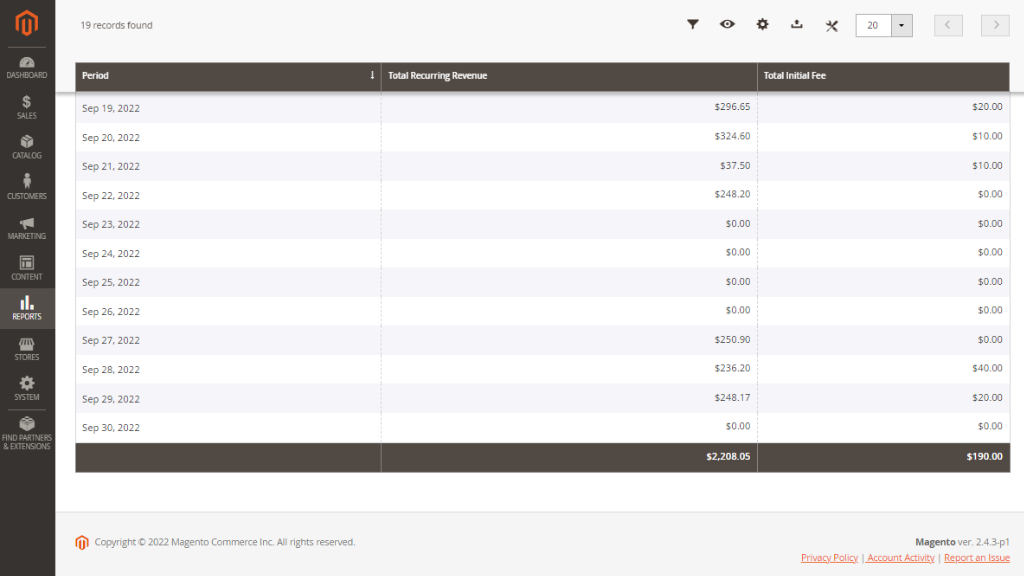
Recurring Revenue - total revenue from all subscription orders (including both recurrent and initial) in the period minus initial fee.
For simple segmentation, the reports come with filtering options. Those include the store view and customer group filters.
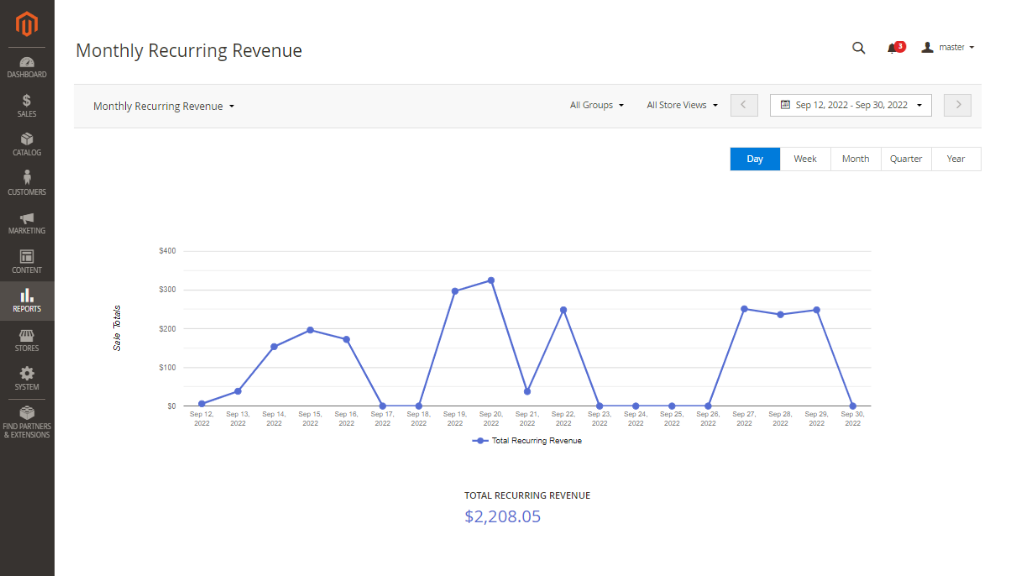
Below the graph, you can see the reporting table providing metrics of Total Recurring Revenue and Total Initial Fee.
8. Monthly Recurring Revenue Growth Report (MRR)
Monthly Recurring Revenue Report gives insights into the revenue generated from your subscriber base each month. In comparison with MRR Report, MRR Growth Report provides more detailed information regarding the growth and decline in monthly recurring revenue over time.
The MRR uses accrual accounting method which recognizes revenue when it is earned rather than when it is received. MRR isn’t equal monthly revenue from subscriptions, it is a specific metric that may correlate with it.
The report includes the following metrics:
- Reactivation - the revenue received from subscriptions that were previously canceled or churned but were reactivated during the month.
- Expansion - the additional revenue generated from existing customers, such as upgrades to their subscription plan or an increase in the quantity of products purchased.
- New - the revenue brought in by new customers who subscribed for the first time ever during the month.
- Churn - the revenue lost due to cancellations by customers.
Note: If a customer is charged during the month and then cancels, their churn will be attributed to the following month.
- Contraction - total reduction in Monthly Recurring Revenue compared to the previous month. This occurs when a customer remains subscribed but pays less due to a plan downgrade, discount, or reduced quantity of items in their subscription.
- Net MRR - the overall revenue growth or decline, calculated using the formula: Net MRR = Total Growth and Existing - Total Loss.
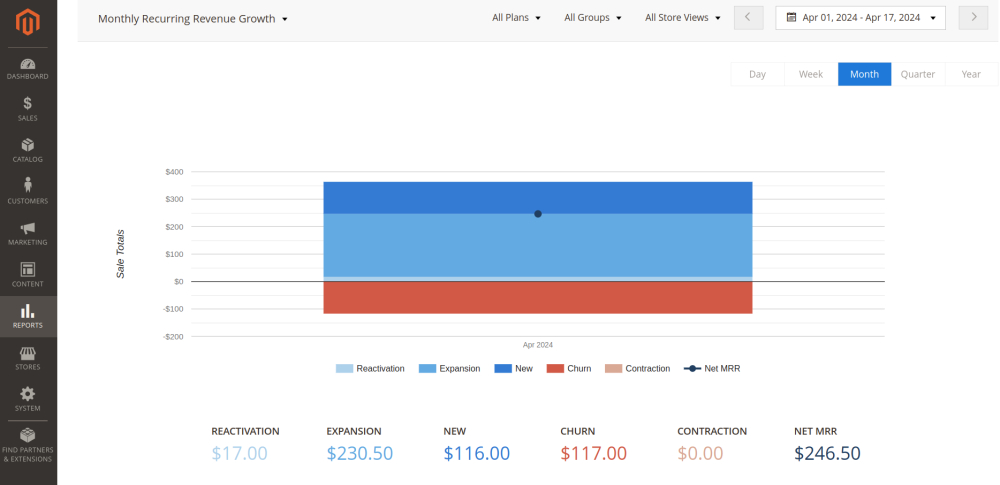
For simple segmentation, the reports come with filtering options.
Below the graph, you'll find a comprehensive reporting table displaying all the metrics described above along with two additional ones:
- Total Loss - this metric represents the overall reduction in revenue resulting from churn and contraction events.
- Total Growth - this metric reflects the total revenue growth generated from new subscribers, expansion, and reactivation.
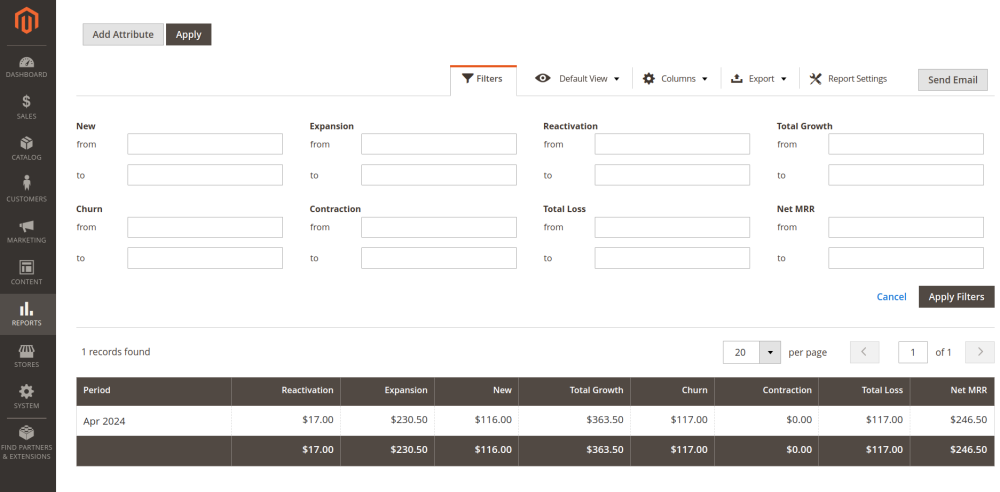
Simple Bundle Products for Magento 2
When the Advanced Subscription Products is integrated with Simple Bundle Product, it simplifies the creation of bundle products by minimizing the number of configuration options. With this extension, store admins can create and add bundles to new orders without additional customization. Customers can now select only the quantity of already configured bundles and add them to their cart without any prior customization.
To create a Simple Bundle Product, follow Catalog → Products, and in the Add Product dropdown, click on Bundle Product.
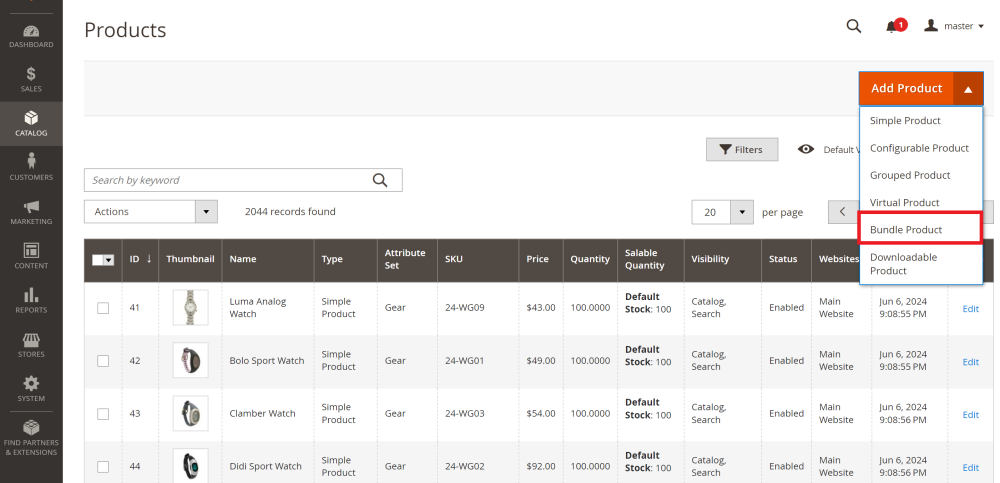
Then, at the New Product page use yes\no toggle to Switch to Simple Bundle

The pop-up alert will appear. Click “Сontinue” to confirm your action.

Note: After switching to Simple Bundle, If you have already had bundle options added, they will be deleted
Scroll down to the Bundle Items section and add the required bundle items.
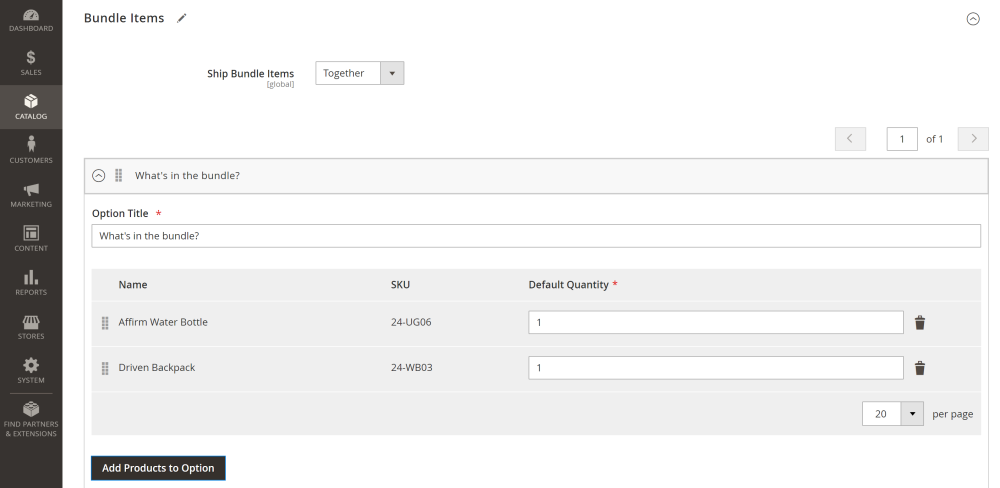
After all these steps have been completed, click on the Save button.
Simple Bundle Products on the Storefront
Simple Bundle Items are displayed as a list, where each item is linked to its respective detail page.
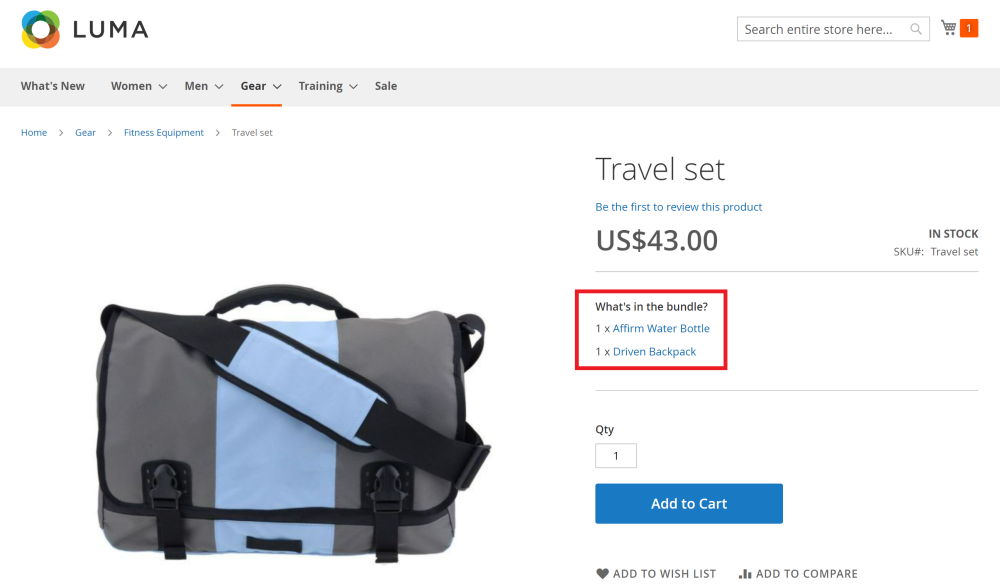
All the modifications have already been made by store admins on the backend, so all that is required from the customer is to decide on the quantity of the simple bundle and add the product to the cart.
Want to learn more about Advanced Subscription Products? Read the following articles:
Already used our product?
We would appreciate your feedback. Please, leave a review.


