Creating Configurable Products in Magento 2: Quick Tutorial
Categorized as : Magento 2 Extensions
Configurable products give online merchants new opportunities for organizing product assortments in their stores as well as improving the inventory of the management process.

Here, we will tell you how to create configurable products in a Magento 2 based store. But first, let’s consider the major advantages of these products compared to the simple ones.
Configurable products include various options, such as sizes, colors, and the like. Each option represents a simple product with a unique stock keeping unit (SKU). Meanwhile, for the simple products with custom options, every option is just a variation of the same product with the universal SKU.
Both types serve for creating products with customizable characteristics. Still, there are several notable differences between them.
The inventory of individual custom options of simple products cannot be managed, while for the configurable ones, each product variation, including SKU, pricing, and the like, is completely manageable.
In the case of simple products with custom options, merchants cannot sell each product variation separately. However, this is possible for those merchants who create configurable products in their stores.
Compared to the configurable products, custom options of the simple products are not included in catalog filters and website search.
In general, configurable products are much more effective than the simple ones, even with custom options. Still, it doesn’t mean that their use is always reasonable. The choice should depend on the specifics and size of a particular business.
For example, the first product type is more appropriate for the businesses that sell small product amounts with a few variations, while the second one works well for those businesses that sell large amounts with a variety of characteristics.
The work with configurable products is more time-consuming, as each product variation should be created and further managed individually on the store’s backend.
So, let’s consider how configurable products should be created in a Magento 2 store.
To start creating a configurable product, first, click on Catalog on the left sidebar of the Magento 2 Admin Panel and choose Products in the Inventory section.
You will be redirected to the Products grid with the whole catalog of the products in your store. Now, expand the Add Product box at the top right corner and select the Configurable Product option.
In the New Product menu opened, click on the Add Attribute button at the top of the menu and select the required attribute sets from the grid opened by ticking the boxes next to the corresponding attribute sets.
If the grid does not contain the attribute sets that you need, you can easily create the new ones by clicking on the Create New Attribute button.
Having selected the attribute sets, click on the Add Selected button to return to the New Product menu.
We will consider the example of the new product with the Gear attribute set. Note that custom attribute sets might have different configuration options.
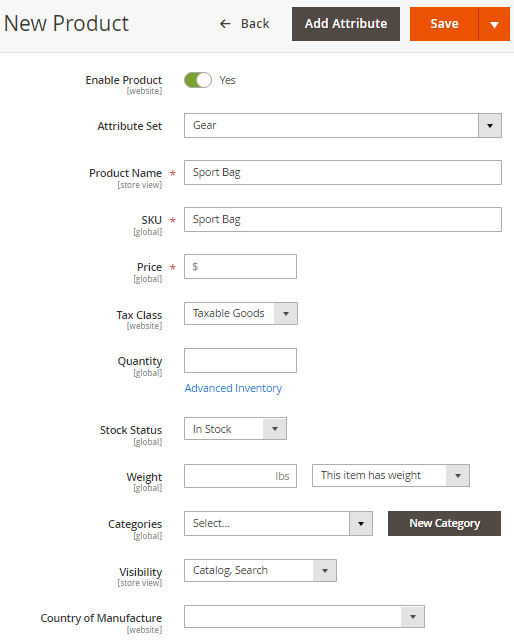
Now, you should complete the required settings for the product to be created in your catalog. To do this, first, enter the name of the new product in the corresponding field.
By default, the product’s SKU corresponds to its name, but you can change it if needed in the following field. Next, specify the product’s Price.
Note that you can set individual prices for different customer groups, add special prices, and the like for your product by clicking on the Advanced Pricing active link below the Price field. The link will become available after you save the new product.
Now, define the Tax Class of your product by choosing between the following two options:
Having set the tax class of the product, specify its Quantity and set the Stock Status.
If you need to set some additional inventory settings, click on the Advanced Inventory active link below the Quantity field.
If the product to be created is physical, choose the This Item has weight option next to the Weight field and specify the required value (in lbs) in the field.
Next, assign the Categories of your product. In the corresponding box, you can precisely specify categories, including subcategories, by ticking the boxes next to the corresponding category names.
Having selected the categories, click on the Done button at the bottom of the Categories box.
If needed, you can create new categories and subcategories and assign them to the new product by clicking on the New Category button next to the Categories field.
After this, define the Visibility of your product by choosing among the following options:
Next, select the Country of Manufacture in the corresponding box.
The following next set of options is custom, and it is provided since we chose the Gear attribute set at the very beginning. Those options relate to the product-specific characteristics, including Activity, Material, Color, Gender, and so on. Specify each option as required and then click on the Save button to create the new product in the catalog.
Note that you can also add the description of your product with some visual data and links by taking advantage of the convenient WYSIWYG editor in the Content section of the New Product menu.
Now, let’s find out how to set up the configurations of our product’s variations.
Having specified the basic characteristics of the product, expand the Configuration section under Content and click on the Create Configurations button.
At the first step, you will be offered to choose the attributes from the corresponding grid by checking the boxes next to the appropriate attribute names. The grid contains all the attributes from the earlier chosen attribute set.
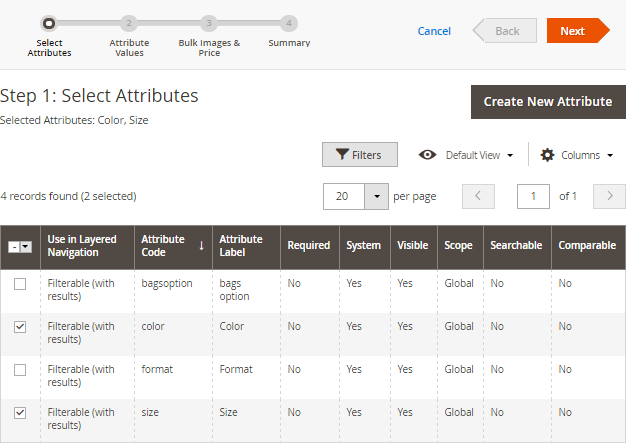
If needed, you can add new attributes by clicking on the Create New Attribute button. The newly created attribute will be automatically added to the attributes grid.
Having selected the attributes required for your configuration, say, Color and Size as in our example, click on the Next button to proceed to the next step.
For the selected Color and Size attributes, you should now choose the corresponding values by marking the boxes next to the corresponding values. Note that you can easily select or deselect all the available attribute values by clicking on the Select All and Deselect All active links accordingly.
You can rearrange the attributes by grabbing the corresponding box next to the attribute name. On the picture below, this box is highlighted in red.
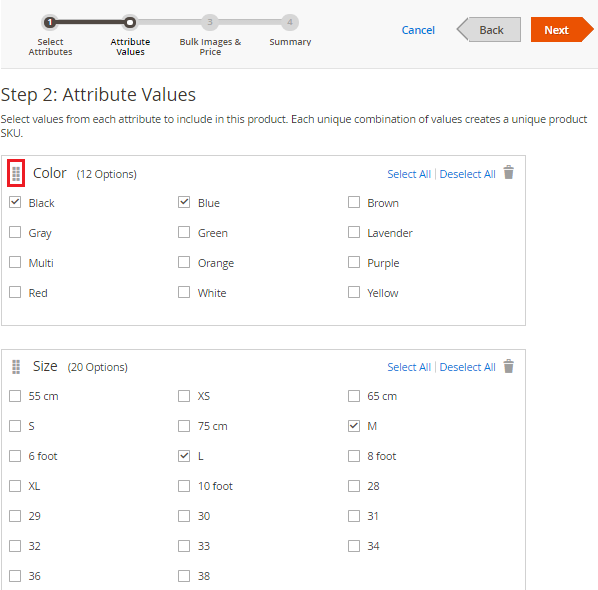
In our example, we selected the Black and Blue values for Color and the L and M values for Size. Based on our selection, four new product items, each with its own SKU, will be created.
Having selected the required attribute values, click on the Next button.
Now, you should configure the Images, Price, and Quantity parameters for your newly created products. Let’s consider each parameter individually.
In the Images section, choose the Apply unique images by attribute to each SKU option and select the attribute in the corresponding box that the image will illustrate, for example, Color. Upload the required images for each attribute value selected earlier, in our case, these are Black and Blue.
In the Price section, you are free to choose between the following options depending on your goals:
In the Quantity section, choose between the following options:
After the configuration is completed, click on the Next button.
You will be redirected to the product variations grid. Now, click on the Generate Products button above the grid.
The additional parameters for product variations, including Product Reviews, Images and Videos, Search Engine Optimization, and the like are optional. Check the official user guide to find out how to configure them.
The new product is created! Now, set the Enable Product option to Yes to publish the product in your store’s catalog.
As you can see the whole process is easy and straightforward, in fact, so you can create several configurable products in Magento 2 in just a few minutes.

Here, we will tell you how to create configurable products in a Magento 2 based store. But first, let’s consider the major advantages of these products compared to the simple ones.
Which Product Type is More Effective?
Configurable products include various options, such as sizes, colors, and the like. Each option represents a simple product with a unique stock keeping unit (SKU). Meanwhile, for the simple products with custom options, every option is just a variation of the same product with the universal SKU.
Both types serve for creating products with customizable characteristics. Still, there are several notable differences between them.
Inventory Management
The inventory of individual custom options of simple products cannot be managed, while for the configurable ones, each product variation, including SKU, pricing, and the like, is completely manageable.
Selling
In the case of simple products with custom options, merchants cannot sell each product variation separately. However, this is possible for those merchants who create configurable products in their stores.
Search and Filtering
Compared to the configurable products, custom options of the simple products are not included in catalog filters and website search.
In general, configurable products are much more effective than the simple ones, even with custom options. Still, it doesn’t mean that their use is always reasonable. The choice should depend on the specifics and size of a particular business.
For example, the first product type is more appropriate for the businesses that sell small product amounts with a few variations, while the second one works well for those businesses that sell large amounts with a variety of characteristics.
The work with configurable products is more time-consuming, as each product variation should be created and further managed individually on the store’s backend.
So, let’s consider how configurable products should be created in a Magento 2 store.
Creating Configurable Products in Magento 2
Creating a Product
To start creating a configurable product, first, click on Catalog on the left sidebar of the Magento 2 Admin Panel and choose Products in the Inventory section.
You will be redirected to the Products grid with the whole catalog of the products in your store. Now, expand the Add Product box at the top right corner and select the Configurable Product option.
In the New Product menu opened, click on the Add Attribute button at the top of the menu and select the required attribute sets from the grid opened by ticking the boxes next to the corresponding attribute sets.
If the grid does not contain the attribute sets that you need, you can easily create the new ones by clicking on the Create New Attribute button.
Having selected the attribute sets, click on the Add Selected button to return to the New Product menu.
We will consider the example of the new product with the Gear attribute set. Note that custom attribute sets might have different configuration options.

The New Product Menu
Now, you should complete the required settings for the product to be created in your catalog. To do this, first, enter the name of the new product in the corresponding field.
By default, the product’s SKU corresponds to its name, but you can change it if needed in the following field. Next, specify the product’s Price.
Note that you can set individual prices for different customer groups, add special prices, and the like for your product by clicking on the Advanced Pricing active link below the Price field. The link will become available after you save the new product.
Now, define the Tax Class of your product by choosing between the following two options:
- None – the tax is not imposed;
- Taxable Goods – the product is taxable.
Having set the tax class of the product, specify its Quantity and set the Stock Status.
If you need to set some additional inventory settings, click on the Advanced Inventory active link below the Quantity field.
If the product to be created is physical, choose the This Item has weight option next to the Weight field and specify the required value (in lbs) in the field.
Next, assign the Categories of your product. In the corresponding box, you can precisely specify categories, including subcategories, by ticking the boxes next to the corresponding category names.
Having selected the categories, click on the Done button at the bottom of the Categories box.
If needed, you can create new categories and subcategories and assign them to the new product by clicking on the New Category button next to the Categories field.
After this, define the Visibility of your product by choosing among the following options:
- Not Visible Individually;
- Catalog;
- Search;
- Catalog, Search.
Next, select the Country of Manufacture in the corresponding box.
The following next set of options is custom, and it is provided since we chose the Gear attribute set at the very beginning. Those options relate to the product-specific characteristics, including Activity, Material, Color, Gender, and so on. Specify each option as required and then click on the Save button to create the new product in the catalog.
Note that you can also add the description of your product with some visual data and links by taking advantage of the convenient WYSIWYG editor in the Content section of the New Product menu.
Now, let’s find out how to set up the configurations of our product’s variations.
Adding Configurations
Having specified the basic characteristics of the product, expand the Configuration section under Content and click on the Create Configurations button.
At the first step, you will be offered to choose the attributes from the corresponding grid by checking the boxes next to the appropriate attribute names. The grid contains all the attributes from the earlier chosen attribute set.

The Attributes Selection Stage
If needed, you can add new attributes by clicking on the Create New Attribute button. The newly created attribute will be automatically added to the attributes grid.
Having selected the attributes required for your configuration, say, Color and Size as in our example, click on the Next button to proceed to the next step.
For the selected Color and Size attributes, you should now choose the corresponding values by marking the boxes next to the corresponding values. Note that you can easily select or deselect all the available attribute values by clicking on the Select All and Deselect All active links accordingly.
You can rearrange the attributes by grabbing the corresponding box next to the attribute name. On the picture below, this box is highlighted in red.

The Attribute Values Selection Stage
In our example, we selected the Black and Blue values for Color and the L and M values for Size. Based on our selection, four new product items, each with its own SKU, will be created.
Having selected the required attribute values, click on the Next button.
Now, you should configure the Images, Price, and Quantity parameters for your newly created products. Let’s consider each parameter individually.
In the Images section, choose the Apply unique images by attribute to each SKU option and select the attribute in the corresponding box that the image will illustrate, for example, Color. Upload the required images for each attribute value selected earlier, in our case, these are Black and Blue.
In the Price section, you are free to choose between the following options depending on your goals:
- Apply single price to all SKUs – for the universal price of all product variations. In this case, enter the required price value in the corresponding field below.
- Apply unique prices by attribute to each SKU – for individual prices of variations. In this case, you should set prices for each attribute value separately by choosing attributes in the corresponding box.
In the Quantity section, choose between the following options:
- Apply single quantity to each SKUs – specify the universal quantity value for all variations in the field below.
- Apply unique quantity by attribute to each SKU – specify individual quantities for each attribute value by choosing the corresponding attributes in the Select attribute box.
After the configuration is completed, click on the Next button.
You will be redirected to the product variations grid. Now, click on the Generate Products button above the grid.
The additional parameters for product variations, including Product Reviews, Images and Videos, Search Engine Optimization, and the like are optional. Check the official user guide to find out how to configure them.
The new product is created! Now, set the Enable Product option to Yes to publish the product in your store’s catalog.
As you can see the whole process is easy and straightforward, in fact, so you can create several configurable products in Magento 2 in just a few minutes.


