How to Manage Stock Inventory in Magento 2: Quick Tutorial
Categorized as : Ecommerce
To operate efficiently in the e-commerce field, store owners should rationally manage their stock inventories. The quantity of goods in a store should always be under control, and the Magento 2 sites are not the exception to the rule.
According to IHL Services only in 2020 the inventory distortion cost businesses $1.8T. These losses could be avoided with smart inventory management. In this article, we will describe how to manage stock inventory of a web store that runs on Magento 2.
In general, Magento 2 provides users with two options of inventory management: controlling the whole stock through the General Inventory Settings and configuring each product in a store individually through the Advanced Inventory Settings. Let’s consider each type of the settings in more detail.
General Inventory Settings
To configure General Inventory Settings, go to Stores in the Magento 2 Admin Panel and click on Configuration in the Settings section. Here, you should expand the Catalog tab and open the Inventory menu. Having done this, you will see two sections – Stock Options and Product Stock Options. To configure any of the options, expand its section. We will start with the Stock Options.
1. Stock Options
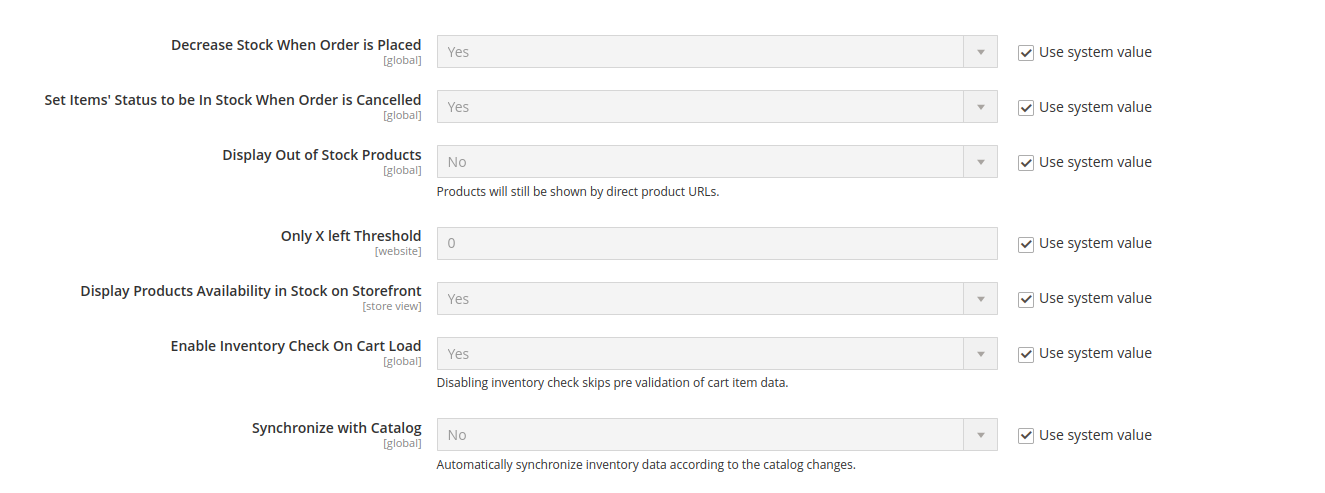
Stock Options Settings
The stock level of products will decrease every time their items are ordered if you choose Yes in the Decrease Stock When Order is Placed field. If you want the cancelled orders to be returned to your stock inventory, set the Set Items’ Status to be in Stock When Order is Cancelled field to Yes. Next, choose Yes in the Display Out of Stock Products field if you want to display the products that are currently out of stock on your catalog pages. You can allow customers to receive notifications if these products become available in your stock again by enabling the Product Alerts option in the corresponding section in Configuration.
Then, enter the required number in the Only X left Threshold field to specify the threshold value of the product items in your stock. If the quantity of the product items approaches this value, the notification message only “Only X Items Left” will be displayed on your product page. The “X” stands for the value you set. For more convenience, it’s recommended to configure this parameter for each product individually. In the following paragraph, we will describe how it can be done.
To display the “In Stock” or “Out of Stock” availability status of your products on frontend, select Yes in the Display Products Availability In Stock on Storefront field. If you want to automatically configure all the stock options settings, just tick the Use system value boxes next to the fields. The configuration of the stock options is completed. However, you should also consider configuring the settings for individual products in your stock inventory in the Product Stock Options.
You can also make the system check the inventory when loading a product in the cart. It helps to avoid out of stock errors. For it, set Yes in the Enable Inventory Check On Cart Load.
Finally, by enabling the Synchronize with Catalog option, you make inventory data be adjusted to the catalog changes.
2. Product Stock Options
In its turn, the Product Stock configuration makes it possible to specify general logic of the product management practice on the per product basis. First, expand the Product Stock Options panel in the Inventory menu in Catalog.

Product Stock Options Settings
To enable the functionality, set the Manage Stock option to Yes. In some cases, for example, when you sell virtual or downloadable products never coming out of stock, you can disable this function, if necessary. Next, determine the availability of the backorders service in your store by choosing between the following options:
- No Backorders – your customers will be not allowed to place backorders for the products that are out of stock;
- Allow Qty Below 0 – your web store starts to accept backorders when the quantity of the products in stock is below zero;
- Allow Qty Below 0 and Notify Customer – this option works the same way as the previous option, but with one major difference: your customers will be notified about the possibility to place backorders for products.
In the Maximum Qty Allowed in Shopping Cart field, specify the maximum quantity of products that customers can add to their shopping carts. Next, in the Out of Stock Threshold field, enter the threshold value of the product items. If the value specified approaches the quantity of the product in your stock inventory, a customer will see the “Out of Stock” notification message on the product page.
After this, set the minimum quantity of goods allowed to be added to a shopping cart by entering the required value in the Minimum Qty Allowed in Shopping Cart field. Here, you can also specify the customer group in the corresponding box for which the value specified in the field will be applied. Note that you can set individual quantity values for several customer groups by clicking on the Add Minimum Qty button that adds a new customer group correspondingly. If you need to delete the customer group, click on the Recycle Bin box under Action. In the Customer Group box, you can choose between the following options:
- ALL GROUPS – the specified minimum quantity value will be applied to all customer groups;
- NOT LOGGED IN – the value will be applied only for guest visitors;
- General – the option will be available only for the core audience;
- Wholesale – the option will be available for wholesalers;
- Retailer – the option will work only for retailers visiting your web store.
After this, set the required value in Notify for Quantity Below. The value entered corresponds to the quantity of the product in stock, according to which the “Out of Stock” notification message will be triggered. To activate the quantity increments option for the product, choose Yes in the Enable Qty Increments field. With this option, you can set the quantity of a product in a separate lot. The quantity can be set in Qty Increments that will appear below the Enable Qty Increments field.
If you want to return the refunded items into the stock, choose Yes in Automatically Return Credit Memo Item to Stock. You are all set now! Apply the configured basic settings by clicking on the Save Config button on the top of the Configuration panel. You can use the default values for the most part of product stock options by ticking the Use system value boxes next to the fields.
Note that particular products in your stock inventory can be configured individually apart from the global store and might have own and different settings. Let’s consider the Advanced Inventory Settings.
CREATE A MULTILANGUAGE WEBSITE IN JUST A FEW STEPS WITH LANGSHOP!

Advanced Inventory Settings
To access the Advanced Inventory Settings, go to the Products menu in your Magento 2 Admin Panel. Here, you should open Catalog in the Inventory section. In Catalog, choose the product to be configured and click on the Edit button. On the window opened, find the Quantity option among all settings and click on the Advanced Inventory button below.
Note that Magento 2 has two advanced settings methods: With Stock Management and Without Stock Management. The first method has a wider set of options than the second one. With it, you can completely configure the settings of individual products in stock - from quantity and threshold values to the stock status. The second method, in turn, offers only a few options and can be used for the products managed mostly under the global settings with only few necessary individual changes. Let’s consider each method individually.
1. With Stock Management Method

With Stock Management Method Settings
To start the configuration of the method, choose Yes in the Manage Stock box. In the Qty field, select the number of the product items that are currently in stock. Next, specify the threshold value in the Out-of-Stock Threshold field. Approaching to this value, the quantity of the product in stock will be marked on the product page as “Out of Stock”. In the Minimum and Maximum Qty Allowed in Shopping Cart fields, set the minimum and maximum quantity of the product items that can be added to a shopping cart.
After this, decide whether your customers can enter values in decimal format for the quantity of the product items ordered by choosing between the following two options:
- Yes – enters order quantity values in the decimal format, which is suitable for the products sold by length, weight, or volume;
- No – permits to enter only whole numbers as order quantity values.
If you want to provide separate shipments of your products, choose Yes in the Allow Multiple Boxes for Shipping field.
Then, decide how backorders should be managed by choosing between the No Backorders, Allow Qty Below 0, Allow Qty Below 0, and Notify Customer options in the Backorders box. All these options were described in the previous section. In the Notify for Quantity Below field, set the value that will correspond to the number of products in stock, which is below the threshold value specified earlier.
To sell product items in individual lots, set Enable Qty Increments to Yes. Having enabled the option, specify the quantity of the product items per lot in the Qty Increments field below.
Finally, select the product availability status in the Stock Status field by choosing between the following two options:
- In Stock – the product is in stock and available for purchase;
- Out of Stock – The product can’t be purchased in the store. However, you can activate the Backorders option for those products that are currently out of stock.
Configuration completed. Now, click on the Done button at the top of the Advanced Inventory menu to apply the settings. Note that you can use the default values for the most part of options in the settings by ticking the Use Config Settings boxes next to the fields. In this case, the system will automatically assign default values to corresponding fields. The settings for individual products in your stock inventory can be configured in a “quick mode” without stock management options. In the following paragraph, we will consider how it can be done.
2. Without Stock Management Method

Without Stock Management Method Settings
To choose this method, just leave No in the Manage Stock field.
Next, define the minimum and maximum quantity of the product that can be purchased within one order in the Minimum and Maximum Qty Allowed in Shopping Cart fields. The users of the Magento 2 Enterprise edition can also enable the Use Deferred Stock Update option by selecting Yes in the field below. The option updates inventory quantity indicators asynchronously after product orders are placed.
Finally, activate the Enable Qty Increments option by setting it to Yes. Next, set the number of the product items in a lot in the Qty Increments field. You can assign the default values for all the above-described options by ticking the Use Config Settings boxes for each field. The method is configured! Save the settings by clicking on the Done button.
Conclusion
With the inventory management options, you can efficiently organize the work of your web store on all levels of stock inventory. So, decide to what extent your stock should be managed by choosing between the General and Advanced Inventory Settings, or by configuring them both, and sell professionally!


