
User Manual - Smart One Step Checkout
- Installing M2 One Step Checkout
- Uninstalling M2 One Step Checkout
- Compatibility
- Introducing M2 Smart One Step Checkout
- Extension Settings
- Delivery Methods
- Checkout Performance Reports
- Getting Around
- Supported Payment Options
- Integrations
- Tips and Tricks
Magento 2 Smart One Step Checkout ensures the flawless checkout process with a one-step checkout page. With the module, you can configure newsletter subscription, delivery dates, address auto completion, GeoIP detection, customizing billing and shipping sections, etc. Analytical reports demonstrate general and detailed (per form) checkout abandonment stats.
Installing M2 One Step Checkout
Command Line Installation
- Backup your web directory and store database
- Download the Smart One Step Checkout installation package
- Upload the contents of the Smart One Step Checkout installation package to your store root directory
- In the SSH console of your server, navigate to your store root folder:
cd path_to_the_store_root_folder |
run:
php bin/magento module:enable Aheadworks_OneStepCheckout |
If you want to install Avalara AvaTax module, then run:
Note: Do not install this module if you are not using Avalara AvaTax, as it may cause errors.
php bin/magento module:enable Aheadworks_OneStepCheckoutAvalara |
then:
php bin/magento setup:upgrade |
after:
php bin/magento setup:static-content:deploy -f |
5. Flush store cache; log out from the backend and log in again
|
Make sure the installation is done from the FTP Administrator account. Otherwise, set 775 permissions to the store root directory after the extension is deployed. |
Composer Installation
- If you are installing an extension from Aheadworks for the first time, you need to add our composer repository to your Magento store:
Login to your ssh console and navigate to your store folder:
cd path_to_the_store_root_folder |
Run the following command:
composer config repositories.aheadworks composer https://dist.aheadworks.com/ |
On successful execution of the command you will be able to use the composer to install the extensions.
To install the extension:
2. Login to your ssh console and navigate to your store folder:
cd path_to_the_store_root_folder |
3. Run the following command to install the latest version of the extension:
composer require aheadworks/module-onestepcheckout |
if you need to install a specific version, run this command:
composer require aheadworks/module-onestepcheckout:<version> |
|
Specify the version of the extension in <version> |
When prompted, enter Public Key (Username) and Private Key (Password):
.png?version=1&modificationDate=1613401999884&cacheVersion=1&api=v2&width=450)
Both Public Key (Username) and Private Key (Password) can be found in My Projects and Licenses in your personal account on our site:
 |
Run the following command if you want to install Avalara AvaTax module:
Note: Do not install this module if you are not using Avalara AvaTax, as it may cause errors
composer require aheadworks/module-onestepcheckout-avalara |
4. Enable the extension:
php -f bin/magento module:enable Aheadworks_OneStepCheckout |
If Avalara is installed:
php bin/magento module:enable Aheadworks_OneStepCheckoutAvalara |
Next, register the extension:
bin/magento setup:upgrade |
Recompile your Magento store if you are in the Production mode:
bin/magento setup:di:compile |
To verify that the extension is enabled, run this command:
bin/magento module:status |
Clean store cache, by running the following command:
bin/magento cache:clean |
Log out and Log in the backend again.
To upgrade the extension:
5. To update or upgrade an extension:
Download the updated extension file. Take note of the module-name and version. Export the contents to your Magento root.
If a composer package exists for the extension, run one of the following.
Update per module name:
composer update aheadworks/module-onestepcheckout |
Updater per version:
composer require aheadworks/module-onestepcheckout:<version> |
Run the following commands to upgrade, deploy, and clean the cache.
php bin/magento setup:upgrade --keep-generated |
Uninstalling M2 One Step Checkout
Since Magento introduced declarative Database you need to be very carefull when uninstalling or disabling the module.
|
NOTE: Please be very careful when uninstalling/disabling this module. This module uses a declarative DB scheme. Once the module is uninstalled the DB tables will be lost. |
Manual Removal
1. Disable the module by executing the following commands:
php bin/magento module:disable Aheadworks_OneStepCheckout |
2. Remove the extension files from the following folder:
app/code/Aheadworks/OneStepCheckout |
Automatic Removal (via Composer)
1. Disable the module by executing the following commands:
php bin/magento module:uninstall Aheadworks_OneStepCheckout |
Compatibility
|
Module Version |
Magento Version |
|
2.1.4 and earlier versions |
2.3.Х - 2.3.6 2.4.0 - 2.4.3 |
|
As of version 2.1.5 |
2.3.7-p3+ 2.4.0 - 2.4.4 |
|
As of version 2.1.8 |
2.3.7-p3+ 2.4.0 - 2.4.5 |
|
As of version 2.2.1 |
2.4.4 - 2.4.5 |
|
As of version 2.5.1 |
2.4.4 - 2.4.6 |
|
As of version 2.8.1 |
2.4.5 - 2.4.7 |
|
As of version 2.8.9 |
2.4.6 - 2.4.8 |
The PHP version depends on your current Magento version. Please, refer to your Magento version release notes.
Introducing M2 Smart One Step Checkout
The Magento 2 Smart One Step Checkout extension streamlines the checkout process by turning the usual multi-step checkout into a single-step page. Moreover, it introduces the following powerful features:
-
Best checkout practices;
-
Advanced built-in analytics;
-
Flexible checkout settings;
-
Form auto-completion and default values;
-
Delivery date and notice fields.
Extension Logic
Once installed, the module replaces the native Magento checkout with a full-fledged single-step checkout page. There, the customer can find all the required options: login, payment and shipping info, etc. Moreover, the page enhances customer experience with field auto-completion, country IP auto-detection, Google form auto-completion, and other features. An admin, in turn, can rename and rearrange checkout fields at their convenience.
To cover all aspects of the checkout process and provide a store owner with a constant possibility to improve, the extension comes with a set of checkout progression reports. The reports show overall and detailed checkout abandonment stats (checkout field completion rates) for quick and meaningful checkout page adjustments.
Integrations
- Gift Card
- Store Credit and Refund
- Reward Points
- Payment Restrictions
- Company Accounts
- Customer Attributes
- Social Login
- NMI Payment
Extension Settings
The extension settings page can be found under Stores → Configuration → AHEADWORKS EXTENSIONS → One Step Checkout. On this page, you can control the overall extension behavior, adjust checkout field names, display orders, upload trust seals, and more.
General Settings
The General section comes with the following settings:
-
Enable Smart One Step Checkout - enables/disables OSC per store view;
-
Title - defines the title of the one-step checkout page;
-
Description - adds a message below the checkout page's title;
-
Apply Discount Code Enabled - defines if customers can apply discount coupons right on the checkout page;
-
Order Notes Enabled - defines if customers can leave notes to the admin. Order notes are available on the order details page;
-
Enable Address Autocomplete Suggestions - enables automated address suggestions provided by the Google Maps service;
-
Google API Key (available when 'Yes' in the above) - the Google Maps API key required to identify your store;
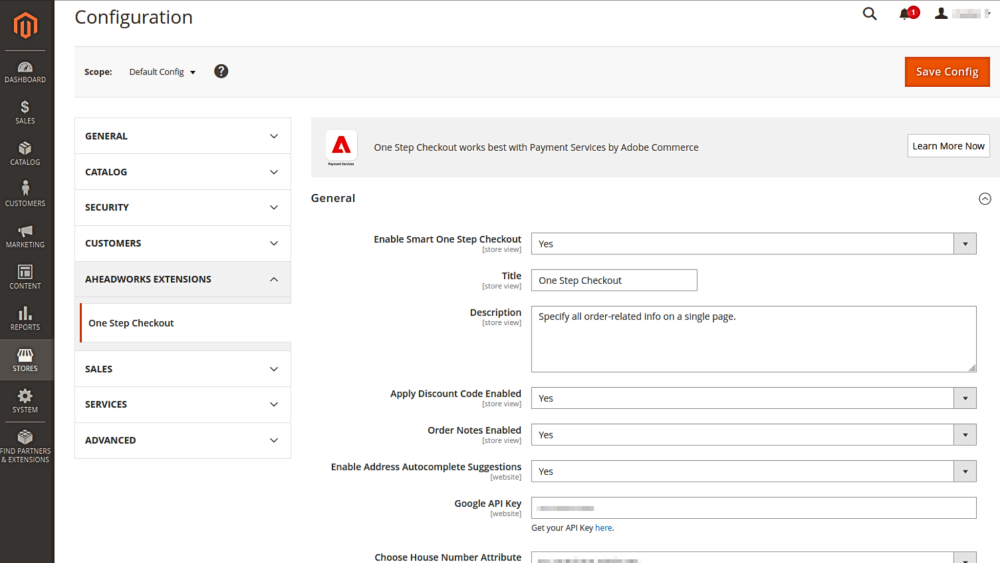
-
Choose House Number Attribute - enables validation, ensuring that customers cannot place an order without entering a valid House Number when using the Google Autocomplete feature;
-
Expand mini cart by default - sets the default layout for the mini cart;
-
Display Top Menu - enables/disables the top menu of the store at checkout;
-
Enable Checkout Reports - enables/disables reporting. When disabled, the report pages are unavailable from the menu;
-
Merge Gift Card and Coupon Code in One Field - enables/disables to merge gift card and coupon code in one field on the checkout;
-
Display Place Order Button Near Payment Methods - defines where to display the Place Order button;
-
Allow Edit Configurable Options - enables/disables configurable options change
-
When it's Yes, attributes are displayed in the dropdown and they can be edited on the checkout;
-
When it’s No, options are displayed in the text and they can't be edited.
-
- Allow Create an Account on the Checkout - enable to allow guest users to create an account on the Checkout Page;
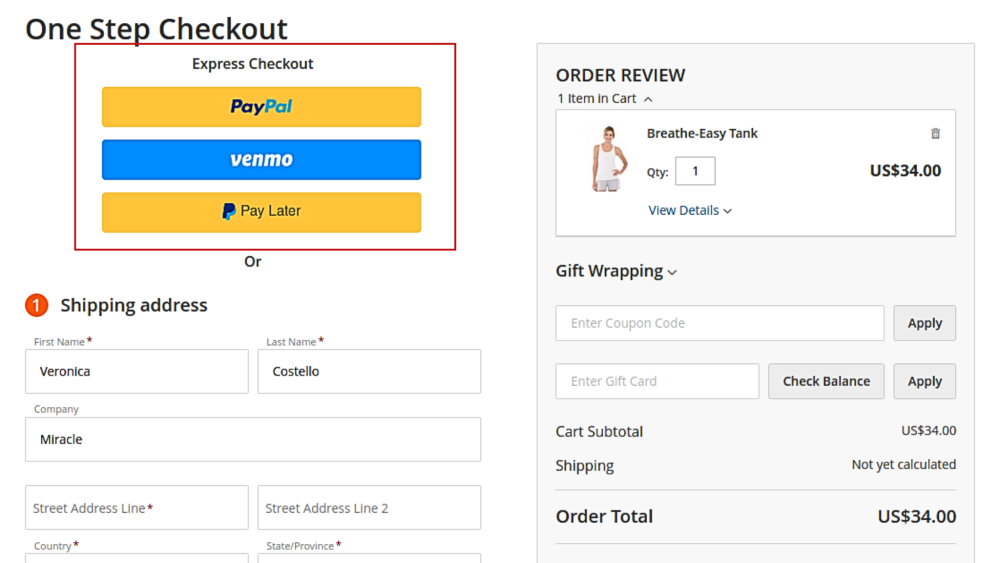
- Display Express Payments at the top of Checkout Page - enable to display express payment buttons at the very top of the checkout page.
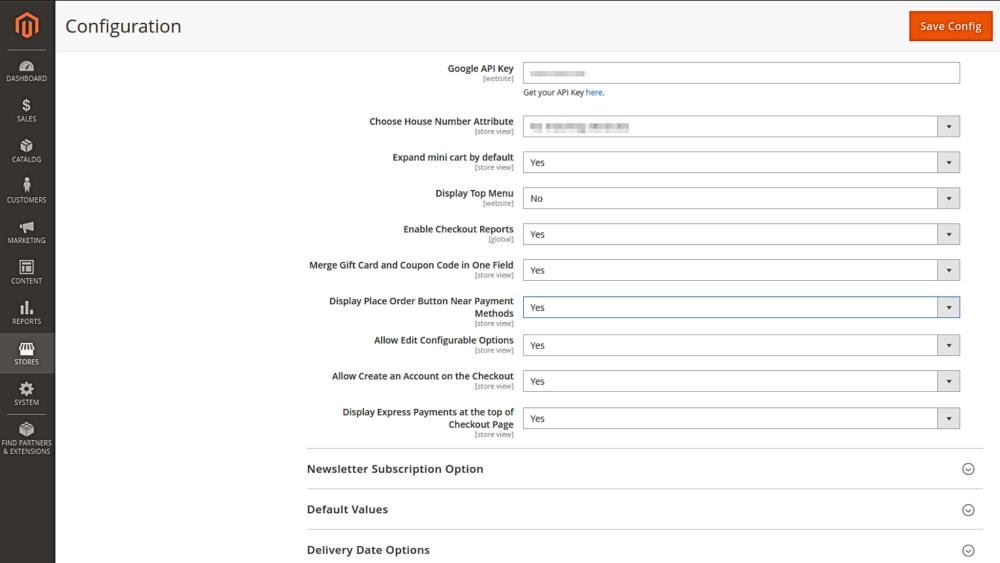
Express payments allow customers to place an order in one click, without even entering their email. The top position makes them even more accessible and streamlines checkout process significantly.
Newsletter Subscription Option
The Newsletter Subscription Option block controls the behavior of the newsletter subscription field if it is available on the checkout page.
- Enabled - defines if customers can subscribe to the newsletter right from the checkout page;
- Checked by Default - defines if the subscribe to newsletter checkbox is checked by default.
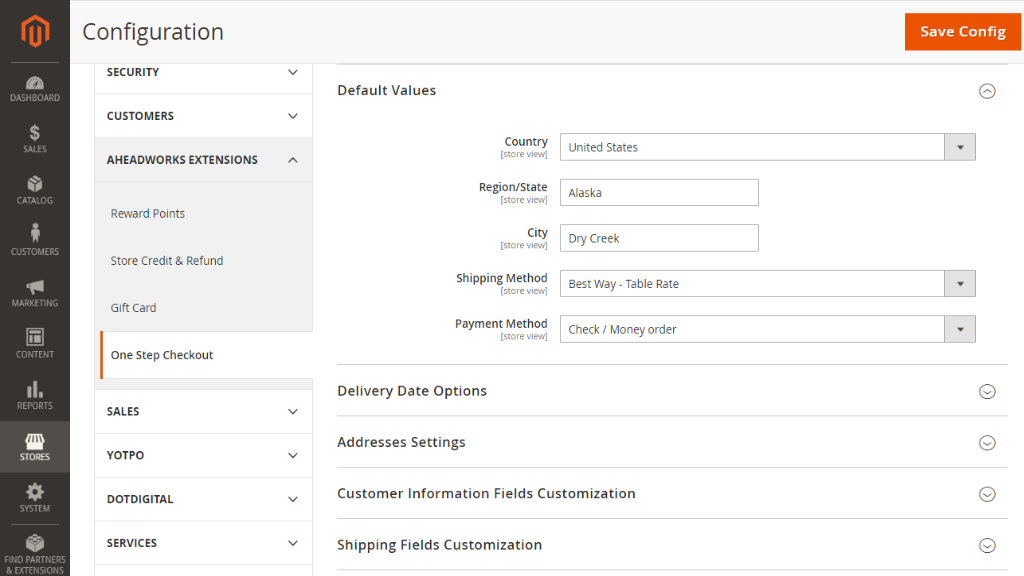
Default Values
The Default Values section controls whether particular fields have predefined values. Helpful for the stores that mostly ship the goods to a single country or work with a particular shipping or payment method company.
- Country - selects the predefined value for the country checkout field;
- Region/State - defines the default region/state;
- City - defines the default city;
- Shipping Method - specifies the default shipping method;
- Payment Method - defines the default payment method.
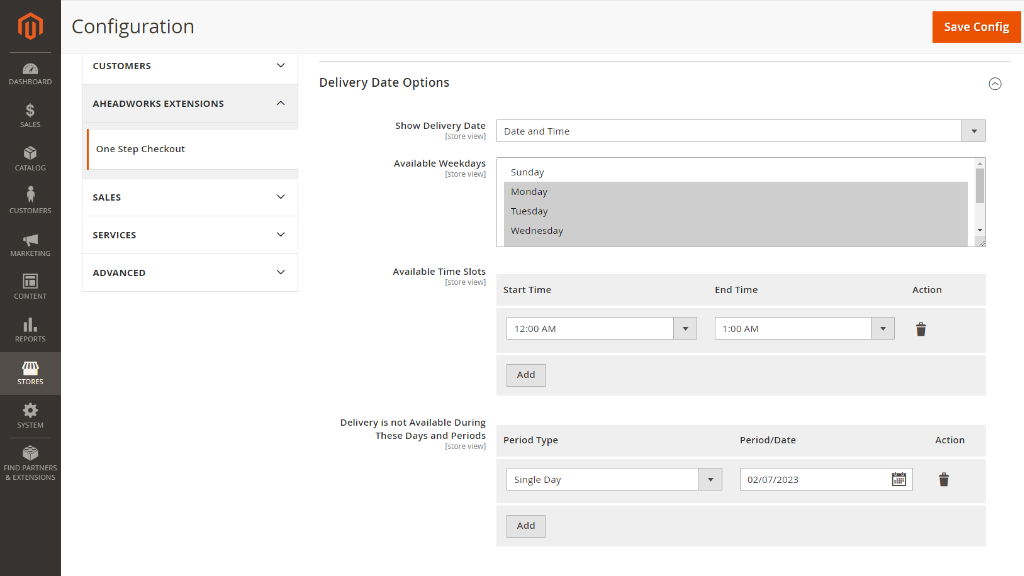
Delivery Date Options
This configuration section defines the date and time slots available for order delivery and whether customers can specify a delivery date and time.
- Show Delivery Date - defines if the Delivery Date and Delivery Time fields are available on the checkout page;
- Available Weekdays - defines on which days of the week orders can be delivered to customers;
- Available Time Slots - defines on which time slots orders can be delivered to customers;
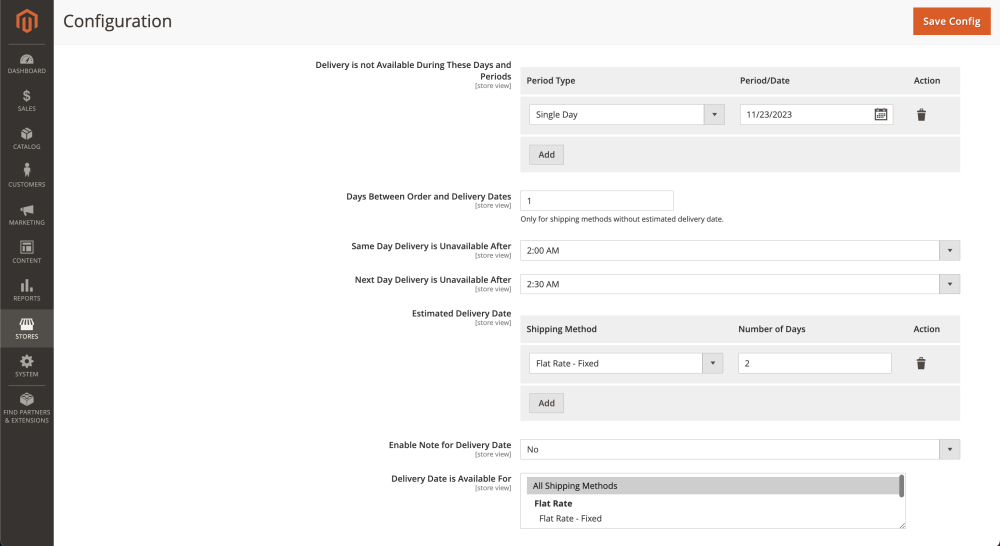
- Delivery is not Available During These Days and Periods - defines which time periods are excluded from the available delivery options;
- Days Between Order and Delivery Dates - defines the number of days from the order date when customers can start booking delivery;
- Same/Next day delivery is unavailable after - time picker which allows you to set same/next day delivery limits after a specific time of day;
- Estimated delivery date - defines the approximate number of days for the delivery date for a particular shipping method;
- Enable note for delivery date - set to ‘Yes’ to display a note for the delivery date;
- Note for delivery date - enter the text for the note to be displayed on the frontend.
- Delivery Date is Available for - choose which shipping methods offer the Delivery Date Option.
In the Delivery is not Available During These Days and Periods section, you are presented with a set of available periods:
- Single Day - excludes a particular date from the delivery options (useful for national holidays);
- Recurrent Day of Week - excludes a particular day of the week from the delivery options (for example, if you don't deliver on weekends);
- Recurrent Day of Month - excludes a particular day of the month from the delivery options (for example, if you have to perform accounting);
- Period, From-To - excludes a particular period from the delivery options (for example, your best delivery guy went on vacation).
You can combine these periods and dates by clicking the Add button.
|
To display delivery dates in order confirmation emails, you need to manually insert the following Magento 2 variables into the template:
|
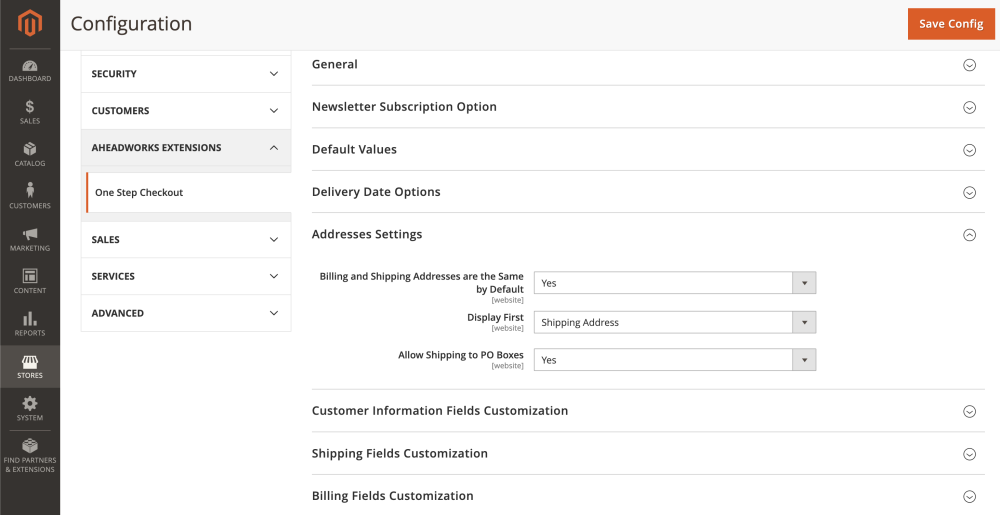
Addresses Settings
Here is only one setting:
When Billing and Shipping Addresses are the Same by Default option is:
-
set to No, checkbox My Billing and Shipping addresses are the same in unchecked by default.
Display First - сhoose either Billing or Shipping information to request first on the checkout page.
Allow shipping to PO Boxes - determine whether to allow addresses with PO Boxes to be entered in the shipping address field or not.
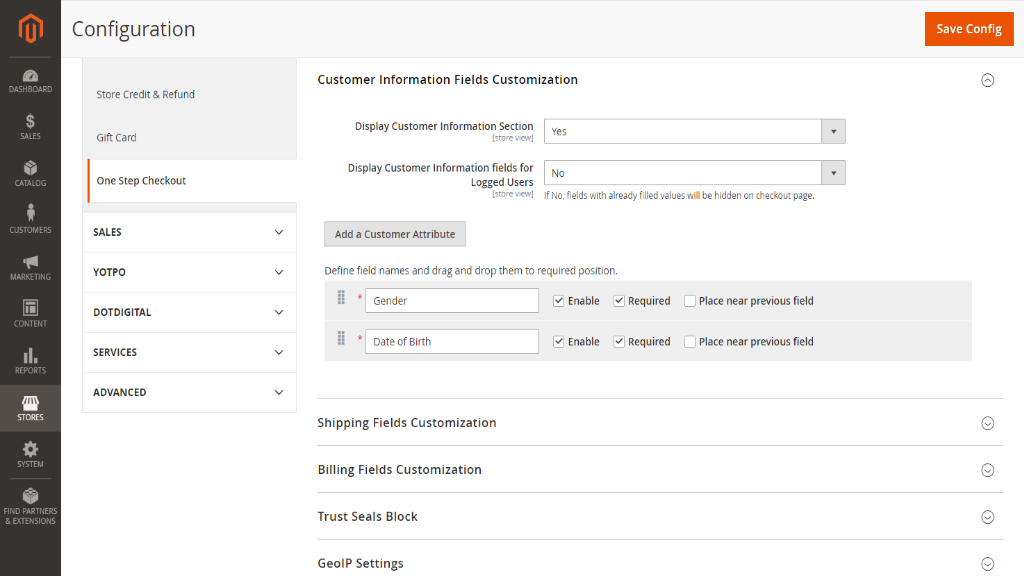
Customer Information Fields Customization
-
Display Customer Information Section - enables/disables to display additional customer information section with customer attributes on the checkout;
-
When it’s set to Yes, block Email on the checkout is renamed to Customer Information.
-
-
Display Customer Information fields for Logged Users - enables/disables to display already filled attributes in the Customer Information section for logged users on the checkout
-
When it’s set to No, fields with already filled values will be hidden on the checkout page for logged-in users.
-
Adding New Customer Information Fields
If you want to add new details for customers during checkout, follow these steps:
Installation:
For Magento Open Source: Install the 'Customer Attributes' module.
For Magento Commerce: Use the native customer attributes.
Adding Attributes:
Method 1: Go to Stores > Configuration > Aheadworks Extensions > One Step Checkout. In the Customer Information Fields Customization tab, choose 'Yes' to show additional customer sections on checkout. Attributes can be edited under Customers > Customer Attributes by Aheadworks.
Method 2: Navigate to Stores > Attributes (for Magento Commerce) or Customer > Customer Attributes (for Magento Open Source) > Add a new attribute.
Attribute Configuration:
After creating an attribute, modify its settings under Stores > Configuration > Aheadworks Extensions > One Step Checkout > Customer Information Fields Customization. Customize its order, requirement status, and more.
Important Notes:
-
Unsupported Field Types: Certain input types like 'File (attachment)' and 'Image File' are not supported for custom checkout fields or when creating orders from the admin panel.
-
Required Fields: Ensure that attributes marked as 'Required' in the configuration match the settings on the attribute edit page to avoid errors.
-
Missing Required Fields: If a required field is empty during checkout, a logged-in user will be directed to the 'My Account' page to fill in the details.
-
Specific Attributes: Some attributes like 'Last Name,' 'First Name,' 'Prefix,' 'Middle Name,' and 'Name Suffix' belong to Customer Address Attributes and won't appear in the Customer Information block on the frontend or in the configuration.
Find out about installation instructions for the Customer Attributes module.
Shipping and Billing Field Customization
With these two configuration sections, you can rearrange fields in the shipping and billing address blocks, mark fields as Mandatory, and furthermore, rename fields.
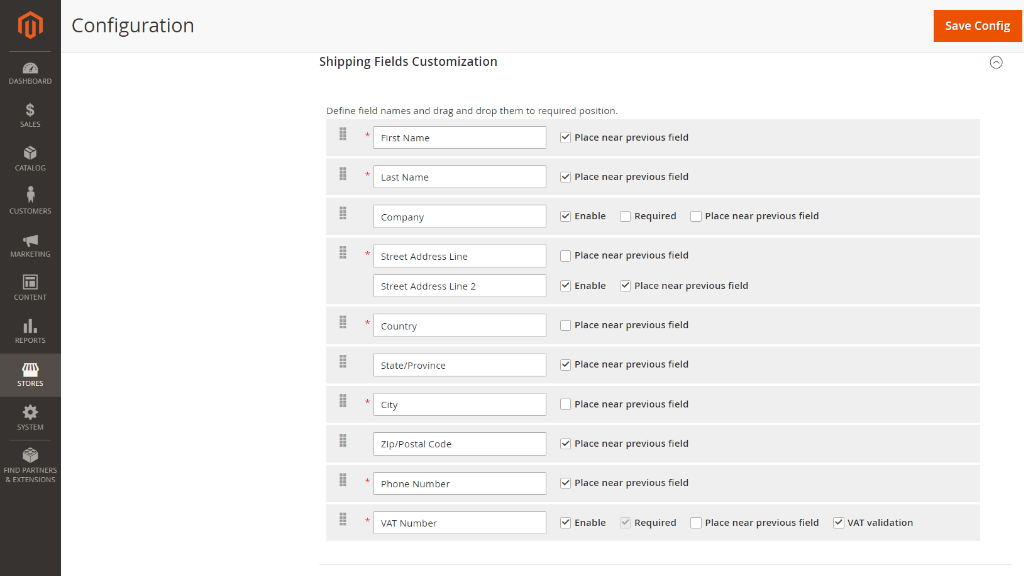
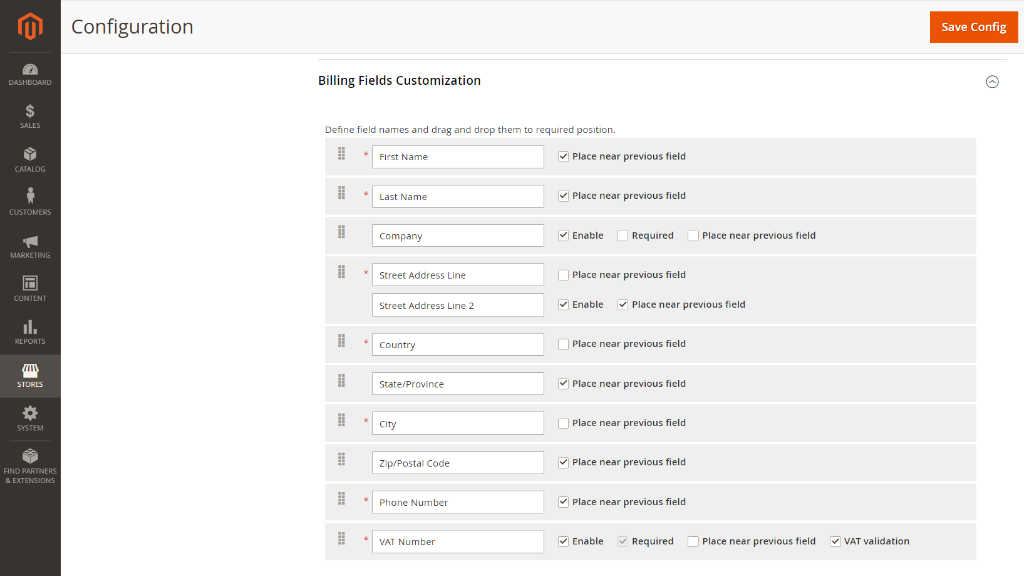
|
Some of the shipping and billing address fields cannot be disabled because most of the payment methods require them present and will not process payments that lack customer information. This is done to avoid conflicts with payment processors. |
Almost every field of this section can be either enabled or set as required. Required fields are mandatory, customers will not be able to complete checkout leaving them blank. Use the correspondent checkbox to enable/disable fields.
To rearrange the field blocks on the checkout page, use the mouse to drag & drop them. Arrange the fields in an ordered layout with the Move next to the previous field option.
Adding a New Address Field
Creating a Field for Checkout
To add a new field to the checkout page:
Installation:
If using Magento Open Source, install the 'Customer Attributes' module. For Magento Commerce, native attributes are used.
Ways to Add Attributes:
Method 1: Navigate to Customer > Customer Attributes by Aheadworks > Customer Address attributes (or Stores > Attributes > Customer Address in Magento Commerce). Click 'Add New Attribute' to create a new field for checkout.
Method 2: Go to Stores > Configuration > Aheadworks Extensions > One Step Checkout. In the Billing Fields Customization and Shipping Fields Customization sections, find 'Add a Customer Address Attribute' to create a new field.
Display on the Checkout:
To show the field on the checkout page, ensure 'Show on Storefront' is set to 'Yes,' and select at least 'Customer Address Registration' under 'Display on forms.' Find more details about the Customer Attributes module for configuration specifics.
Important Notes:
- Unsupported Input Types: Some input types like 'File (attachment)' and 'Image File' are not supported for custom fields during checkout or while creating admin panel orders.
- Ensuring Compatibility: To prevent errors, verify that the 'Required' field value matches between the One Step Checkout attributes and the attribute edit page.
Saving Attributes:
Once the attribute is created, click 'Save' to store the changes.
Attribute Configuration:
After saving, find the attribute in the One Step Checkout configuration (Stores > Configuration > Aheadworks Extensions > One Step Checkout > Billing Fields Customization and Shipping Fields Customization). Adjust its order, requirement status, enablement, or disablement, among other settings.
Fields Relations
The Customer Attributes module for Open Source already includes this functionality.
Managing Relations
This feature allows a field to appear based on specific choices made by the customer in a prior field.
-
The "Manage Relations" option in attributes enables showing a field only when certain options are selected in a previous field.
-
This applies to Yes/No and Dropdown fields and activates after completing three preceding sections and saving the attribute.
Creating Dependent Attributes
To utilize this feature effectively:
-
Create dependent attributes to appear as choices in the "Dependent Attribute" field.
-
The "Option" field specifies dropdown options (like Yes or No) based on prior selections.
|
Example: If the customer selects Yes in the field “Are you a member of our club?”, a new field will be displayed “Member Card number”For the example above there has been created an attribute “Are you a member of our club?” with a Yes/No type. In the Manage Relations section a dependent attribute Member Card Number was selected to the corresponding Yes option. When No is chosen, no field is displayed. |
For Commerce Users
For Commerce users, to enable this functionality:
-
Install the customer-attributes-relation module.
-
This module supports attribute relations for customer accounts, addresses, and checkout similar to the Aheadworks Customer Attributes module.
-
Note: There's a limitation; attribute options and relation options need to be selected separately before they become available for relations.
Trust Seals Block
With the Trust Seals Block setting section, you can upload the security badges provided by payment processors.
- Enabled - defines if the trust seals displayed below the dropdown;
- Secure Payment Label - defines the wording that anticipates the trust seals;
- Trust Seals - uploads trust seals to the checkout page;
- Custom Text - the additional text block to be displayed below the uploaded trust seals. Most of the payment processors offer a couple of lines of code to insert trust seals into the page. You can upload multiple seals by clicking on the Add button.
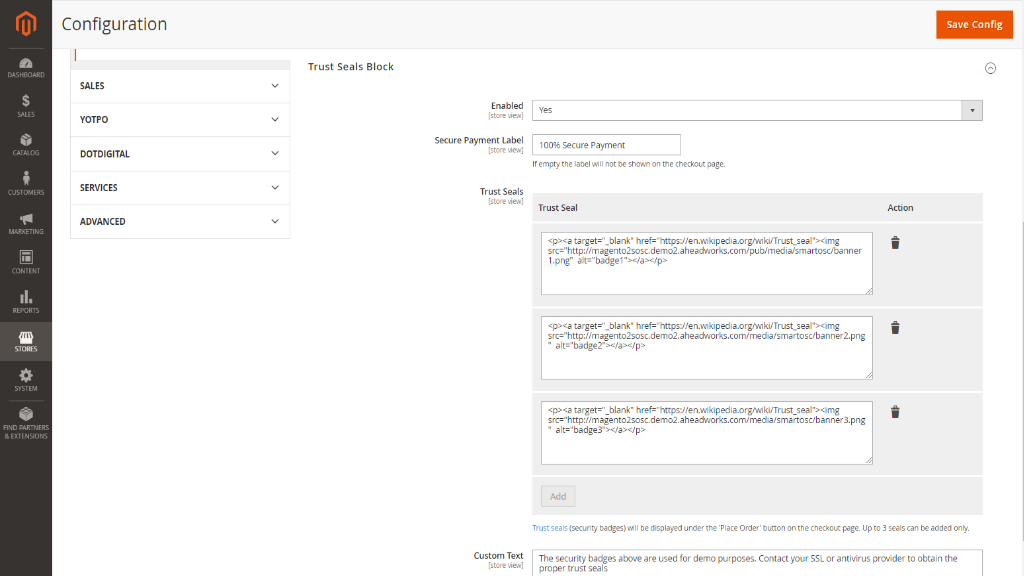
Trust seals might be useful for introducing new payment methods and gaining customers' trust.
|
JS is not supported. |
GeoIP Settings
The GeoIP Settings section provides you with the address detection by IP functionality.
- GeoIP2 Library - downloads and installs the GeoIP2 library;
- License Key - your license key to the GeoIP solution in use;
- GeoIP2 Database - downloads or updates the existing GeoIP2 database;
- Enable IP Detection - enables the functionality if the GeoIP library is installed.
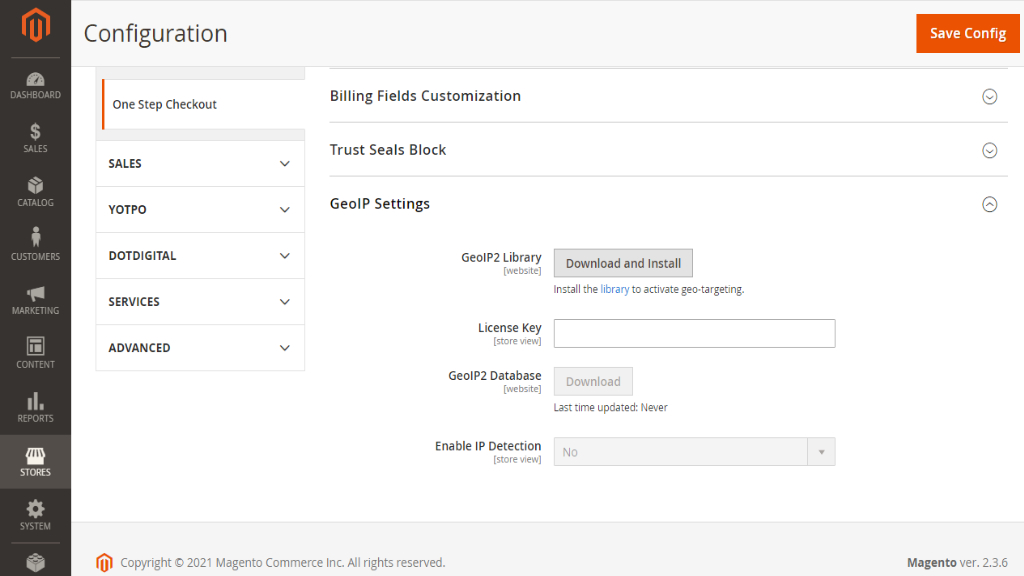
|
If specified, the Default Country option has a higher priority over the above functionality. |
|
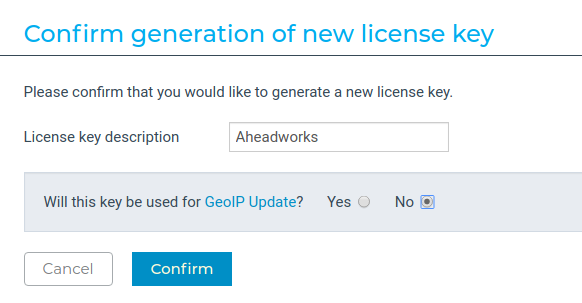
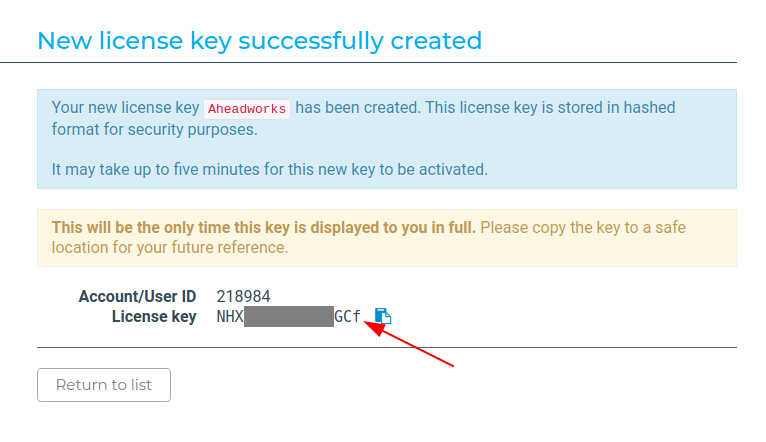
How can I get a License Key? Expand the text below for sample guidance on retrieving a license key from the MaxMind GeoIP solution. Follow the steps below to retrieve a license key from the MaxMind GeoIP solution:
3. Click on Generate new licence key and complete the form 4. Click on the Confirm button
5. You can now copy-paste your license key
|

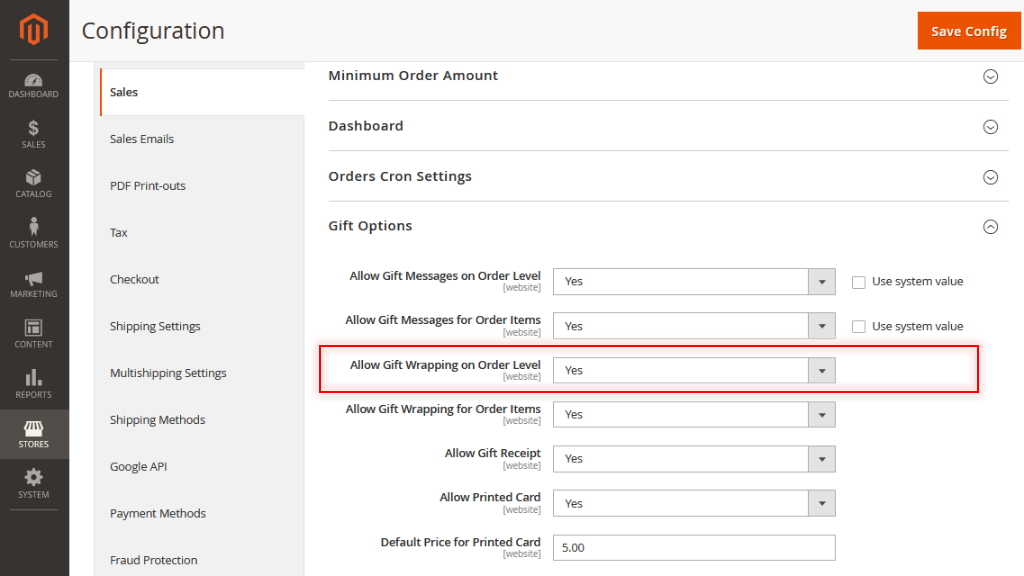
Adding Gift Wrapping Option
Offering Additional Services
To include services like Gift Wrapping for your customers, follow these steps:
1. Navigation:
Go to Stores > Settings > Configuration > Sales > Gift Options.
2. Enabling Gift Wrapping:
Locate and enable the "Allow Gift Wrapping on Order Level" option.
Delivery Methods
Configuring Delivery Methods
Backend Configuration
Delivery Methods:
From the backend, configure various delivery methods and shipping carriers.
Configurable Methods:
Backend settings allow configuring delivery methods that don't need a third-party account: Free Shipping, Flat Rate, Table Rates, In-Store Delivery, and Dimensional Weight.
Third-Party Shipping:
Additionally, you can set up third-party shipping methods:
-
UPS
-
USPS
-
FedEx
-
DHL
To configure these, navigate to Stores > Settings > Configuration > Sales > Delivery Methods. Enable these methods by unchecking the box and selecting 'Yes' from the Enable dropdown list.
Configuration Details:
Further details on configuring shipping methods can be found in the configuration settings.
In-Store Delivery
-
Allow customers to choose the In-Store Delivery method during checkout through backend configuration.
-
When 'Pick in Store' is chosen, configure Stores and Sources.
Configuration Steps:
1. Google API Key:
Insert the Google API key in Stores > Settings > Configuration > Catalog > Inventory > Google API.
2. Stock and Sources:
-
Start by creating a new stock by clicking 'Add New Stock.'
-
Manage sources: Create a store, providing Name, Code, Latitude, and Longitude. Activate the 'Use as Pickup Location' option.
-
Ensure each source corresponds to a new store and assign stock to the source.
-
Products must also be assigned to these sources. If products are available from multiple sources, choose the preferred delivery location.
Checkout Performance Reports
|
The extension is the first extension on the market to offer a full range of checkout performance reports for meaningful checkout page layout adjustments. |
The checkout performance reports can be found under Reports → One Step Checkout by Aheadworks.
Abandoned Checkout Statistics Report
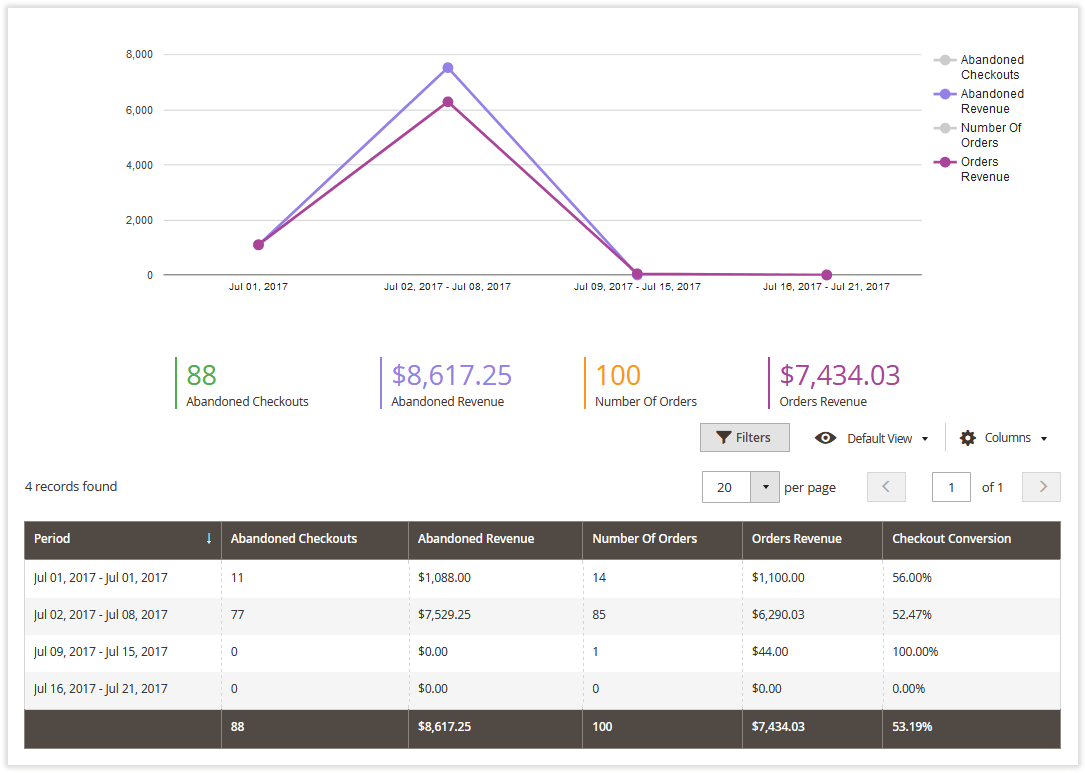
The Abandoned Checkout Statistics report shows the number of abandoned checkouts, the abandoned checkout revenue (the additional possible revenue), the number of orders, the order revenue, and checkout conversion rates for the set period.
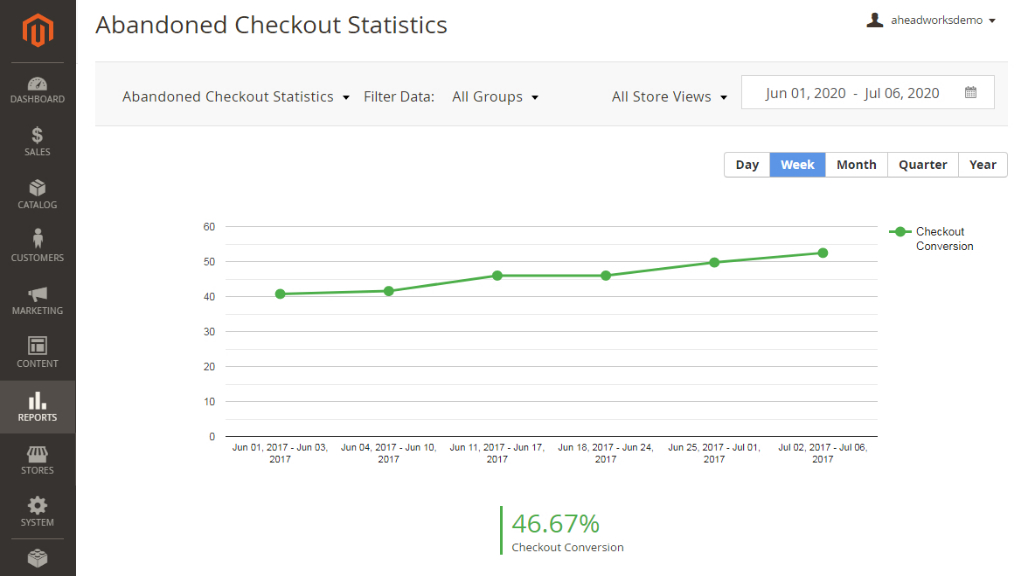
For simple segmentation, the reports come with filtering options. Those include the store view and customer group filters.
The date range can be selected in the flexible calendar:
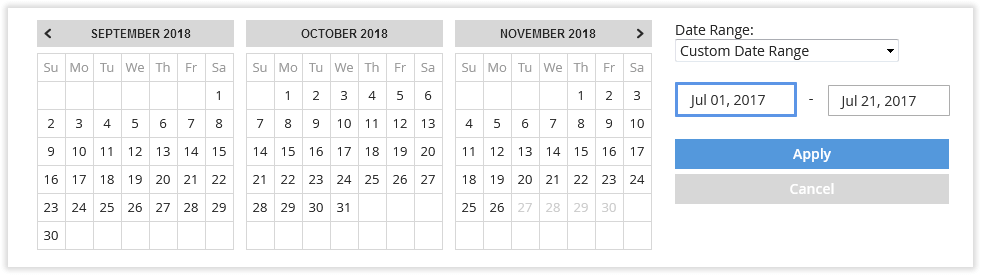
In the provided calendar, you can specify any date or date range either by clicking the required dates or by indicating the interval manually. Once the date has been selected, click Apply to refresh the report page.
Below the checkout conversion chart, you can see the reporting table and chart providing an abandoned checkout overview.
You can also define which values should be displayed in the chart.
Checkout Behavior Report
The Checkout Behavior Report provides you with the per-field statistics of the checkout page's performance. Thus, you can make the appropriate changes to the checkout page depending on how well particular fields perform in terms of conversion rates.

Getting Around
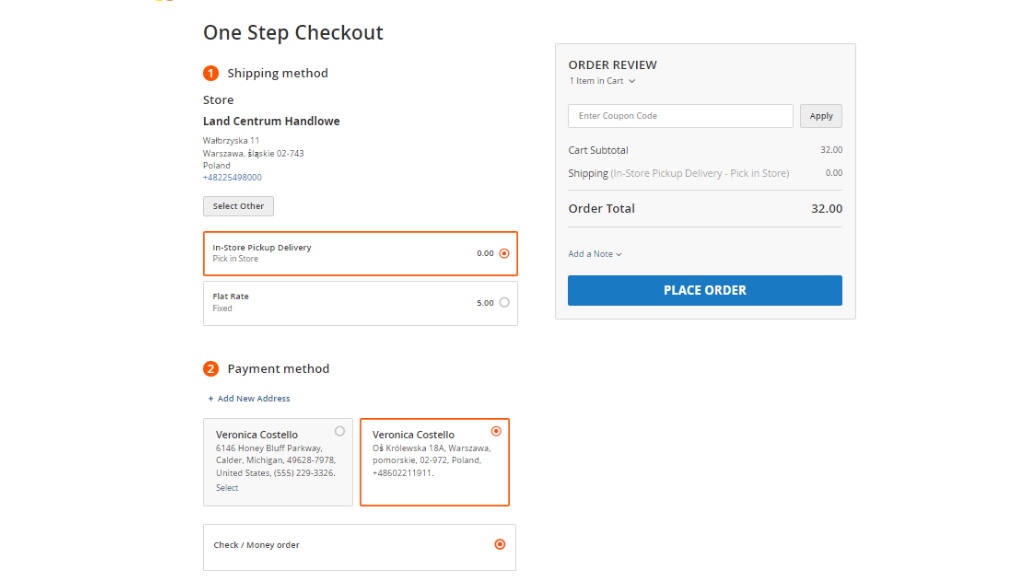
The one-step checkout page, introduced by this extension, consolidates all necessary functionalities in a single location.
Enhanced Checkout Experience
The design of the extension aims to reduce the number of customers abandoning the checkout process.
Login and Shipping Address
The initial checkout block allows customers to log in.
Logging In:
Customers are prompted to enter their email. If an account exists with the provided email, the system recognizes it and offers relevant suggestions.
Manual Login:
Customers can also click the "Login here" link to log in manually. Clicking the link triggers a pop-up window prompting customers to enter their login details.
Customer Information:
Once enabled in the backend, this block is renamed to "Customer Information."
Customer Address Attributes:
When enabled and configured from the backend, additional fields will be displayed on the checkout page.
Phone Number Field:
Restrictions: The Phone Number field on the checkout accepts only numbers, spaces, and specific symbols like (-, +, () ).
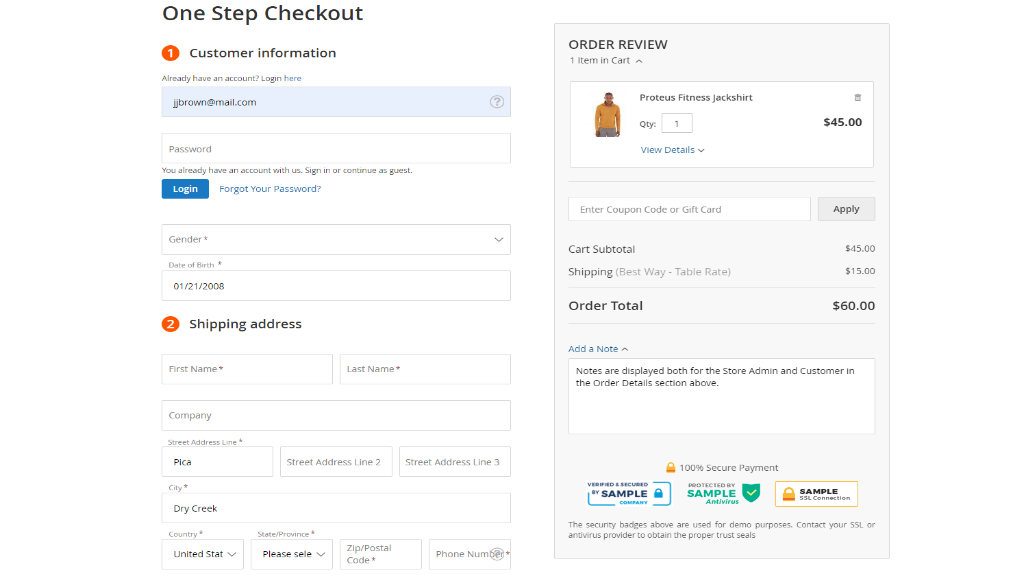
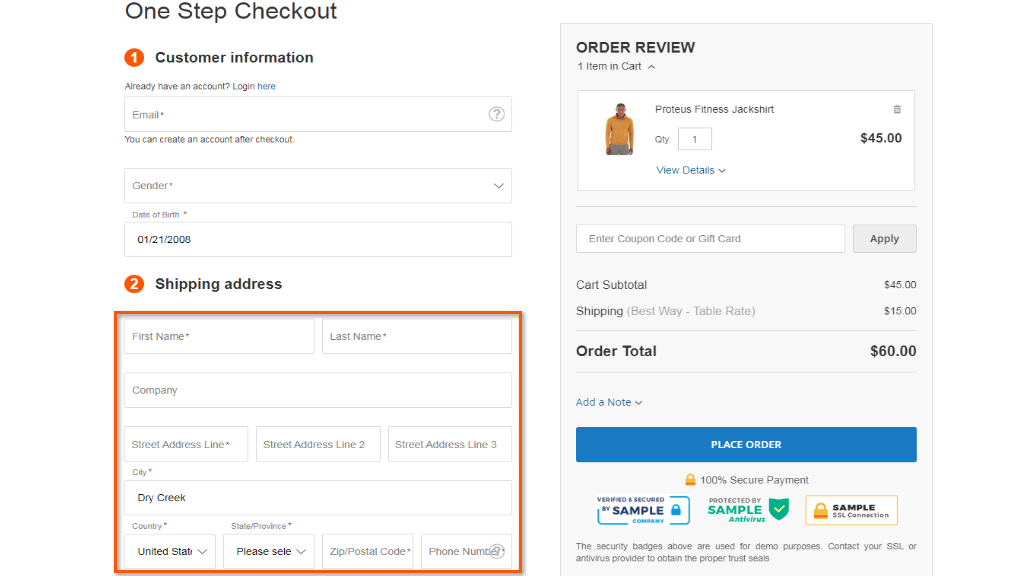
Shipping Address
Below the login and registration fields, you'll find the Shipping Address block.
Default Values Configuration
Backend Configuration:
If configured in the Default Values section from the backend, all information will be visible on the frontend.
Information Retention
- Session Cache:
Every entered detail is stored within the session for convenience.
- Preventing Data Loss:
In case of unexpected page reloads, all submitted information remains saved.
Customer Convenience
-
Automatic Address Saving:
For registered customers, their shipping address is automatically saved and will be utilized for future purchases, streamlining the checkout process.
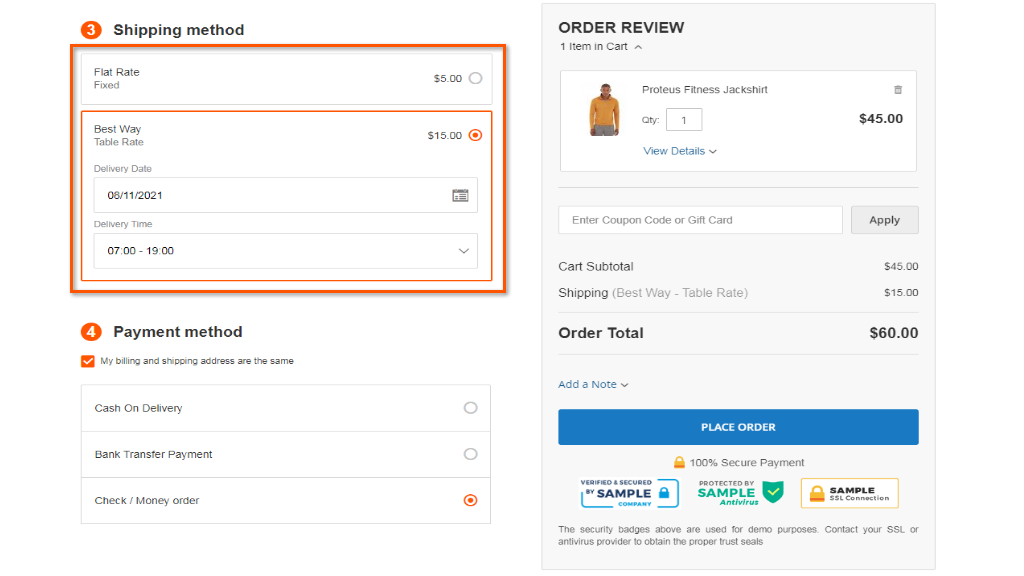
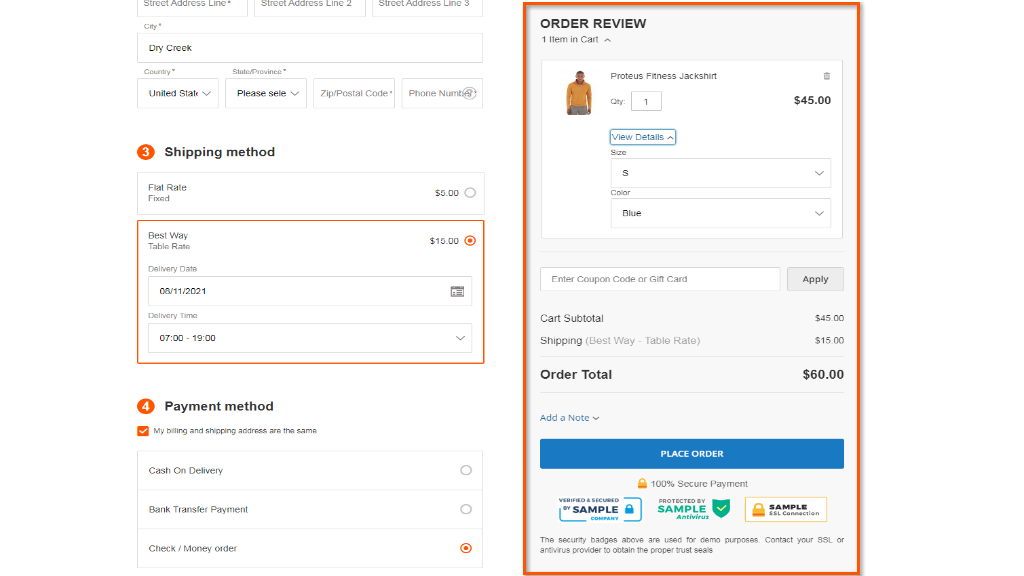
Shipping Method
Selecting Shipping Method and Delivery Preferences
Checkout Convenience
Shipping Method Selection
Customers can choose their preferred Shipping Method during checkout.
Delivery Date and Time
If permitted by the extension settings, customers can define a delivery date and time.
Flexible Delivery Options
Admin Area Configuration:
Set flexible Delivery Date and Time options in the admin panel. Customize dates and time intervals based on available delivery choices.
Order Details Display
The chosen delivery date and time preferences are visible on the order details page.
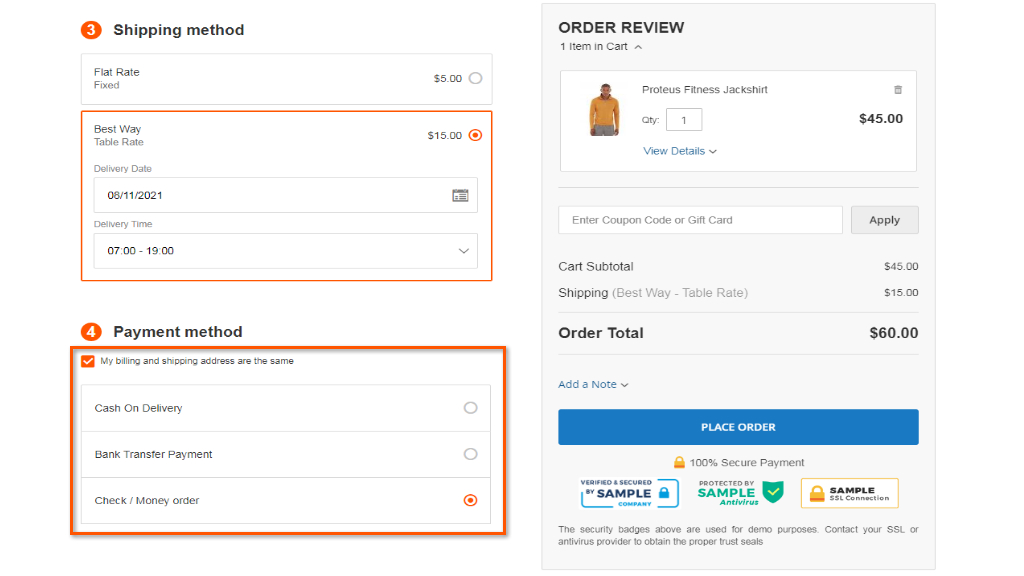
Payment Method
Choosing Payment Method
Selecting Payment Preferences
Payment Method Selection
Customers proceed to specify their preferred payment method in this section.
Billing Address
If the billing address differs from the shipping address, customers are prompted to enter or confirm it.
Payment Procedure
Based on the Chosen Method:
Depending on the selected payment method, customers may need to fill in the required fields or get redirected to the payment method’s interface. This depends on the configuration and specific features of the chosen payment method.
Address Options
Billing and Shipping Addresses:
You have the option to enable using billing and shipping addresses as the same.
Automatic Checkbox
Checkbox Functionality:
When a payment method is selected during checkout, the checkbox enabling the use of billing and shipping addresses as the same is automatically checked.
Order Review
Order Review Section
Viewing and Adjusting Order Details
Overview
On the checkout page's right side, customers find the Order Review section.
Order Details Display
Customers can view all added products, quantities, sizes, colors, and total prices in this block.
Adjusting Cart Contents
Editing Options:
Customers have the ability to:
-
Remove products,
-
Change quantities, colors, and sizes,
-
Apply discount codes.
Real-Time Updates
Automatic Adjustments:
Any changes made, such as adjusting quantities or removing products, instantly update the order total without needing to refresh the page.
|
Know your customers! Should they be eager to place orders with 150+ products, limit the number of items featuring in the Overview section to prevent page freezing. To do so, go to Stores → Configuration → Sales → Checkout → Maximum Number of Items to Display in Order Summary, enable the field and indicate the value. |
In the Coupon Code and Gift Card fields, a customer can enter a coupon code or gift card. When a Coupon Code is entered, the button Apply is replaced to Cancel and a customer isn’t able to apply for a Gift card.
If the Gift Card extension by Aheadworks is disabled, only the coupon code field will be displayed.
|
The loading speed will be a bit lower because of two inquiries sent at one time. |
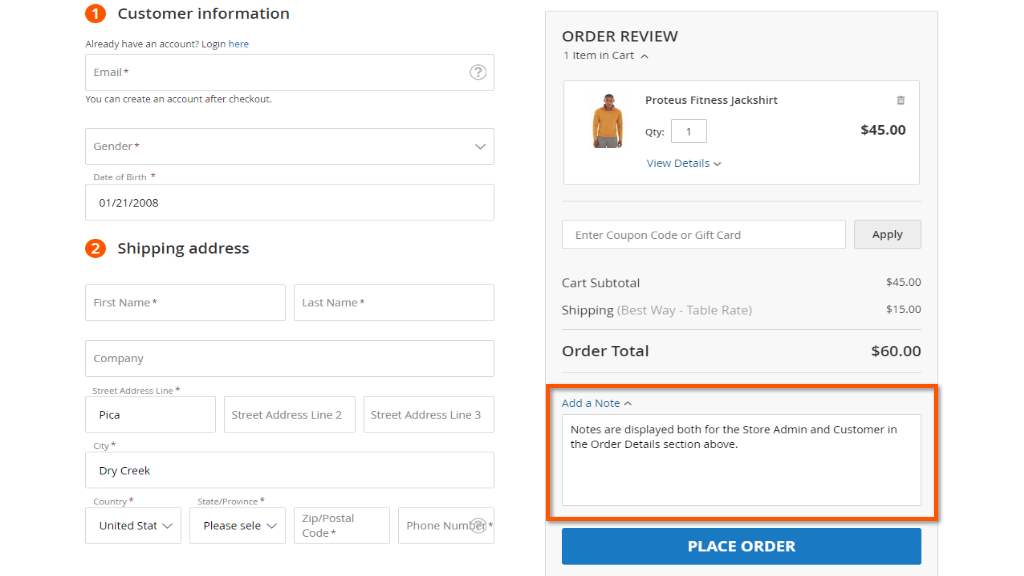
In the Adding Notes and Placing an Order area customers can leave any note to the admin that will be available on the order details page.
Additionally, the admin can upload trust seals of the payment methods available and specify a secure payment label.
Here customers can leave any note to the admin that will be available on the order details page. Additionally, the admin can upload trust seals of the payment methods available and specify a secure payment label. In the above image, you can see the uploaded official PayPal trust seal and the '100% Secure Payment' secure payment label specified.
Supported Payment Options
Smart One Step Checkout is integrated with several Aheadworks extensions, including Payment Restrictions, Shipping Restrictions, Store Credit and Refund, Gift Card and Reward Points.
Further to the above, the extension supports a few payment methods and payment gateways: B2B Company Credit, NET.30, Authorize.net, Bambora APAC, NMI, PayPal Payflow, Affirm, Klarna, SplitIt payment support, Amazon Pay module, and Braintree Payments by Gene module.
Authorize.net
The extension is compatible with the new Authorize.Net payment method that has been added to M2.3.1 instead of Authorize.Net Direct Post (Deprecated).
|
When using Authorize.net, make sure each customer profile is set up to include up to 10 payment profiles and up to 100 shipping profiles (this is an official restriction by Authorize.net). |
Bambora APAC
Bambora payment support is possible with a standalone module Bambora APAC, available for purchase on the Aheadworks store.
NMI
NMI payment support is possible with a standalone module NMI Payment available on the Aheadworks store.
On Credit Payment
The On-Credit payment support is possible with a standalone module B2B Company Credit available on the Aheadworks store.
NET 30 Deferred Payment
Deferred payment (NET 30) support is possible with a standalone module NET 30 available on the Aheadworks store.
Klarna
We added Klarna payment method, which means that your customers can make payments in your Magento website using Klarna.
SplitIt payment support
Now One Step Checkout 2.0.0 is integrated with the Splitit payment module (version 2.X).
Amazon Pay module
Now One Step Checkout 2.0.0 is integrated with the official Amazon Pay module (version 5.X).
Braintree Payments by Gene module
Now One Step Checkout 2.0.0 is integrated with Braintree Payments by Gene module (version 4.X).
Adyen All-In-One payments
Now One Step Checkout 2.1.7 is integrated with the Adyen All-In-One payments.
Razorpay payment method
Now One Step Checkout 2.2.0 is integrated with the Razorpay payment method.
Adobe Payment Services
Now One Step Checkout 2.5.0 is integrated with the Adobe Payment Services.
Smart One Step Checkout integrates with many other payment methods, ensuring smooth transactions. If you encounter any issues with a specific method, please reach out to our support team for assistance. We're here to help resolve any concerns you may have.
To configure payment methods to be available at checkout, please refer to Stores > Settings > Configuration > Sales > Payment Methods. The official Magento 2 guide will be of help here. To extend the native Magento 2 functionality and specify payment methods to be available at checkout to selected groups of customers install the Payment Restrictions module (extra fee may apply).
Integrations
Customers can login via social networks on the checkout page. Availability of Social Login components on the Checkout page is managed by Social login settings.

Social login tabs can be displayed only inside the authentification pop-up on the One Step Checkout page.
B2B for Adobe Commerce
Smart One Step Checkout is widely adopted within B2B businesses. When employing Smart One Step Checkout for Magento 2 within the B2B suite for Adobe Commerce, Admins gain access to Approval Rules, a native B2B feature.
To activate this functionality, navigate to Customers > Companies. Open a company profile, scroll down to Advanced Settings, and set "Yes" next to the "Enable Purchase Orders" function.
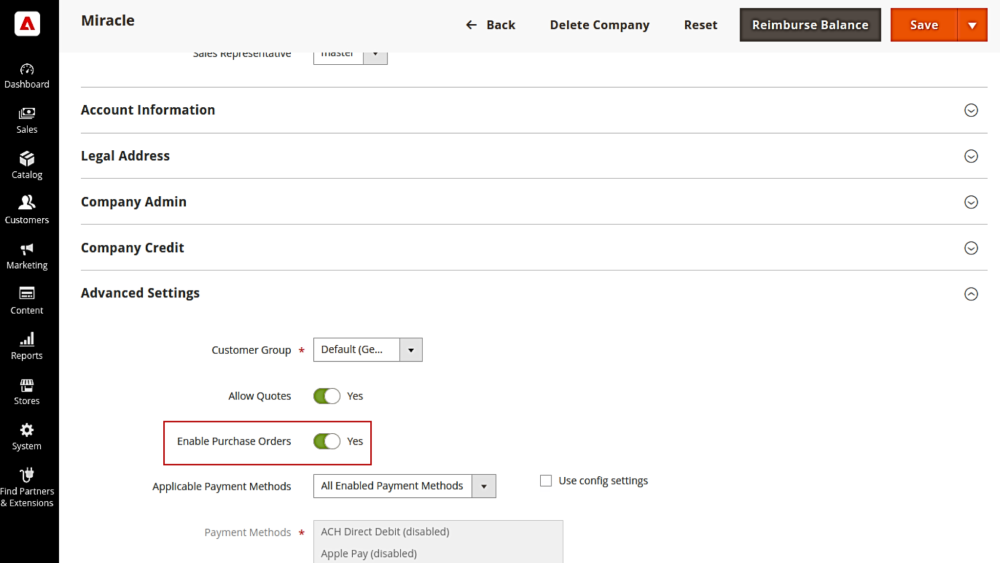
Once activated, Admins can establish rules within their account using the Approval Rules tab.
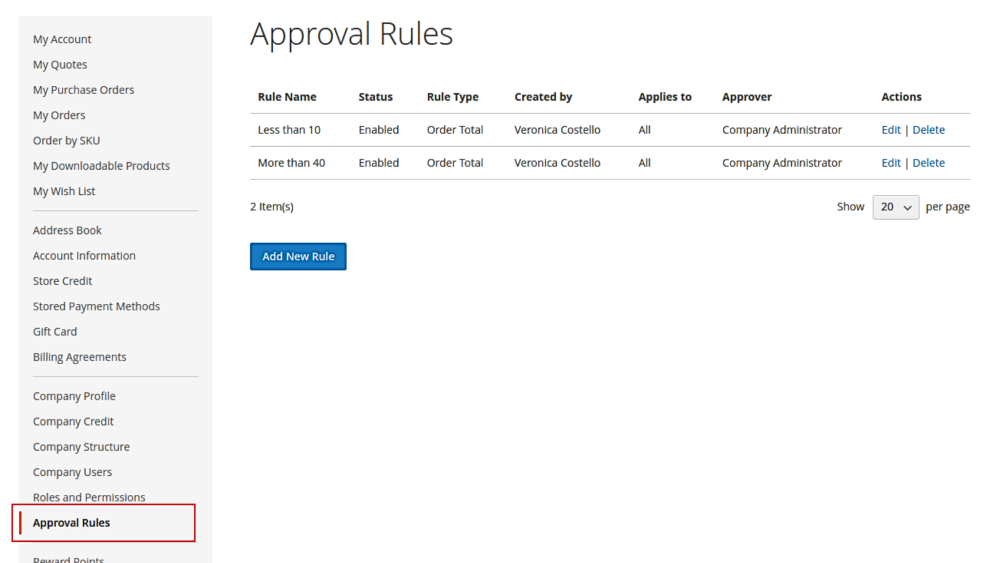
An extra tab titled "My Purchase Orders" will then show up in the company Admin’s account to handle approvals or rejections for purchases.

If the order doesn't meet the criteria (e.g., the order amount is lower), it will be marked as "Approved - Ordered." In such cases, the company Admin isn't required to approve it.
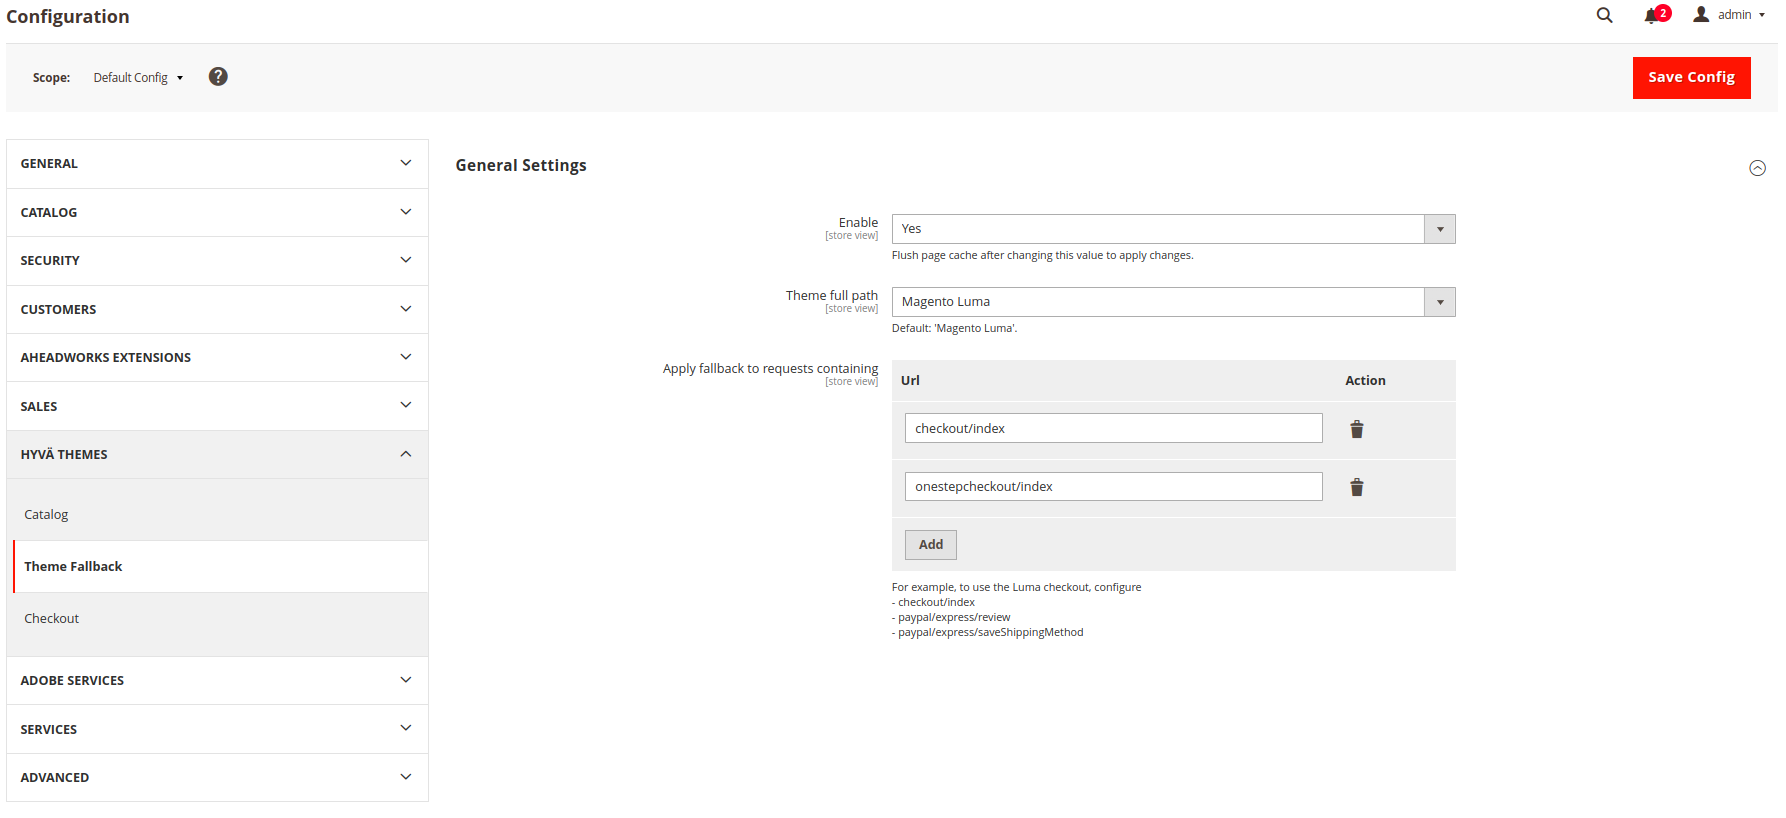
Hyvä-compatibility
Smart One Step Checkout extension is compatible with the Hyvä theme; however, it will be operational only when you activate the Luma checkout and configure the specified settings under Stores > Configuration > Hyvä Themes > Theme Fallback:
- Enable - Yes;
- Theme full path - Magento Luma;
- Apply fallback to requests containing - Url 1. checkout/index; Url 2. onestepcheckout/index.
Tips and Tricks
Custom Email Variable
The Smart One Step Checkout extension comes with a single custom email variable:
{{var order.getAwOrderNote()}}
|
The variable inserts the notice a customer left for an order into a notification email.
We added the compatibility with the themes that do not support LESS compilation. To enable the compatibility, you need to find the following lines in the app / code / Aheadworks / OneStepCheckout / view / frontend / layout / onestepcheckout_index_index.xml file:
<head> |
and change them to:
<head> |
![]()
Already used our product?
We would appreciate your feedback. Please, leave a review.