How To Configure Basic Payment Methods in Magento 2: Quick Tutorial
Categorized as : Ecommerce
In this article, we’ll consider the basic payment methods supported by Magento 2 and describe how to configure them for a web store.

Initially, Magento 2 supports several basic payment methods that do not require the services of third-party payment processing companies.
To configure any of the methods, first, you should go to Stores in your Admin Panel and then open the Configuration section. From this section, you can start to set up the required method.
The configuration of every payment method starts with choosing the Merchant Location of the store, for which the settings should be applied. To do this, expand the box next to the Merchant Country field.
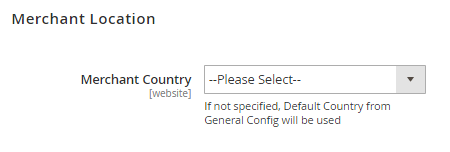
If you leave this field blank, the country you specified in the General Config section will be selected automatically.
So, let’s consider each method individually.
The Cash On Delivery Payment method can be set as the default payment option for a web store. If needed, this method can be chosen for some particular countries.
First, in the Configuration menu, expand Sales and click on the Payment methods tab in the panel under Sales.
Here, you will see the list of payment methods. Find the Cash On Delivery Payment section and click on it to expand. The panel with all the required settings will be opened.
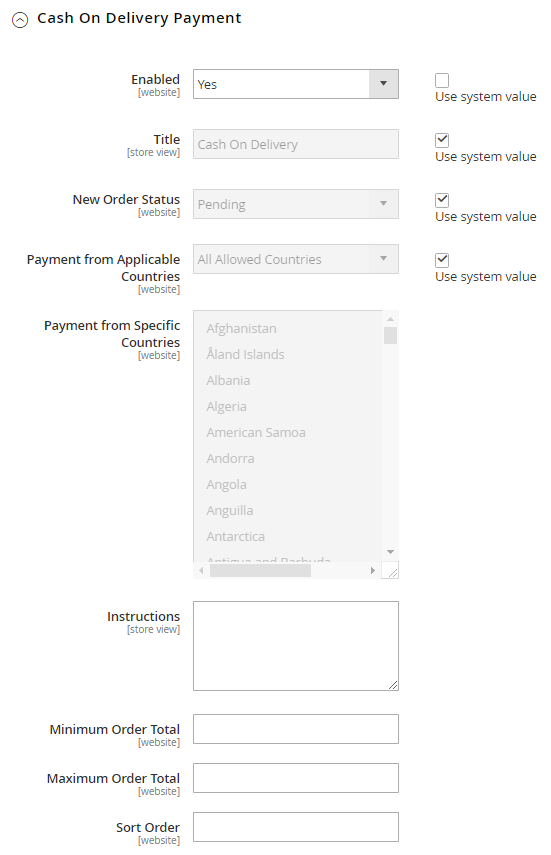
To identify the Cash On Delivery Payment method during the checkout process, enter the Title in the corresponding field.
Next, choose the Pending option in the New Order Status field. This status of an order will remain until the receipt of the payment is confirmed.
In the Payment from Applicable Countries field, choose between the following two options:
After this, describe the Instructions for the method in the corresponding field.
Next, specify the number of orders for this payment method in the Minimum Order Total and Maximum Order Total fields accordingly. An order qualifies if the value is between or exactly matches the minimum or maximum total values set by you.
Almost done! Enter the number in the Sort Order field to determine the position of the Cash On Delivery Payment method in the list of all Magento 2 payment methods that is shown during the checkout process (for example, ‘0’ stands for ‘first’, ‘1’ for ‘second’, ‘2’ for ‘third’, and so on).
Finally, click on the Save Config button on the right top of the Configuration panel to apply your configuration of the method.
As in the case with the Cash On Delivery Payment option, you can choose the specific countries for which the Check/Money Order payment method will be applied or you can choose it as the default method for all countries. In addition, you can also set the maximum and minimum order values to be accepted.
Let’s consider the major steps of the configuration of the Check/Money Order method. First, expand the Check/Money Order option in the Payment Methods menu.
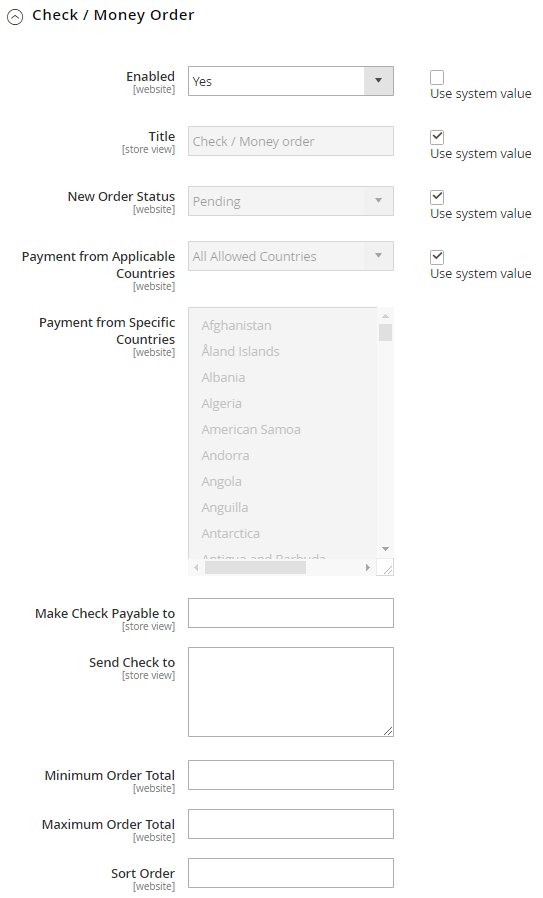
The following five steps of the configuration are the same as for the previous method: enable the method by choosing Yes in the Enable section, then enter the Title of the method, and set the New Order Status to Pending until the payment receipt is confirmed. After this, choose between the All Allowed Countries or Specific Countries options to define the countries in which this method will be applied.
Then, in the Make Check Payable To field, enter the name of the party to whom the check must be payable. In the Send Check To field section, enter the street address or the post-office Box where checks should be mailed.
Next, define the Minimum and Maximum Order Total in the corresponding fields that are needed to qualify the Check/Money Order payments. An order qualifies whether the total value matches the values specified or it is between them.
After this, enter your Sort Order number in the appropriate field to identify the position of the method in the list of all payment methods supported by your web store.
You are all set! Now, click on the Save Config button on the right top of the Configuration panel and enjoy the result!
With this option, you can accept payments that come from customer bank accounts and deposited into the merchant bank account of your web store.
Again, to configure Bank Transfer, you should open the Payment Methods menu in Configuration and then expand the Bank Transfer Payment option. To activate the method, choose the Yes option in the Enabled field.
The most part of the steps of the configuration of this payment method coincides with the steps of the configuration of the above-described methods. Having enabled the method, you should enter its Title, then set the New Order Status to Pending and choose the Countries in which the method will be applied – All Allowed Countries or Specific Countries.
Next, specify the Instructions that customers should follow according to this method. It’s recommended to include the following information in the instructions:
Then, set the Minimum and Maximum Order Total in the corresponding fields and the Sort Order number to determine the sequence of your Bank Transfer payment method in the list of all payment methods supported by your web store.
Configuration completed. Click on the Save Config button.
The Zero Subtotal Checkout method is available only for orders created from the Payment Methods menu in the Admin Panel. For example, this method can be used in the following situations:
As usual, the Zero Subtotal Checkout method can be accessed by users from the Payment Methods menu in the Sales section in Configuration. Again, you should activate the method by choosing the Yes option in the Enable field, then enter the Title of the method.
Typically, orders wait for authorization, so set the New Order Status to Pending. After the payment is authorized, the transaction begins processing.
After this, specify the countries that should support the Zero Subtotal Checkout method by choosing between the All Allowed Countries and Specific Countries options.
Then, choose a Sort Order number that will correspond to the position of this option in the list of all payment methods set for your web store. Again, “0” stands for “first”, “1” for “second”, and so on.
Finally, click on the Save Config button to apply the configured settings.
The Purchase Order method is widely used in the B2B sector. With it, commercial customers can pay for authorized purchases by indicating the purchase order number. The purchase order is issued in advance by the company which makes the purchase in your store. After receiving your invoice, the company pays for the purchase.
It’s recommended to check the creditworthiness of customers before accepting their payments for a purchase.
The steps for configuration of this method are the same as for the Cash On Delivery Payment method. So, consider all these steps in the “Cash On Delivery Payment” paragraph again if you need to set up the Purchase Offer payment method for your web store.
After all is done, don’t forget to apply the configuration of the method by clicking on the Save Config button.
Authorize.net Direct Post is the last basic payment method that we’ll review in this guide. This method can be used to pay for purchases either from storefront or right from the Admin Panel of your Magento 2.
So, let’s find out how to configure this option in Magento 2.
As usual, the method is accessed from the Payment Methods menu in the Sales section in Configuration. Click on the Authorize.net Direct Post option (the last in the list of payment options) to expand it.
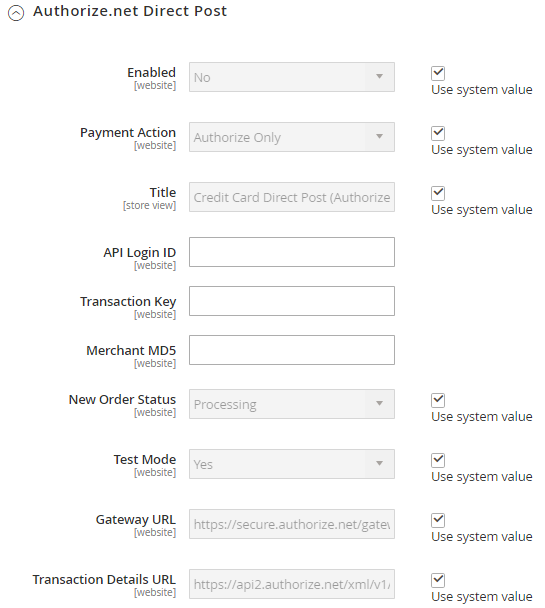
Activate the method by choosing Yes in the Enabled field. Then, you should specify the Payment Action by choosing from the following options:
After choosing the required option, enter the name of the method in the Title field.
Before moving on to the next step of configuration, you should create an Authorize.net account. The API Login ID, Transaction Key, and Merchant MD5 that you specified when creating the account are required for the corresponding fields in the Configuration panel.
Next, set the New Order Status to Processing. In the Test Mode field, choose between two following options:
The Gateway URL and Transaction Details URL fields should be filled with the default link from your Authorize.net profile.
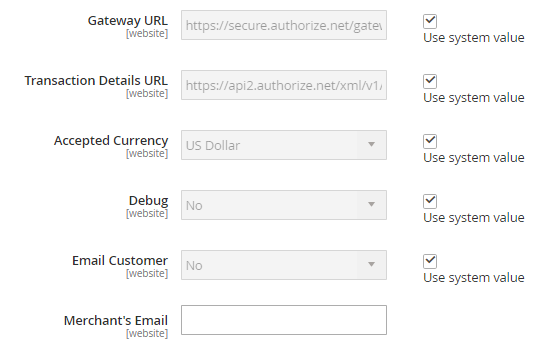
To start working with the Authorize.net option, you will also need to configure some extra settings. First, choose the Accepted Currency that you need for your payment operations. Set Debug to Yes if you need all the payment information to be transmitted between your web store and your Authorize.net account.
If you want customers to be notified about their completed Authorized.Net transactions, set the Email Customer option to Yes.
In the Merchant’s Email field, specify the email address on which you will receive notifications of Direct Post orders. If you do not need this option, just leave this field blank.

In addition, you can specify Credit Card Types that should be supported by your store. Next, set Credit Card Verification to Yes to allow customers to enter verification codes. Also, choose between the Applicable Countries options: All Allowed Countries or Specific Countries.
Finally, define values in the Minimum Order Total, Maximum Order Total, and Sort Order fields.
All is done! Click on the Save Config button to apply the configuration.
With Magento 2, you can configure any basic payment method without much difficulty. Just follow the instructions from our guide, and soon, you will be able to provide your customers with a perfect purchasing experience.

Initially, Magento 2 supports several basic payment methods that do not require the services of third-party payment processing companies.
To configure any of the methods, first, you should go to Stores in your Admin Panel and then open the Configuration section. From this section, you can start to set up the required method.
The configuration of every payment method starts with choosing the Merchant Location of the store, for which the settings should be applied. To do this, expand the box next to the Merchant Country field.

Merchant Location for Magento Payments
If you leave this field blank, the country you specified in the General Config section will be selected automatically.
So, let’s consider each method individually.
1. Cash On Delivery Payment
The Cash On Delivery Payment method can be set as the default payment option for a web store. If needed, this method can be chosen for some particular countries.
First, in the Configuration menu, expand Sales and click on the Payment methods tab in the panel under Sales.
Here, you will see the list of payment methods. Find the Cash On Delivery Payment section and click on it to expand. The panel with all the required settings will be opened.

Cash on Delivery Payment Settings
To confirm the use of this payment method, choose Yes in the Enabled field.
To identify the Cash On Delivery Payment method during the checkout process, enter the Title in the corresponding field.
Next, choose the Pending option in the New Order Status field. This status of an order will remain until the receipt of the payment is confirmed.
In the Payment from Applicable Countries field, choose between the following two options:
- All Allowed Countries: by default, the Cash On Delivery Payment method is used for customers from all countries specified in your store configuration.
- Specific Countries: if you choose this option, the list of specific countries for this payment method will become active. In the list, choose the countries in which the method will be applied.
After this, describe the Instructions for the method in the corresponding field.
Next, specify the number of orders for this payment method in the Minimum Order Total and Maximum Order Total fields accordingly. An order qualifies if the value is between or exactly matches the minimum or maximum total values set by you.
Almost done! Enter the number in the Sort Order field to determine the position of the Cash On Delivery Payment method in the list of all Magento 2 payment methods that is shown during the checkout process (for example, ‘0’ stands for ‘first’, ‘1’ for ‘second’, ‘2’ for ‘third’, and so on).
Finally, click on the Save Config button on the right top of the Configuration panel to apply your configuration of the method.
2. Check/Money Order
As in the case with the Cash On Delivery Payment option, you can choose the specific countries for which the Check/Money Order payment method will be applied or you can choose it as the default method for all countries. In addition, you can also set the maximum and minimum order values to be accepted.
Let’s consider the major steps of the configuration of the Check/Money Order method. First, expand the Check/Money Order option in the Payment Methods menu.

Check/Money Order Payment Settings
The following five steps of the configuration are the same as for the previous method: enable the method by choosing Yes in the Enable section, then enter the Title of the method, and set the New Order Status to Pending until the payment receipt is confirmed. After this, choose between the All Allowed Countries or Specific Countries options to define the countries in which this method will be applied.
Then, in the Make Check Payable To field, enter the name of the party to whom the check must be payable. In the Send Check To field section, enter the street address or the post-office Box where checks should be mailed.
Next, define the Minimum and Maximum Order Total in the corresponding fields that are needed to qualify the Check/Money Order payments. An order qualifies whether the total value matches the values specified or it is between them.
After this, enter your Sort Order number in the appropriate field to identify the position of the method in the list of all payment methods supported by your web store.
You are all set! Now, click on the Save Config button on the right top of the Configuration panel and enjoy the result!
3. Bank Transfer
With this option, you can accept payments that come from customer bank accounts and deposited into the merchant bank account of your web store.
Again, to configure Bank Transfer, you should open the Payment Methods menu in Configuration and then expand the Bank Transfer Payment option. To activate the method, choose the Yes option in the Enabled field.
The most part of the steps of the configuration of this payment method coincides with the steps of the configuration of the above-described methods. Having enabled the method, you should enter its Title, then set the New Order Status to Pending and choose the Countries in which the method will be applied – All Allowed Countries or Specific Countries.
Next, specify the Instructions that customers should follow according to this method. It’s recommended to include the following information in the instructions:
- The name of your bank account
- The number of your bank account
- Bank routing code
- Bank name
- Bank address
Then, set the Minimum and Maximum Order Total in the corresponding fields and the Sort Order number to determine the sequence of your Bank Transfer payment method in the list of all payment methods supported by your web store.
Configuration completed. Click on the Save Config button.
4. Zero Subtotal Checkout
The Zero Subtotal Checkout method is available only for orders created from the Payment Methods menu in the Admin Panel. For example, this method can be used in the following situations:
- The whole price of the purchase is covered by the discount.
- Customers add a downloadable product to their shopping cart, and the price equals zero.
- A coupon code covers the full price of products, including shipping.
As usual, the Zero Subtotal Checkout method can be accessed by users from the Payment Methods menu in the Sales section in Configuration. Again, you should activate the method by choosing the Yes option in the Enable field, then enter the Title of the method.
Typically, orders wait for authorization, so set the New Order Status to Pending. After the payment is authorized, the transaction begins processing.
After this, specify the countries that should support the Zero Subtotal Checkout method by choosing between the All Allowed Countries and Specific Countries options.
Then, choose a Sort Order number that will correspond to the position of this option in the list of all payment methods set for your web store. Again, “0” stands for “first”, “1” for “second”, and so on.
Finally, click on the Save Config button to apply the configured settings.
5. Purchase Order
The Purchase Order method is widely used in the B2B sector. With it, commercial customers can pay for authorized purchases by indicating the purchase order number. The purchase order is issued in advance by the company which makes the purchase in your store. After receiving your invoice, the company pays for the purchase.
It’s recommended to check the creditworthiness of customers before accepting their payments for a purchase.
The steps for configuration of this method are the same as for the Cash On Delivery Payment method. So, consider all these steps in the “Cash On Delivery Payment” paragraph again if you need to set up the Purchase Offer payment method for your web store.
After all is done, don’t forget to apply the configuration of the method by clicking on the Save Config button.
6. Authorize.net Direct Post
Authorize.net Direct Post is the last basic payment method that we’ll review in this guide. This method can be used to pay for purchases either from storefront or right from the Admin Panel of your Magento 2.
So, let’s find out how to configure this option in Magento 2.
As usual, the method is accessed from the Payment Methods menu in the Sales section in Configuration. Click on the Authorize.net Direct Post option (the last in the list of payment options) to expand it.

Authorize.net Payment Settings
Activate the method by choosing Yes in the Enabled field. Then, you should specify the Payment Action by choosing from the following options:
- Authorize Only - creates an order after authorizing a customer card.
- Authorize and Capture - simultaneously creates invoices, captures funds, and places an order.
After choosing the required option, enter the name of the method in the Title field.
Before moving on to the next step of configuration, you should create an Authorize.net account. The API Login ID, Transaction Key, and Merchant MD5 that you specified when creating the account are required for the corresponding fields in the Configuration panel.
Next, set the New Order Status to Processing. In the Test Mode field, choose between two following options:
- Yes – if you need to temporarily run this payment method in a test environment.
- No – if you are ready for Authorize.Net live transactions.
The Gateway URL and Transaction Details URL fields should be filled with the default link from your Authorize.net profile.

Authorize.net Payment Settings
To start working with the Authorize.net option, you will also need to configure some extra settings. First, choose the Accepted Currency that you need for your payment operations. Set Debug to Yes if you need all the payment information to be transmitted between your web store and your Authorize.net account.
If you want customers to be notified about their completed Authorized.Net transactions, set the Email Customer option to Yes.
In the Merchant’s Email field, specify the email address on which you will receive notifications of Direct Post orders. If you do not need this option, just leave this field blank.

Authorize.net Payment Settings
In addition, you can specify Credit Card Types that should be supported by your store. Next, set Credit Card Verification to Yes to allow customers to enter verification codes. Also, choose between the Applicable Countries options: All Allowed Countries or Specific Countries.
Finally, define values in the Minimum Order Total, Maximum Order Total, and Sort Order fields.
All is done! Click on the Save Config button to apply the configuration.
Conclusion
With Magento 2, you can configure any basic payment method without much difficulty. Just follow the instructions from our guide, and soon, you will be able to provide your customers with a perfect purchasing experience.


