Magento 2 Tutorial for Beginners. Part 1: Installation
Categorized as : Ecommerce
In our Magento 2 tutorial, we will tell you about the things you should know to start working with the platform successfully.

The tutorial embraces the overview, installation, configuration, and updating stages, Magento themes, marketing promotions, and so on.
The “CMS” abbreviation works for Magento only partially. Yes, it is primarily a content management system, but the capabilities of its engine also allow developing applications. This makes Magento a content management framework and development environment.
The first version of the platform was released in 2008. For many years, Magento has ranked among the top e-commerce products, and today is used by multiple online stores with a worldwide reputation. The Magento team constantly develops the project, so the latest Magento 2 combines high performance with powerful functionality.
As any sophisticated and complex platform, Magento has its own coding standards to be adhered by the Magento team and all the contributors. The standards include the next main sections:
Additionally, Magento advises using the provided HTML Style Guides with all standards covered by the principal coding guidelines.
With the advent of Magento 2, the technology stack for the platform was improved considerably. Thus, the comparison between the versions used by Magento 1 and Magento 2 differs as follows:

For detailed information about the technology stack of Magento 2, visit the official site.
We’ve already said that before installing Magento for any development needs you should ensure that your installation environment complies with the minimal requirements applied to Magento. But, in order to make your work more effective and consistent, you can take advantage of the Magento DevBox.
This development option allows you to quickly set up all the software required for the development of add-ons and extensions for Magento 2 with a single command. Available for both, Mac and Windows, DevBox Beta includes necessary web and database servers, Redis and Varnish cache services, Elasticsearch, and RabbitMQ.
Note: Currently Magento DevBox is being updated and not available for download. But, later you can find it in the DevBox Github repository. For more details please visit the DevBox reference page on the Magento official website.
Beginning users often confuse Magento framework with the Zend web application framework provided with Magento. They are quite different things as Magento Framework is responsible for the application component interactions, while Zend is designed to support the development of web applications, including APIs. So, Magento is the higher-level framework based on Zend Framework 2.
Magento contains 3 core entities: Modules, Themes, and Language packages.
Modules are made to accomplish particular business functions interacting with other parts of the application. Themes are responsible for the visual representation of a Magento store. And, Language packages make Magento suitable for international and global sales.
Magento 2 uses Composer to allow users to manage components and dependencies. What’s more important is that with Composer third-party libraries can be updated and maintained without touching the main application code. Composer is not difficult to work with, as it has a convenient component structure. Moreover, it allows you to see the versions of all dependencies.
With Composer, you don’t have to manage library dependencies manually, as it manages them by itself, thus, saving your time.
So, this is a brief description of the platform from the developer's point of view. For everyone else – welcome to the Magento’s official site to see more details about the platform.
Anyway, first of all, Magento 2 is made for customers and merchants allowing them to shop and sell conveniently and profitably. So, what are the main advantages of Magento 2 for store owners?
Rich Functionality
This is the first thing that users mark after installing Magento 2. Product promotions, coupons, reports, sales statistics, various catalog filters, data caches, ability to change page layouts, etc. – all this is available "out of the box", i.e. you do not need to spend extra money on the purchase of additional modules.
Open Source Software
In fact, Magento 2 is available in two versions: Open Source and Commerce editions. The first one is absolutely free and allows any code changes and customizations. Magento 2 Commerce edition is chargeable and is distributed both as standalone and cloud-hosted software.
Large Number of Modules and Themes
As the proverb says, "demand creates supply." Therefore, due to an extraordinary popularity of the product, a lot of add-ons for it were developed. The Magento community includes numerous programmers around the world, so you will not encounter any shortage of performers.
Multi-language and Multi-site Support
Magento 2 allows you to create several stores on the same installation and manage them from one dashboard. Also, you can choose any language from the officially available by default.
Of course, it’s just a brief enumeration of the advantages the platform provides to online merchants. Anyway, this brief insight encourages any entrepreneur to start considering Magento as the next point of destination for their successfully developing business.
Before starting the installation, check the full list of the system requirements. Set up one or several hosts (depends on your needs). Be ready to back up the system to its initial state in case if something goes wrong during the installation process. It’s recommended to install Magento 2 in the development environment in order to have access to all the components. Update the required software to its latest version if needed. Now, you are all set and ready for the next step!
First, download the distribution kit from the official site. Currently, the latest Magento Open Source 2.2 is available!
Here, a user is offered with various options for downloading: "clean" version, demo version (with sample data), various patches, instructions for installation through Composer, etc.
The last one perfectly suits for those who want to install add-ons on Magento 2. Also, this way of installation will help you to update the platform without any problems in the future.
If you decided to act this way, the first thing you need to do is to obtain authentication keys – a secure key-password pair that you will need when installing Magento via Composer. See instructions here. In this case, the installation of Magento 2 will be performed from the GitHub repository.
By the way, registration on GitHub is useful for many other purposes. Many products are installed in the same manner. For example, the Yii2 Framework is performed this way.
As soon you installed Composer successfully, you need to get the Magento metapackage either for the Open Source or Commerce versions.
In addition to Composer, Magento can be installed in a "classic" way – by downloading a zip archive with the platform files and running the installation process in the browser.
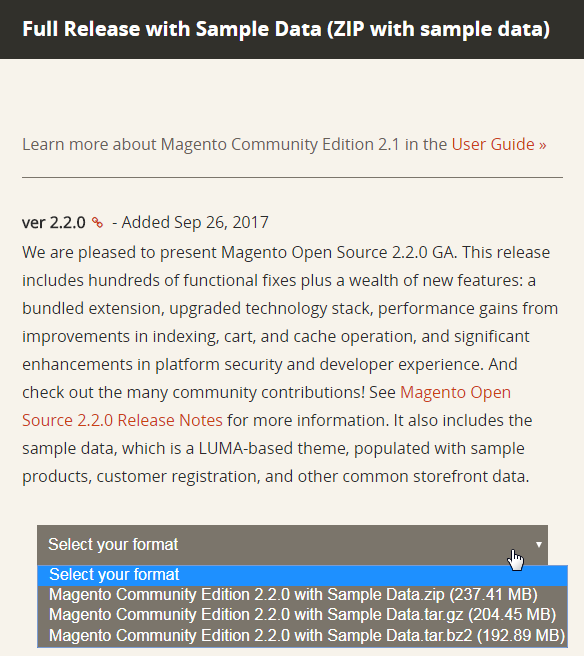
To download, just choose the needed version, then click “Select your format” and choose the appropriate option:
It should be noted that if you chose to install the version with no sample data, your site will not look like a ready-to-use online store. To give a store a decent look, we recommend installing the version with sample data, which represents the design theme and a trial set of products and categories. But, you will need more time to download the version and install the provided sample data. Moreover, sample data will not help you make a unique store and the theme and a set of sample products will have to be changed eventually.
Thus, installing Magento with sample data is great to discover all the platform abilities. While, installing Magento without sample data is a standard way to start with your own store.
There are two installation options for Magento 2: via the Setup Wizard or Command Line. The Magento team recommends using the first option for less experienced users and we’ll follow their advice.
The basic steps of the Magento 2 installation look like this:

Open any web browser and enter the domain name of your site into the address bar (the name of the folder into which you put the files from the Magento 2 distribution).
Next, read and agree with the terms of the licensing agreement.
On the following step let the system check the environment to be ready for successful Magento installation, including PHP versioning and file permissions.
Next, add a database providing all the required database information, including a server host, server username, database server password (optional), database name, and table prefix (optional).
Database Server Host – the name (or address) of the host. In most cases (if the database server is not located on a separate machine), a localhost will suit you. In case of installation on hosting, you should consult your hosting provider in advance. Also, in this field, you can specify the port in the format "hostname: 3306".
Tables Prefix – the prefix of the database tables. The value entered here will be added before the names of the database tables. Thus, it is possible to store tables for several sites within one database. If you do not need it, then the field can be left blank (not mandatory).
In the third step, you need to set up web configuration of your store, including your store frontend and admin URL addresses.
Your Store Address. This is the URL of your future store where you and your customers will get access to the storefront. The address entered must be of the URL format, i.e. it must start with the protocol (HTTP / HTTPS) and contain the domain of at least the second level. If the specified address does not match the specified template, then the Magento 2 installer just will not let you proceed to the next step.
Magento Admin Address – URL for the access to the admin panel. Here, you can enter anything you like. One must say that this option allows you to significantly increase the security of your future site because hackers who decide to gain access to the admin area will spend enough time to find out the custom URL. At the same time, you will have enough time to track them by logs and block by IP. In general, it should be noted that the issue of security in Magento 2 has been given enough attention, which qualitatively distinguishes this engine from other platforms.
The Advanced Options at this stage allow you to use the HTTPS protocol for the Magento storefront and admin area if you have an SSL certificate; enable Apache rewrites, and choose the type of the encryption key. You can either use your own one or take advantage of the keys generated by Magento.
The next step allows you to create a store with sample data (if necessary), and select the default time zone, currency, and language.
Creating an admin account at the next stage of the wizard, you’ll need to provide a username, email, and password.
Username and User Password – the data used to connect to the database. If you work with a local web server, the "User Password" field can be empty in this case. If you created a separate user to work with the database, you will need to enter this data. When installing Magento 2 on hosting, you will need to check the user’s name of the database and password with your hosting provider.
After that, the wizard will start the installation process and install Magento 2 according to the provided configuration. As soon as the installation is completed, enter the admin area and clear cache on the backend Cache Management page.
That’s all. Magento 2 is installed successfully. Now you can check it on the frontend.
To be continued...

The tutorial embraces the overview, installation, configuration, and updating stages, Magento themes, marketing promotions, and so on.
So, what is Magento?
The “CMS” abbreviation works for Magento only partially. Yes, it is primarily a content management system, but the capabilities of its engine also allow developing applications. This makes Magento a content management framework and development environment.
The first version of the platform was released in 2008. For many years, Magento has ranked among the top e-commerce products, and today is used by multiple online stores with a worldwide reputation. The Magento team constantly develops the project, so the latest Magento 2 combines high performance with powerful functionality.
Magento 2 for Developers
Magento 2 Coding Standards
As any sophisticated and complex platform, Magento has its own coding standards to be adhered by the Magento team and all the contributors. The standards include the next main sections:
- Code demarcation standards are mainly established to dissociate the visual CSS layer, functional JavaScript, HTML markup, and PHP classes.
- PHP Coding Standards. These coding standards are entitled by PHP itself, and currently, Magento recommends to follow the PSR-1 Basic Coding Standard and PSR-2 Coding Style Guide. In order to force the use of the above standards the team also suggests to use PHP Code Sniffer.
- DocBlock Standard. Following the DocBlock standards is also desirable for code comments in order to create a consistent environment for all types of code, including third-party extensions.
- JavaScript Standards. The scope of JavaScript Standards involves coding and DocBlock standards.
- jQuery Widget Coding Standard includes some naming conventions, development, and architecture standards for building all jQuery widgets.
- LESS Coding Standard. The same as the other standards, LESS and CSS coding is required to be provided with conventional formatting, including indentations, braces, quotes, property line breaks, etc.
Additionally, Magento advises using the provided HTML Style Guides with all standards covered by the principal coding guidelines.
Technology Stack
With the advent of Magento 2, the technology stack for the platform was improved considerably. Thus, the comparison between the versions used by Magento 1 and Magento 2 differs as follows:

Magento 2 vs. Magento 1
For detailed information about the technology stack of Magento 2, visit the official site.
Magento DevBox
We’ve already said that before installing Magento for any development needs you should ensure that your installation environment complies with the minimal requirements applied to Magento. But, in order to make your work more effective and consistent, you can take advantage of the Magento DevBox.
This development option allows you to quickly set up all the software required for the development of add-ons and extensions for Magento 2 with a single command. Available for both, Mac and Windows, DevBox Beta includes necessary web and database servers, Redis and Varnish cache services, Elasticsearch, and RabbitMQ.
Note: Currently Magento DevBox is being updated and not available for download. But, later you can find it in the DevBox Github repository. For more details please visit the DevBox reference page on the Magento official website.
Magento Framework
Beginning users often confuse Magento framework with the Zend web application framework provided with Magento. They are quite different things as Magento Framework is responsible for the application component interactions, while Zend is designed to support the development of web applications, including APIs. So, Magento is the higher-level framework based on Zend Framework 2.
Magento Components
Magento contains 3 core entities: Modules, Themes, and Language packages.
Modules are made to accomplish particular business functions interacting with other parts of the application. Themes are responsible for the visual representation of a Magento store. And, Language packages make Magento suitable for international and global sales.
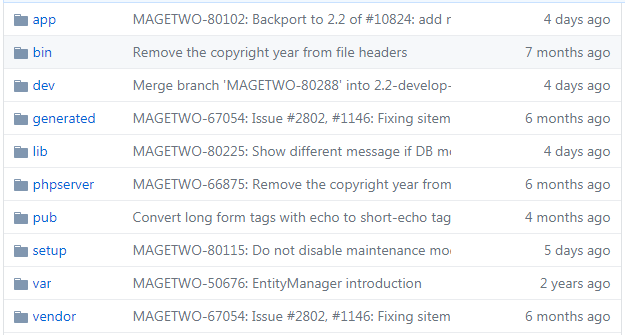
Magento 2 Directory Structure

Magento 2 Directory Structure
- app - includes the code and design folders. These folders contain files for Magento extensions and themes;
- bin - contains the Magento command line utility;
- dev - hosts files for the Testing Framework and development tools;
- lib - comprises necessary libraries and packages;
- php server - contains the configuration files for the PHP built-in webserver;
- pub - Magento static and media files are stored here;
- setup - contains setup scripts and performance toolkit folders;
- var - cache files, logs, and reports are stored here;
- vendor - is used for mandatory third-party applications, e.g. Composer.
Composer for Magento 2
Magento 2 uses Composer to allow users to manage components and dependencies. What’s more important is that with Composer third-party libraries can be updated and maintained without touching the main application code. Composer is not difficult to work with, as it has a convenient component structure. Moreover, it allows you to see the versions of all dependencies.
With Composer, you don’t have to manage library dependencies manually, as it manages them by itself, thus, saving your time.
So, this is a brief description of the platform from the developer's point of view. For everyone else – welcome to the Magento’s official site to see more details about the platform.
Magento 2 for Store Owners
Anyway, first of all, Magento 2 is made for customers and merchants allowing them to shop and sell conveniently and profitably. So, what are the main advantages of Magento 2 for store owners?
Rich Functionality
This is the first thing that users mark after installing Magento 2. Product promotions, coupons, reports, sales statistics, various catalog filters, data caches, ability to change page layouts, etc. – all this is available "out of the box", i.e. you do not need to spend extra money on the purchase of additional modules.
Open Source Software
In fact, Magento 2 is available in two versions: Open Source and Commerce editions. The first one is absolutely free and allows any code changes and customizations. Magento 2 Commerce edition is chargeable and is distributed both as standalone and cloud-hosted software.
Large Number of Modules and Themes
As the proverb says, "demand creates supply." Therefore, due to an extraordinary popularity of the product, a lot of add-ons for it were developed. The Magento community includes numerous programmers around the world, so you will not encounter any shortage of performers.
Multi-language and Multi-site Support
Magento 2 allows you to create several stores on the same installation and manage them from one dashboard. Also, you can choose any language from the officially available by default.
Of course, it’s just a brief enumeration of the advantages the platform provides to online merchants. Anyway, this brief insight encourages any entrepreneur to start considering Magento as the next point of destination for their successfully developing business.
Preparing to Install
Before starting the installation, check the full list of the system requirements. Set up one or several hosts (depends on your needs). Be ready to back up the system to its initial state in case if something goes wrong during the installation process. It’s recommended to install Magento 2 in the development environment in order to have access to all the components. Update the required software to its latest version if needed. Now, you are all set and ready for the next step!
First, download the distribution kit from the official site. Currently, the latest Magento Open Source 2.2 is available!
Here, a user is offered with various options for downloading: "clean" version, demo version (with sample data), various patches, instructions for installation through Composer, etc.
The last one perfectly suits for those who want to install add-ons on Magento 2. Also, this way of installation will help you to update the platform without any problems in the future.
Installation with Composer
If you decided to act this way, the first thing you need to do is to obtain authentication keys – a secure key-password pair that you will need when installing Magento via Composer. See instructions here. In this case, the installation of Magento 2 will be performed from the GitHub repository.
By the way, registration on GitHub is useful for many other purposes. Many products are installed in the same manner. For example, the Yii2 Framework is performed this way.
As soon you installed Composer successfully, you need to get the Magento metapackage either for the Open Source or Commerce versions.
In addition to Composer, Magento can be installed in a "classic" way – by downloading a zip archive with the platform files and running the installation process in the browser.
To download, just choose the needed version, then click “Select your format” and choose the appropriate option:

Magento 2 for Download
To download the Magento 2 distribution kit, you need to create an account on the official Magento site. After that, you need to manually unpack the downloaded archive and upload files to your server web root. Well, now, we have all the necessary files for installing our version of Magento 2.
It should be noted that if you chose to install the version with no sample data, your site will not look like a ready-to-use online store. To give a store a decent look, we recommend installing the version with sample data, which represents the design theme and a trial set of products and categories. But, you will need more time to download the version and install the provided sample data. Moreover, sample data will not help you make a unique store and the theme and a set of sample products will have to be changed eventually.
Thus, installing Magento with sample data is great to discover all the platform abilities. While, installing Magento without sample data is a standard way to start with your own store.
Installing Magento 2
There are two installation options for Magento 2: via the Setup Wizard or Command Line. The Magento team recommends using the first option for less experienced users and we’ll follow their advice.
The basic steps of the Magento 2 installation look like this:

Open any web browser and enter the domain name of your site into the address bar (the name of the folder into which you put the files from the Magento 2 distribution).
Next, read and agree with the terms of the licensing agreement.
On the following step let the system check the environment to be ready for successful Magento installation, including PHP versioning and file permissions.
Next, add a database providing all the required database information, including a server host, server username, database server password (optional), database name, and table prefix (optional).
Database Server Host – the name (or address) of the host. In most cases (if the database server is not located on a separate machine), a localhost will suit you. In case of installation on hosting, you should consult your hosting provider in advance. Also, in this field, you can specify the port in the format "hostname: 3306".
Tables Prefix – the prefix of the database tables. The value entered here will be added before the names of the database tables. Thus, it is possible to store tables for several sites within one database. If you do not need it, then the field can be left blank (not mandatory).
In the third step, you need to set up web configuration of your store, including your store frontend and admin URL addresses.
Your Store Address. This is the URL of your future store where you and your customers will get access to the storefront. The address entered must be of the URL format, i.e. it must start with the protocol (HTTP / HTTPS) and contain the domain of at least the second level. If the specified address does not match the specified template, then the Magento 2 installer just will not let you proceed to the next step.
Magento Admin Address – URL for the access to the admin panel. Here, you can enter anything you like. One must say that this option allows you to significantly increase the security of your future site because hackers who decide to gain access to the admin area will spend enough time to find out the custom URL. At the same time, you will have enough time to track them by logs and block by IP. In general, it should be noted that the issue of security in Magento 2 has been given enough attention, which qualitatively distinguishes this engine from other platforms.
The Advanced Options at this stage allow you to use the HTTPS protocol for the Magento storefront and admin area if you have an SSL certificate; enable Apache rewrites, and choose the type of the encryption key. You can either use your own one or take advantage of the keys generated by Magento.
The next step allows you to create a store with sample data (if necessary), and select the default time zone, currency, and language.
Creating an admin account at the next stage of the wizard, you’ll need to provide a username, email, and password.
Username and User Password – the data used to connect to the database. If you work with a local web server, the "User Password" field can be empty in this case. If you created a separate user to work with the database, you will need to enter this data. When installing Magento 2 on hosting, you will need to check the user’s name of the database and password with your hosting provider.
After that, the wizard will start the installation process and install Magento 2 according to the provided configuration. As soon as the installation is completed, enter the admin area and clear cache on the backend Cache Management page.
That’s all. Magento 2 is installed successfully. Now you can check it on the frontend.
To be continued...


