How to Configure Product Attributes in Magento 2: Quick Tutorial
Categorized as : Magento 2 Extensions
The assortment of any web marketplace is built on specific products with related attributes.

In our foregoing user guide, we explained how to compose configurable products in Magento 2. Nevertheless, for the sensible arrangement of such product type, one should preliminary take care of the conforming product attributes. This issue will be reviewed in our today’s article.
Besides featuring product’s specific info, product attributes designate the input types, say, sliders, dropdowns, swatches, and the like, of product options picked by shoppers when filtering products in a catalog.
To embark the configuration, click Stores in the Magento 2 dashboard and choose Product underneath Attributes.
Next, click Add New Attribute.

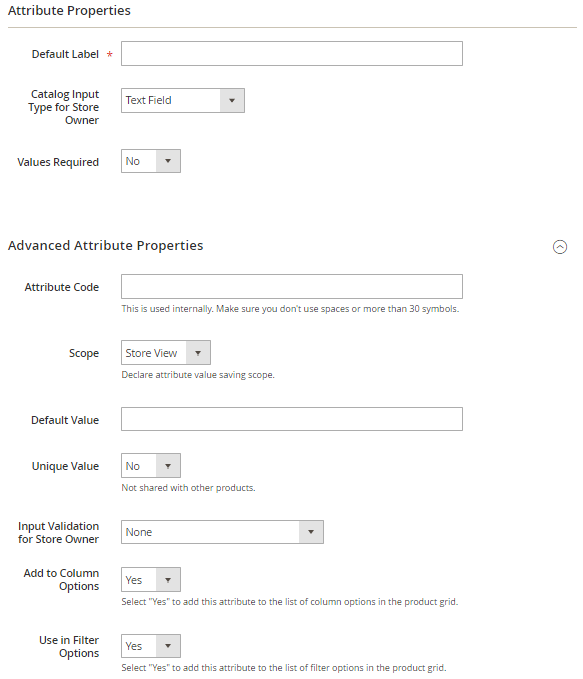
Here, indicate the attribute’s Default Label.
In the Catalog Input Type for Store Owner box, decide how users will select the attribute options. Read about attribute input types here.
For the Dropdown and Multiple Select inputs, determine the sequence of options among which shoppers will later choose. In Manage Options, click Add Option and then identify the individual option values for distinct store views to be shown first in the selection popup.
You can append multiple options and determine their sequence by moving the conforming box in the section’s left top corner. To make a particular option visible in the drop-down menu list when it is collapsed, check the Is Default box alongside the according option.
Now, let’s configure settings in the Advanced Attributes Properties section.
First, identify the Attribute Code. The code should contain only lowercase characters.
Next, define the store hierarchy level for the attribute by choosing among the Store View, Website, and Global options in the Scope box. Learn about store hierarchy levels in our dedicated blog post.
If the attribute conforms only to one product, set Unique Value to Yes.
Next, set the channel for the Input Validation for Store Owner. Notice that the None option disables input validation.
To insert the future attribute as a dedicated column in the grid, choose Yes in Add to Column Options. To filter the grid by the column, choose Yes in Use in Filter Options.
Next, click Save and Continue Edit.
We’ve done configuring properties, now, let’s deal with labels. Pick Manage Labels in the Attribute Information left sidebar.
In the Manage Labels menu, you can manage attribute titles for each distinct store view. Specify the required titles and then click Save and Continue Edit.
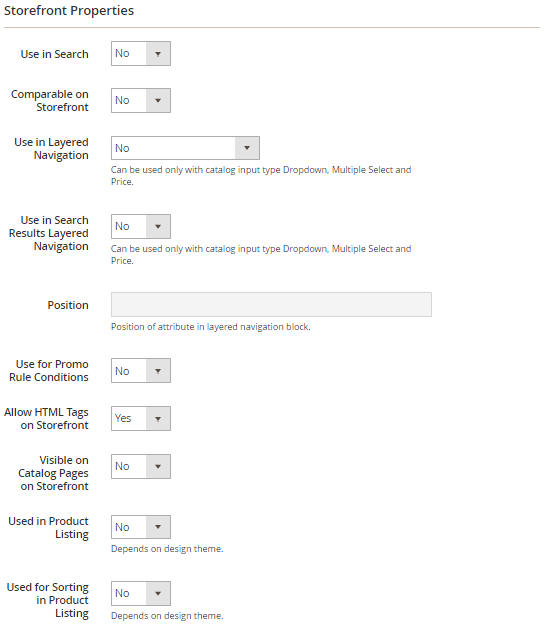
Lastly, let’s see how the Storefront Properties set of options should be configured.

To insert the attribute into search, choose Yes in Use in Search.
To allow shoppers to compare products by implementing the attribute, choose Yes in the Comparable on Storefront box.
The Use in Layered Navigation and Use in Search Results Layered Navigation options are available upon choosing the Dropdown, Multiple Select, or Price input types. This way, if the options are available, they can be switched on by choosing Yes in the conforming boxes.
If the attribute is included in navigation, specify its Position.
You can utilize the attribute in pricing rules by setting Use for Promo Rule Conditions to Yes.
To make the attribute’s text editable, choose Yes in the Allow HTML Tags on Storefront field.
Next, choose Yes in Visible on Catalog Pages on Storefront to expose the attribute in the catalog if needed.
To append the attribute to product listings, enable the Used in Product Listing option.
Finally, decide whether to utilize the attribute for sorting by choosing between the Yes and No options in the Used for Sorting in Product Listing box. Click Save Attribute.
Thanks to Magento 2, you can also compile the whole attribute sets. This topic will be covered further in the article.
Click Stores on the dashboard and select Attribute Set underneath Attributes.
In the menu opened, first, click Add Attribute Set and identify the future set’s Name.
In the Based On box, choose the attribute set to be a sample for the set to be established. Save changes.
The following menu is broken down into three columns. The first column, Edit Attribute Set Name, encompasses the attribute set created a while ago. You can rename it if needed.
The second column, Groups, exposes the attribute groups related to the composed set.
The Unassigned Groups column contains values not related to the set. Still, you can easily assign them by dragging the corresponding attributes to Groups.
You can append new attribute groups by clicking Add New.
Lastly, click Save to put changes in place.
The possibilities of Magento 2 suggest flawless product attribute setting. Besides, attribute groups and their values are completely manageable, which ensures the straightforward control at all attribute levels.

In our foregoing user guide, we explained how to compose configurable products in Magento 2. Nevertheless, for the sensible arrangement of such product type, one should preliminary take care of the conforming product attributes. This issue will be reviewed in our today’s article.
Product Attributes Configuration
Besides featuring product’s specific info, product attributes designate the input types, say, sliders, dropdowns, swatches, and the like, of product options picked by shoppers when filtering products in a catalog.
To embark the configuration, click Stores in the Magento 2 dashboard and choose Product underneath Attributes.
Next, click Add New Attribute.

The Attribute Properties Menu
Here, indicate the attribute’s Default Label.
In the Catalog Input Type for Store Owner box, decide how users will select the attribute options. Read about attribute input types here.
For the Dropdown and Multiple Select inputs, determine the sequence of options among which shoppers will later choose. In Manage Options, click Add Option and then identify the individual option values for distinct store views to be shown first in the selection popup.
You can append multiple options and determine their sequence by moving the conforming box in the section’s left top corner. To make a particular option visible in the drop-down menu list when it is collapsed, check the Is Default box alongside the according option.
Now, let’s configure settings in the Advanced Attributes Properties section.
First, identify the Attribute Code. The code should contain only lowercase characters.
Next, define the store hierarchy level for the attribute by choosing among the Store View, Website, and Global options in the Scope box. Learn about store hierarchy levels in our dedicated blog post.
If the attribute conforms only to one product, set Unique Value to Yes.
Next, set the channel for the Input Validation for Store Owner. Notice that the None option disables input validation.
To insert the future attribute as a dedicated column in the grid, choose Yes in Add to Column Options. To filter the grid by the column, choose Yes in Use in Filter Options.
Next, click Save and Continue Edit.
We’ve done configuring properties, now, let’s deal with labels. Pick Manage Labels in the Attribute Information left sidebar.
In the Manage Labels menu, you can manage attribute titles for each distinct store view. Specify the required titles and then click Save and Continue Edit.
Lastly, let’s see how the Storefront Properties set of options should be configured.

The Storefront Properties Menu
To insert the attribute into search, choose Yes in Use in Search.
To allow shoppers to compare products by implementing the attribute, choose Yes in the Comparable on Storefront box.
The Use in Layered Navigation and Use in Search Results Layered Navigation options are available upon choosing the Dropdown, Multiple Select, or Price input types. This way, if the options are available, they can be switched on by choosing Yes in the conforming boxes.
If the attribute is included in navigation, specify its Position.
You can utilize the attribute in pricing rules by setting Use for Promo Rule Conditions to Yes.
To make the attribute’s text editable, choose Yes in the Allow HTML Tags on Storefront field.
Next, choose Yes in Visible on Catalog Pages on Storefront to expose the attribute in the catalog if needed.
To append the attribute to product listings, enable the Used in Product Listing option.
Finally, decide whether to utilize the attribute for sorting by choosing between the Yes and No options in the Used for Sorting in Product Listing box. Click Save Attribute.
Thanks to Magento 2, you can also compile the whole attribute sets. This topic will be covered further in the article.
Attribute Set Configuration
Click Stores on the dashboard and select Attribute Set underneath Attributes.
In the menu opened, first, click Add Attribute Set and identify the future set’s Name.
In the Based On box, choose the attribute set to be a sample for the set to be established. Save changes.
The following menu is broken down into three columns. The first column, Edit Attribute Set Name, encompasses the attribute set created a while ago. You can rename it if needed.
The second column, Groups, exposes the attribute groups related to the composed set.
The Unassigned Groups column contains values not related to the set. Still, you can easily assign them by dragging the corresponding attributes to Groups.
You can append new attribute groups by clicking Add New.
Lastly, click Save to put changes in place.
Conclusion
The possibilities of Magento 2 suggest flawless product attribute setting. Besides, attribute groups and their values are completely manageable, which ensures the straightforward control at all attribute levels.


