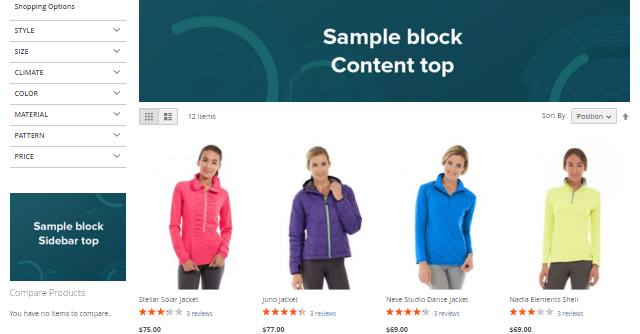
New and Free. Rich Banner Slider for Magento 2 Stores
Categorized as : Magento 2 Extensions
What is the way to spectacularly present your brands (products, services, promos, etc.) in just 2 or 3 seconds to a new visitor of your store?

You may say there is an ocean of ideas, but we’d like to present your a ready-to-use solution - Rich Banner Slider for Magento 2.
 Free. That’s the core definition of this extension, both in terms of price and your freedom to use an overwhelming number of ways to welcome and endear an online visitor. The module works just according to the classical marketing funnel (Attention -> Interest -> Consideration), and you already see that newbie seriously evaluates the possibility to make some purchases in your store.
Traditionally we do not only pay attention to the frontend functionality, but also provide Magento admins with advanced usability and rich configuration options. The whole process of creating and placing new banners will hardly take much longer than the time customers spend to walk through the slides in front.
Slides are basic elements of the extension creating new banners brick by brick. You can use the same slides in different banners still getting individual statistics of their effectiveness everywhere they are used.
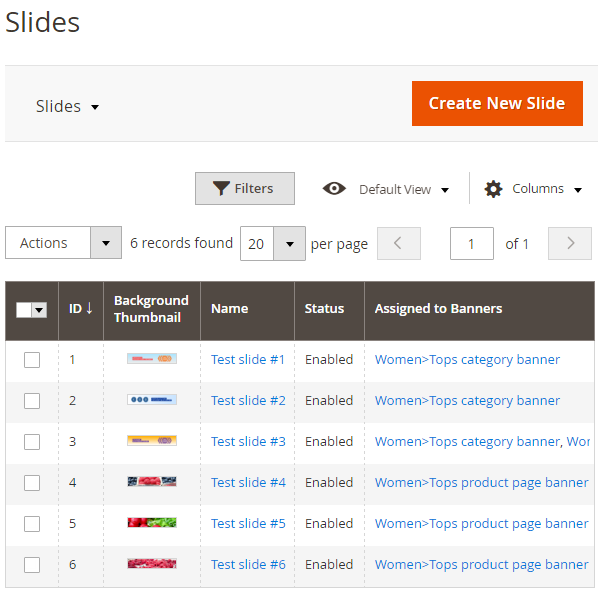
The starting point to create a new slide is located at Content -> Rich Banner Slider by Aheadworks -> Slides. Except the standard Magento grid filtering and configuration options, the Slides grid contains some extra ad-hoc usability enhancements.
The process of creating new slides is simple and straightforward. In the General Information section you should name the slide, assign it to the banner, enable it, specify eligible store views and customer groups, and schedule its displays.
Next, you should upload the background image or specify its URL and provide its title and alt attributes. By the way, that’s not the only SEO feature, since the URL Options section, alongside the URL and Open URL in New Window options, allows you to add the “nofollow” tag to slide URLs, and this way protect your store from low-quality outbound links, if necessary.
The Banners Grid also makes it possible to manage banners immediately. In particular, you can delete, enable or disable certain units.
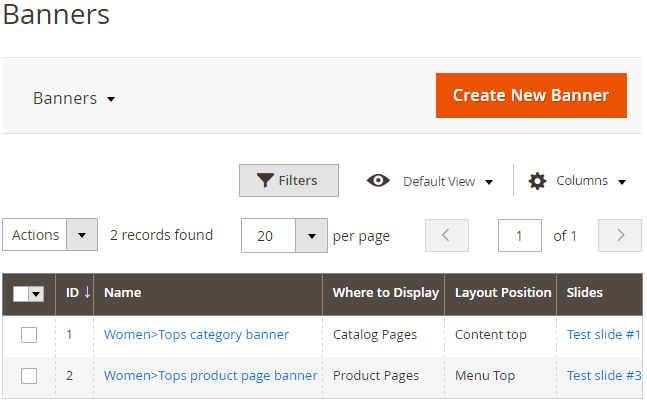
The new banner creation process contains four steps: General Information, Position, Behavior, and Slides.
Now, when the banners are created and slides are assigned, you can enjoy the results of your work on the frontend. However, it’s not the final step of the entire process. You still need to evaluate and adjust the effectiveness of each banner and slide, and in this case, you can take advantage of the provided Statistics section. The section shows you the number of slide impressions, their clicks, and CTR.
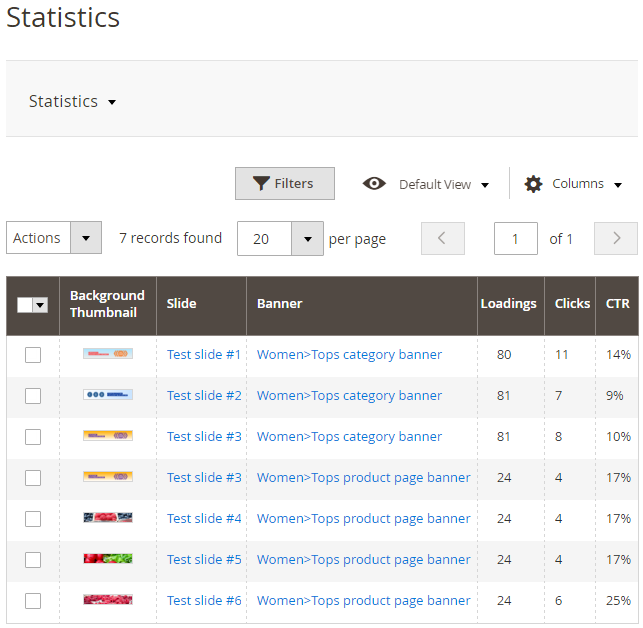
Using this information you can find out most effective pages and positions for banners, determine most welcomed promotions and notifications by certain customers in certain store views.
Alongside the naturally provided website space savings and freshness of content, Rich Banner Slider for Magento 2 also delivers advanced usability opportunities and make the process of extension configuration just pleasant. So, if you find this extension suitable for your online store, you are welcome to download it for free on the product page of the extension.
More Information is available from the product documentation or you can try it in action in our backend and frontend demos.

Rich Banner Slider. Frontend View.
You may say there is an ocean of ideas, but we’d like to present your a ready-to-use solution - Rich Banner Slider for Magento 2.
Traditionally we do not only pay attention to the frontend functionality, but also provide Magento admins with advanced usability and rich configuration options. The whole process of creating and placing new banners will hardly take much longer than the time customers spend to walk through the slides in front.
Rich Banner Slider Features
- Multiple banners;
- Advanced banner location, display, and animation options;
- Multiple slides;
- Advanced slides targeting, scheduling and segmentation options;
- Slide statistics;
- Included unit tests.
Backend Setup and Configuration
Slides Grid
Slides are basic elements of the extension creating new banners brick by brick. You can use the same slides in different banners still getting individual statistics of their effectiveness everywhere they are used.

Slides Grid
The starting point to create a new slide is located at Content -> Rich Banner Slider by Aheadworks -> Slides. Except the standard Magento grid filtering and configuration options, the Slides grid contains some extra ad-hoc usability enhancements.
- Preview Popup. Just after the creation or before adding to another banner you can preview the slide just here in the pop-up window. And, it seems to be even more useful, as far as you can even manage slides without leaving the grid;
- Actions. The Slides grid allows you to add and/or remove slides from banners, delete them permanently and change their statuses on the spot. For the purpose you just need to checkmark the slide and choose the desired action.
New Slides
The process of creating new slides is simple and straightforward. In the General Information section you should name the slide, assign it to the banner, enable it, specify eligible store views and customer groups, and schedule its displays.
Next, you should upload the background image or specify its URL and provide its title and alt attributes. By the way, that’s not the only SEO feature, since the URL Options section, alongside the URL and Open URL in New Window options, allows you to add the “nofollow” tag to slide URLs, and this way protect your store from low-quality outbound links, if necessary.
Banners Grid
The Banners Grid also makes it possible to manage banners immediately. In particular, you can delete, enable or disable certain units.

Banners Grid
New Banners
The new banner creation process contains four steps: General Information, Position, Behavior, and Slides.
- General Information. The General Information section has only two points: name and enable/disable switch button.
- Position. Banners positioning contains two options: Where to Display and Layout Position. The first option allows you to choose among Home, Product and Catalog pages, while the second one positions banners within the page (Menu Top, Menu Bottom, Content Top, Page Bottom).
- Behavior. In order to make slides natural and suitable for the appearance of your store you need to adjust their behavior carefully. The section includes two animated effects, slide transition and pause between transitions time settings. It also allows you to stop animation on mouseover and includes the options displaying arrows, navigation bullets, and the one to display slides randomly.
- Slides. The Slides section lists all the created slides and enables you to select the slides you need to display within the banner.
Statistics
Now, when the banners are created and slides are assigned, you can enjoy the results of your work on the frontend. However, it’s not the final step of the entire process. You still need to evaluate and adjust the effectiveness of each banner and slide, and in this case, you can take advantage of the provided Statistics section. The section shows you the number of slide impressions, their clicks, and CTR.

Statistics Grid
Using this information you can find out most effective pages and positions for banners, determine most welcomed promotions and notifications by certain customers in certain store views.
Conclusion
Alongside the naturally provided website space savings and freshness of content, Rich Banner Slider for Magento 2 also delivers advanced usability opportunities and make the process of extension configuration just pleasant. So, if you find this extension suitable for your online store, you are welcome to download it for free on the product page of the extension.
More Information is available from the product documentation or you can try it in action in our backend and frontend demos.


