
User Manual - Advanced Reports
- Installing Advanced Reports
- Updating to a New Version
- Set up cron
- Uninstalling Advanced Reports
- Compatibility
- Introducing Advanced Reports
- Extension Settings
- Report Indexes
- Using Advanced Reports
- Integrations
- Troubleshooting
Magento 2 Advanced Reports provides a comprehensive overview of a web store performance. The data reported comes via 10 report widgets and 15 reports made against a variety of metrics providing a comprehensive overview of your web store performance. The data reported can be compared/contrasted by various time periods, furthermore it can be sorted by specific customer segments. Each report reflects a specific aspect of performance of the store at a varying level of elaboration. The reports can be viewed and emailed, due mailing schedule arranged.
Installing Advanced Reports
Command Line Installation
- Backup your web directory and store database
- Download the Advanced Reports installation package
- Upload contents of the Advanced Reports installation package to your store root directory
- In SSH console of your server navigate to your store root folder:
cd path_to_the_store_root_folder |
run the following command:
php bin/magento module:enable Aheadworks_AdvancedReports |
then:
php bin/magento setup:upgrade |
after:
php bin/magento setup:static-content:deploy -f |
5. Flush store cache; log out from the backend and log in again
|
Make sure the installation is done from the FTP Administrator account. Otherwise, set 775 permissions to the store root directory after the extension is deployed. |
Composer Installation
If you are installing an extension from Aheadworks for the first time, you need to add our composer repository to your Magento store:
1. Login to your ssh console and navigate to your store folder:
cd path_to_the_store_root_folder |
Run the following command:
composer config repositories.aheadworks composer https://dist.aheadworks.com/
|
On successful execution of the command you will be able to use the composer to install the extensions.
To install the extension:
2. Login to your ssh console and navigate to your store folder:
cd path_to_the_store_root_folder |
3. Run the following command to install the latest version of the extension:
composer require aheadworks/module-advanced-reports |
if you need to install a specific version, run this command:
composer require aheadworks/module-advanced-reports:<version> |
|
Specify the version of the extension in <version> |
When prompted, enter Public Key (Username) and Private Key (Password):

Both Public Key (Username) and Private Key (Password) can be found in My Projects and Licenses in your personal account on our site:
 |
4. Enable the extension:
php -f bin/magento module:enable Aheadworks_AdvancedReports |
Next, register the extension:
bin/magento setup:upgrade |
Recompile your Magento store if you are in the Production mode:
bin/magento setup:di:compile |
To verify that the extension is enabled, run this command:
bin/magento module:status |
Clean store cache, by running the following command:
bin/magento cache:clean |
Log out and Log in the backend again.
To upgrade the extension:
5. To update or upgrade an extension:
Download the updated extension file. Take note of the module-name and version. Export the contents to your Magento root.
If a composer package exists for the extension, run one of the following.
Update per module name:
composer update aheadworks/module-advanced-reports |
Updater per version:
composer require aheadworks/module-advanced-reports:<version> |
Run the following commands to upgrade, deploy, and clean the cache.
php bin/magento setup:upgrade --keep-generated |
Updating to a New Version
On updating to a newer version, reindex the Advanced Reports extension via the console. To do this, follow the steps below:
Reindexing will start. Note, that the command above doesn't reindex the whole store, but the reports tables only. |
Reindexing is essential to have the new tables/columns filled with the relevant data on loading the newer version of the extension.
| With the release of the version 2.7.0, the database is not blocked (as it was in the previous versions) when reindexing is run. |
Set up cron
Skip this step if you have already configured cron or if you are familiar with the job. Otherwise, read the following instructions on setting cron job on your Magento store: Magento user guide.
Generally, it is enough to run the following command in the SSH console:
crontab -e |
And insert the following lines:
*/3 * * * * php -c <ini-file-path> <your Magento install dir>/bin/magento cron:run |
Confirm the Save request before exit.
Uninstalling Advanced Reports
Since Magento introduced declarative Database you need to be very carefull when uninstalling or disabling the module.
|
NOTE: Please be very careful when uninstalling/disabling this module. This module uses a declarative DB scheme. Once the module is uninstalled the DB tables will be lost. |
Manual Removal
1. Disable the module by executing the following commands:
php bin/magento module:disable Aheadworks_AdvancedReports |
2. Remove the extension files from the following folder:
app/code/Aheadworks/AdvancedReports |
Automatic Removal (via Composer)
1. Disable the module by executing the following commands:
php bin/magento module:uninstall Aheadworks_AdvancedReports |
Compatibility
|
Module Version |
Magento Version |
| 2.11.1 and earlier versions |
2.3.Х - 2.3.6 2.4.0 - 2.4.3 |
| As of version 2.11.2 |
2.3.7-p3+ 2.4.0 - 2.4.4 |
| As of version 2.11.3 |
2.3.7-p3+ 2.4.0 - 2.4.5 |
| As of version 2.11.4 |
2.4.4 - 2.4.6 |
| As of version 3.2.1 |
2.4.5 - 2.4.7 |
| As of version 3.2.3 |
2.4.6 - 2.4.8 |
| As of version 3.2.9 |
2.4.6 - 2.4.9 |
The PHP version depends on your current Magento version. Please, refer to your Magento version release notes.
Introducing Advanced Reports
Available Reports
To help reflect on the performance of a store Magento 2 Advanced Reports suggests 15 reports, 5 general and 10 detailed.
General Reports
- Sales Overview shows cumulative essentials on orders placed within the given period;
- Traffic and Conversion lists conversion rates (ratios of unique visitors to orders they placed) against the given periods;
- Abandoned Carts introduces cart abandonment statistics;
- Customer Sales suggests details on purchases within the given sales ranges.
- Stock vs. Sold report enables monitoring the quantity of products available in inventory as well as those that have been sold. Report is designed to work with inventory tables, if MSI is turned off, it will not work.
Detailed Reports
- Product Performance – a sales-per-product report;
- Sales Detailed - a sales-per-order report;
- Orders Detailed - displays a detailed breakdown of order-related data;
- Sales by Category – a sales-per-category report;
- Sales by Product Attributes - a sales-by-attribute (set of attributes) report (only attributes with the 'Use for Promo Rule Conditions' option enabled are processed);
- Sales by Location - a sales-by-location report (helps identify new promotional campaigns);
- Sales by Coupon Code – a sales-by-discount report;
- Sales by Payment Type – a sales-by-payment type report to tell the number of orders placed and items ordered per payment method;
- Sales by Manufacturer – a sales-by-manufacturer report to analyze sales perspectives per manufacturer;
- Sales by Hour – a “sales-by-hour” report to figure out which time intervals bring more sales.
Key-Features
Advanced Reports is totally a backend module. The module facilitates store admins with comprehensive statistics on various aspects of their store performance. Each aspect is reflected upon in a report. The reports are accessible from either the menu or dashboard. The dashboard furthermore allows for comparison and contrast of data with regard to the given time period. The period is set with the help of the advanced calendar.
The extension allows configuring reports both in bulk and individually. Configuration includes settings for scheduled emailing of reports or their parts. Emailing could be done to multiple addresses.
Integrations
- Refer a Friend
- Gift Card
- Reward Points
- Store Credit and Refund
- Customer Segmentation
- Advanced Subscription Products
- RMA
- Help Desk Ultimate
- Coupon Code Generator
- Affiliate
- Company Accounts
- Company Accounts for Adobe Commerce
- Web API
Extension Settings
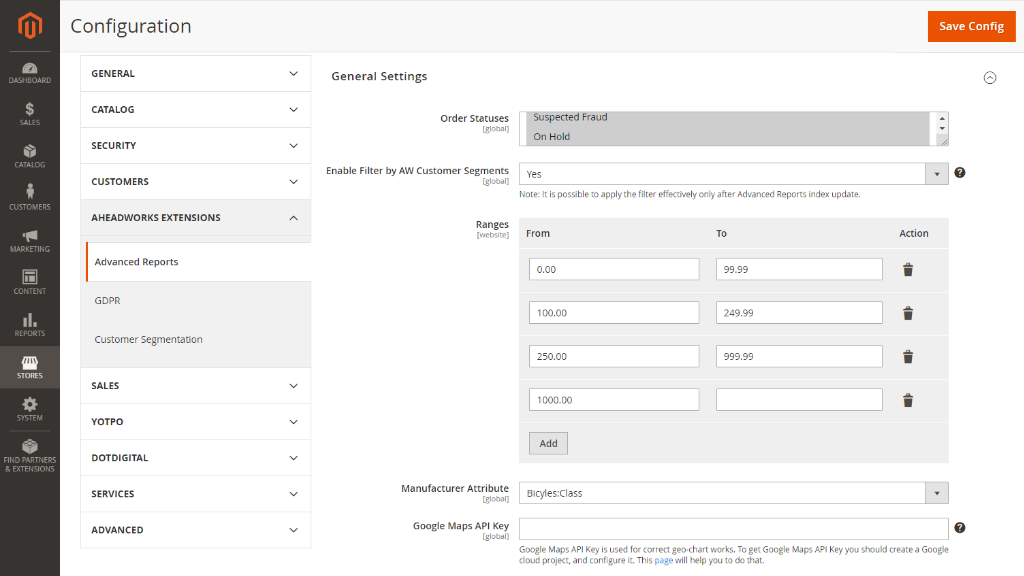
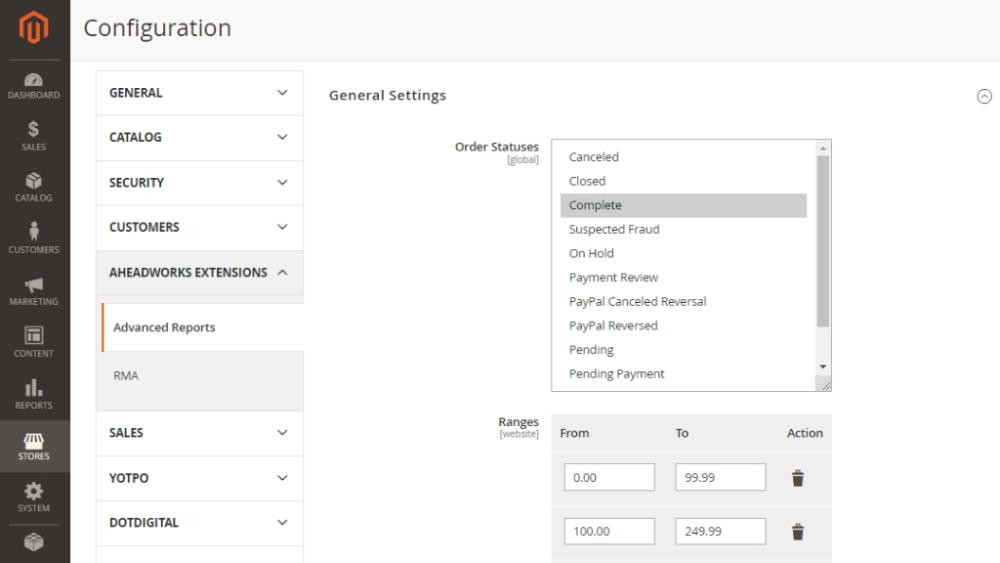
The general settings of the extension can be accessed from Stores > Configuration > AHEADWORKS EXTENSIONS > Advanced Reports.
The Settings page comes in two blocks: General Settings and Scheduled Email Reports.
General Settings
The General Settings block allows tweaking Order Statuses, Ranges, and Manufacturer Attribute.
- Order Statuses - select orders to provide data for the reports. By default, only 'Complete' orders will be processed.
If required, you can select multiple order statuses using either of the two hot-keys: press Shift, hold Right Button, select to select a group of orders or press CTR, click right button to select order statuses one by one.
Specifying order statuses herein will extend the selection over all the reports. See Configuring Reports above for individual configuration of reports.
- Enable Filter by AW Customer Segments - set to enable or disable Customer Segments Filter for the Sales Overview, Product Performance, Product Variation Performance, Sales by Category, Sales by Coupon Code, Sales by Payment Type, Sales by Manufacturer reports. By default filter is disabled;
- Price Ranges - set price ranges to be used by the 'Customer Sales' report;
- Manufacturer Attribute - the product attribute to be used as the key parameter within the 'Sales by Manufacturer' report. The dropbox lists the following options: 'Manufacturer', 'Color', 'Size', and 'Format';
- Google Maps API Key - set it up to provide the correct work of Geo chart Sales by Location report.
If you don’t have a valid Google Maps API Key follow the detailed instructions to create it.
There are two API's you have to enable in the APIs tab Google Cloud Platform for the correct work of the extension:
-Maps JavaScript API,
-Geocoding API.
Then, verify these settings.
Once done, click Save Config in the top right of the page, or proceed to the next step.
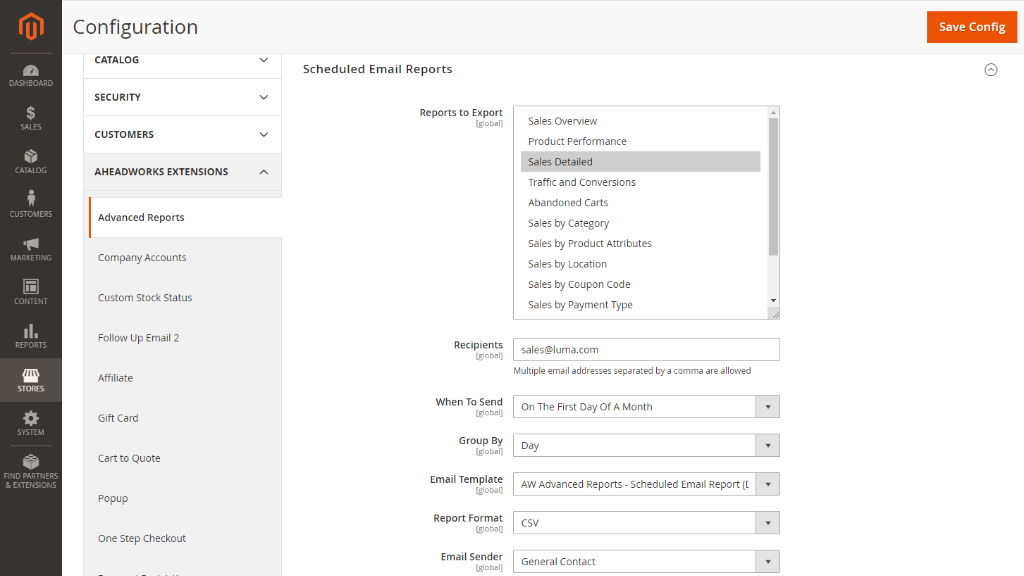
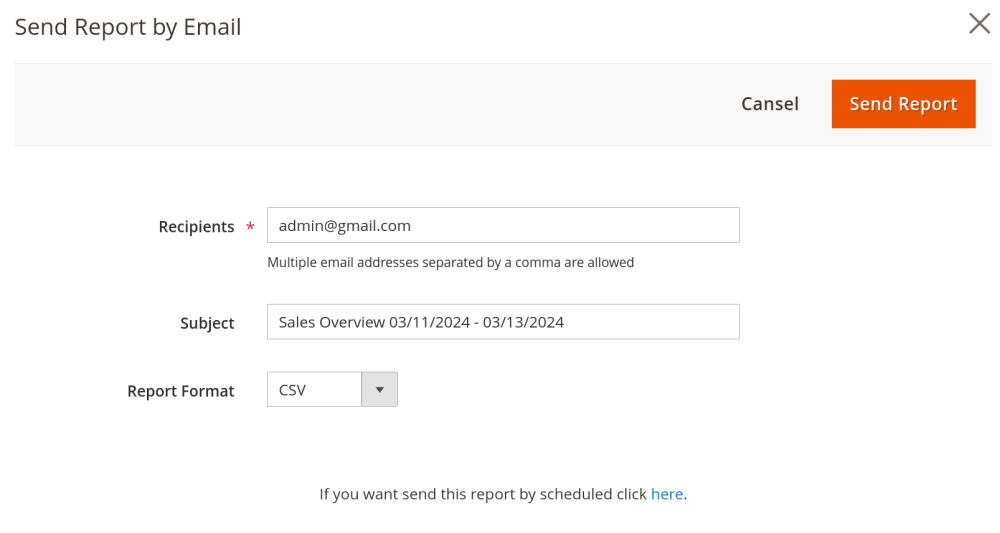
Scheduled Emailing
Starting from version 2.9.0 Advanced Reports allows scheduling emails containing reports. It is possible to send full reports or parts of thereof. Furthermore, the extension supports multi-address mailing.
The Scheduled Email Reports block of the Settings page contains the following configuration options:
- Reports to export - a list of all available in the extension reports (multiselect is possible)
- Recipients - email addresses of the recipients (separate addresses with a comma)
- When to send - trigger event for email dispatch (select one of the three: first day of a week/month/quarter)
- Group by - grouping criteria (select one of the five: day/week/month/quarter/year)
- Email Template - selection of email templates (AW Advanced Reports - Scheduled Email Report by default)
- Report Format - a format of the attachment document to contain the report (Excel XML or CSV)
- Email sender - a selection of email senders as configured in the store.
|
Leave the Recipients field blank to disable scheduled emailing of reports. |
Once done, click Save Config in the top right of the page.
Report Indexes
Starting from version 2.0.0, the extension introduces report indexes which facilitate faster data load, a period for reporting specified.
Report indexing eliminates the need for report generation on demand. Basically, the reports are generated once a day (or more frequently depending on the cron settings). Post-generated results are loaded when you open a report.
Report indexing is particularly useful for busy stores processing large numbers of orders. For example, it should not take more than a couple of minutes to reindex ~200k orders on a decent server hardware. Considerable lags on reports generation may occur otherwise.
How to index reports?
As it was mentioned above, the reports are indexed automatically depending on your store cron setup. By default, cron runs once a day, meaning that the data reported will always be up-to-date.
You can always run reindexing manually, however, it involves console usage.
Once reindexing is done, the reports will feature latest data.
Will the Advanced Reports extension process those orders which were placed before the installation?
Yes, the Advanced Reports extension will index ALL orders which have been placed in the store.
| With the release of version 2.7.0, the database is not blocked (as it used to be in the previous versions) when reindexation of the module is run.
|
Using Advanced Reports
Report Dashboard
Dashboard Layout
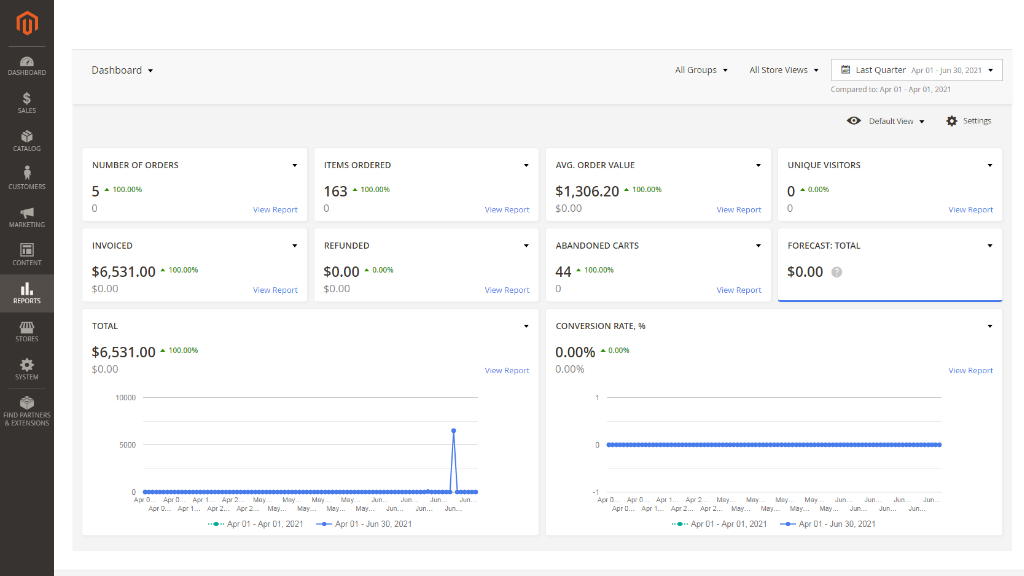
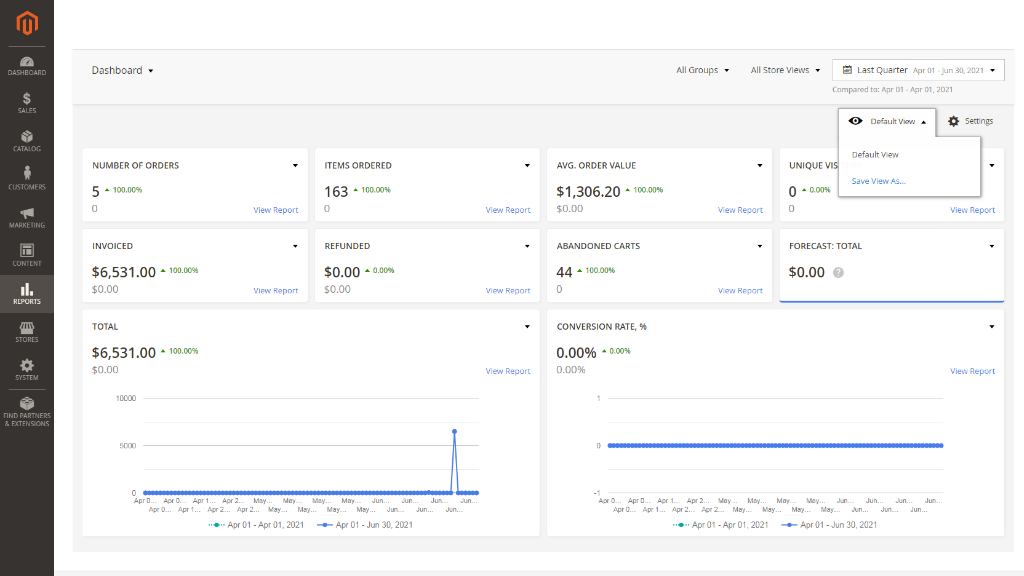
The dashboard shows 10 configurable widgets to reflect on the overall performance of the store.
The widgets come as 8 numeric and 2 chart ones. Each widget has the following elements:
- Name - performance indicator (clickable);
- Total (in bold) - the total $, # or % of the index as of the current period (see below for details);
- Total (faded out) - the total of the index as of the previous period (see below for details);
- Increment (green) - the ratio between the two totals / decrement (red);
- View Report - an active link to the full report.
|
The increment comes in % by default. Hover the mouse cursor over the increment to see absolute values. |
In addition to the above, the chart widgets will show relevant trends (for example, conversion rate by time period) and legends telling the time periods in comparison. Hovering the cursor over the trend milestones will show a popup telling the value of the X time-line in that point of time (day, month or other augment).
Finally, the dashboard has a set of filters (see top of the page). You can track the performance of a selected customer group and/or store view.
Changing widget content
The module enables changing the content of the widgets. To do so, click on the name of the widget. A folding list will appear showing three categories of indices available for display. The indices and categories are as follows in the table below.
|
Sales |
Traffic and Conversions | Abandoned Carts |
|
|
|
On choice of an index the widget will update its data.
The content of the widgets is saved automatically, so you will not need to configure the widgets every time you enter the dashboard page.
|
You can save several dashboard views as bookmarks and later switch between them with the help of the View block in the top right.
|
Setting Comparison Period
The dashboard presents data in comparison and contrast. To set the periods for statistical comparison refer to the Comparison Period Block in the top right.
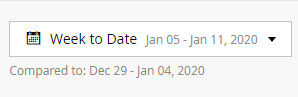
The block comes as a dropbox with the following options:
- Today
- Yesterday
- Week to Date
- Last 7 Days
- Last Week (Sun - Sat)
- Last Business Week (Mon - Fri)
- Month to Date
- Last Month
- Last Quarter.
On choice of the current period the period for comparison will be set automatically one step back. For example, Today will be compared to Yesterday, Yesterday to the day before, and so on.
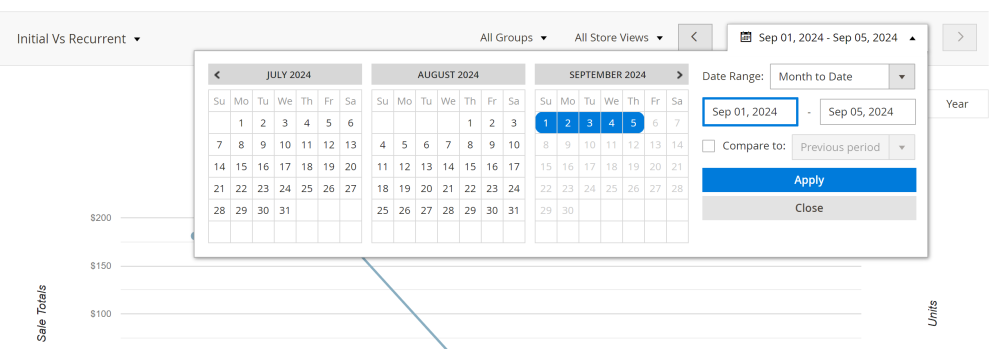
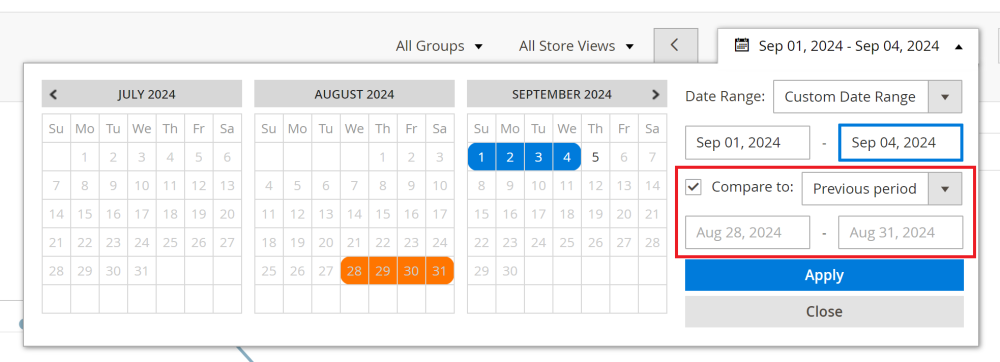
Advanced Reports also allows for setting custom periods for comparison. This feature is only available in the Calendar, which in turn is only available on the pages of the reports, not on the Dashboard page.
The Calendar features an additional option the list of options for comparison above - "Custom Date Range". On enabling this option, either type-in the dates in the date fields, or select the dates on the calendar tables to the left. To set a custom comparison period, activate the checkbox next to the "Compare to" feature and select 'Custom' in the drop list. The date range fields will then become active. Type-in the dates in the comparison date fields, or select the dates on the calendar tables to the left.
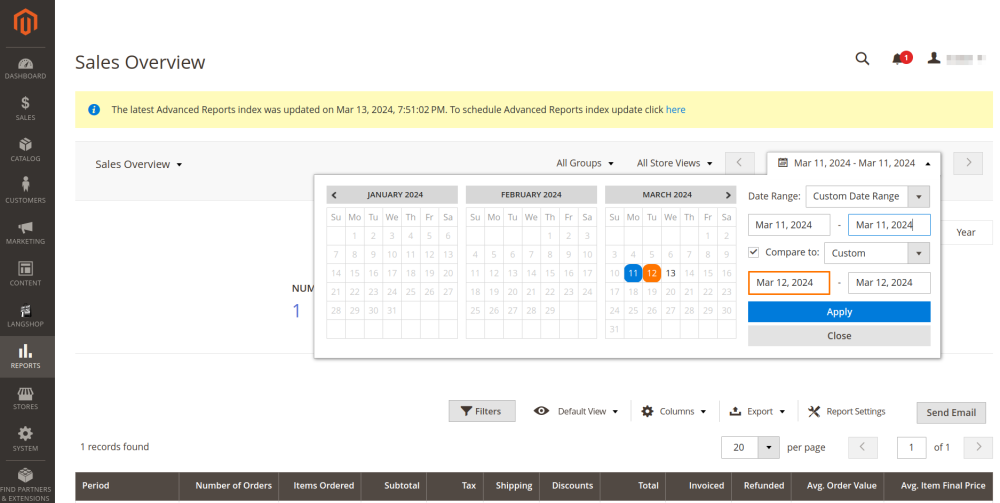
The choice of the time period will be saved automatically on page reload or when surfing to another page.
Performance Reports
Report Layout
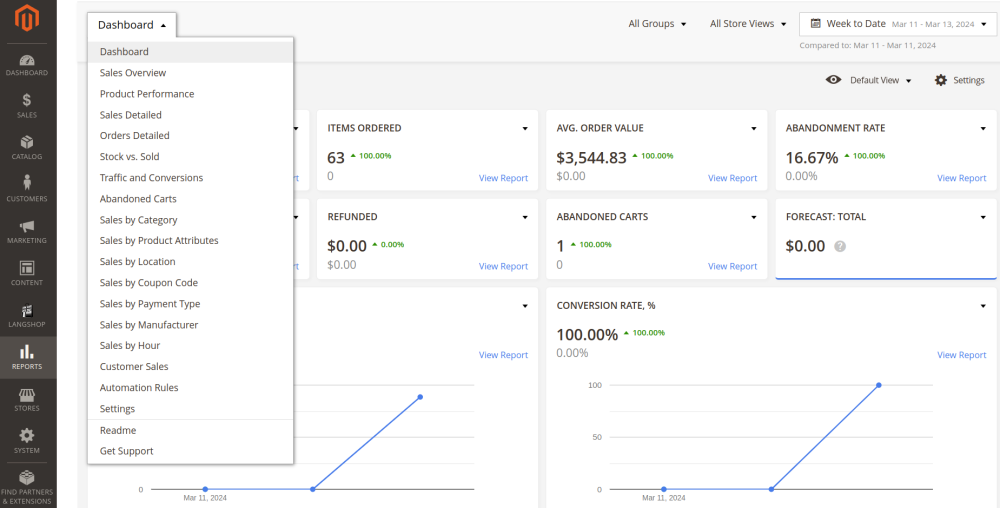
To get access to the reports go to Reports > Advanced Reports by Aheadworks. Alternatively, should you find yourself on the Dashboard page click the View Report active link on the widget (see Dashboard Layout above). Finally, you may employ the Navigation menu.
Generally, each report page has the following elements:
- Navigation menu – used for quick navigation within the extension. With the help of the navigation menu, you can switch to the required report.
- Calendar – used to set the period for reporting. It comes with the same predefined reporting periods as the report dashboard. Setting custom comparison periods is also possible.
- Report intervals – used to quickly group the data reported by the one of the five periods: day, week, month, quarter and year;
|
You can generate a report from a whole month's data (1st to 31st) and then group it by day (31 entry – day-by-day sales), week (5 entries – week total sales), or month (1 entry – month sales total). |
- Report chart – used to present sales data in a visual form;
- Chart parameters - these represent the legend for the visualization;
- Dual Y-axis - two-axis charts present data against the two prearranged key-indices, thereby they are twice more informative;
- Totals block - represents the totals for quick examination;

- Report grid – represents the data built against the period defined in the calendar (including comparison);
- Filters and report grid adjustments - represent a set of filters, including Customer Group, Segment, Store View, as well as some other tools for filtering and arranging reports.
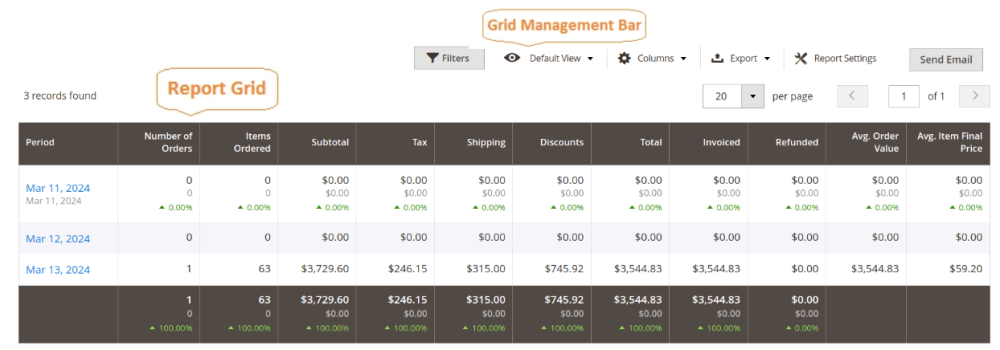
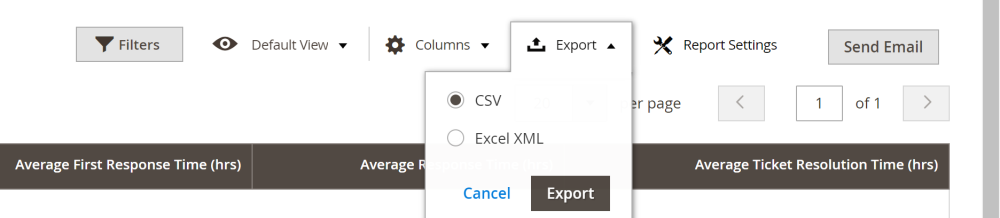
For more convenience, the generated reports can be later exported to *.csv or *.xml tables with the help of the 'Export' button above the report grid.
Additionally, by clicking the Send Email button, you can email reports directly from the report page and schedule automatic report sending on a daily basis or for custom dates.
Generating a Report
The extension comes with 13 reports each covering a specific aspect of performance of the store. To generate a report, take the following steps:
Step 1 - Select the required report from the list (go to Reports > Advanced Reports by Aheadworks).
Step 2 - Use the calendar to select the required report date range and click the 'Apply' button.
Step 3 - The report is generated. Now, you can adjust the period for reporting and data grouping to get the required presentation. Adjust filters if necessary.
Step 4 - Once the required filters are selected, save the current view by expanding the 'Default View' box and clicking Save view as.
The saved view will be available on all Advanced Reports pages. It can be recalled anytime you make changes to the filters or the report grid.
Report Drill-down
All reports are interconnected. It means that you can consecutively get a deeper picture of the report subject matter.
Taking the 'Sales Overview' report as a starting point, you can navigate to a 'Product Performance' report by clicking on an entry in the report grid. Next, clicking on the entry in the 'Product Performance' report will take you to an 'Individual Product Performance' report page.
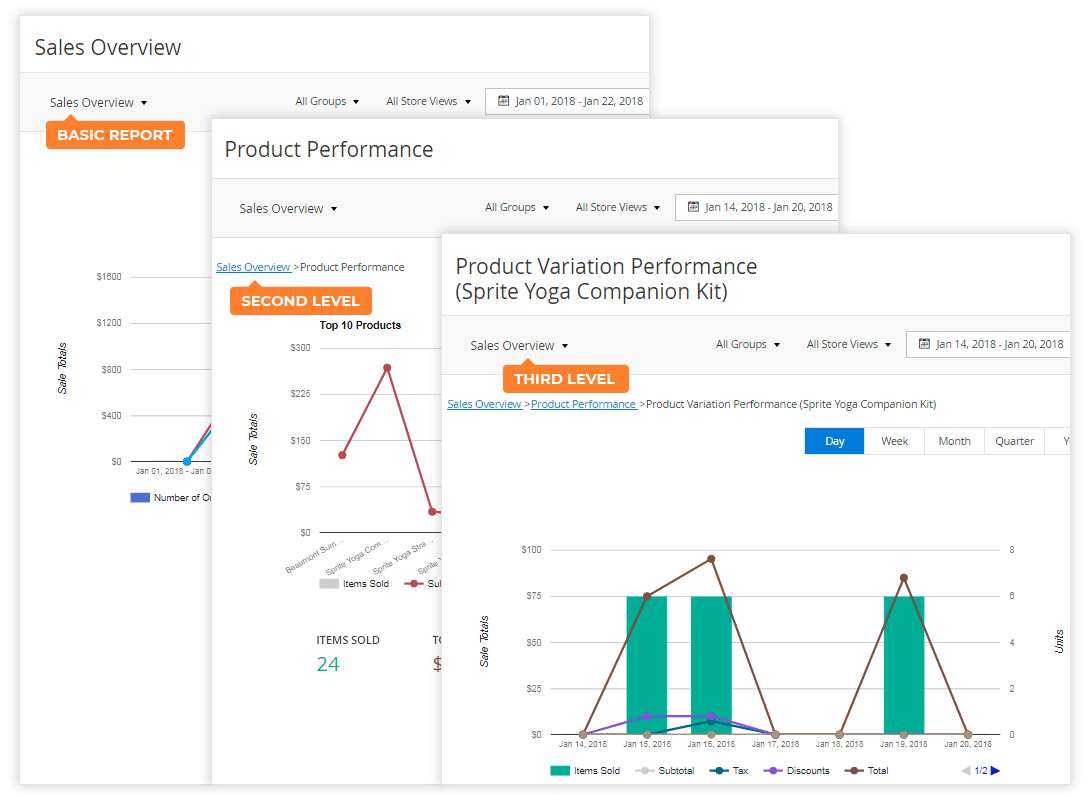
You can use the breadcrumb trail above each report chart to navigate the sequence of reports.
The available drill-down scenarios are as follows:
- Sales Overview > Product Performance;
- Product Performance > Product Variant Performance;
- Sales by Category > Product Performance;
- Sales by Coupon Code > Sales Overview;
- Sales by Payment Type > Sales Overview;
- Sales by Manufacturer > Product Performance;
- Traffic and Conversions > Product Conversion >
- Sales by Location > Sales by State/Region > Sales by City/Place.
Configuring Reports
To configure the report, click on the Report Settings option in the Grid Management Bar.
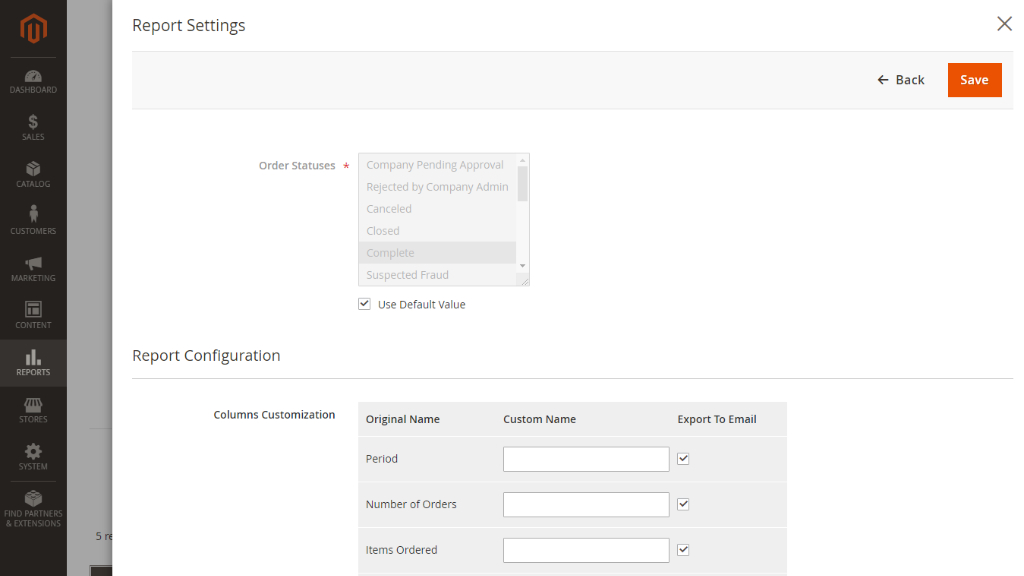
A popover will appear, suggesting two blocks for customization: Order Statuses and Report Configuration.
The former comes as a list of order statuses available for selection. Only orders of selected herein statuses will be the sources of data for the given report. By default the list is disabled, the values set for all reports on the Extension Settings page are used. Disable the checkbox next to the 'Use Default Value' to customize the list of statuses.
The Report Configuration block allows for columns customization. You can substitute the default names of the report columns with your text, and also to decide whether data in these columns are to be exported to emails (see the checkbox next to the column name).
|
The Customer Sales and Sales Detailed reports will also feature the Include Refunded Items toggle. This option is meaningful only for these two reports, and thereby is not available for other. |
Integrations
Customer Segmentation for Magento 2
Allow filtering Advanced Reports by Customer Segments
When "Filter by Customer Segments" is enabled in the Advanced Report configuration, the store admin can select a specific customer segment and apply it to certain reports. This filters the sales data in the report based on the customer segment chosen by the user, refining the information displayed in the report's grid accordingly.
The Customer Segments Filter is available for:
-
Sales Overview
-
Product Performance
-
Product Variation Performance
-
Sales by Category
-
Sales by Coupon Code
-
Sales by Payment Type
-
Sales by Manufacturer reports
-
Orders Detailed report
-
Sales by Hour
-
Sales Detailed
-
Sales by Product Attributes
-
Sales by Location
-
Customer Sales
-
Product Conversion
-
Traffic and Conversions
If a filter has been applied to a report, its effect is saved for reports that are available as drill-down scenarios.
|
The filter by Customer Segments will work along with Advanced Reports if both modules AW Customer Segmentation (1.2.3 or newer) and Advanced Reports are installed. |
To activate the filter by Customer Segments you need set to "Yes" the Enable Filter by AW Customer Segments option from Stores > Configuration > AHEADWORKS EXTENSIONS > Advanced Reports tab.
After the Filter is enabled, the relevant data for filtering will be available as soon as the next Reindex of the Advanced Reports module is passed. Tasks for updating the Index of Advanced Reports and Customer Segmentation modules are automatically added to the list for updating.
|
If you enable the Customer Segment filter, Reindexing time and report’s performance will slow down. These performances also depend on the number of enabled and created segments and users in them. If the filter is disabled, there are no changes to the Reports performance and Reindex time. |
Principal details of the applying Customer Segments filter for Advanced Reports are:
- Order and Segment are correlated when both belong to the same store level or have a one-to-many parent/child relationships structure.
- Customers who have made orders are on the list of “Matched Customers” in the “Customer Segments”. The information from Matched Customers grid is taken at the moment of the last Advanced Reports Reindex update.
- Orders made by guests will associate with certain segments through the “Store id” and “Email".
- Orders made by registered users will associate with certain segments through the “Store id” and “Customer id”.
Also, customer group id is taken into account for linking sales orders with customer segments.
The date and other conditions which are taken into account when creating a Customer Segment do not affect the application of filtering by Customer Segment in the reports except the store view setup.
The Customer Segments drop-down consists of the following items:
- Customer Segments - set by default and means that the filter is not applied.
- No Segments - the filter excludes all data that don't belong to the customer segments.
- Customer Segments - data in the grid will filter according to the list of customers belongs to the segment.
- If the status of Customer Segment is set to "disabled" then it will be marked as disabled in the dropdown filter. You can apply a filter to such a Customer Segment, but the data quality may not be relevant at the time of application.
All existing filters and settings can be applied together with the filter by Customer Segments.
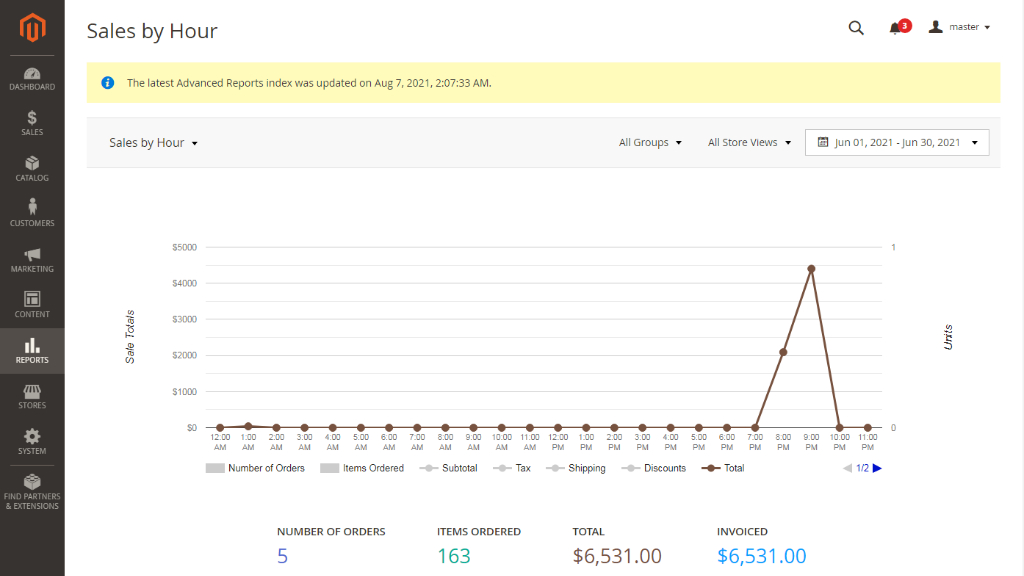
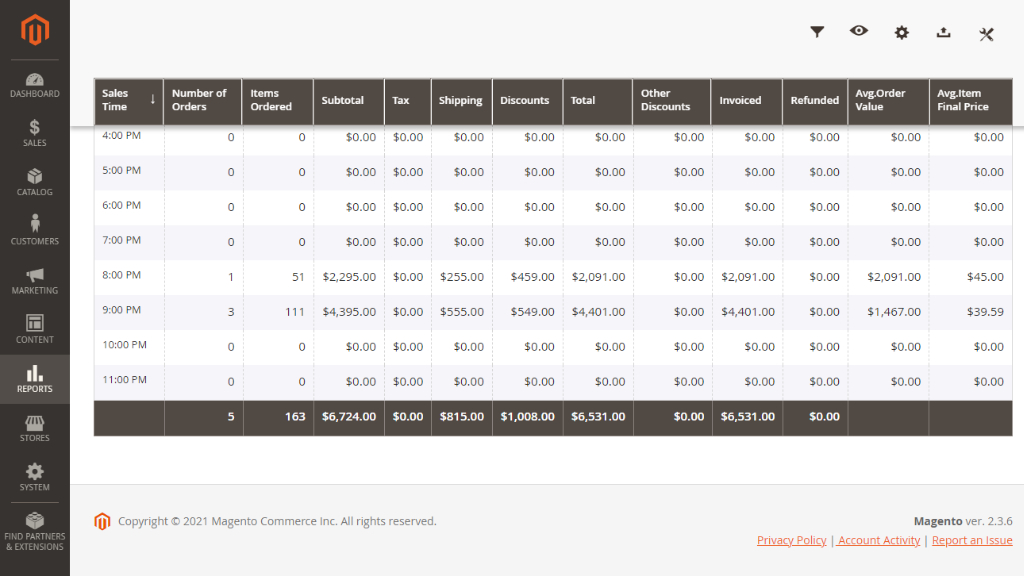
Example: Sales by Hour report
Sales by Hour report detects the optimal time interval for marketing campaigns and lets you know when your store managers have the most workload.
The report shows stats data primarily based on the number of products sold (Quantity) or the Total sum paid by customers within a specific time period.
Overall it consists of the following columns:
- Number of Orders;
- Items Ordered;
- Subtotal;
- Tax;
- Shipping;
- Discounts;
- Total;
- Invoiced;
- Refunded.
The data in the report's grid is grouped by the following conditions:
If the order is made from 00.00 till 00.59 - it places to the span time - 00.00.
If the order is made from 01.00 till 01.59 - it places to the span time - 01.00.
If the order is made from 02.00 till 02.59 - it places to the span time - 02.00 etc.
The Sales by Hour report is configurable and has a set of filters, including Customer Group, Segment, Store View, as well as some other tools for filtering and arranging reports. The data in the report are formed according to the period in the calendar or by custom date range. The other standard settings such as those in the already existing reports.
The time format of the first report's column depends on the Interface Locale belonging to the Admin role and supports several options for time zones.
The chart for the Sales by Hour report allows to visually represent the data in the grid. The diagram is available for the whole time range and shows the dynamics of sales belongings to a certain time of span. The Y-axis is associated with the "Total" indicator. The X-axis is associated with the "Sales Time" indicator, starting from 00.00 and ending at 23:00.
The column "Other Discounts" appears in the report's grid if the one or more of the following modules installed: Company Credit, Reward Points, Gift Card (EE) and Refer a Friend (AW).
The Other Discounts column consists of the sum applied totals of Company Credit, Reward Points, Gift Card (EE) Refer a Friend (AW).
If the "Other Discount" column is available the Total is added up by the following formula: Total = Invoiced +Other discount.
Company Accounts for Magento 2
Allow filtering Advanced Reports by Company Name
The integration of Advanced Reports with AW Company Accounts or Company Accounts by Adobe Commerce allows you to filter Sales Detailed Report and Orders Detailed Report by company name.
Also, a column Company Name can be added to the grid to help Admins identify which company the customer belongs to. When a customer is not a part of a company, column Company Name is empty.
Help Desk Ultimate for Magento 2
Overview Help Desk statistics
The integration of Advanced Reports with Help Desk Ultimate (module 2.3.0 or newer) allows store admins to monitor the statistics concerning the help desk performance.
|
Note: Please, make sure you also install and enable add-on module-helpdesk-report, which will provide the integration between Help Desk and Advanced Reports modules: php bin/magento module:enable Aheadworks_Helpdesk2Report
|
To enable the module go to Stores > Configuration > Aheadworks Extensions > Help Desk 2 Report.
In the General section you can configure the start and the end of the agent's working day to be displayed in the report. The work days can also be configured in the same section.
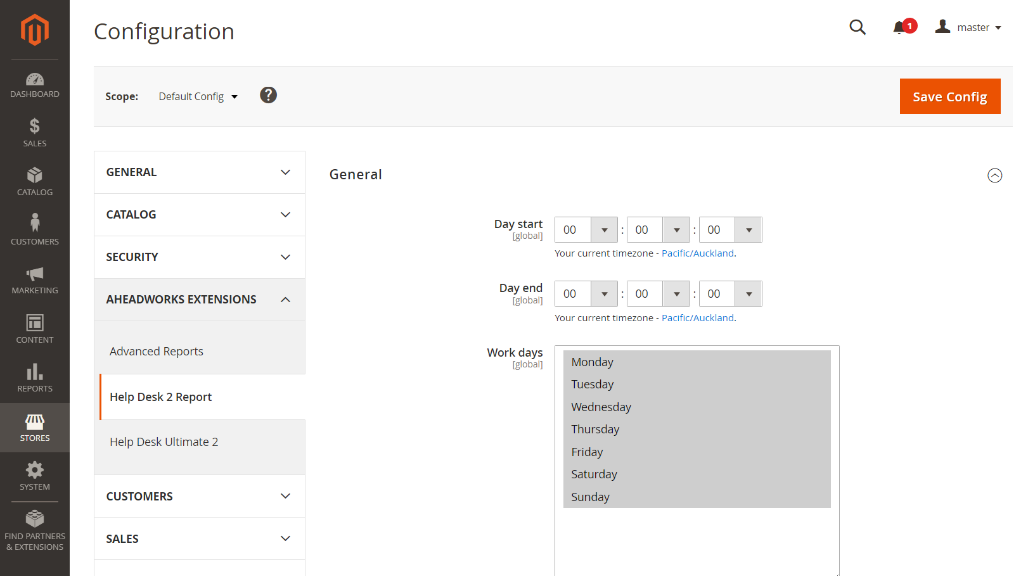
When the configuration is complete click the Save Config button.
Response & Resolution Time Report.
Response and Resolution Time can be monitored in Reports > Help Desk Ultimate 2 by Aheadworks > Response & Resolution Time Report. This report provides detailed insights into the performance of help desk agent by tracking the average response and ticket resolution times.
For convenience the data is displayed in two forms: graph and grid.
The data is analyzed against the following key performance metrics:
- Average First Response Time (hrs) –the average time taken for an agent to respond to a customer's initial inquiry.
This is calculated by dividing the total time taken by the agent to send the first response by the number of tickets with a first response sent within the selected time period.
| First Response Time is measured from the moment a new ticket is submitted until a Help Desk agent provides the initial response. The calculation does not include automated replies or tickets generated by agents themselves. |
- Average Response Time (hrs) – the average time taken by an agent to respond to all messages within a ticket.
This is calculated by dividing the total time taken by the agent to respond by the number of responses sent within the set time period.
- Average Ticket Resolution Time (hrs): The average time required for an agent to fully resolve a customer's ticket.
This is calculated by dividing the total time taken by the agent to resolve all the tickets by the number of closed tickets within the set time period.
|
Total Resolution Time is measured from when the ticket is first submitted until the most recent time it is marked as closed. If a ticket is reopened and closed multiple times within the given period, the Total Resolution Time includes the entire duration from the customer's initial message to the most recent closure of the ticket. |
The ticket statuses included in the resolution time calculation can be customized by selecting or deselecting options (New, Open, Waiting for a customer) in the Statuses Included in Resolution Time box.
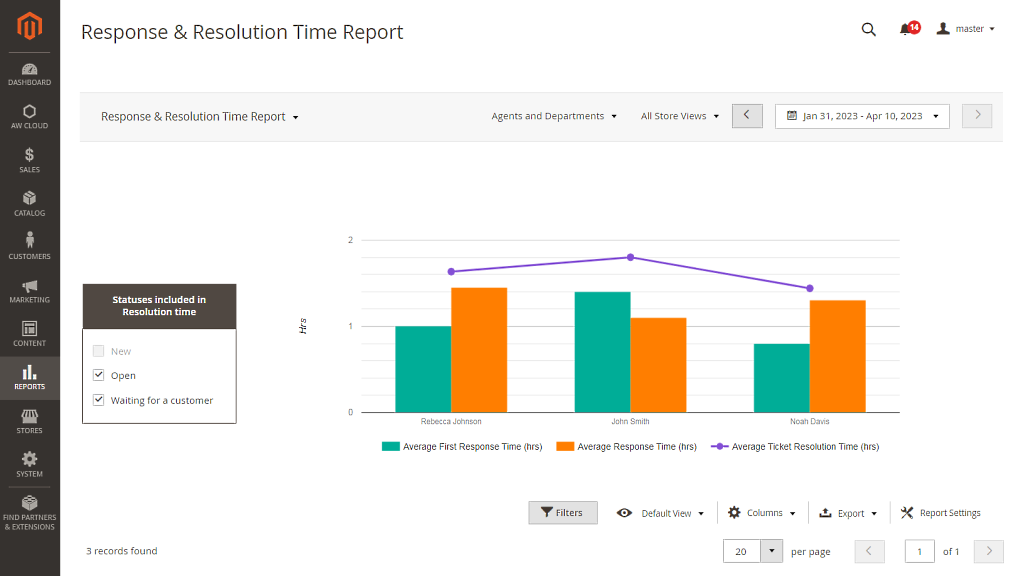
Below the graph, you can overview a reporting grid that displays the same metrics together with two additional ones – Agent Name and Department this agent belongs to.
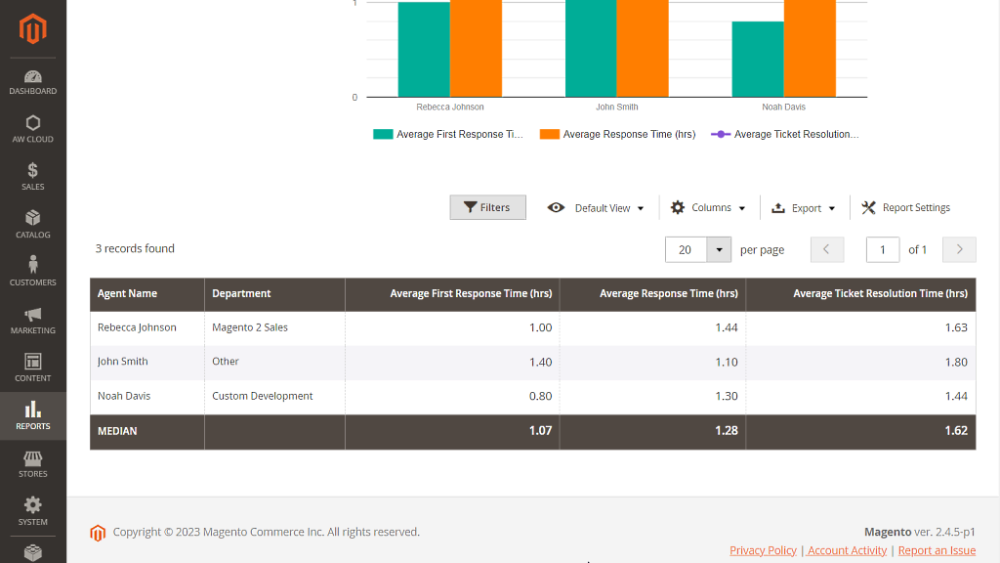
The store admin can choose which metrics are displayed in the grid using the column filtering option.
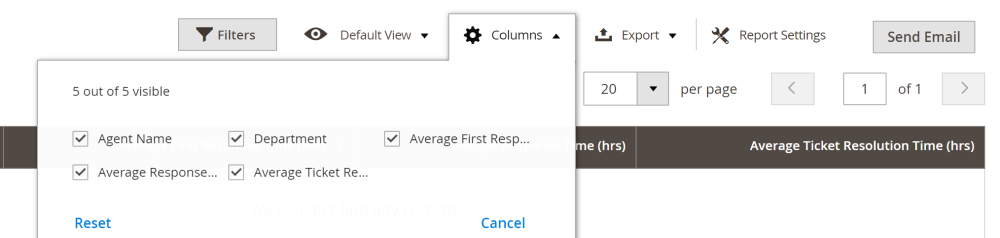
Admin can export the report data in different formats by clicking the Export button.
Tag Reports
Tag Reports can be monitored in Reports > Help Desk Ultimate 2 by Aheadworks > Tag Reports.
The Tag Reports section provides detailed insights into the performance and management of support tickets based on the assigned tags over the set time period. This tool helps in identifying recurring issues, popular topics, and trends in customer support requests.
|
The date shown on the graph represents when a tag was assigned to a ticket. If multiple tags are applied to a ticket, the date used will be when the last tag in that group was added. |
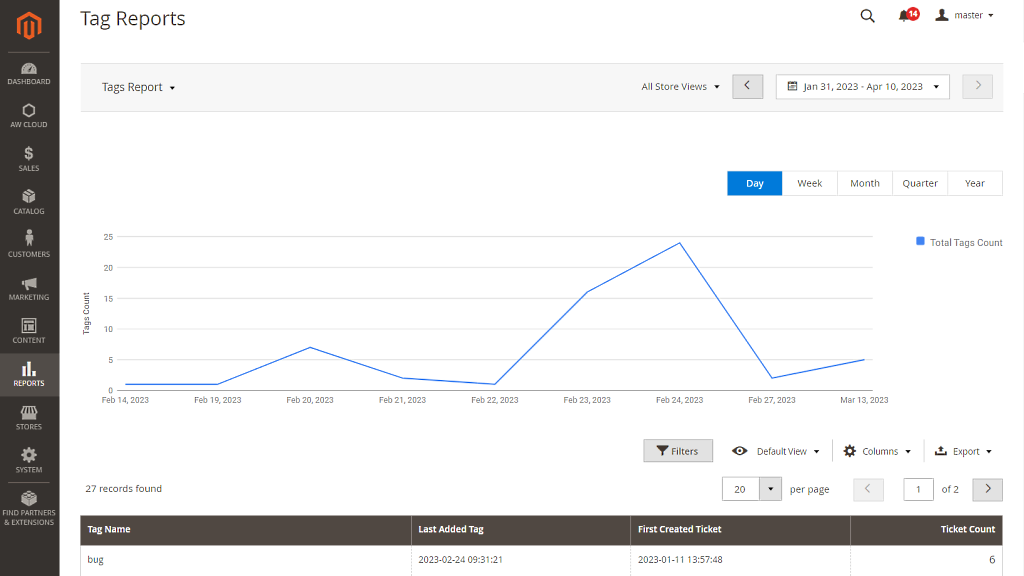
The store admin can apply a Tag Name filter.
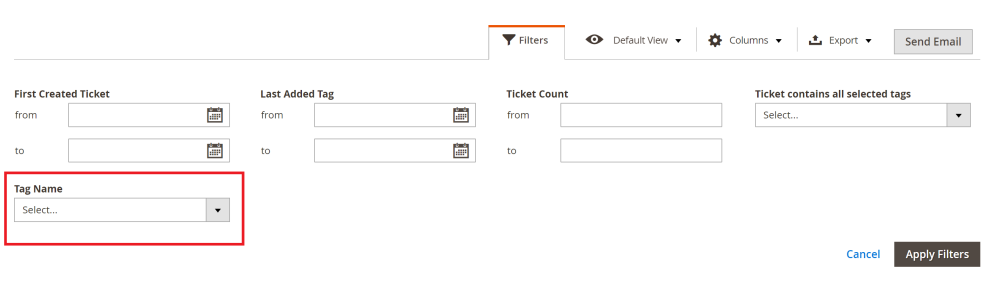
By using the Tag Name filter, the graph can display data for each tag separately.
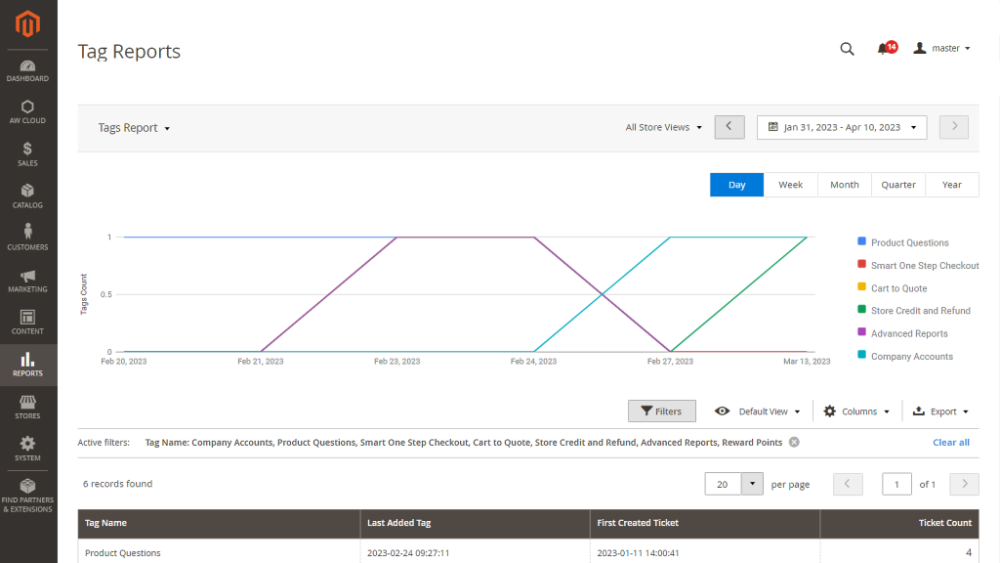
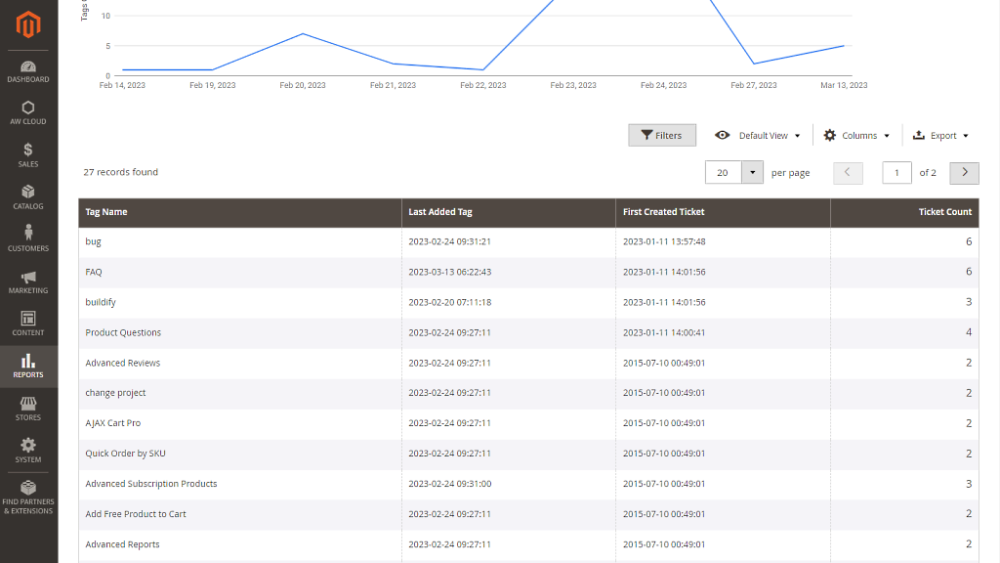
Below the graph, a grid presents detailed information for each tag using the following metrics:
- Tag Name – the name assigned to categorize support tickets;
- Last Added Tag – date and time when this tag was last applied to a ticket;
- First Created Ticket – the date of the first ticket associated with this tag over a set period;
- Ticket Count – the total number of tickets that share this tag.
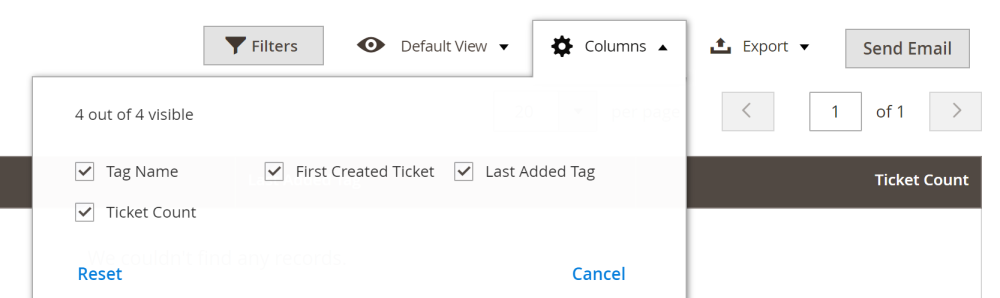
The store admin can choose which metrics are displayed in the grid using the column filtering option.
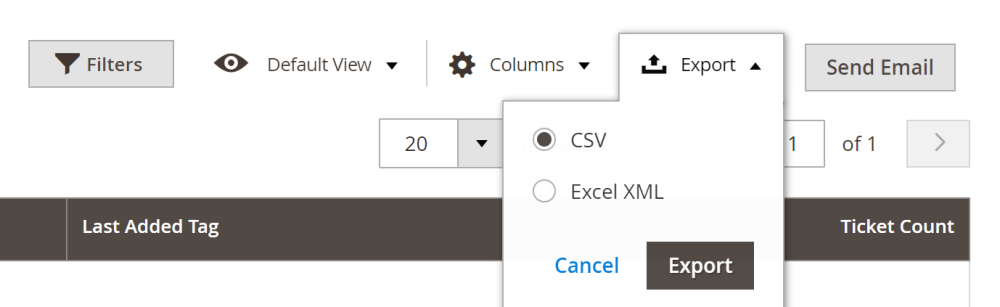
Admin can also export the tag report in different formats by clicking the Export button.
RMA for Magento 2
Overview of Returns Management Reports
The Advance Reports integration with RMA for Magento 2 provides store admins with detailed reports to help track and manage product returns.
|
Note: Please, make sure you also install and enable an integration add-on module-rma-reports. php bin/magento module:enable Aheadworks_RmaReports
|
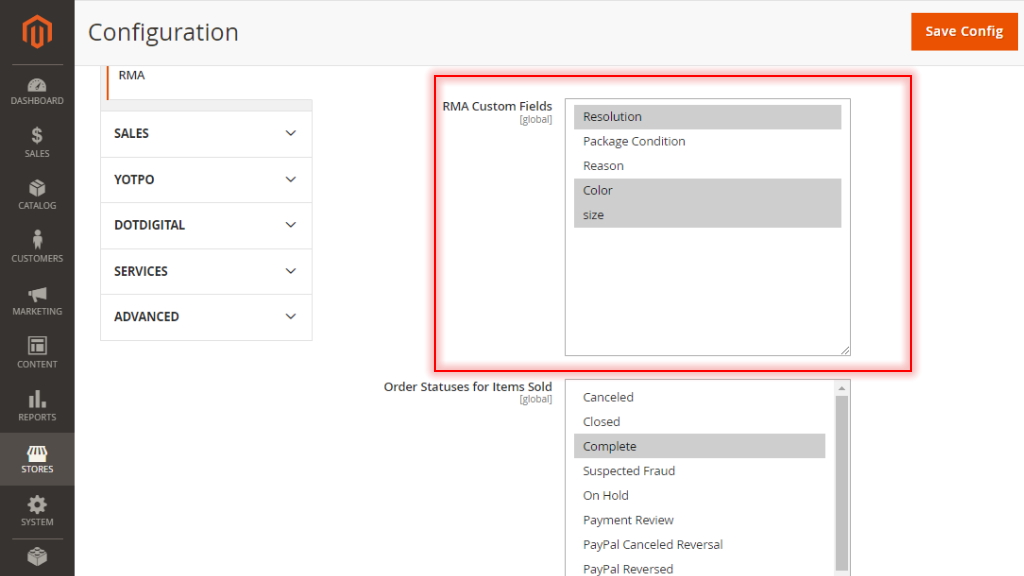
To ensure that only the relevant orders, based on their status, are included in your analysis go to Stores > Settings > Configuration > Aheadworks Extensions > Advanced Reports
In the Order Statuses field define which specific orders should be taken into account when generating a report.
Then, go to Stores > Settings > Configuration > Aheadworks Extensions > RMA
In the RMA Custom Fields option choose the specific fields that will be used to create the RMA detail report. You can select multiple fields, and each field will appear in its own column in the grid. The first selected field will be shown in the first column, the second in the next column, and so on.
The report can be found in Sales > RMA by Aheadworks > RMA Reports.
| Note: Each return request has both a creation date and a last modification date. However, the report will only reflect requests that have reached their completion date. If a return request is canceled before completion, it will not be included in the report. |
The RMA Reports graph provides a summary view of products with the highest return rates compared to the number of sold items over a set time period. This feature is crucial for tracking customer return behavior and product performance.
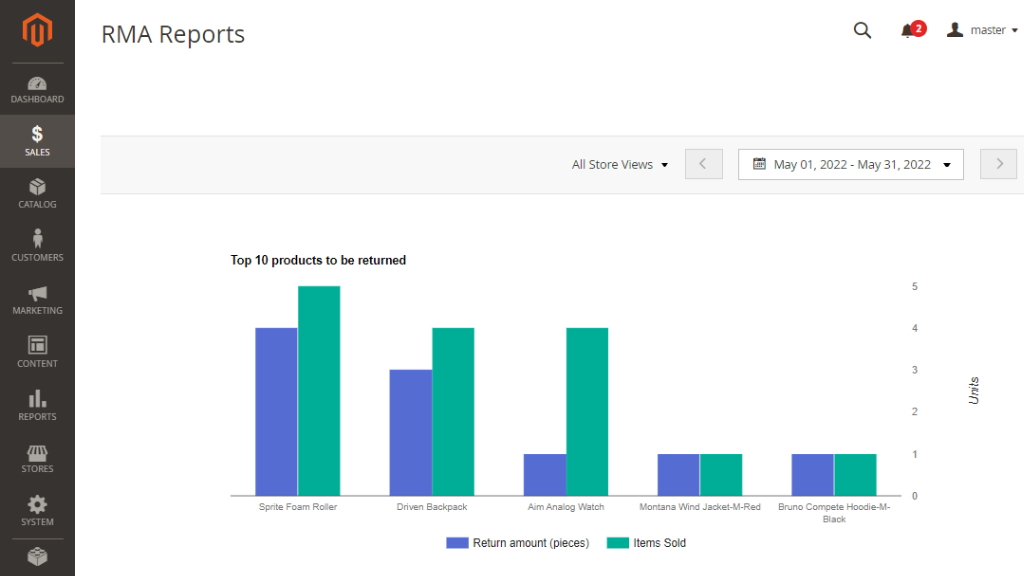
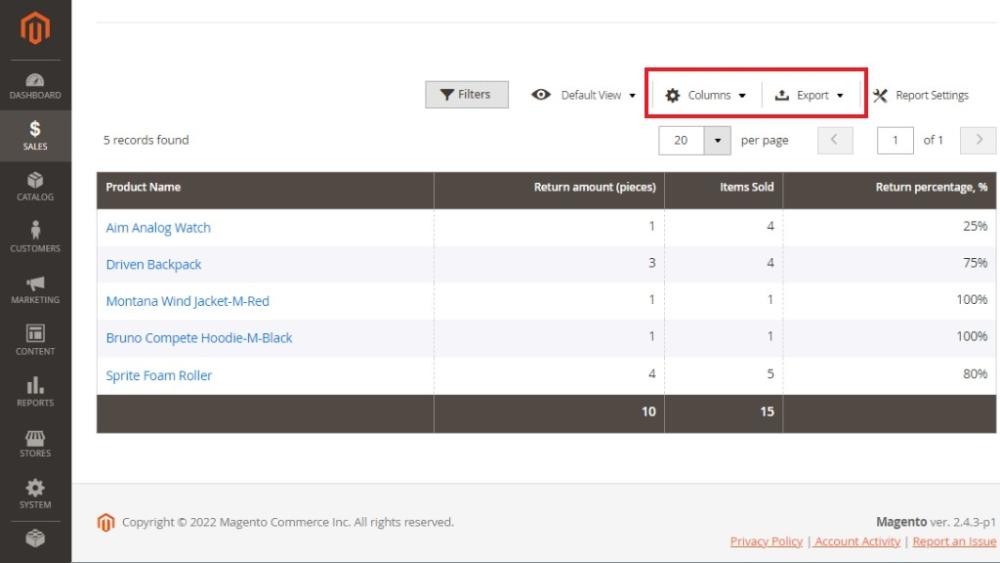
The grid below the graph provides detailed information about the top returned products using the following metrics:
- Product Name – the name of the product being returned;
- Return Amount (Pieces) – the number of returned units for that product;
- Items Sold – the number of units sold during the set time period;
- Return Percentage (%) – the percentage of sold items that were returned.
The store admin can choose which metrics are displayed in the grid using the column filtering option.
Admin can also export the RMA report in different formats by clicking the Export button.
You can further investigate individual product returns by clicking on the name of the product in the main RMA report grid.
The following metrics can be monitored here:
- Items Sold – shows the total number of units sold for the selected product;
- Amount – the total number of returned units of the selected product;
- Return Percentage – the percentage of sold items that were returned.
At this page, you can also overview a reporting grid that displays the same metrics together with several additional ones:
- Resolution – indicates how the return was handled (e.g., Replacement, Refund);
- Color and Size columns – shows the individual characteristics of the returned item.

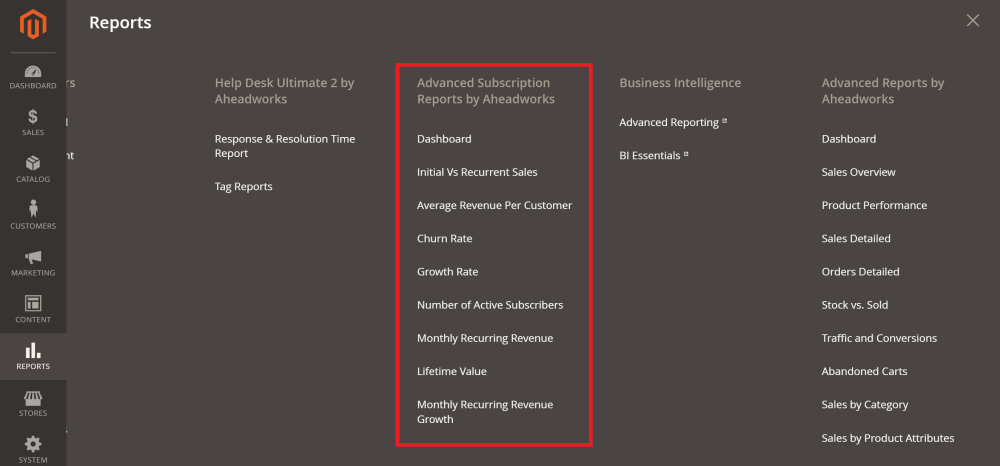
Advanced Subscription Products for Magento 2
Through the integration of Advanced Reports with the Advanced Subscription Products extension, store admins will be able to track subscription sales performance.
|
Note: Make sure you install and enable module-sarp2-reports, which will provide the integration between Advanced Subscription Products and Advanced Reports modules. If you haven't installed the Advanced Reports extension, please refrain from installing module-sarp2-reports package to avoid potential errors. |
Once the module is installed, a new set of report data will become available in Reports tad.
Dashboard: Analytics & Metrics
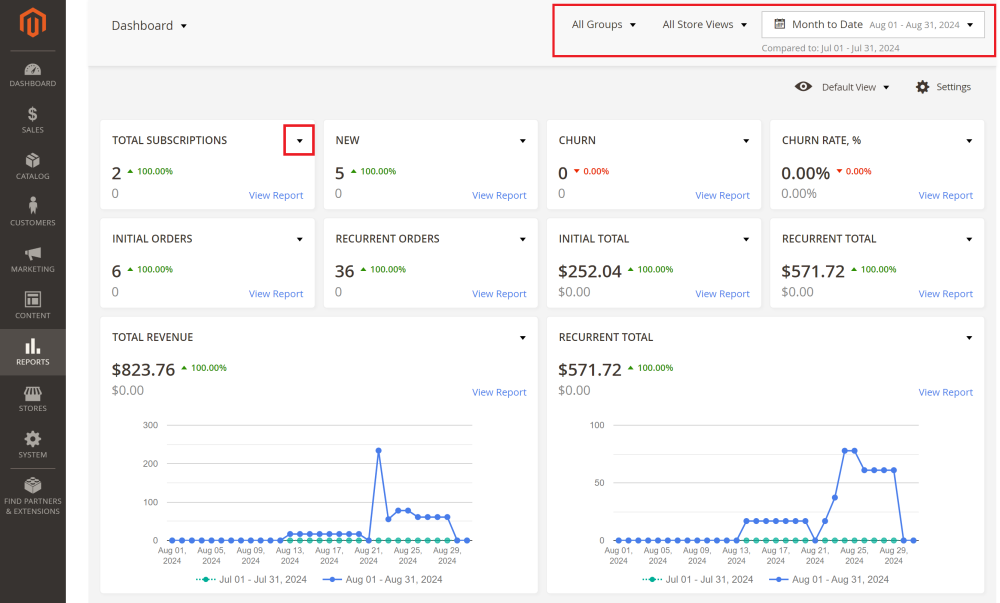
To access the dashboard go to Reports -> Advanced Subscription Reports by Aheadworks -> Dashboard.
Here, you'll find key metrics that provide a clear overview of the subscriptions performance.
The dashboard contains the following data:
- Total Subscriptions – the overall number of active subscriptions;
- New – the number of new subscriptions created within the set time period;
- Churn – the number of canceled/expired subscriptions;
- Churn rate – the churn rate in percentage from the beginning of the set time period to the end of this period;
- Initial Orders – the number of first-time orders during the period, with a percentage change indicator;
- Recurrent Orders – the number of repeat orders, along with a percentage change;
- Initial Total – the revenue generated by initial orders;
- Recurrent Total – the revenue generated by recurrent orders;
- Total Revenue graph – the combined revenue from both initial and recurrent orders compared to the previous period revenue;
- Recurrent Total graph - the revenue from recurrent orders compared to the previous period revenue.
This page consists of graph and metrics widgets. The administrator can customize each widget by clicking on the triangle in the upper right corner of the widget.
In addition, data can be filtered by customer groups, store views and time periods allowing users to drill down into specific segments of their subscription business.
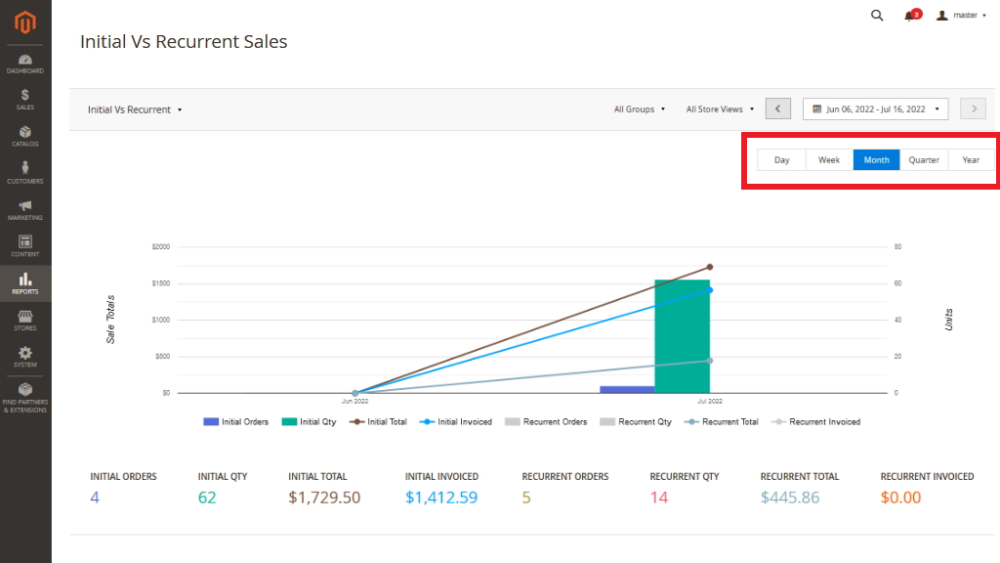
Initial Vs Recurrent Sales
The Initial vs. Recurrent Sales report highlights the sales dynamics of both initial and recurring orders.
For convenience the data is displayed in several forms: graph and grid.
They present data for key metrics:
- Initial Orders –Number of initial orders;
- Initial Qty – Total quantity of items in initial orders;
- Initial Total – Total revenue from initial orders;
- Initial Invoiced – Total amount invoiced from initial orders;
- Recurrent Orders –Number of repeat orders;
- Recurrent Qty –Total quantity of items in repeat orders;
- Recurrent Total –Total revenue from repeat orders;
- Recurrent Invoiced – Total amount invoiced from repeat orders.
These data can be filtered by time period: Day, Week, Month, Quarter, Year.
Below the graph all the metrics are displayed in a grid with filtering and customization options.
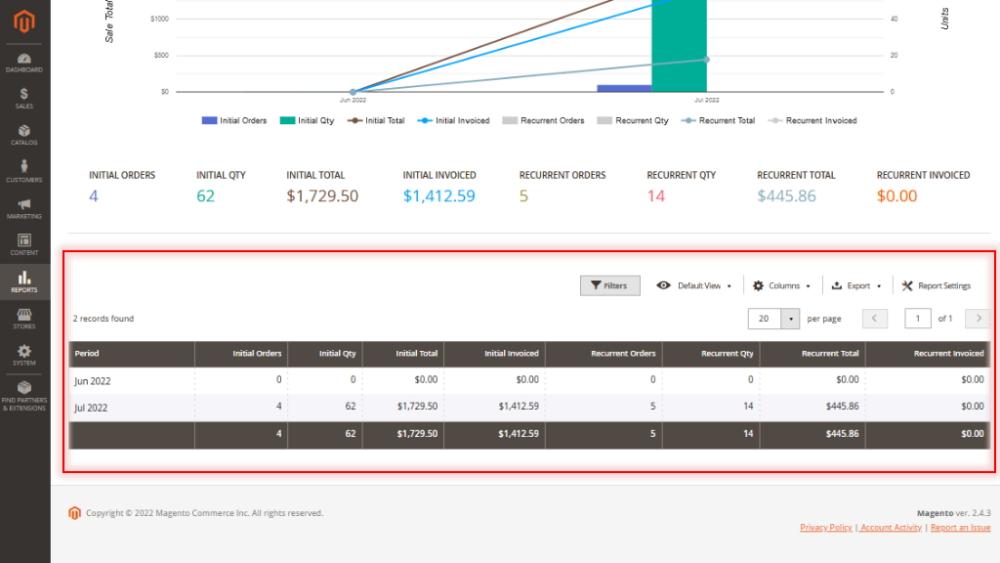
For better segmentation, the data can be filtered by store view and customer group.
Additionally, you can choose the date range using one of the options in the dropdown list:
- Today;
- Yesterday;
- Week to date;
- Last 7 days;
- Last week (Sun-Sat);
- Last business week (Mon-Fri);
- Month to date;
- Last Month;
- Last Quarter;
- Custom Date Range.
Or set your own time period using the input fields or choose the range manually using flexible calendar.
Here you can also compare data for the set period to previous period, previous year or custom period.
Once the date has been selected, click Apply to refresh the report page.
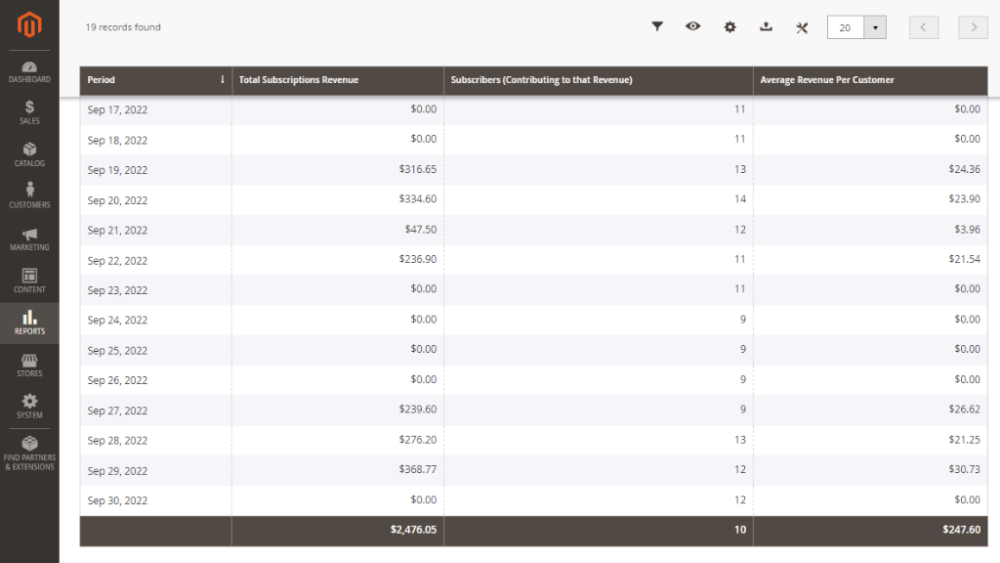
- Average Revenue Per Customer Report (ARPC)
ARPC calculates the total revenue generated by all customers within a set time period, divided by the total number of customers.
This graph displays data corresponding to the following metrics:
- Total Subscriptions Revenue – the total revenue generated by all subscriptions within the set time period;
- Subscribers (contributing to that revenue) – the number of active subscribers;
- Average Revenue Per Customer – the average amount of revenue generated per customer.
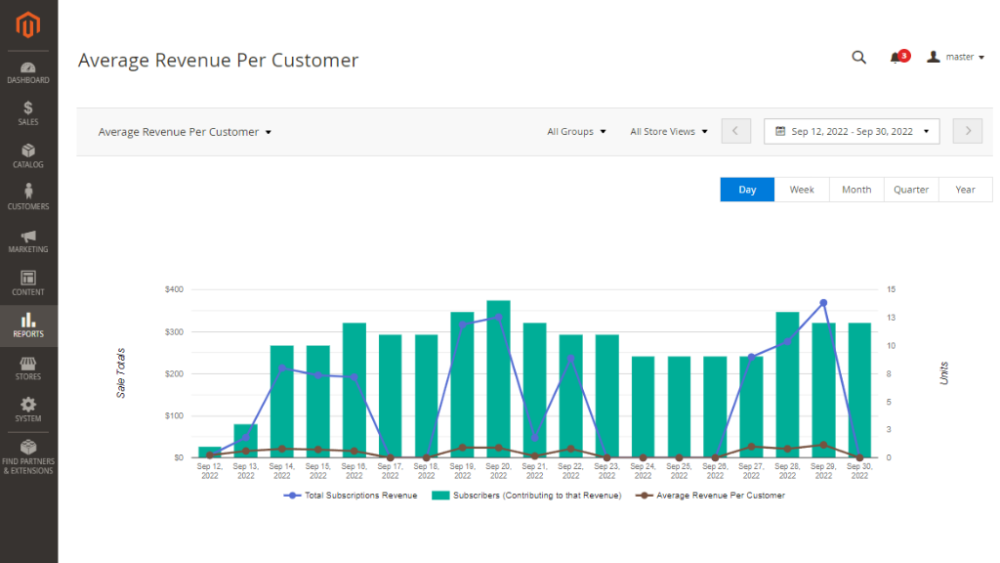
Below the graph, there's a reporting grid that displays the same metrics.
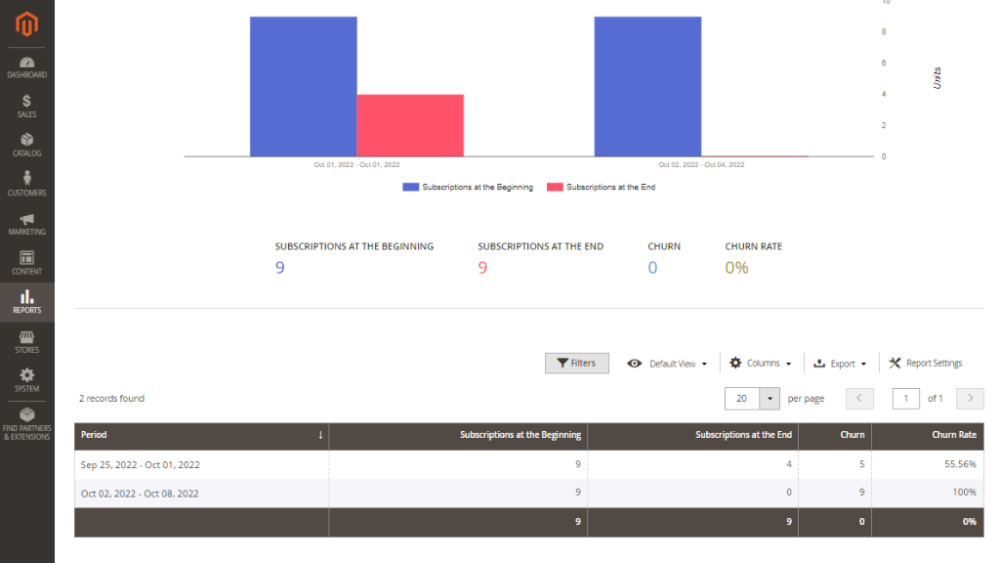
- Churn Rate Report
The Churn Rate Report provides an overview of the churn rate for a set time period. It includes the following metrics:
- Subscribers at the Beginning – number of subscribers at the start of the set period.
- Subscribers at the End – number of subscribers at the end of the set period.
- Churn – the number of canceled or expired subscriptions.
- Churn Rate – the percentage change in subscriptions, indicating an increase or decrease.
The total statistics displayed below the chart represent data for the set period in the calendar, independent of the grid data.
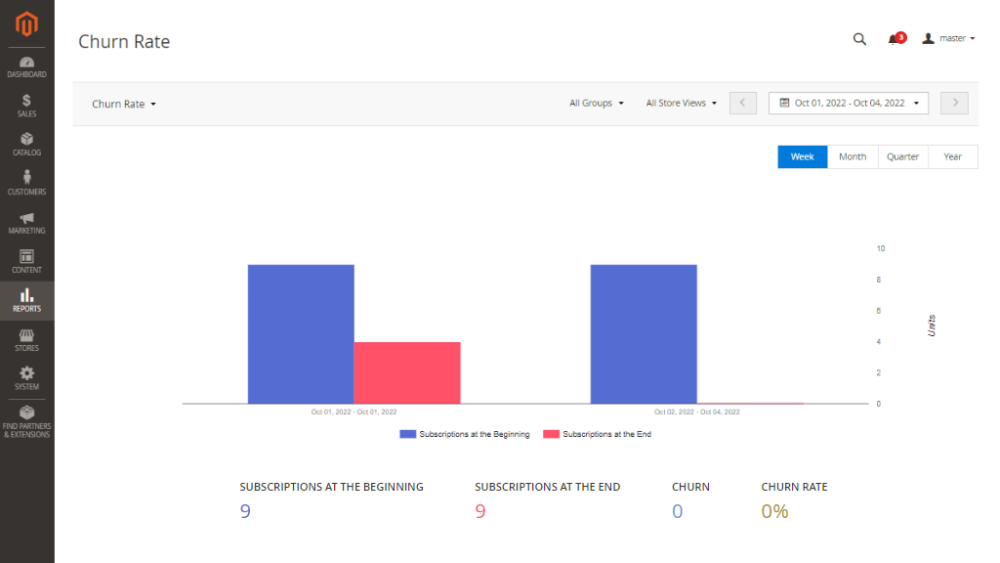
Data in the grid reflects data from the selected period aggregated by week, month, quarter, year.
The last row in the grid shows statistics from totals and it doesn’t depend on previous rows.
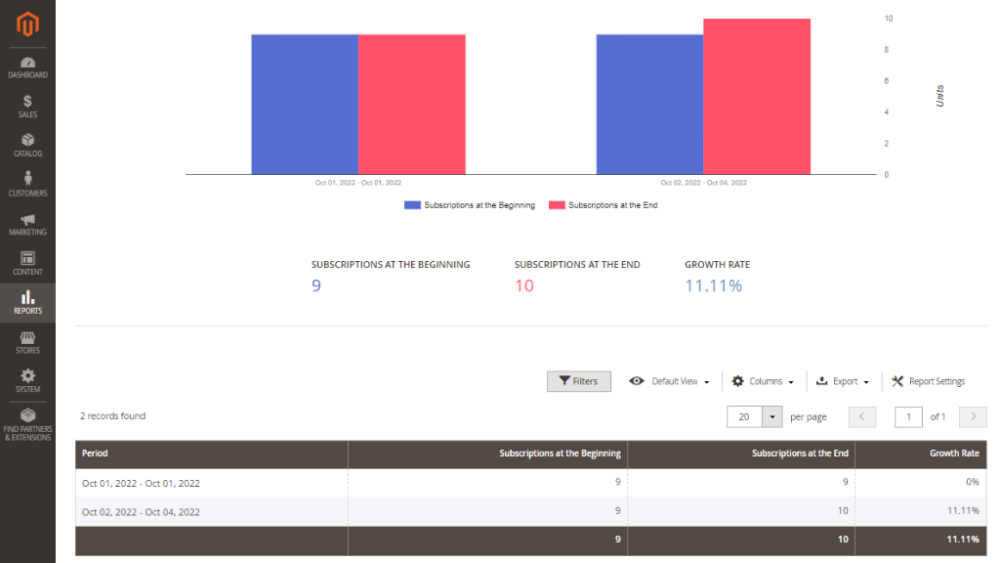
- The Growth Rate Report
The Growth Rate Report highlights the increase in the number of subscriptions over a set time period compared to the initial period.
This report tracks the following metrics:
- Subscriptions at the Beginning – The total number of active subscriptions at the start of the set period;
- Subscriptions at the End – The total number of active subscriptions at the end of the set period;
- Growth Rate – the percentage of increase in the number of new subscribers over a set period.
| Note: If the initial number of subscriptions is "0," the growth rate will always be "0%" due to the formula's denominator being "0." |
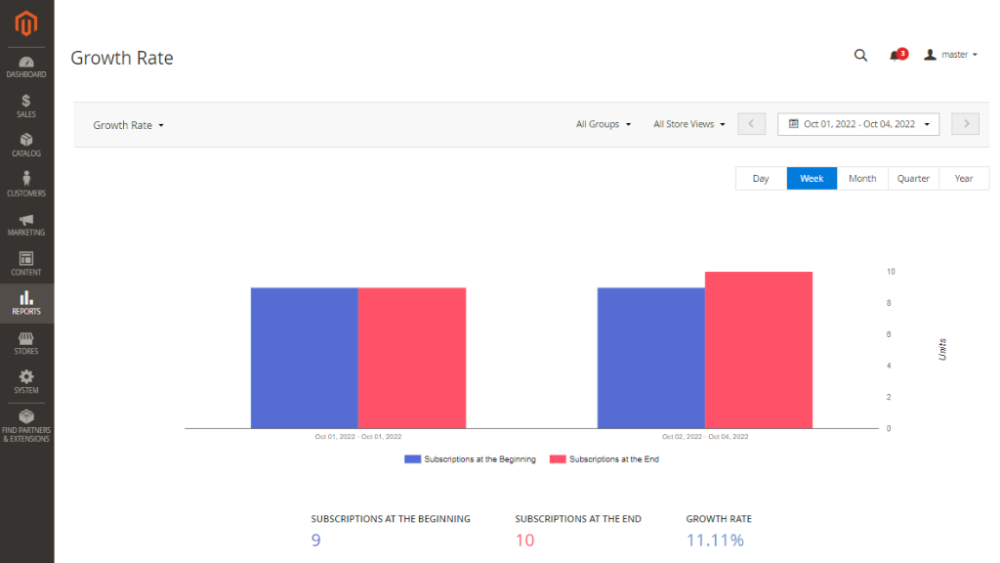
Below the graph, you will find a reporting grid that displays the same metrics.
The total data reflects the arithmetic average for the selected period based on the calendar, not the column's average.
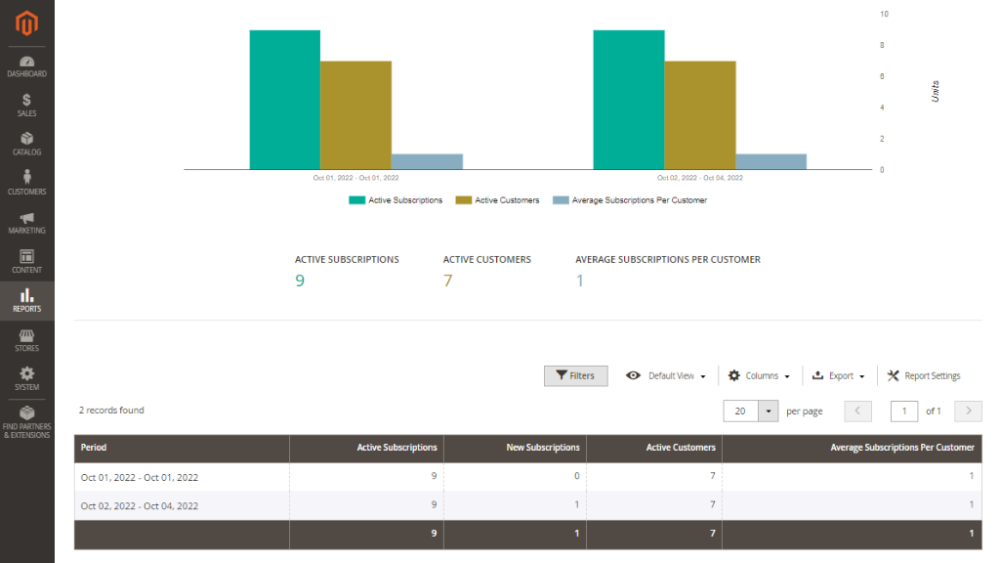
- Number of active subscribers Report
The Active Subscribers Report provides an overview of how many customers currently maintain active subscriptions within a set time period.
The chart highlights several key indicators:
- Active Subscriptions reflect all subscriptions that are still processing payments;
- Active Customers are those who hold one or more ongoing subscriptions;
- Average Subscriptions Per Customer represents the ratio of total subscription profiles to the number of subscribing customers.
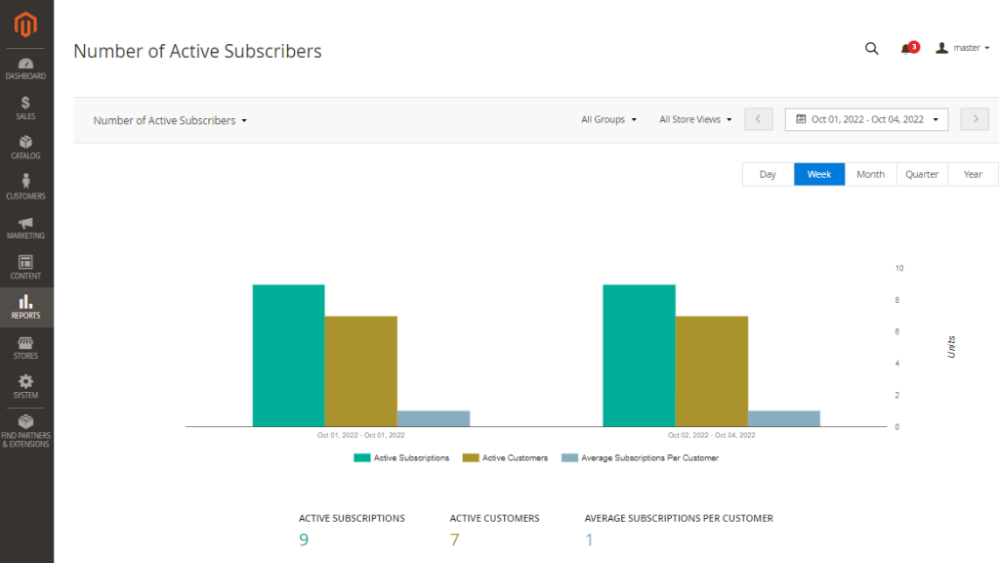
Below the graph, you will find a reporting grid that displays the same metrics.
The totals section calculates the average for the chosen reporting period.
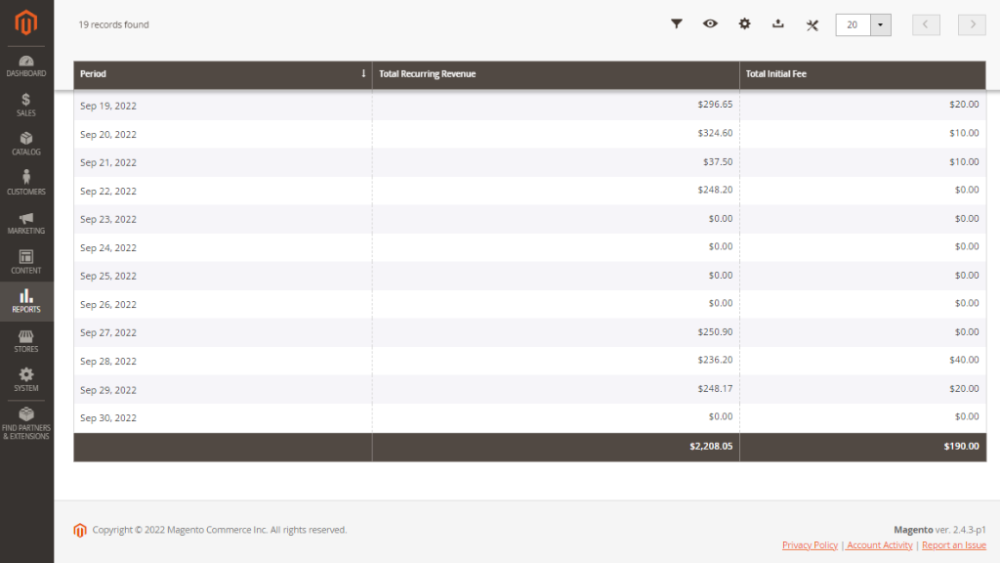
- Monthly Recurring Revenue Report
The Monthly Recurring Revenue Report tracks the income generated by subscription orders month over month. It helps you estimate the growth of your subscription business in terms of revenue so you can approximately estimate future revenues based on trends.
The graph presents insights into Total Recurring Revenue. This is the overall income from subscription orders (both initial and recurring) during the month, excluding any initial fees.
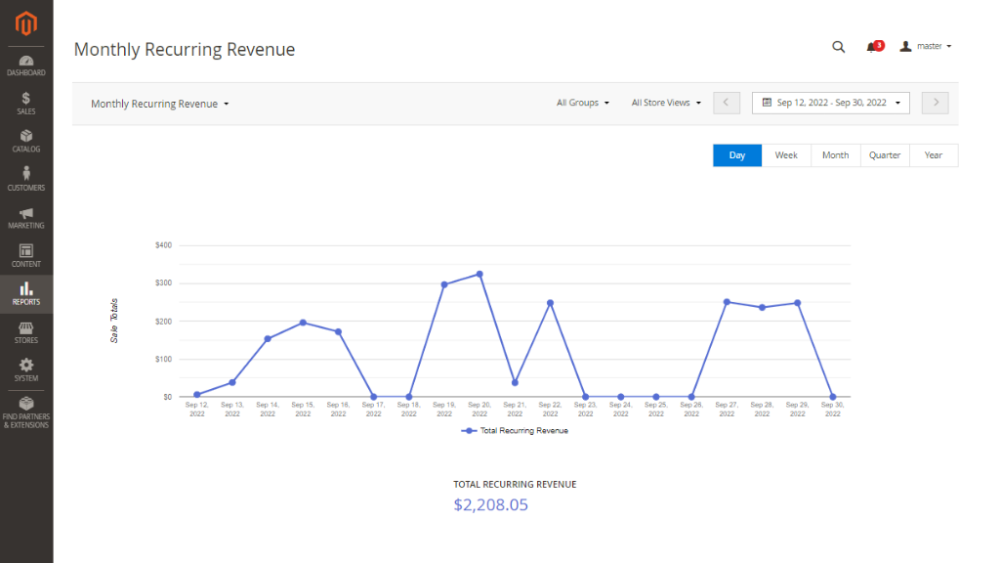
Below the graph, you will find a reporting grid that displays the same metrics.
- Monthly Recurring Revenue Growth
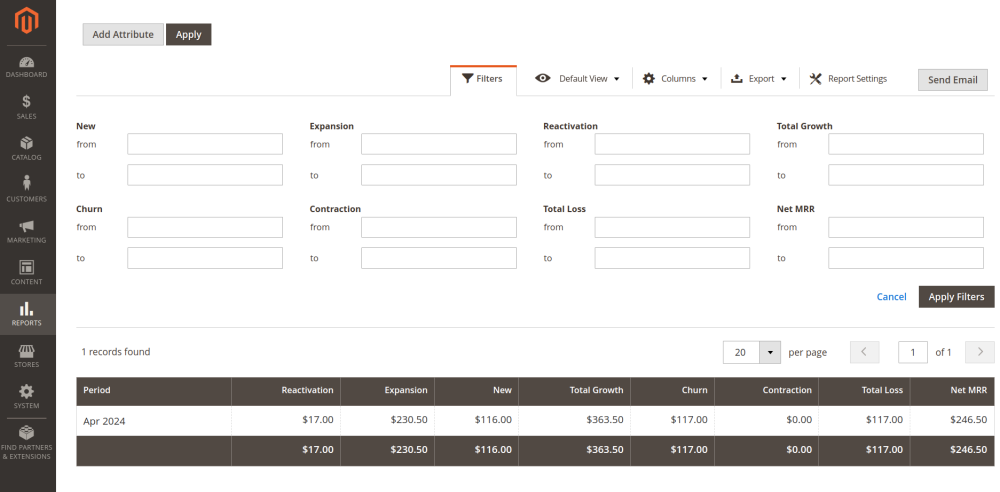
The Monthly Recurring Revenue Growth report is a detailed tool that tracks the growth and changes in your recurring revenue from subscriptions. This feature offers a comprehensive view of how different factors like new subscriptions, reactivations, expansions, churn, and contractions affect the growth of your business's subscription revenue over a set time period.
Report is calculated using an accrual method, meaning revenue is recognized when it's earned rather than when it's actually received. While MRR Growth relates to monthly subscription income, it’s a distinct metric that may not exactly match monthly revenue.
This report highlights key metrics such as:
- Reactivation – income from subscriptions that were previously canceled but reactivated during the month.
- Expansion – additional revenue from existing customers, whether through plan upgrades or increased product quantities.
- New – revenue from brand-new subscribers who joined during the month.
- Churn – revenue lost due to cancellations. If a customer cancels after being charged in the same month, their churn is counted in the next month.
- Contraction – revenue drop when customers downgrade plans or reduce their subscription items, resulting in lower payments compared to the previous month.
- Net MRR: A measure of overall revenue growth or decline, calculated by subtracting total losses (churn and contraction) from total gains (new subscribers, expansion, and reactivation).
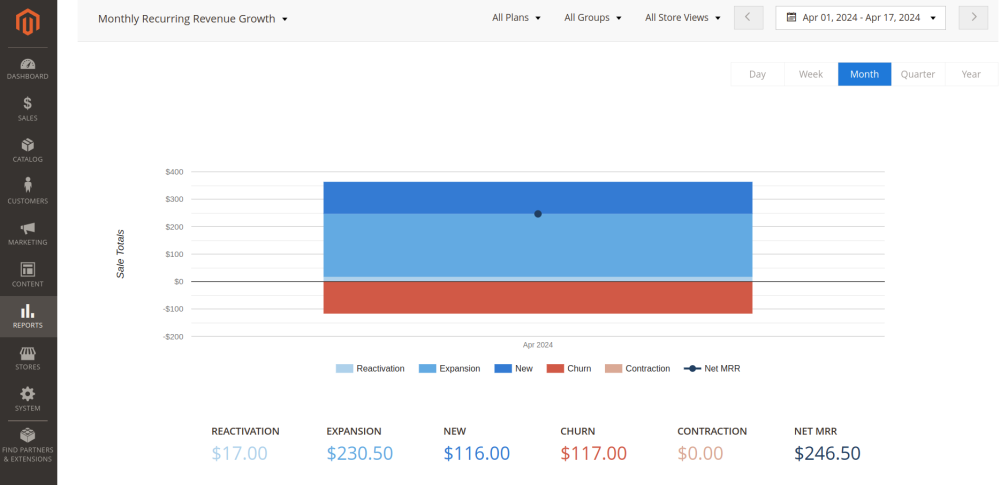
Below the graph, you will find a reporting grid that displays the same metrics together with two additional ones – Total Loss and Total Growth – to give you a full picture of how your revenue is evolving.
Here, admin can also use these metrics to filter and segment the data to analyze specific aspects of their MRR growth.
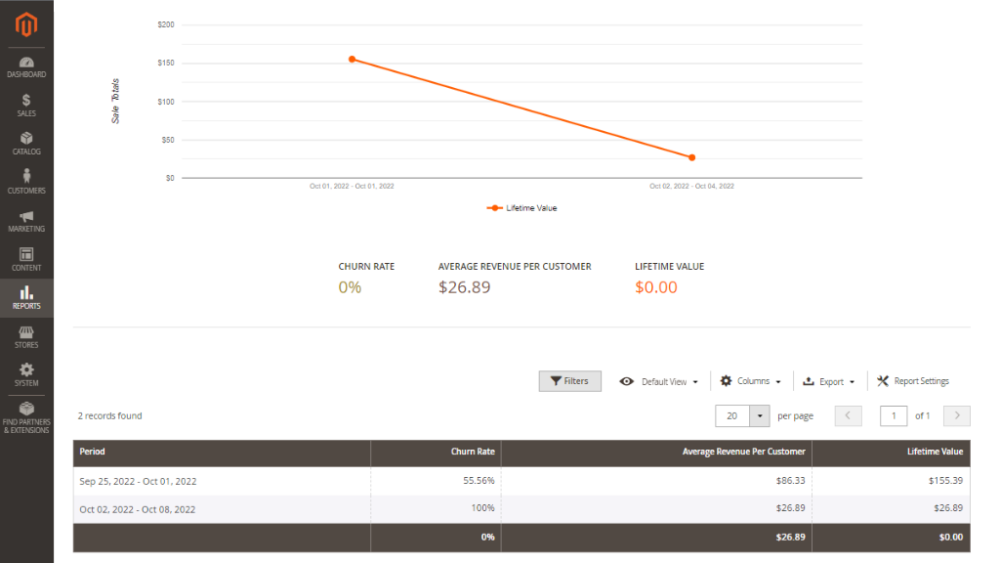
- Lifetime Value
The Lifetime Value (LTV) report provides insights into the long-term value customers bring to your business. The LTV report calculates the profit generated from each customer by deducting the costs associated with serving them. It helps in evaluating customer retention, average revenue, and the overall value generated by customers over a set time period.
This report presents a graph that tracks several key metrics:
- Churn Rate – the percentage of customers who have either started or stopped their subscriptions;
- Average Revenue Per Customer – the average amount of revenue generated by each customer per subscription within the set period;
- Lifetime Value – the total revenue a customer contributes throughout the duration of their subscription.
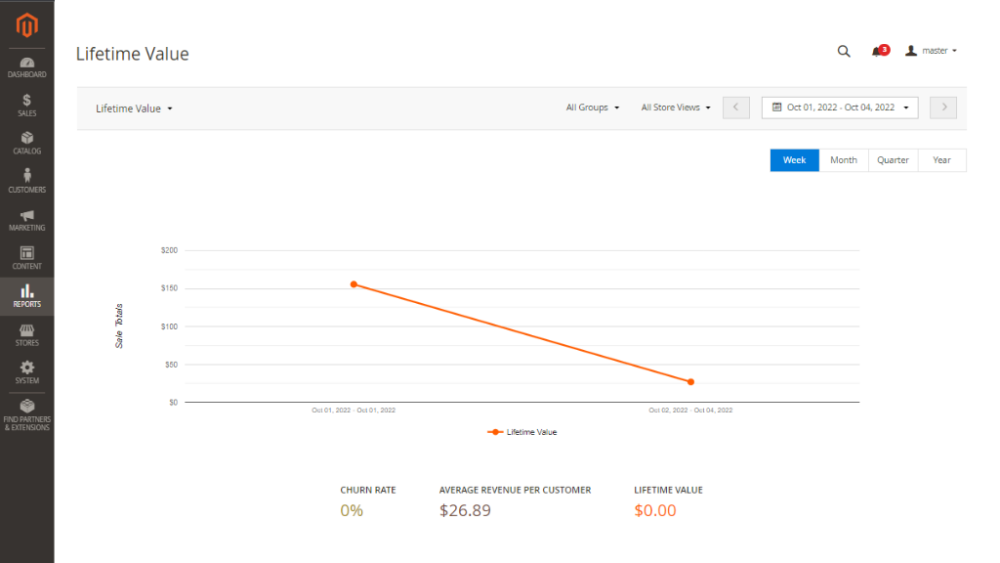
Below the graph, you will find a reporting grid that displays the same metrics.
Reward points for Magento 2
The Reward Points extension integration with Advanced Reports, enables store admins to monitor reward points performance through report grid.
| For more information about the reward points configuration go to the Reward Points user manual. |
Once the integration is enabled, a new column Other discounts will be added to the report grids.

This column shows the total amount of discounts applied through Reward Points. In this case the Total will be calculated using the following formula: Total = Invoiced + Other Discounts.
|
Note: If you have one or more of the following extensions installed, they will also be included in the "Other Discounts" column: Gift Card, Store Credit and Refund, Refer a friend. |
Refer a Friend for Magento 2
The Refer a Friend extension integration with Advanced Reports allows store owners to gain deeper insights into referral programs through reporting.
| For more details on setting up and configuring the referral program use Refer a Friend user manual. |
After enabling the integration, an Other Discounts column will be added to the report grids. This column tracks the total discounts applied through referral programs.
When this column is present, the Total is calculated using the formula: Total = Invoiced + Other Discounts.
| Note: if you have extensions like Gift Card, Store Credit and Refund, Reward Points installed, any discounts from those programs will also be reflected in the Other Discounts column. |
Gift Card for Magento 2
The Gift Card extension integrates with Advanced Reports to help store owners better track and analyze the success of their promotions with the gift card program.
| For more details on configuring promo programs with gift cards use the Gift Card user manual. |
Once the integration is activated, a new Other Discounts column appears in the report grid. This column displays the total value of discounts from gift cards.
If the Other Discount column is present, the Total is calculated using this formula: Total = Invoiced + Other Discounts.
| Note: if you have extensions like Refer a Friend, Store Credit and Refund, Reward Points installed, any discounts from those programs will also be reflected in the Other Discounts column. |
Store Credit and Refund for Magento 2
The Store Credit and Refund extension works seamlessly with Advanced Reports, allowing store owners to more effectively monitor and evaluate their credit and refund operations.
| For step-by-step guidance on setting up store credits and refunds, refer to the Store Credit and Refund user manual. |
Once this integration is activated, a new Other Discounts column will be added to the report grid, reflecting the combined value of credits and refunds.
When the Other Discount column is included, the Total is calculated as: Total = Invoiced + Other Discounts.
| Note:If you have additional extensions installed, such as Refer a Friend,Gift Card, Reward Points any discounts from these will also be displayed in the Other Discounts column. |
Troubleshooting
I have deleted the product. Will it impact the reports?
If the product was deleted, the 'Product Performance' report will erase the SKUs of the product from the order table. It means that configurable products and products with custom options will have their SKUs marked as 'product was deleted'. The deleted products will not impact the report performance or the data generated.
I can't see the attribute in the 'Sales by Attributes' report!
Make sure you have enabled the 'Use for Promo Rule Conditions' option for the attribute you cannot find in the report. If required, refresh cache and reload the page.
Why can I not see some configurable and bundle products in the 'Sales by Attributes' report?
It depends on whether you have set a dynamic or fixed price for the corresponding configurable and/or bundle products.
- If you have set dynamic prices - only child products will be considered while building the report;
- If you have set fixed prices - both parent and child products will be considered while building the report.
Why does the Geo chart work incorrectly?
If the Geo Chart from Sales by Location report works incorrectly and there will be errors in the console such as “Geocoding Service: You must use an API key to authenticate each request to Google Maps Platform APIs.”
-
Verify the Google Maps API Key setting and if the key no valid or unset follow Stores > Configuration > Aheadworks Extensions >Advanced Reports > General Settings > Google Maps API Key to get and configured it.
-
Make sure you have enabled “Maps JavaScript API and Geocoding API” in the APIs tab Google Cloud Platform.
Please use this page to get a detailed guide to creating a Google Maps API Key.
How are profit values calculated in the 'Product Performance' report?
Total revenue, cost, profit, and margin are calculated in accordance to the following formulae:
Total Revenue (excl. Tax)
Total Revenue (excl. Tax) = sum for each item (Item final price * Qty sold - Taxes - Total discount) |
Total Cost
Taken from the order, not from the current product attribute value |
Total Profit
Total Profit = Total Revenue (excl. Tax) - Total Cost |
Total Margin
Total Margin = (Total Profit / Total Revenue (excl. Tax)) * 100 |
Why doesn't the integration with Company Accounts work correctly?
If both Aheadworks Company Accounts and Adobe Commerce Company Accounts are installed, reports may display inaccurately due to conflicts between the extensions.
![]()
Already used our product?
We would appreciate your feedback. Please, leave a review.