
User Manual - Company Accounts
Magento 2 Company Accounts allows creating and managing company accounts, the one-parent-multiple-children hierarchies with apparent role boundaries of member-accounts. The module helps online vendors and their wholesale customers interact as brands, sophisticated engagement assured for best business-to-business practices.
API documentation link
Installing M2 Company Accounts
Command Line Installation
- Backup your web directory and store database
- Download the Company Accounts installation package
- Upload the contents of the Company Accounts installation package to your store root directory
- In the SSH console of your server, navigate to your store root folder:
cd path_to_the_store_root_folder |
run the following command: :
php bin/magento module:enable Aheadworks_Ca |
then:
php bin/magento setup:upgrade |
after:
php bin/magento setup:static-content:deploy -f |
5. Flush store cache; log out from the backend and log in again
|
Make sure the installation is done from the FTP Administrator account. Otherwise, set 775 permissions to the store root directory after the extension is deployed. |
|
Make sure you installed module ui-components, which comes as an extra library to the Company Accounts extension (without installing the module, frontend styles will not work properly). Command Line installation process for ui-components is the same as described above. |
Composer Installation
- If you are installing an extension from Aheadworks for the first time, you need to add our composer repository to your Magento store:
Login to your ssh console and navigate to your store folder:
cd path_to_the_store_root_folder |
Run the following command:
composer config repositories.aheadworks composer https://dist.aheadworks.com/ |
On successful execution of the command you will be able to use the composer to install the extensions.
To install the extension:
2. Login to your ssh console and navigate to your store folder:
cd path_to_the_store_root_folder |
3. Run the following commands to install the latest version of the extension:
composer require aheadworks/module-ca |
if you need to install a specific version, run this command:
composer require aheadworks/module-ca:<version> |
|
Specify the version of the extension in <version> |
When prompted, enter Public Key (Username) and Private Key (Password):
.png?version=1&modificationDate=1613404334292&cacheVersion=1&api=v2&width=450)
Both Public Key (Username) and Private Key (Password) can be found in My Projects and Licenses in your personal account on our site:
 |
Run the following command to install Company Accounts GraphQl:
composer require aheadworks/module-ca-graph-ql
|
4. Enable the extension:
php -f bin/magento module:enable Aheadworks_Ca |
Next, register the extension:
bin/magento setup:upgrade |
Recompile your Magento store if you are in the Production mode:
bin/magento setup:di:compile |
To verify that the extension is enabled, run this command:
bin/magento module:status |
Clean store cache, by running the following command:
bin/magento cache:clean |
Log out and Log in the backend again.
To upgrade the extension:
5. To update or upgrade an extension:
Download the updated extension file. Take note of the module-name and version. Export the contents to your Magento root.
If a composer package exists for the extension, run one of the following.
Update per module name:
composer update aheadworks/module-ca |
Updater per version:
composer require aheadworks/module-ca:<version> |
Run the following commands to upgrade, deploy, and clean the cache.
php bin/magento setup:upgrade --keep-generated |
Installing Hyvä Theme Compatibility Module
Starting from Company Accounts version 1.13.0 and its Hyvä Compatibility Module version 1.1.0, the Hyvä Compatibility Module is available only via the Aheadworks Composer repository.
Older versions of the Hyvä Compatibility Module can still be accessed via GitLab.
Installing Hyvä-compatibility module 1.1.0 and newer
To install Hyvä Compatibility Module 1.1.0 or newer via Aheadworks Composer, run the following command:
composer require aheadworks/module-ca-hyva
Installing older versions of Hyvä-compatibility module
To install an older version of the Hyvä Compatibility Module, use the following command:
composer require hyva-themes/magento2-aheadworks-ca
Hyvä-compatibility Modules with CSP Compliance
Starting from Hyvä Compatibility Module version 1.1.0, all Hyvä compatibility modules are CSP compliant. Older versions remain non-CSP compliant.
Note: The CSP-compliant modules may not be compatible with older versions of Hyvä Theme (1.3.9 and older). Before updating, please verify which version of the Hyvä Theme your store is using.
Uninstalling M2 Company Accounts
Since Magento introduced declarative Database you need to be very carefull when uninstalling or disabling the module.
|
NOTE: Please be very careful when uninstalling/disabling this module. This module uses a declarative DB scheme. Once the module is uninstalled the DB tables will be lost. |
Manual Removal
1. Disable the module by executing the following commands:
php bin/magento module:disable Aheadworks_Ca |
2. Remove the extension files from the following folder:
app/code/Aheadworks/Ca |
Automatic removal
To uninstall the extension, run the following command:
php bin/magento module:uninstall Aheadworks_Ca |
Please note: uninstall script works correctly only if the module was previously installed via Composer
|
Note for a developer: To use the uninstall script in the standard workflow, see Magento\Setup\Console\Command\ModuleUninstallCommand::validate(). The function should return an empty array for further correct processing. You can simply comment out the lines 319-338. |
Compatibility
|
Module Version |
Magento Version |
|
1.7.2 and earlier versions |
2.3.Х - 2.3.6 2.4.0 - 2.4.3 |
|
As of version 1.7.3 |
2.4.3 - 2.4.5 |
|
As of version 1.8.0 |
2.4.4 - 2.4.6 |
|
As of version 1.12.2 |
2.4.6 - 2.4.8 |
|
As of version 2.4.0 |
2.4.6 - 2.4.9 |
The PHP version depends on your current Magento version. Please, refer to your Magento version release notes.
Introducing M2 Company Accounts
Business Advantages
Magento 2 Company Accounts facilitates the B2B model for an eCommerce business. Store admins find it easier to manage the accounts of companies, and project for higher sales as they see a broader purchasing strategy of the partner. Corporate customers get able to stay organized within a sharp structure with apparent role boundaries; they act as one but loose no individuality and always retain composure and feel the back of the colleague.
What Makes the module Different
- Multi-user company accounts
- Custom company attributes
- Single account for company representatives
- Single wallet for company accounts users
- Status options for company accounts
- Status for company account users
- Roles and permissions for users
- Notifications on company account activity
Integrations
Compatible with:
M2 Company Accounts on Backend
Customizing the Extension
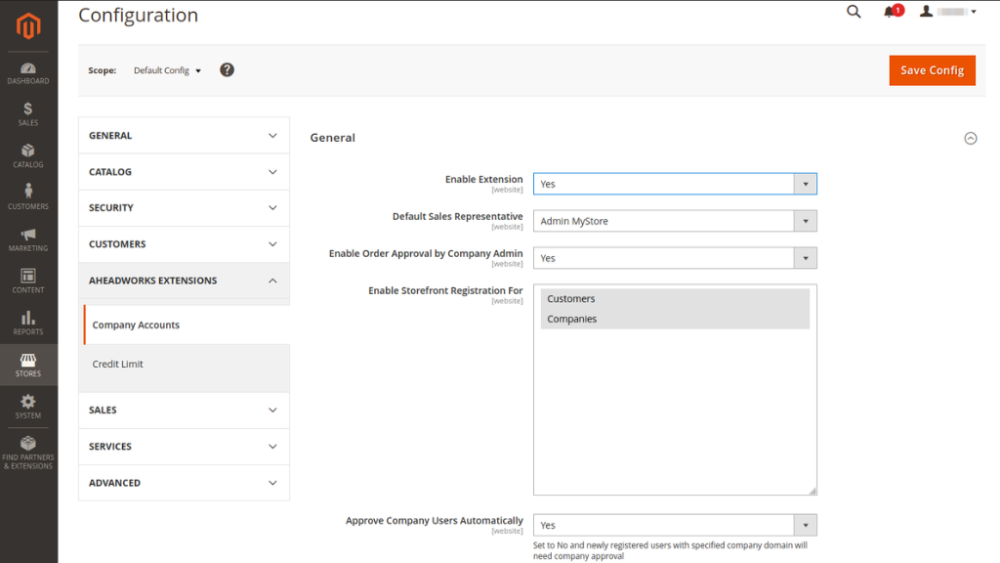
To access the settings of the extension, proceed to Stores > Settings > Configuration > Aheadworks Settings > Company Accounts. The configuration page is split into four sections: General, Email, New Company form Customization, and History Log.
General Settings
The following configuration options are available in the General section:
- Enable Extension - set toYes to enable extension functionality on the store view. If the extension is disabled:
- Company registration is not available;
- Company users are not able to log in;
- Adding new users to a company by domain is disabled. - Default Sales Representative - select a store-user to be the Default Sales Representative to deal with company accounts. The name and email address of the Default Sales Representative will be available to the company users on the Frontend. The Default Sales Representative is then a contact point regarding all company-related matters.
- Enable Order Approval by Company Admin - set to Yes to subject orders to the Company Admin's approval in cases when order subtotals surpass the established by the Company Admin limit;
- Enable Storefront Registration For - select registration form for standard Magento customer:
- If the Customer's option is selected, the company's registration form is hidden on the frontend. A company account can be created only from the backend. The section New Company Account is hidden on both Sign in and Create an Account pages.
- If the Company's option is selected, the customer’s registration form is disabled. A customer account can be created only from the backend. The section New Customers is not displayed on Sign In page and it’s replaced with the New Company Account.
- Approve Company Users Automatically - set to Yes, newly registered users with specified company domain will not need company admin approval. If it is set to No, all users, who register on the frontend with the specified domain, get a new status - Pending on the frontend. All new users can be approved by the company admin on the frontend.
|
Approve Company Users Automatically Users with status Pending are not able to sign in until they get status Active by company admin. On the frontend, new users are displayed on the Company Users grid with status Pending. This rule works only for the frontend, on the backend admin can’t change the status. It’s only displayed on the Customer edit page > Customer view > Status in Company. Backend admin can register company users without the approval process. Backend actions with Pending customers will be the same as with Inactive status. |
|
The Sales Representative extension can noticeably expand the concept of the Default Sales Representative. |
|
When Enable Order Approval by Company Admin is set from Yes to No, orders which were created when Enable Order Approval by Company Admin was set to Yes are subject to the rules as per respective setting. New orders, which were created starting the time Enable Order Approval by Company Admin was set to No, are not subject to the approval of the Company Admin. Orders, which were created before Enable Order Approval by Company Admin was set to Yes, are not subject to the approval of the Company Admin. |
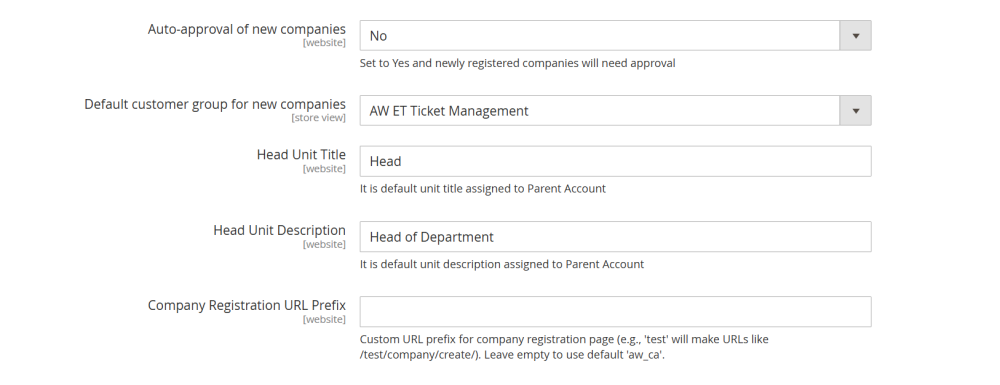
- Auto-approval of new companies - If set to Yes, all newly registered companies will automatically receive the status Approved.
- Default customer group for new companies - Select a default customer group: all newly registered companies will be assigned to this group.
- Head Unit Title - specify the title of the Parent Account unit for the company hierarchy.
- Head Unit Description - define the description of the Parent Account for the company hierarchy.
- Company Registration URL Prefix – Define custom URL for company registration page to prevent Google from indexing undesired URLs
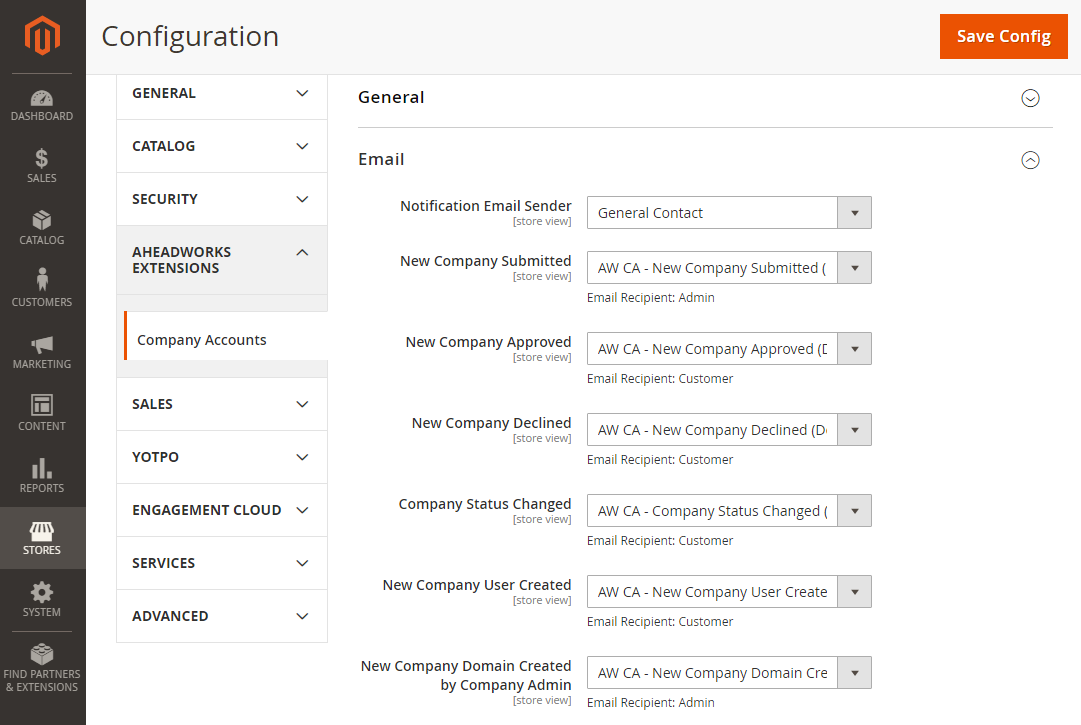
First, specify the sender of the notifications. Do that with the help of the Notification Email Sender drop-down menu. The options available here are native Magento 2 parameters which can be found and fine-tuned in Stores > Settings > Configuration > General > Email.
|
Note: You can disable any notification email whenever needed. To do this, go to Stores > Settings > Configuration > General > Email. In the drop-down menu for the corresponding email template, select “Don’t send notification”.
|

Next, select the templates for the notifications considering the following:
| Configuration Parameter |
Trigger Event |
Email Recipient | Comment |
| New Company Submitted | New company account submitted for approval | Admin |
The Admin will not receive the email when a company is created on the Frontend, if the Default Sales Representative is not selected in the settings of the extension. When a company is created on the Backend, a Sales Representative is selected automatically in the New Company form. The Admin receives the email in the latter case. |
| New Company Approved | Company account approved |
Customer |
|
| New Company Declined | Company account rejected |
Customer |
|
| Company Status Changed | The status of the company account is updated | Customer | |
| New company User Created | New customer is added to the company account | Customer | |
| New Company Domain Created by Company Admin | A new domain is assigned to Company Domains and has status Active | Admin | |
| New Company User Assigned, Send To Company Admin | A customer is assigned to the Company | Customer | |
| New Company User Assigned, Send To Company User | A customer is assigned to the Company | Customer | |
| Company Domain Approved by Sales Representative | The Sales Representative approves the domain | Customer | Requires M2 Sales Representative installed |
| Company Domain Status Changed by Sales Representative | The Sales Representative changes the status of the domain | Customer | Requires M2 Sales Representative installed |
| Company Domain Status Deleted by Sales Representative | A domain is deleted by the Sales Representative | Customer | Requires M2 Sales Representative installed |
| Company Domain Status Changed by Company Admin | A domain receives a change of status, either from the Backend or Frontend | Admin | |
| Company Domain Deleted by Company Admin | A domain is deleted | Admin | |
| Order was Sent for Approval | A new order was sent for approval by a Company User | Admin | |
| Order Status Changed | Corporate order status is changed |
Customer |
|
Note: The email notification "New Company Admin Change Request by Company Admin" automatically includes the Company Name directly within the message body. This allows the Store Admin to immediately identify which corporate account has submitted the administrator reassignment request without looking up additional details. |
|
Make sure you have set the desired expiration period to the link which appears in the notifications on the following occasions:
To check if the expiration period is satisfactory with your needs, and alter it, if need be, please proceed to Stores → Configuration → Customer configuration → Recovery Link Expiration Period (hours). |
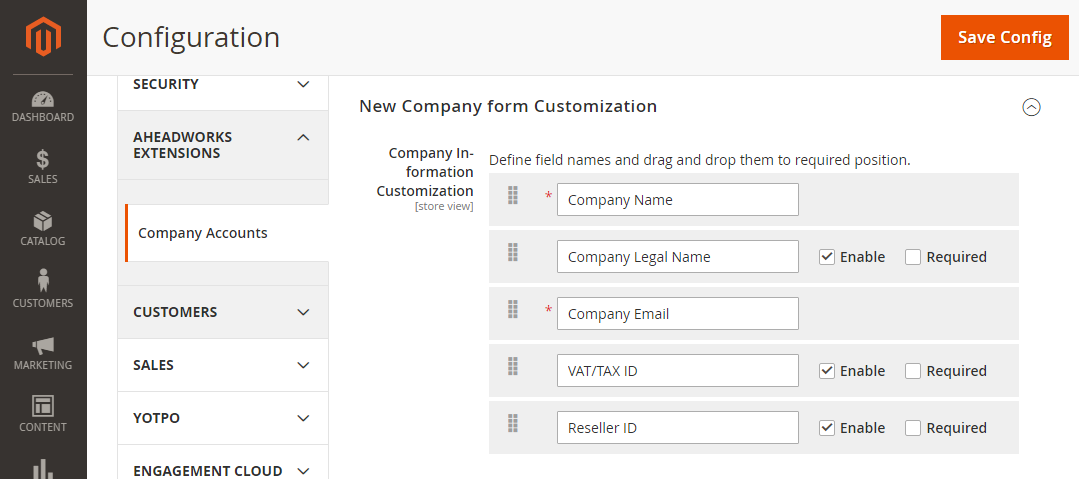
New Company Form Customization (for Frontend)
|
The customization made herein concerns only the New Company form on the Frontend. The New Company form on the Backend always remains static. The form on the Backend is not subject to changes according to the logic of the B2B interactions. |
To customize the New Company form, you can do the following:
- rename the fields
- shuffle the fields to the desired order
- enable or disable fields
- set fields as "Required"
|
Not all fields can be disabled or set as "Not Required". |
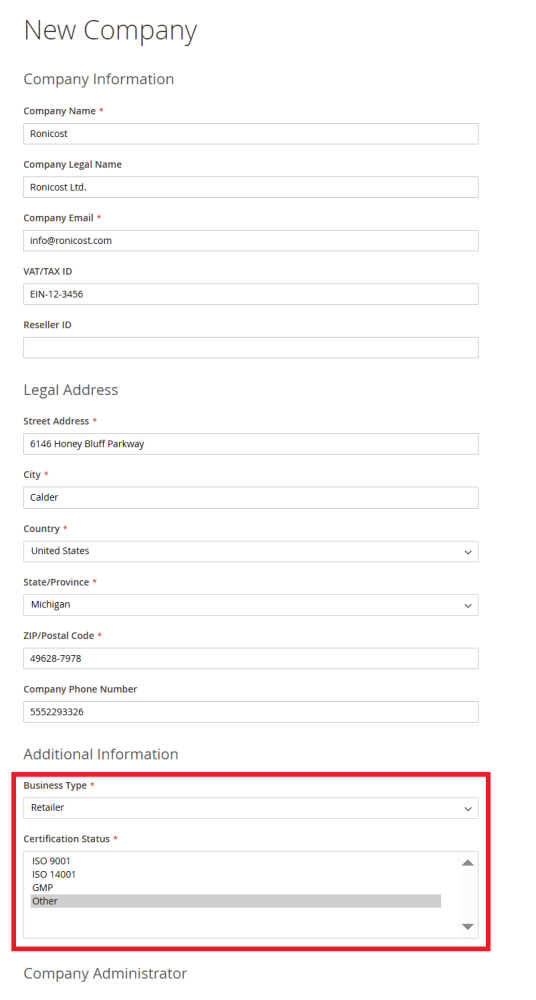
The New Company form Customization section is split into three blocks: Company Information Customization, Company Administrator Customization and Legal Address Customization.
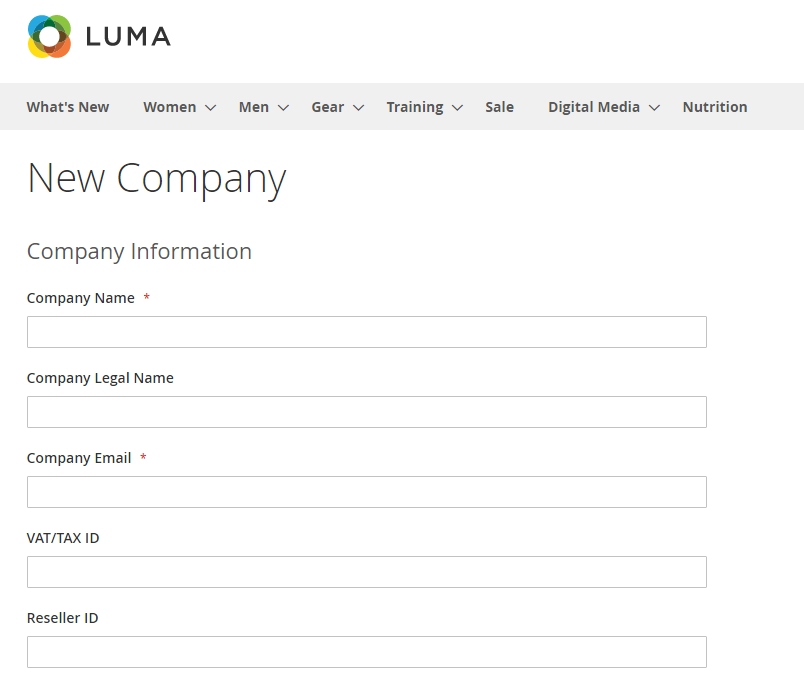
The Company Information Customization allows customizing the form as follows:
| Field | Enable/Disable | Required |
Comments |
| Company Name | - | - |
Mandatory field |
| Company Legal Name | + | + | |
| Company Email | - | - |
Mandatory field |
| VAT/TAX ID | + | + | |
| Reseller ID | + | + |
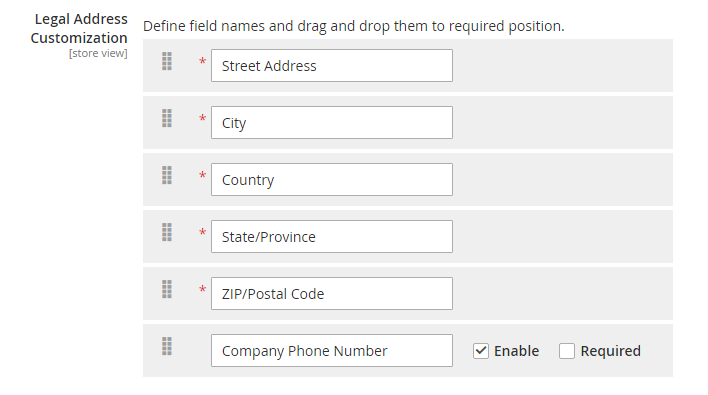
The Legal Address Customization allows customizing the form as follows:
| Field |
Enable/Disable |
Required | Comments |
|
Street Address |
- | - | Mandatory field |
|
City |
- | - | Mandatory field |
|
Country |
- | - | Mandatory field |
|
State/Province |
- | - | Mandatory field |
|
ZIP/Postal Code |
- | - | Mandatory field |
|
Company Phone Number |
+ | + |
|
The "State/Province" field can be marked as required at the extensions's configurations, but can not necessarily be required on the company creation pages (frontend and backend). The behaviour of "State/Province" is configured in Stores > Configuration > General > State Options > State is Required for. It is not possible to customize the Ste/Province field in the Company Accounts settings. You can only change the order of this field in the form. |
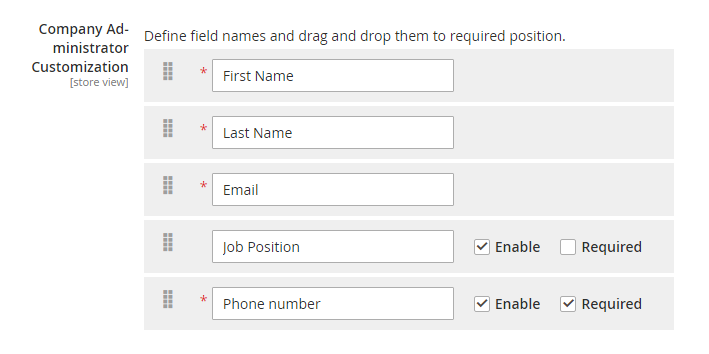
The Company Administrator Customization allows customizing the form as follows:
|
Field |
Enable/Disable | Required | Comments |
|
First Name |
- | - | Mandatory field |
|
Last Name |
- | - | Mandatory field |
|
|
- | - | Mandatory field |
|
Job Position |
+ | + | |
|
Phone Number |
+ | + |
History Log
Enable History Log - allows you to enable or disable the History Log feature. When enabled, it will track various actions performed on the store and store them in a log file.
History Log Lifetime, Days - specifies the number of days for which the history log will be stored. After the specified time, the log will be automatically deleted.
Frequency Of Log Cleaning - specifies the frequency at which the log files will be cleaned. The available options are daily, weekly and monthly. You can select the appropriate option based on the volume of logs generated by your store.
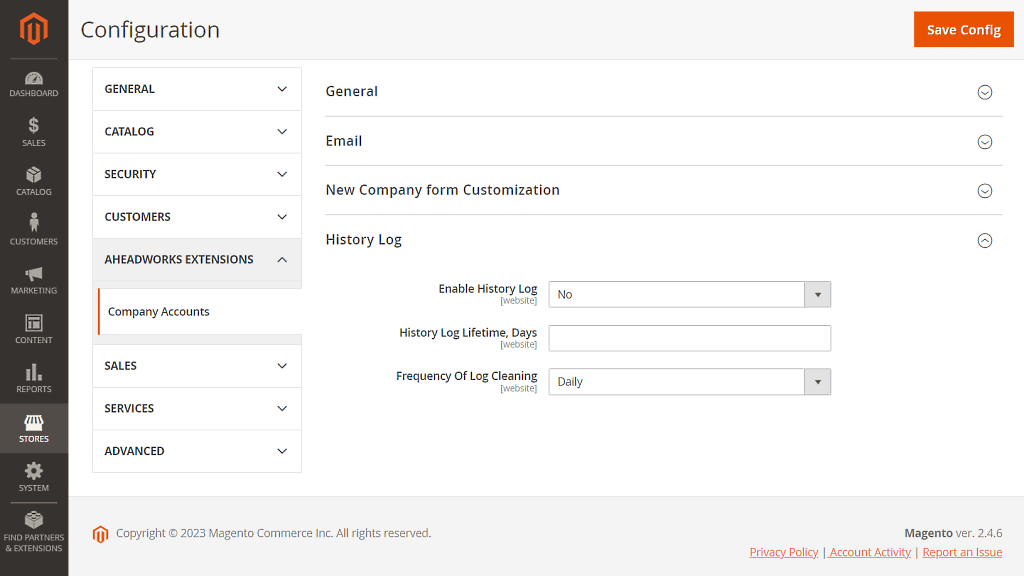
To finalize the configuration, click on the Save Config button in the top right corner of the Settings page.
Adding reCaptcha to the New Company form
To secure your store from robot messages and spam, enable Google reCaptcha for the New Company form. To do so, go to Stores → Configuration → Security → Google reCaptcha → Frontend.
Enable the reCaptcha on the Frontend, and scroll down the section to enable reCaptcha for the New Company form. To do so, set Use in Create Company to Yes
More on Google reCaptcha in Magento 2.
Company Attributes
Starting from Company Accounts 2.0.0 admins can create, edit, configure company-specific attributes, and display new custom fields on the frontend New Company registration form.
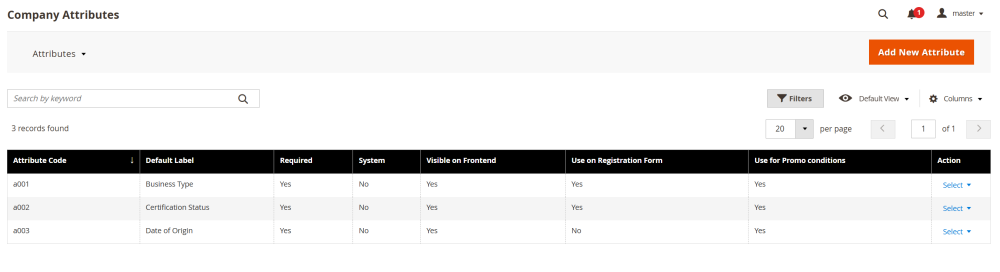
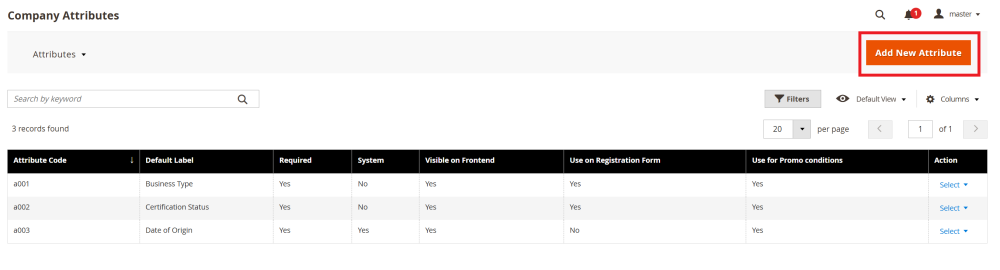
Company attributes can be found under Stores > Attributes > Company
On this page you will see a table listing all existing company attributes. The table includes the following columns:
- Attribute Code – The unique identifier of the attribute;
- Default Label – The default name of the attribute;
- Required – Indicates whether the attribute must be filled in;
- System – Shows if the attribute is a system attribute (non-editable except by company admin);
- Visible on Frontend – Whether the attribute is displayed on the frontend company profile;
- Use on Registration Form – Whether the attribute appears on the company registration form;
- Use for Promo Conditions – Indicates whether the attribute can be used in price rule and promotion conditions;
- Action – Provides access to available actions: Edit, Delete.
The grid supports sorting, filtering, and pagination, allowing admins to quickly find and manage attributes.
Creating Company Attributes
To create a new company attribute, go to Stores > Attributes > Company, and click the Add New Attribute button.
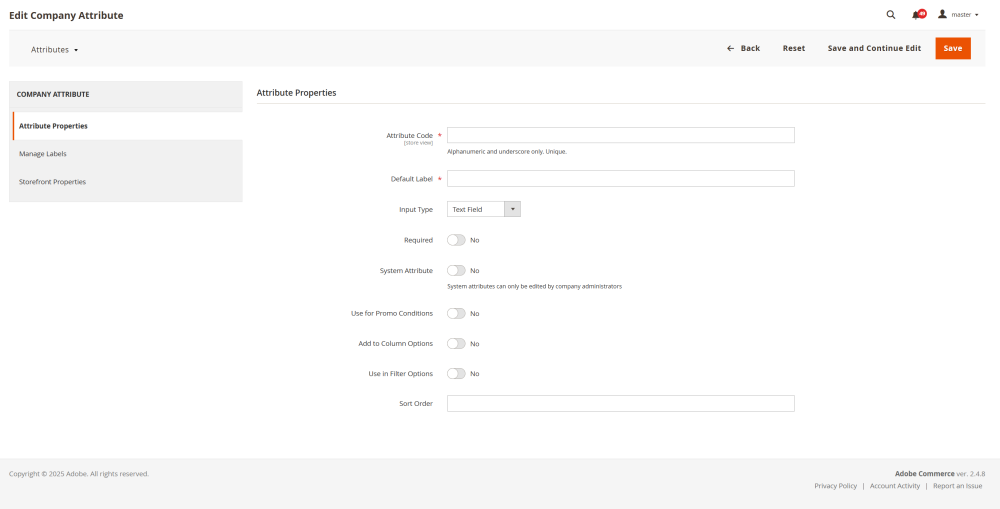
The Edit Company Attribute page contains several configuration sections.
The Attribute Properties section allows the administrator to edit core attribute settings:
- Attribute Code – Required internal system identifier; alphanumeric and underscore characters only;
- Default Label – Attribute name visible to users;
- Input Type – Defines how the value is entered:
-
- Text field
- Text area
- Date
- Multiple select
- Dropdown
|
Note: When Multiple Select or Dropdown is selected, an additional Manage Options field appears, where the admin can:
|
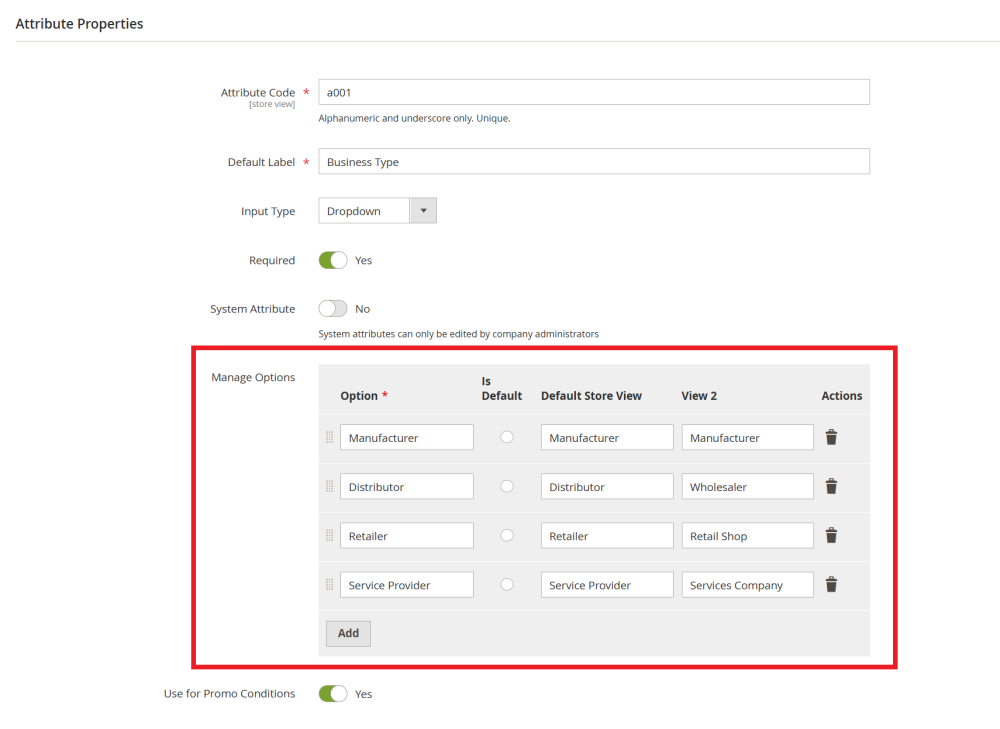
- Required – Whether the attribute must be filled out;
- System Attribute – Indicate whether the attribute is a built-in system field (system attributes can only be modified by company admins);
- Use for Promo Conditions – If enabled, the attribute becomes available in price rules and other condition builders;
- Add to Column Options – Allow the attribute to appear as an optional column in the Companies grid;
- Use in Filter Options – Allow the attribute to be used as a filter in the Companies grid;
- Sort Order – Define the attribute position in forms and lists;
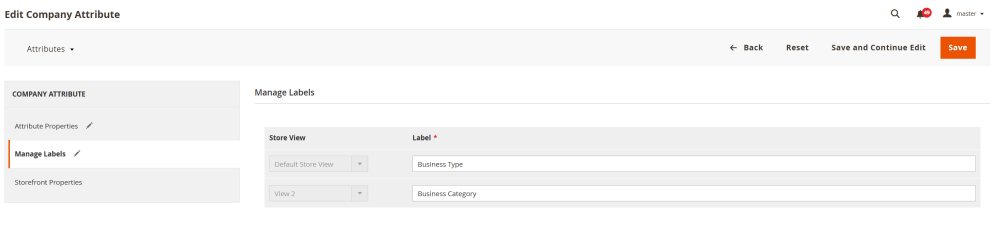
In the Manage Labels section, admins can define label values per store view.
Each store view has its own editable Label field, allowing to localize or customize attribute names across multilingual or multi-brand stores.
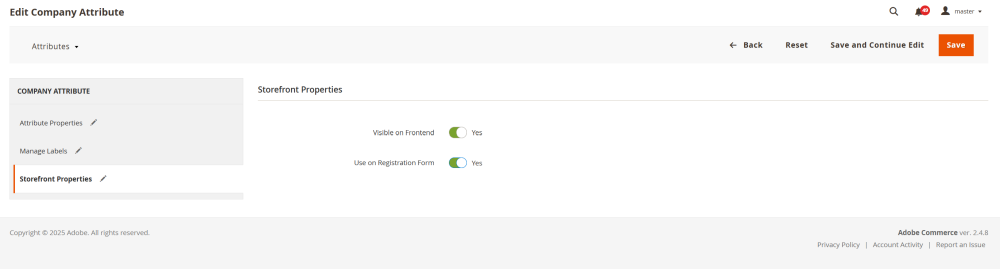
In the Storefront Properties section, admins can configure how attributes appear on the storefront:
- Visible on Frontend – If enabled, the attribute appears in the customer’s Company Information page in My Account.
- Use on Registration Form – If enabled, the attribute appears on the New Company registration form. Enabling this option automatically forces the attribute to be visible on the frontend.
Company Attributes on Backend
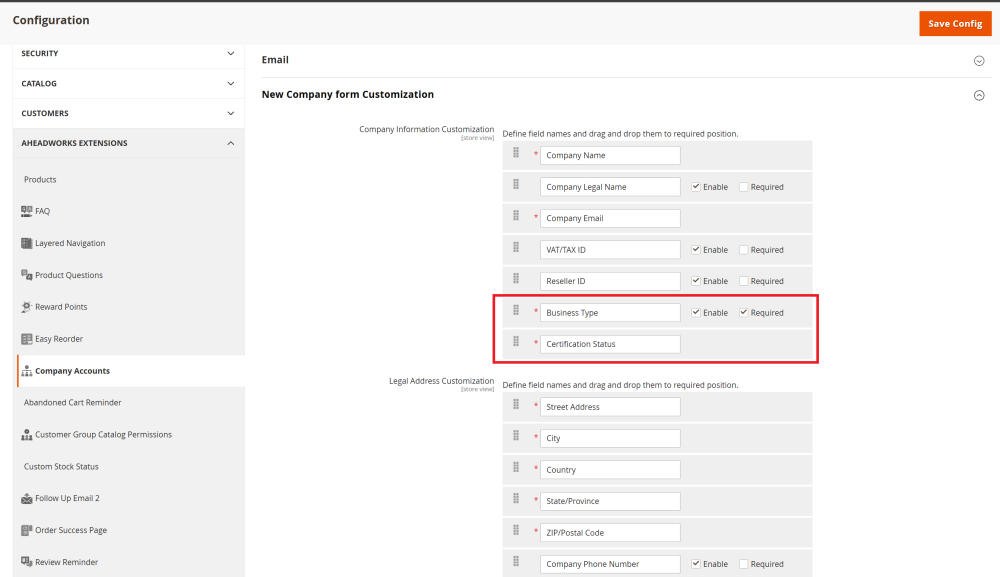
If the Use on Registration Form option is enabled, the created attributes will appear in Stores > Settings > Configuration > General > New Company form Customization.
Here, you can further configure them by defining the field name, position, and whether it is a required field.
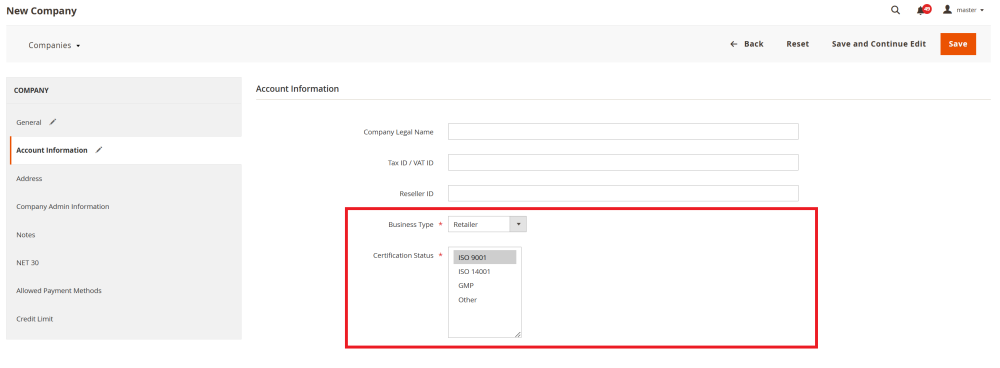
When creating/editing company from the backend, all created attributes will appear in the Additional Information section of the New Company page or Edit Company page.
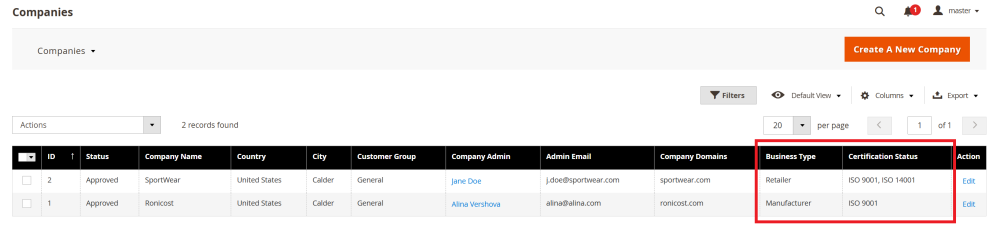
Attributes can also appear in the Companies table if this has been enabled in the attribute settings.
Company Attributes on Storefront
If the Use on Registration Form option is enabled, the created attributes will be displayed in the Additional Information section of the New Company registration form on the storefront.
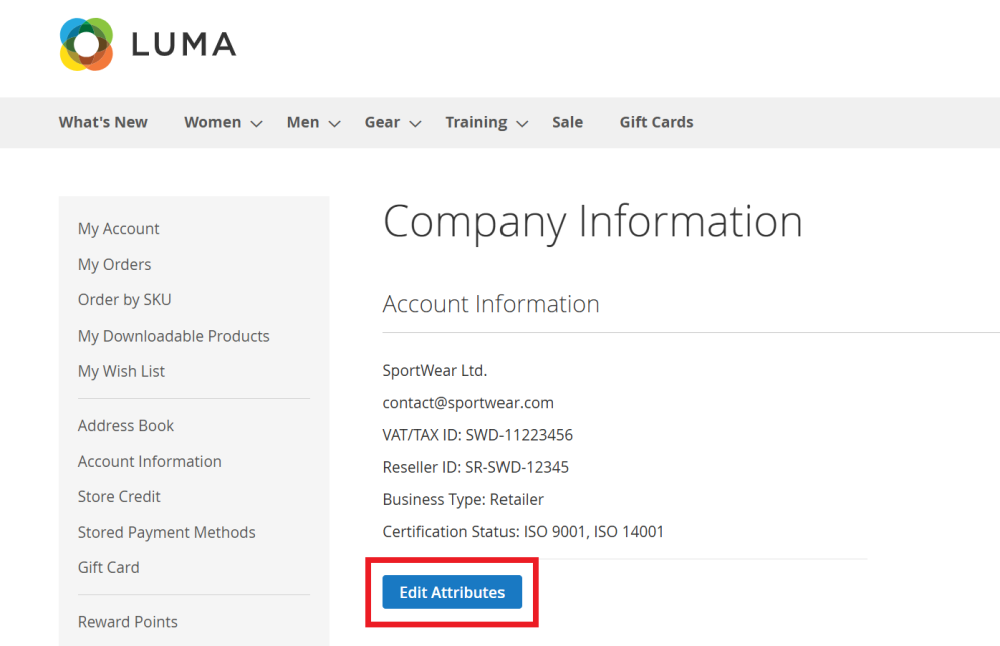
Once the company is registered, company users will see the attributes in:
My Account > Company Information
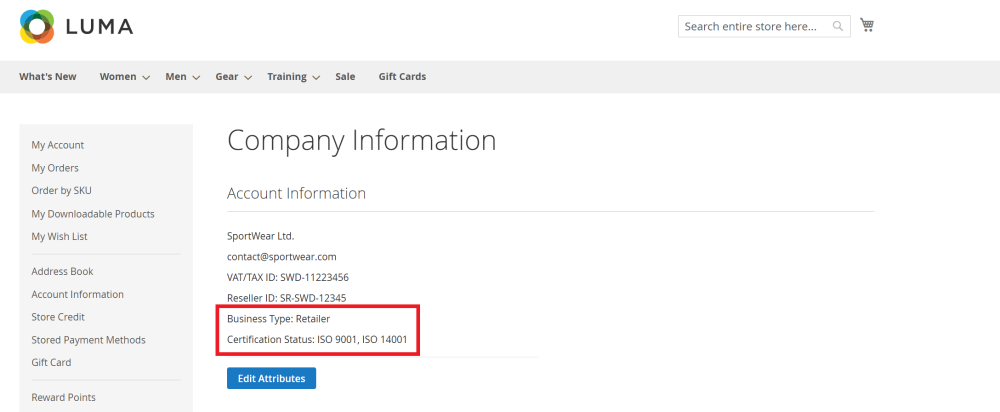
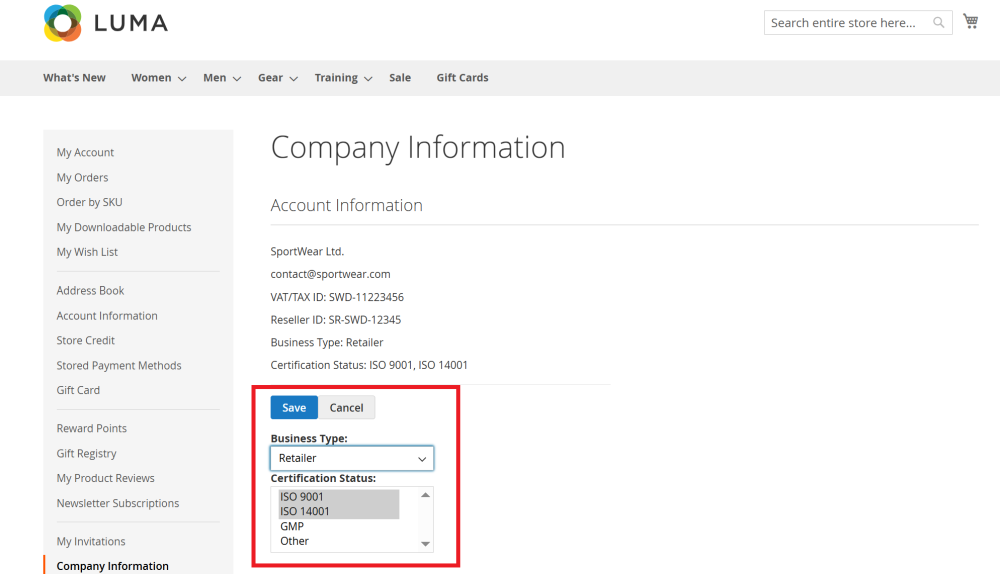
On Company Information page, account user can also edit attribute values. To do this, click the Edit Attributes button.
The editing mode will appear; after making the necessary changes, click Save.
| Note: If the Attribute is set as System Attribute it will not appear in the editing mode because it can only be modified by a company admin. |
Company Accounts Grid
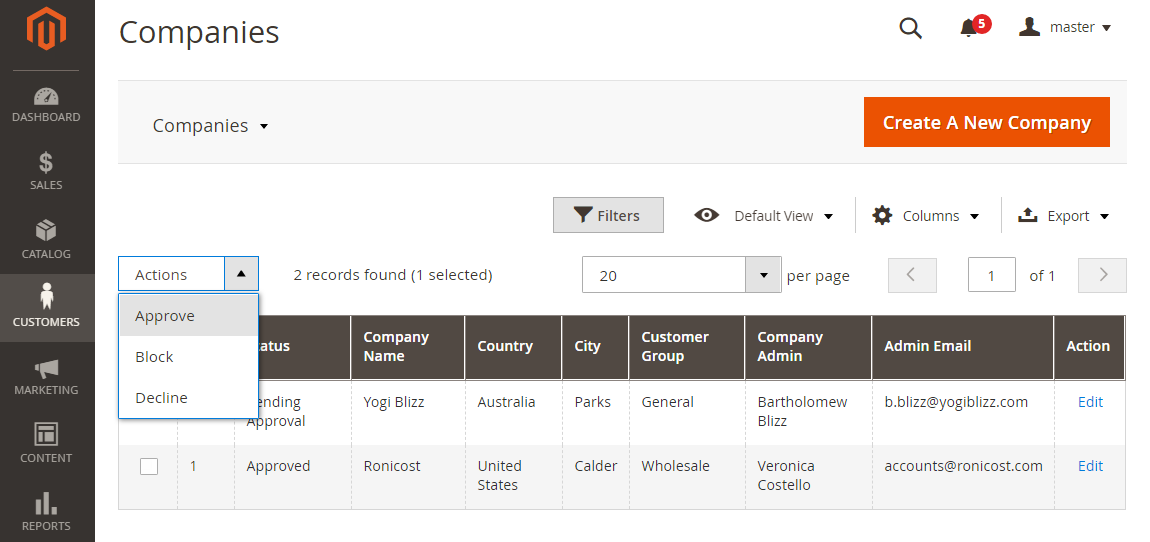
To get access to the company accounts, proceed to Customers > Companies.
The page shows a grid with the following columns:
- ID - the identification number of the company account;
- Status - the status of the company account: Pending Approval, Approved, Blocked or Declined;
- Company Name - the name of the company;
- Country - the country as per the legal address of the company;
- City - the city as per the legal address of the company;
- Customer Group - the customer group the company is assigned to;
- Admin Email - the email of the Company-Admin;
- Company Domains – domain name associated with the Company;
- Allowed Payment Methods (available on integration with Payment&Shipping Restrictions) - the list of payment methods specified for the company with the Payment&Shipping Restrictions module;
- Sales Representative (available on integration with Sales Representative) - the Store User who is assigned to the company as the Sales Representative;
- Action - the Edit active link redirects to the Edit Company page.
You can decline, block and approve company accounts individually or in bulk with the help of the Actions drop-box on the left, above the grid. Editing is only possible for an account via the Edit active link in the correspondent cell of the Action column.
Creating / Editing Company Accounts
To create a company account from the Backend, click on the Create a New Company button in the top right of the page. To edit a company account, click on the Edit active link in the correspondent cell of the Action column of the Companies Grid.
Once Create a New Company is clicked on, the module takes you to the Create/Edit a Company account page.
This is where you proceed with the following blocks: General, Account Information, Legal Address, Company Admin Information, Notes, Company Domains (only for the Edit Company page)and Allowed Payment Methods (only when Payment&Shipping Restrictions is installed).
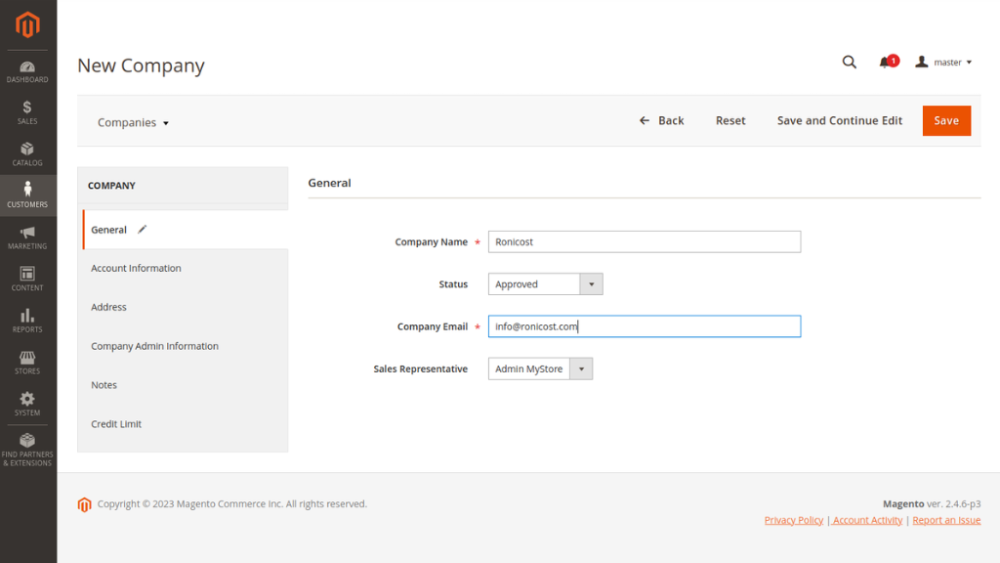
General Company Information
The General block prompts some general information about the company:
- Company Name - (required) the name of the company;
- Status - the status of the account: Pending (default), Approved, Blocked and Declined;
- Company Email - (required) the email of the company;
- Sales Representative - assign the Sales Representative to monitor the activities of the company and receive notifications on thereof. You may set a default Sales Representative in the configuration of the extension;
- Allow Quotes (available on installation of the Cart to Quote extension) - enable or disable access to RFQs for all company users.
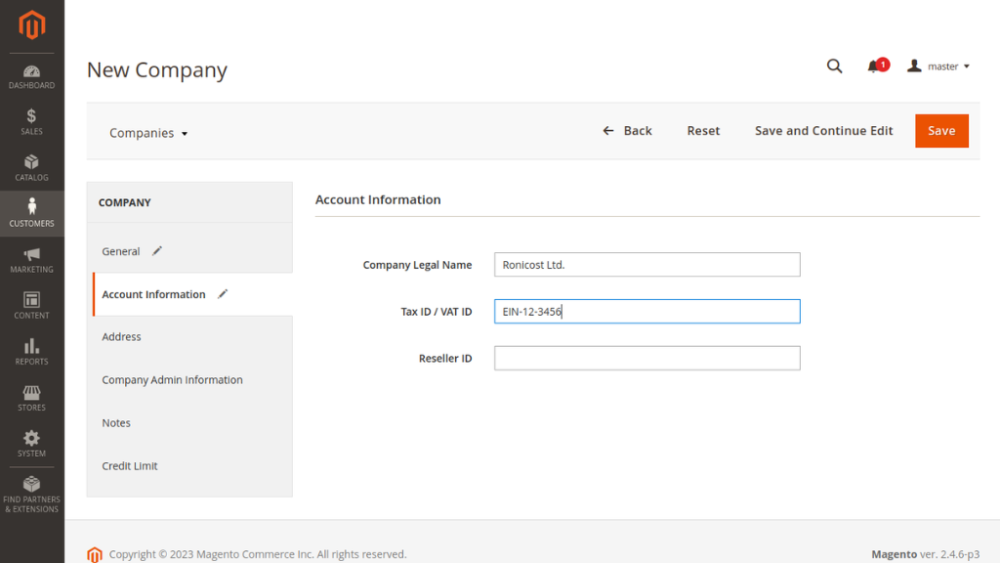
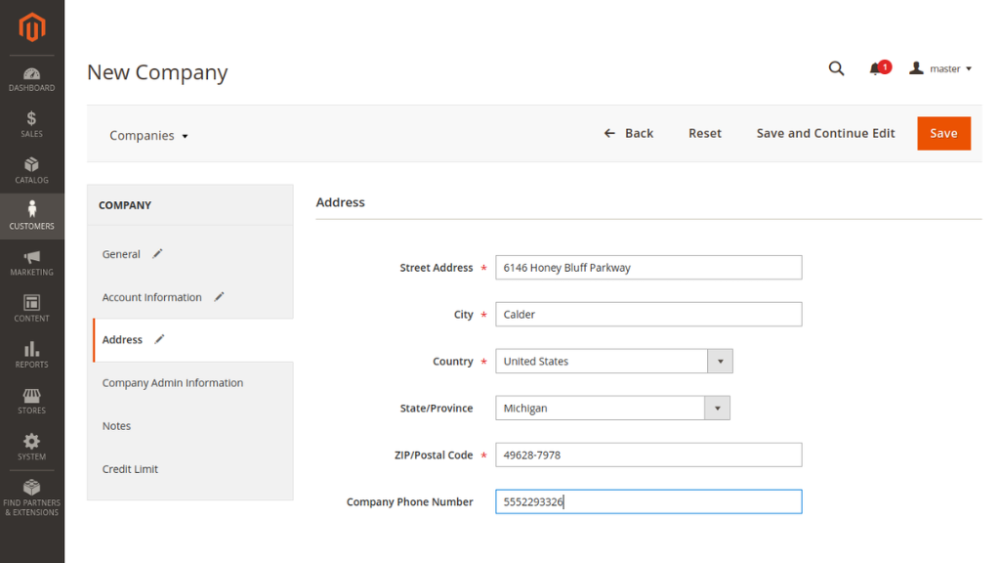
Account Information and Legal Address
The Account Information block invites to enter some legal and financial details of the company account, if available:
- Company Legal Name - the legal name of the company;
- Tax id / VAT id - the tax or VAT number of the company;
- Reseller id - the identification number of the reseller.
The Address requires typical address details of the company as a legal unit. State/Province and Phone Number are optional herein.
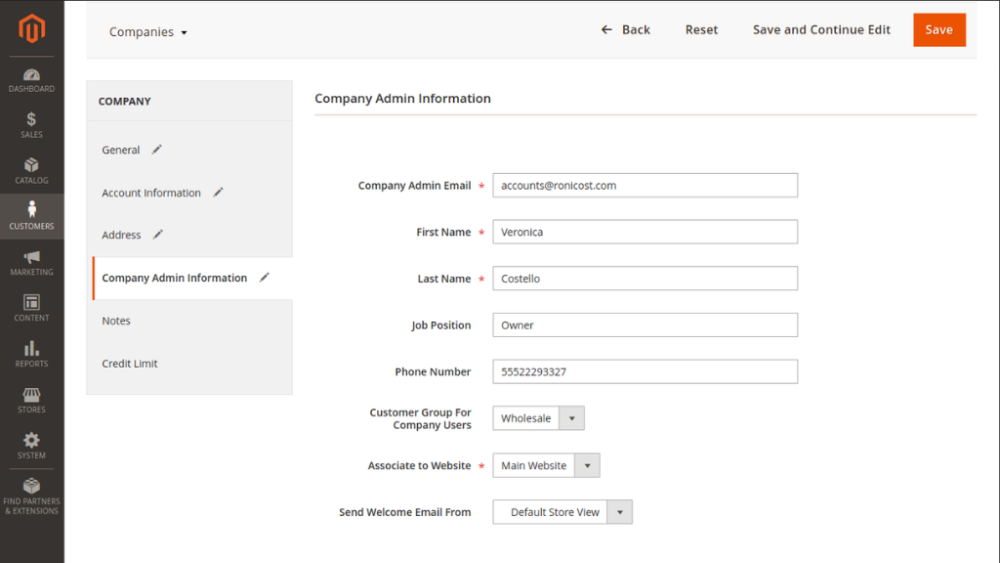
Company Admin Information
The Company Admin Information block suggests you provide some details on the administrator of the company account:
-
Company Admin Email - (required) the email address of the Company-Admin (may differ to that one of the company);
|
Here you can change company admin by clicking the ‘Change Admin’ button. Backend admin can select company user + any non-company user as a new company admin without approval. The prospective candidate for the new company admin position should not possess any individual balances, including credit limits, points or store credit. |
-
First, Last Name - (required) the name of the Company-Admin;
-
Job Position - the position of the Company-Admin;
-
Phone Number - the phone number of the Company-Admin (may differ to that one of the company);
-
Customer Group For Company Users - the group the users of the company account belong to being the customers of your store (General, Wholesale, Retail or any other you have on the list);
-
Associate to Website - the website of your store, the administrator is associated with as a customer;
-
Send Welcome Email From - the view of the store the administrator will receive emails from.
The value of the Customer Group parameter will be assigned to all users of the company account, as chosen herein. Company account users are added by the Company-Admin (or by other company users with relevant role-permissions) on the Frontend.
You can assign a company user to a different group. Do that on the Customer Edit page: Customers → All Customers → Edit (link in the Action column) → Account Information .
|
Customer email is a unique identifier in Magento. Therefore, if you use the email of an existing customer for Company Admin Email, this customer will have his/her individual account transformed into a Company-Admin account. All orders of that user will then be available (due permissions set) to all other users of the company. A customer can be the admin to only one company account. |
|
Deleting company users
|
Import companies from CSV
The data import is processed using the native Magento import operation.
To import reviews, go to the System > Data Transfer > Import. The import is fully processed when the data from the file is transferred to Magento tables according to the import configuration.
Notes
The Notes block contains a text-field where you can leave notes about the company. These will be visible only to the Store-Admin.
Company Users
This block is available only on the Edit Company page. Here, you'll find a list of all customers associated with the company. Additionally, you can make edits to customer information.
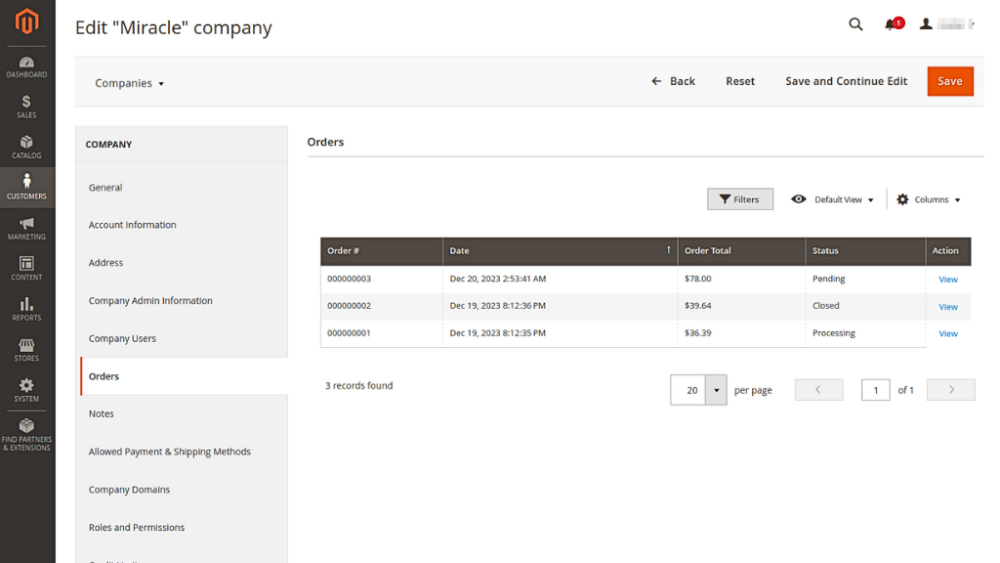
Orders
When editing the company page, you'll also find the Orders tab. Here, you'll see a grid displaying all the orders made by customers associated with the company.
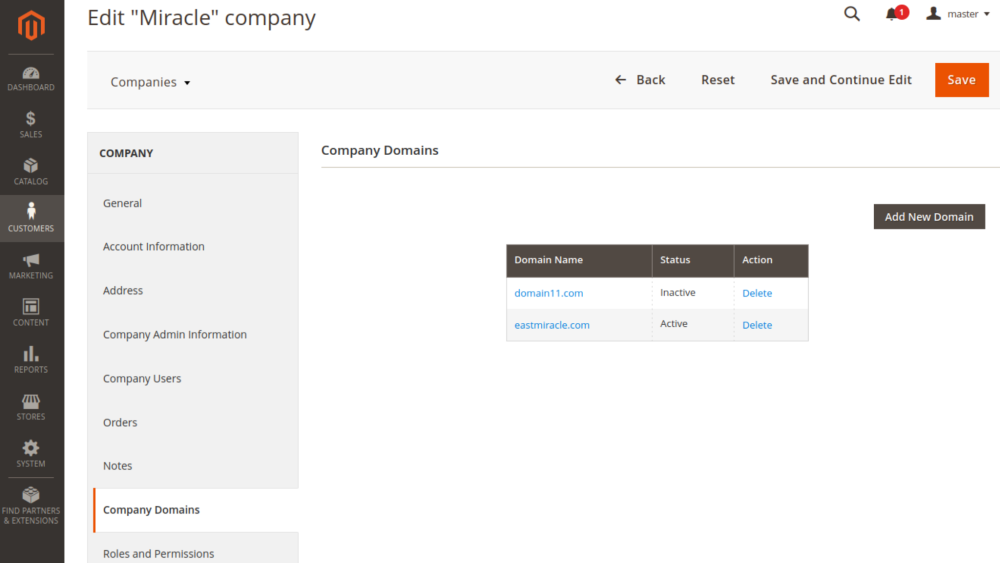
Company Domains
This block is also available only on the Edit Company page. When creating a company from scratch (that is when working on the New Company page), you will first have to save the company and then edit it to add company domains.
| New customer accounts registered with emails which belong to the company domains will automatically be added as child accounts to the company. This solution may save a lot of time on assigning users to companies. |
To delete a domain from the grid, and untie it from the company account, use the respective Delete link. The Company Domains block comes with a grid and the Add new Domain button. The grid collects the domains assigned to the company account into the three columns: Domain Name, Status and Action. The Action columns contains the Delete active link.
|
When a domain is deleted, users whose emails belong to that domain are not removed from the company account. They continue to be the users of the company account. |
To update the status of a domain, click on the name of the domain and update the status. The Configure Domain popup up will emerge. The popup has two fields: Domain Name and Status. Use Status to update the status of the domain.
|
When a domain is on the grid, it is not possible to change the name thereof. The Configure Domain popup up will have it disabled. You will have to delete the domain with the 'incorrect' name and add a new domain. |
Mind the following when updating the status of a domain:
- Inactive → Active: new customers whose emails are within the domain will be assigned to the company, the customers will have status Active
- Inactive → Pending: new customers whose emails are within the domain are NOT assigned to the company
- Active → Inactive: starting the moment of the status change, new customers whose emails are within the domain will NOT be assigned to the company automatically. Existing company users whose emails are withing the domain will remain active company users.
- Active → Pending: starting the moment of the status change, new customers whose emails are within the domain will NOT be assigned to the company automatically. Existing company users whose emails are withing the domain will remain active company users.
- Pending → Active: starting the moment of the status change, new customers whose emails are within the domain will be assigned to the company automatically, and the customers will have status Active
- Pending → Inactive: new customers whose emails are within the domain are NOT assigned to the company
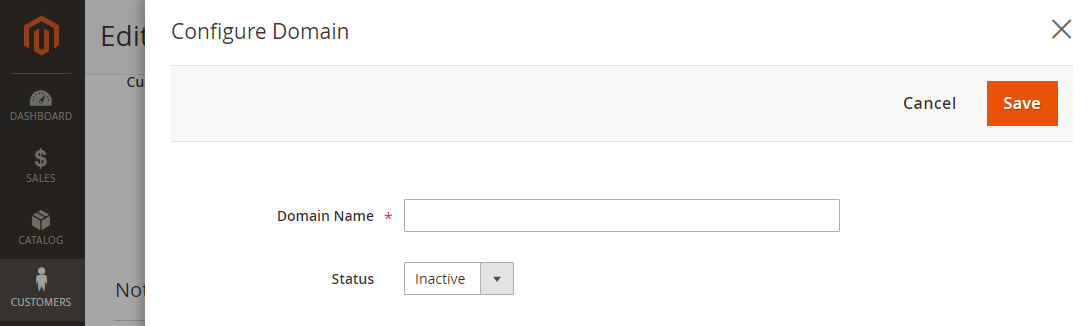
To add a domain, click on the Add New Domain button. The Configure Domain popover will prompt you to enter the name for the domain and specify its status. The status may take one of the three options: Inactive (by default), Pending and Active.
To save the domain, click on the Save button in the top right. To cancel the operation - Cancel.
Domains entered here by the Store-Admin will appear in the Configure Domains grid on the Frontend.
|
Customers who are already registered on your store, and whose emails belong to the newly configured domain will NOT be added to the company automatically. If need be, you will have to do it manually. |
|
There are some domains which cannot be submitted as company domains (gmail, yahoo, 10mins emails, etc). If the Store-Admin or Company-Admin tries to submit them, a popup is displayed: “This domain address can’t be used“. More examples of 'forbidden' domains can be found here: |
Deleting Company Accounts
To comply with data privacy regulations such as GDPR, the Store Admin can permanently remove a company account from the Magento backend.
The Delete button becomes available in the top action bar on the Edit Company page only when the company status is set to Declined. Clicking the Delete button completely removes the company profile and its corporate data from the system.

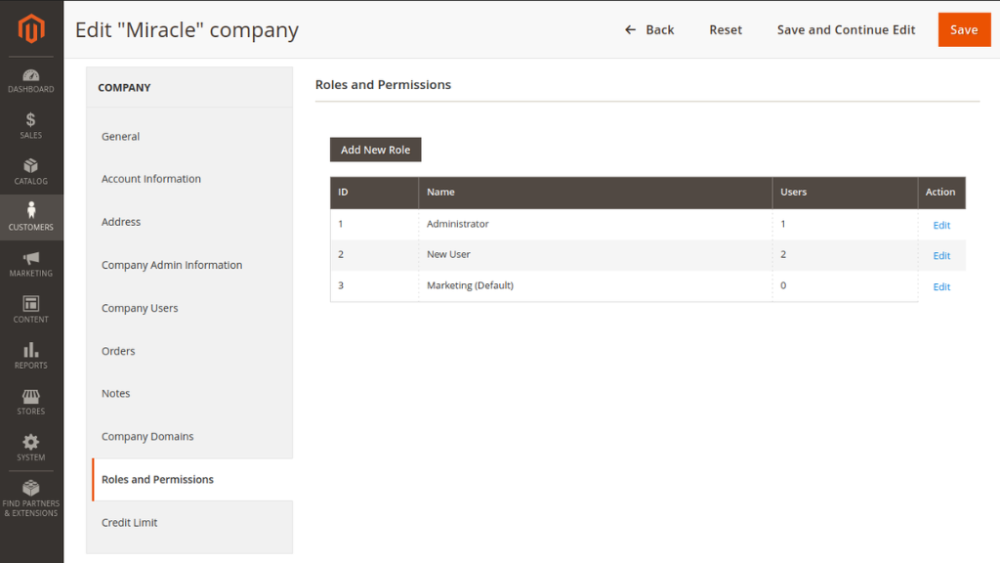
Roles and Permissions
The Roles and Permissions block allows users to add roles and manage permissions. Click on the ‘Add New Role’ button to add the new role and permissions to it.
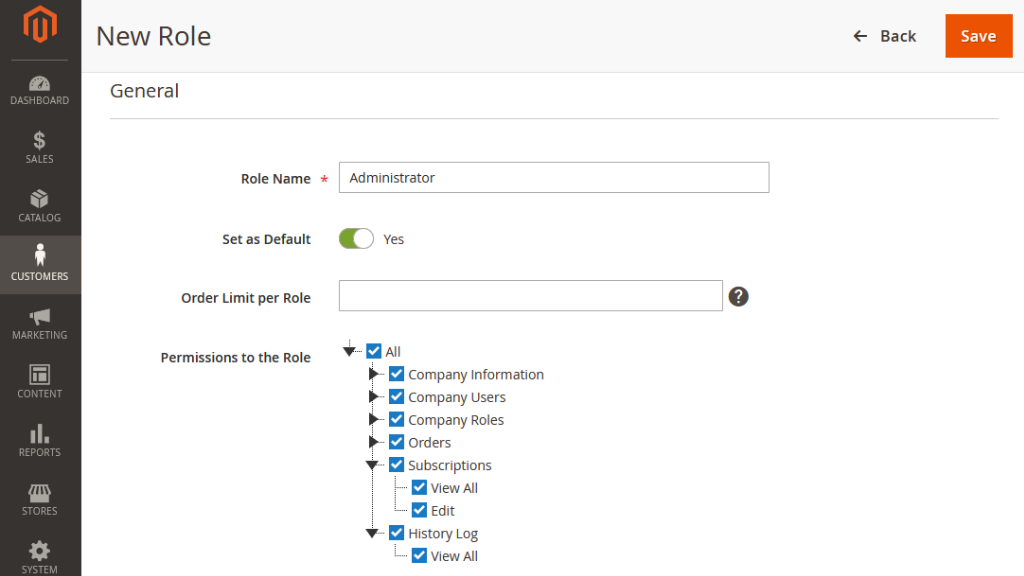
The General block prompts the following:
- Role Name - suggest the name for the role (required field);
- Set as Default - tick the check-box to set the given role as Default.
- Order Limit per Role - enter starting order value that must be approved by company admin. Leave empty to disable order limit. Set to zero to require approval for every order.
- Permissions to the Role - the Company Admin/User decides the access the role has to: all account information, company information, company users, roles, orders, subscriptions and history log. Set how much of the access is allowed to the role: viewing, and/or adding, and/or editing.
Company Units
The Company Units section enables store admins to modify the company hierarchy and add new units to the hierarchy tree.

The block contains a units grid listing all units associated with the company. Admins can create a new company unit from the backend by clicking the "Add New Unit" button. In the left side tree, choose the parent unit to which the new unit will be related. Then, add Unit Title and Unit Description, and save it.
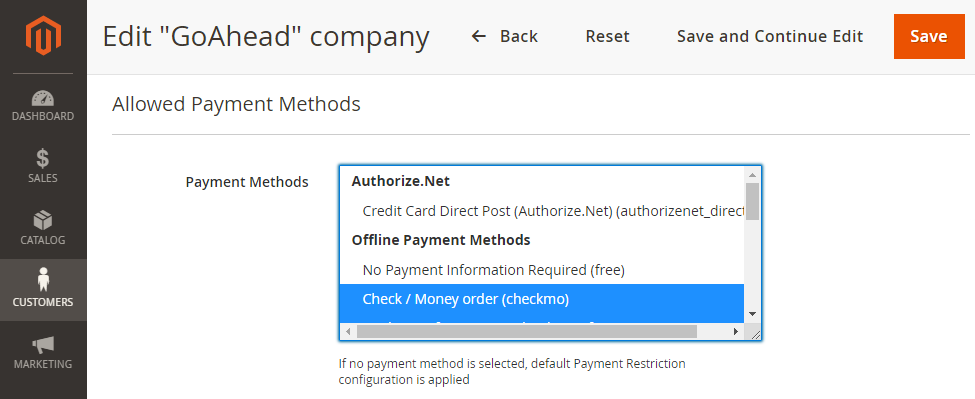
Allowed Payment Methods
The Allowed Payment Methods block gets available on integration with the Payment&Shipping Restrictions module. The blocks comes as a list of payment methods available for multiple selection. Selected payments will then be available to all company users at checkout.
Once finished, click Save in the top right corner of the page to save the company account. Alternatively, you may use one of the the other buttons claiming a correspondent action with the present company account.
|
If no payment method is selected, default Payment Restriction configuration is applied. |
Learn more on setting Payment Restriction defaults.
Learn how to enable/disable payment methods in Magento 2.
The list of native Magento 2 payment methods can be extended by the following extensions from Aheadworks:
Deleting Company Accounts
When the status of a company is Declined, the Company Edit Page displays the Delete button. Click on the button to remove all company data including that of the sub-accounts and company account itself. A popup is displayed: “Do you want to delete this company permanently? Company data and related sub-accounts will be deleted.” Click on Yes to finalize the proceed, click on No to cancel the operation.
|
The email of the deleted sub-account of the Company-Admin can be used for the registration of a new customer account. |
|
This can be a solution in cases when a company account is created by mistake and the email address is to be freed for a customer account. |
Company Account as a Customer Attribute
According to the logic of the present extension, Company Account is a customer attribute. Thereby, discounts, refunds or rewards to a particular customer within the Company are visible and available to all the company users.
Moreover, the Backend will feature the Company and Status in Company columns added to the Customers Grid, alongside other company information in the layouts of orders, invoices, etc.
Company Accounts on Frontend
Starting Company Accounts
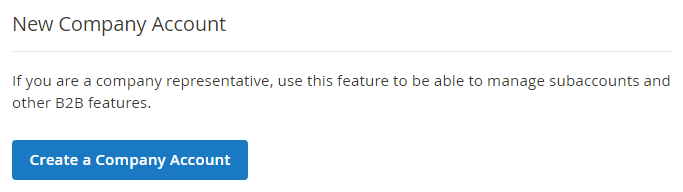
Creating a company account on the Frontend is similar to creating a customer account. When the module is successfully installed on your store, the Sign-In or Create New Account page will have an extra block - New Company Account. The Customer clicks on the blue button Create a Company Account to start a company account.
On clicking on the Create a Company Account button, the user is redirected to the New Company page, where he/she is prompted to fill in the New Company form. The form will have the fields as specified in the extension configuration.
On creation of the account, a notification arrives to the email inbox of the Company-Admin. The notification will have a link to set a password and enter the account for the 1st time. Please mind, the link is subject to expiration ( the period of link validity is set in Backend → Stores → Configuration → Customer configuration → Recovery Link Expiration Period). The link stays active even when it expires. In this case, instead of taking the user to the "Set Password" page, it will take him/her to the 'Forgot password' page. On entering the email address in the offered field, a new notification with a re-activated link will be forwarded to the user to set a password and enter the account.
|
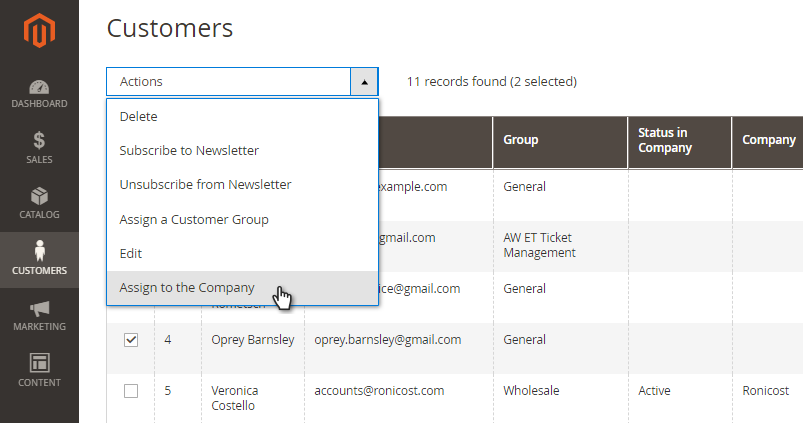
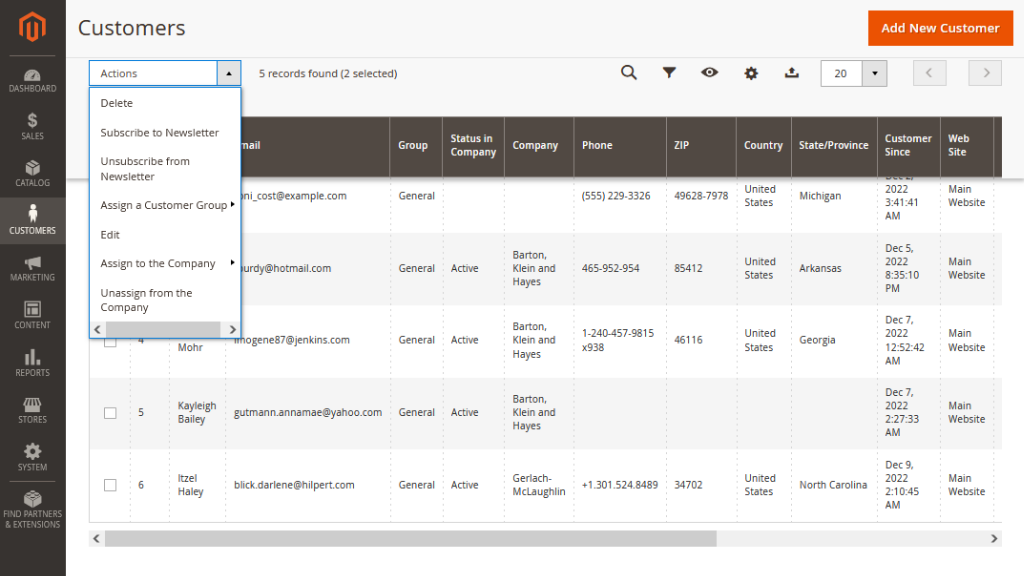
Customers, who already have customer accounts with your store, will not be able to link already registered email addresses to a Company-Admin or company user account. An email address is a unique identifier. Only the Store-Admin can assign a customer account to a Company-Admin account or company user account. Do that on the Customers page. Tick out a user, and click on the Actions folding list. Select the Assign to the Company option. The option can be applied to customers in bulk.
Make sure, that all orders of a customer, now assigned to the company, will become visible to other company users who have due permissions to view company orders. Users assigned to a company from the Backend will receive the Default Role with permissions specified by the Company-Admin on the front. On creation of a company, the Default Role is configured as follows: Name - New User, Permissions - view Company Information (only). |
|
You can delete/unassign customers via 'mass actions' or while editing customer information. Orders and subscriptions always belong to the customer. The company can't see the user's orders and subscriptions if you unassign the user from the company. If you delete a user, they will be automatically excluded from the company. To keep orders and subscriptions from other users in the company, but delete the user, the company administrator must deactivate the user.
|
Creating a Company Account using an Existing Customer Email
If the storefront company registration for existing customers is enabled in the backend settings, individual users who already have a registered account with the store can establish a new company account themselves.
To do this, the logged-in customer must navigate to the My Account section on the storefront and click the Create a Company account button.

Managing Company Accounts
Customers use My Account on the Frontend to manage company accounts in the same fashion as they do for individual customer accounts. The list of features is extended here with those of Company Information, Company Users and Roles & Permissions.
Besides, within the Address Book section, Admins have the ability to Share addresses for all sub-accounts, minimizing potential errors when employees order products.

Company Information
Company users find the details on the company in My Account→ Company Information. This information is given in the way it was provided by the Company-Admin on creating the company account.
You can change the company admin by clicking the 'Change' button. Company admin can select only the company user of the current company with approval procedure. The prospective candidate for the new company admin position should not possess any individual balances, including credit limits, points, or store credit.
Once an admin is selected, an email notification containing a link to the admin system to approve changes will be dispatched to the email address of the Backend Admin. Upon confirmation, a subsequent notification is dispatched to the recently designated Company Admin, notifying of the appointment to a new role.
To edit the information, the Company User clicks on the Edit active link next to the title of the page.
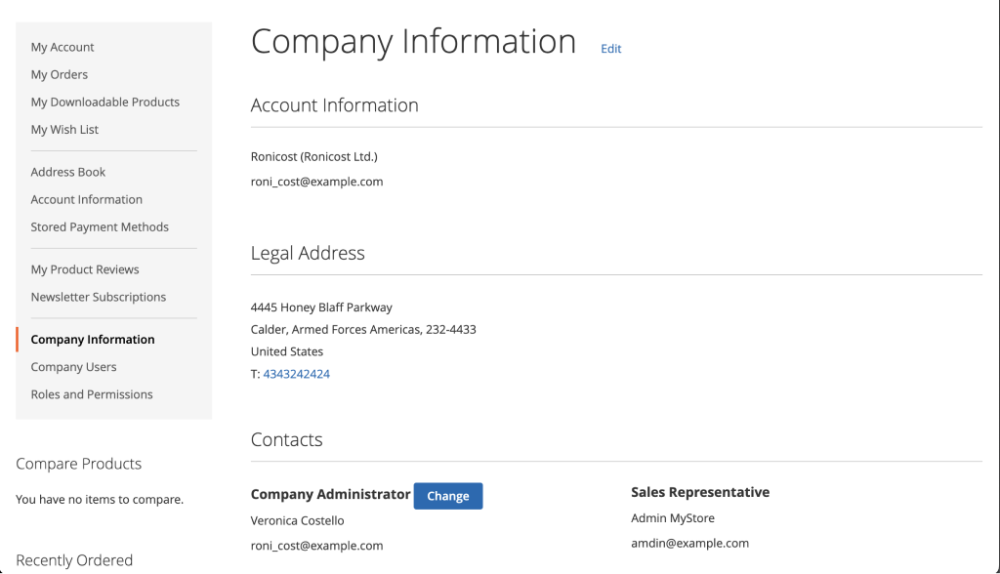
For the Company-Admin only, the Company Information page also shows the Company Domains section. Other company users are not able to see the section.
This is where all company domains are collected into a grid of the following columns: Domain Name, Status and Action. The Action cells contain the Delete and Deactivate/Activate links which allow to manipulate the domains as follows:
- On clicking on the Delete link, the domain record is deleted from the grid, company users whose emails are withing the deleted domain are not removed.
- On clicking on the Activate link, the inactive domain receives status Active
- On clicking on the Deactivate link, the active domain receives status Inactive
Only Delete is displayed for domains with the Pending status.
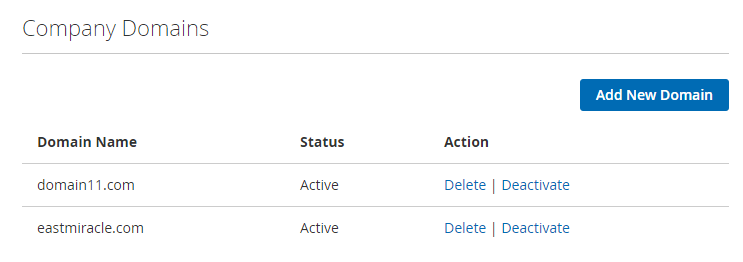
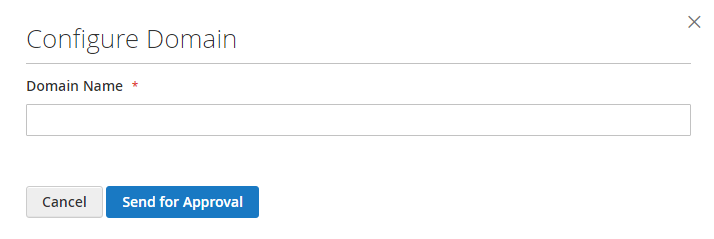
To add a domain, the Company-Admin clicks on the Add New Domain button. A popup emerges prompting to indicate a domain name.
On clicking on the Send for Approval button, the popup is closed, the record is added into the grid with status Pending. On clicking the Cancel button, the popup is closed and the record is not saved.
Domains entered here by the Company-Admin will appear in the Company Domains grid on the Backend.
|
New customer accounts registered with emails which belong to the company domains will automatically be added as child accounts to the company. This solution may save a lot of time on assigning users to companies. |
|
When the email of an existing customer is changed into the one withing a company domain, the user is not added to the company automatically. |
|
There are some domains which cannot be submitted as company domains (gmail, yahoo, 10mins emails, etc). If the Company-Admin tries to submit them, a popup is displayed: “This domain address can’t be used“. More examples of 'forbidden' domains can be found here: |
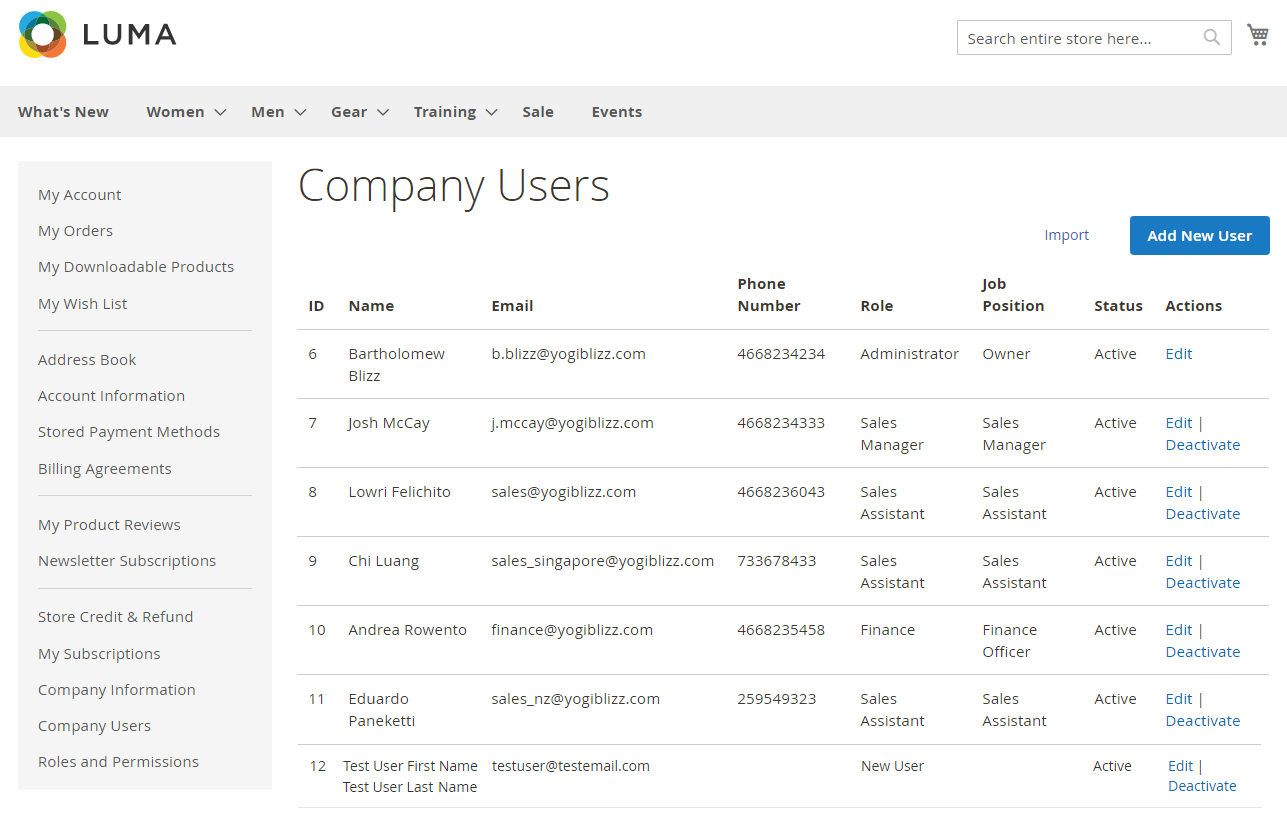
Company Users
The Company Users page lists all the company account users. The data is presented in a table of the following columns: ID, Name, Email, Phone Number, Role, Unit, Job Position, Status and Actions.
The status of a company user may take one of the two values: Active or Inactive. To activate/deactivate a user, click on a corresponding active link in the Actions column.
|
When a company user receives status Inactive he/she is not able to enter the company account. Furthermore, inactive users are not be able to use their email addresses to start new accounts. Deleting users from a company account is not possible on the Frontend. Should need be, this operation is possible on the Backend. However, make sure that deleting entities from the store, deletes or damages the entities interlinked with thereof. |
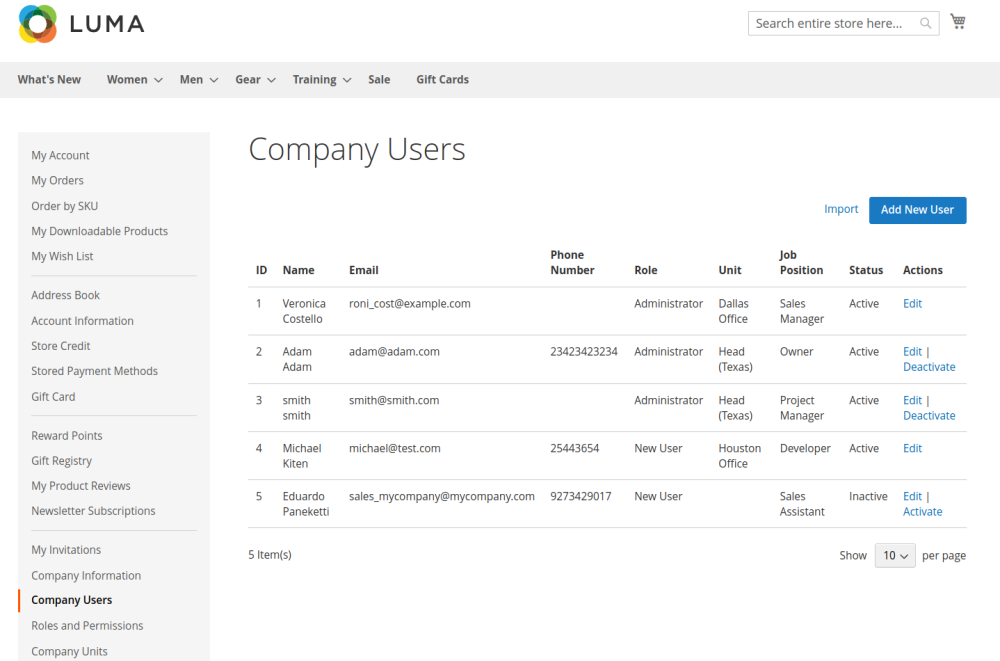
To edit or add a company user, click on the Edit active link or the Add New User button respectfully. The Add New User button does not allow adding an existing customer, only creating a new one. Admin can add an existing customer from the backend.
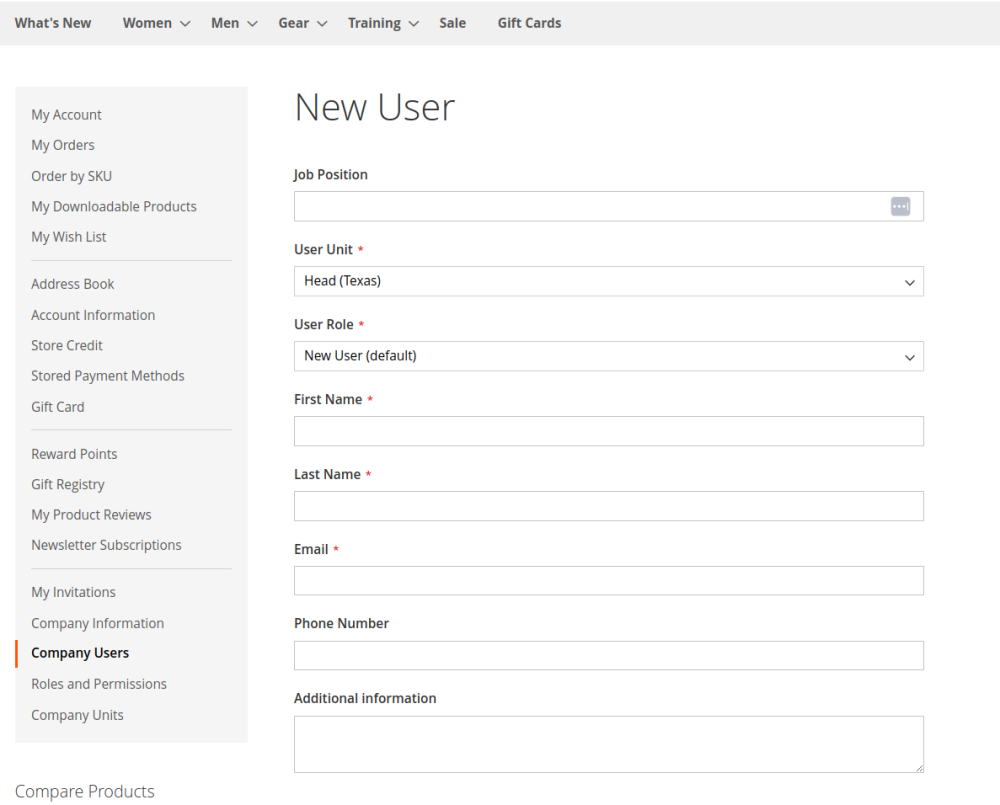
All fields in the New User form are mandatory except for Phone number and Additional information. They are text fields prompting user's Job position, First name, Last name and Email, as well a drop-box User Unit to assign the user to a unit in the hierarchy, and User Role to pick out a role of the user within the company account (Administrator by default). Should you find no suitable role, please proceed to the next step.
Import Company Users
To import users from the company, please follow the steps below:
1) To import company users, click on the Import button. This will take you to a new page where you can upload your CSV file containing the list of users. You can create your own CSV file or download a sample file and modify it accordingly.
2) Once you have your CSV file ready, click on the Choose File button and select the file from your computer.
3) After selecting the file, click on the Upload button to upload the file to the system.
4) The system will then validate the file and display a success or error message depending on the result. If the validation is successful, you will see a button to Import. Click on this button to import the records from the file. After importing, the system will display a success message indicating that the users have been imported successfully.
Bulk Adding Existing Customers by Domain
To streamline the onboarding process for companies with already registered store customers, the Search users button (secondary type) is available on the Company Users page.
|
Note: The Search users button remains disabled until the company has at least one approved or active domain name populated in the Company Information tab. |
Once clicked, the system scans the store’s database for any registered customers whose email addresses match the verified company domain(s). Customers who are already members of the company are excluded from the search results.

Clicking the button triggers the "Add registered users to company" popup window, which features the following elements:
-
Match Counter: A summary text above the list stating: "{number} users match your domain."
-
Scrollable Customer Table: A list of matching users containing three columns:
-
Checkbox: For manual, individual customer selection;
-
Name: The first and last name of the registered customer;
-
Email: The customer's registered email address.
-
Action Buttons:
-
Add All: Instantly assigns all found matching customers to the company;
-
Add Selected: Assigns only the customers manually ticked in the checkboxes.
The popup can be easily closed without saving changes by clicking the 'X' icon in the top-right corner, pressing the Escape key, or clicking anywhere outside the popup container.

Reassigning Subscriptions on User Deactivation
To ensure corporate subscriptions are processed without interruption, the Company Administrator can reassign active recurring profiles when deactivating a team member.
Clicking the Deactivate button for a user with active subscriptions triggers the "Active Subscriptions Found" popup window. The administrator must select an alternative active company user from the list and click Confirm Reassignment to complete the transfer.
Note: If subscriptions are not reassigned, they will transition to the "Suspended" status and subsequent payments will stop, as subscription profiles must always belong to an active customer account.

Mass Importing and Exporting Company Data
To simplify data management for stores handling thousands of corporate clients, the extension integrates seamlessly with the native Magento Import/Export functionality. This eliminates the need to manually create accounts and link them to corporate structures one by one.
Under System > Data Transfer > Export, Store Admins can find a new corporate entity added to the Entity Type dropdown list: Aheadworks Company Accounts (Companies). Selecting this option allows for the quick extraction of corporate account structures from the store database.

For onboarding profiles in bulk, Store Admins can utilize the native Magento Customer Import routine (using the Customers Main File entity type). By including the company identification data within the standard customer import CSV file, the system automatically registers the new customer accounts and instantly assigns them to their respective companies during the import process.
Once the import file is successfully processed, the newly added users automatically appear within the Company Users grid on the backend Edit Company page. The imported users are instantly activated and assigned the default corporate role, ensuring a swift and automated B2B onboarding experience.

Roles and Responsibilities
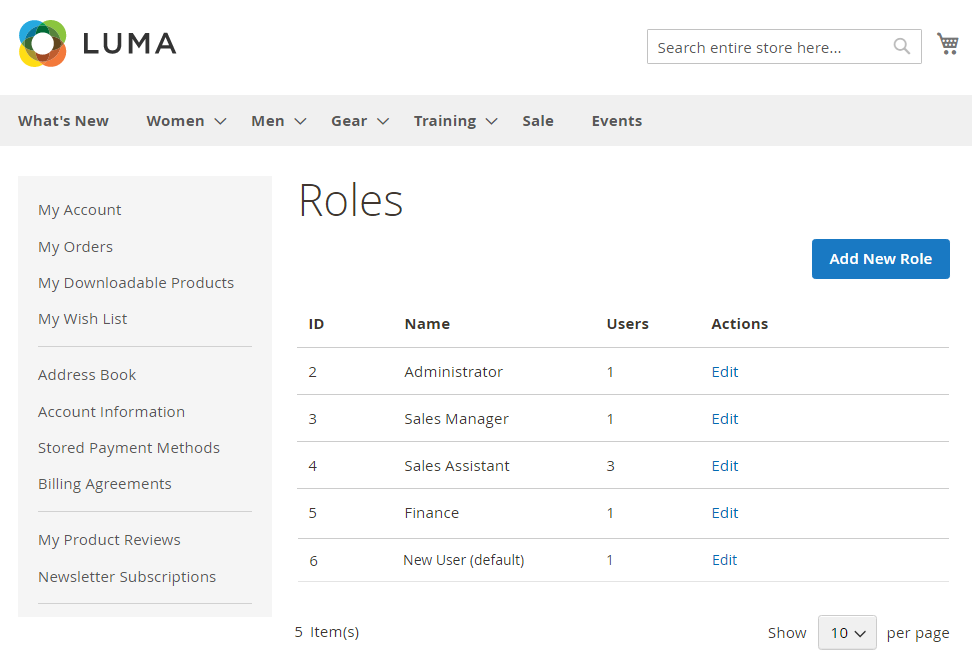
To browse, edit and add new roles, the Customer User gos to Roles and Permissions in My Account. The page features a table with all the roles available in the account. Company users can see the number of users which belong to a role, the name and id of the role.
To edit or add a new role, the Customer User clicks on the Edit active link or Add New Role button respectively.
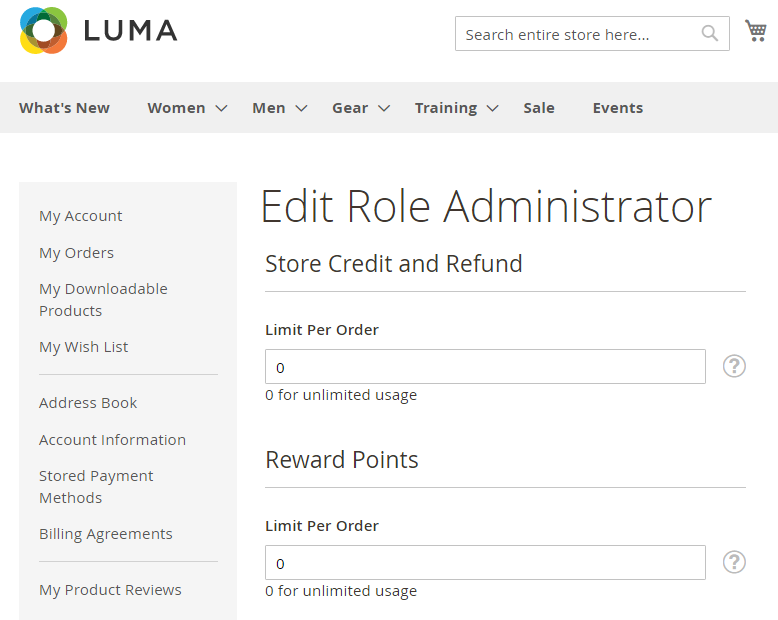
There are three blocks on the Create/Edit Role page: General Information, Store Credit & Refund and Reward Points (the later two require respective modules from Aheadworks installed).
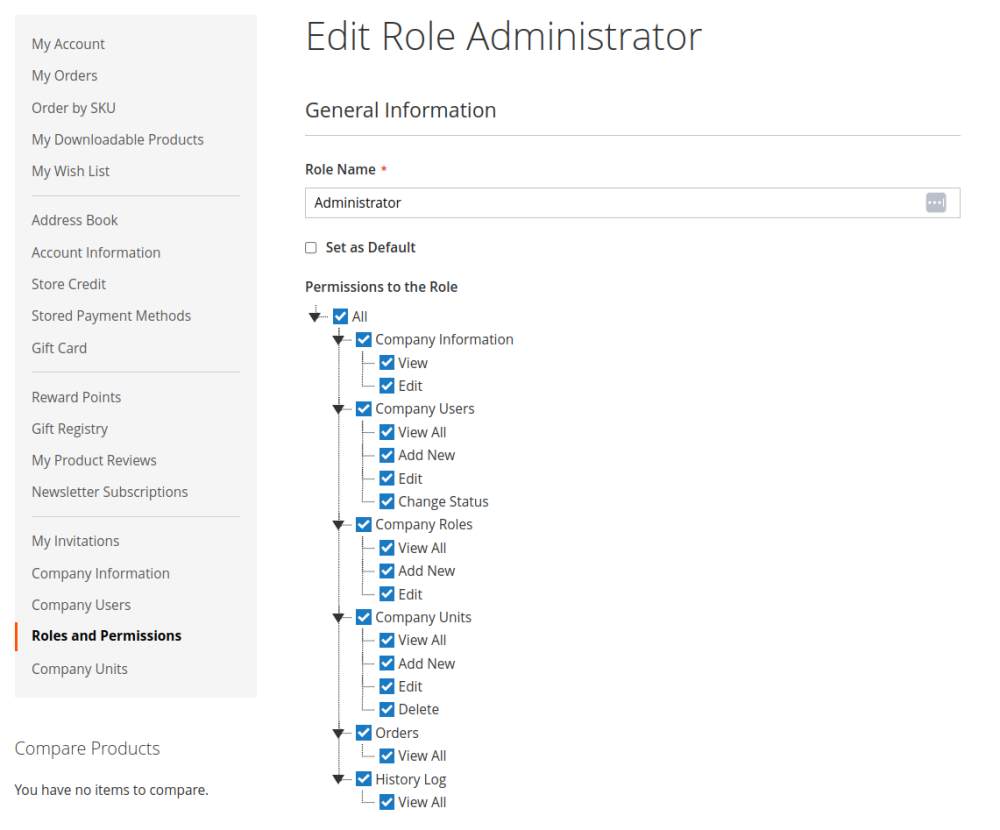
The General Information block prompts the following:
- Role Name - the Company Admin/User suggests the name for the role (required field).
- Set as Default - the Company Admin/User ticks the check-box to set the given role as Default. Users assigned to the company from the Backend receive the Default Role. Only one role can be the Default Role. When the role is (already) default, the checkbox Set as Default is disabled.
- Order Limit per Role (visible only to the Company Admin) - the Company Admin/User indicates the threshold for the subtotals of orders when the Company User of the given role is not able to complete an order without the approval of the Company Admin.
- Permissions - the Company Admin/User decides the access the role has to: all account information, company information, company users, roles, company units, orders, reward points, credit balance and quotes. Set how much of the access is allowed to the role: viewing, and/or adding, and/or editing.
|
When nothing is entered into the Order Limit per Role field, there is no order limit for the role, i.e. the Company User if the given role can complete orders of any subtotal. When "0" is entered, then every order requires approval. |
|
Corporate customers use Order Limit per Role to ensure that Company Users do not spend over the given amount of money, particularly when they are not authorized to do so. |
|
Do not mistake the Administrator role and the Administrator account of the company account. Make sure the company users are not confused by this too. The Company Admin can change the name of this role, as well as the permissions to his/her convenience. |
|
If the Company Admin wants to change the administrator of the Company, he/she does that on the Company Information Page (on the Frontend) or from the Companies Grid (on the Backend). The Company Admin may later reassign the former Company Administrator to the company under a different role, to assign him/her to a different company or to delete his/her account. Make sure, the Company Admin does not delete the Administrator of the company account, never mind how many users with the Administrator role they have within the account. |
|
Company admin has all permissions no matter which role permissions he has, even if permissions are changed, these changes will not apply to his permissions. To edit Admin Role follow to Frontend > Roles and Permissions > Role edit page. |
The Store Credit & Refund and Reward Points blocks feature two text-fields, each to set the limit of credit balance and reward points available to the role per order.
'0' (zero) is the text-box value for unlimited usage of either reward points or credit balance. "0" is the value by default. The Customer Admin leaves '0' if he/she wants the role to have access to all reward points or credit balance available for the company. Roles with limit values different from '0' are not able to spend more reward or credit points than that value.
Once finished, the Company User clicks on the Save button. The User will be redirected to the Roles page.
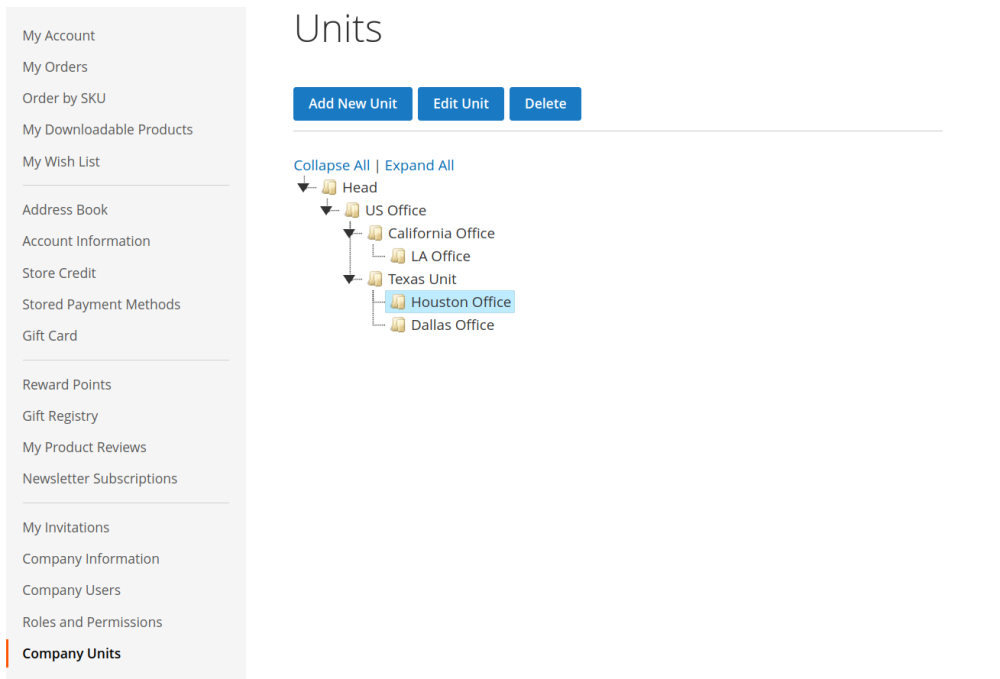
Company Units
From the My Account section, the parent account can organize a company structure by creating units and sub-units, and then assigning sub-accounts to different units based on their roles and locations. This feature is visible to users who are associated with a company and have the necessary permissions.
When a company is set up and marked as Active, the parent account is automatically placed at the top of the hierarchy and cannot be moved. However, renaming the parent unit from "Head" may result in the hierarchy tree disappearing.
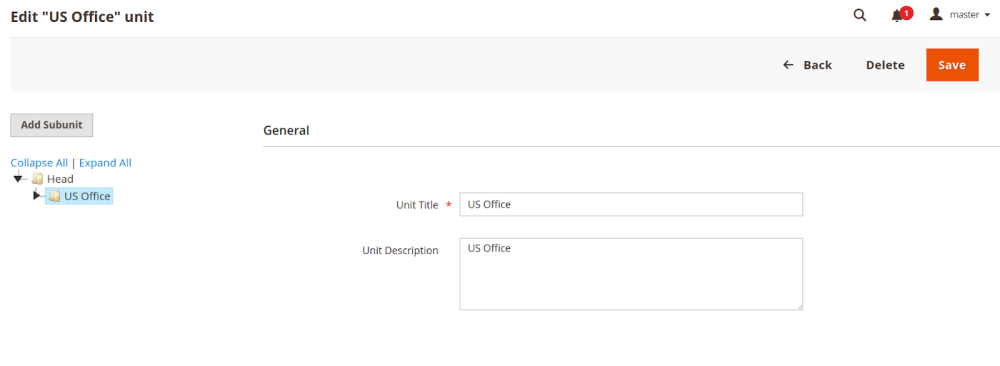
The admin has the flexibility to create multiple units within the company hierarchy as needed.
To add a unit to the company hierarchy tree, click Add Unit button. A new unit page will be opened, where Unit Title and Unit Description should be added. Once saved, the new unit is created and displayed below the Head unit. Users can also select a created unit from the hierarchy and assign a sub-unit to it.
Units can be rearranged by dragging and dropping.
Existing units can be deleted by selecting the unit and clicking the Delete button located above the hierarchy. This action automatically unassigns all related users and units.
Inactive users are removed from their units or the hierarchy automatically.
Order Approval Process
Following section describes Order Approval proces in details.
|
To enable Order Approval by company admin, go to Stores → Configuration → Aheadworks → Company Accounts → set Enable Order Approval by Company Admin to Yes. Company User has Order Limit per Role as described in the Roles and Responsibilities section. |
When a corporate order requires verification, the Company Administrator can add a comment before approving or rejecting it.
On the order details page in the customer account, the Order Approval section is located directly below the Order Information block. It includes an optional Comment text field, while the Approve Order and Reject Order action buttons are positioned at the bottom of the section.
The administrator can type a comment for the order owner in the text area and then click either Approve Order or Reject Order. Once the action is confirmed, the comment is automatically saved to the order history log and sent as an email notification to the company user who originally placed the order.

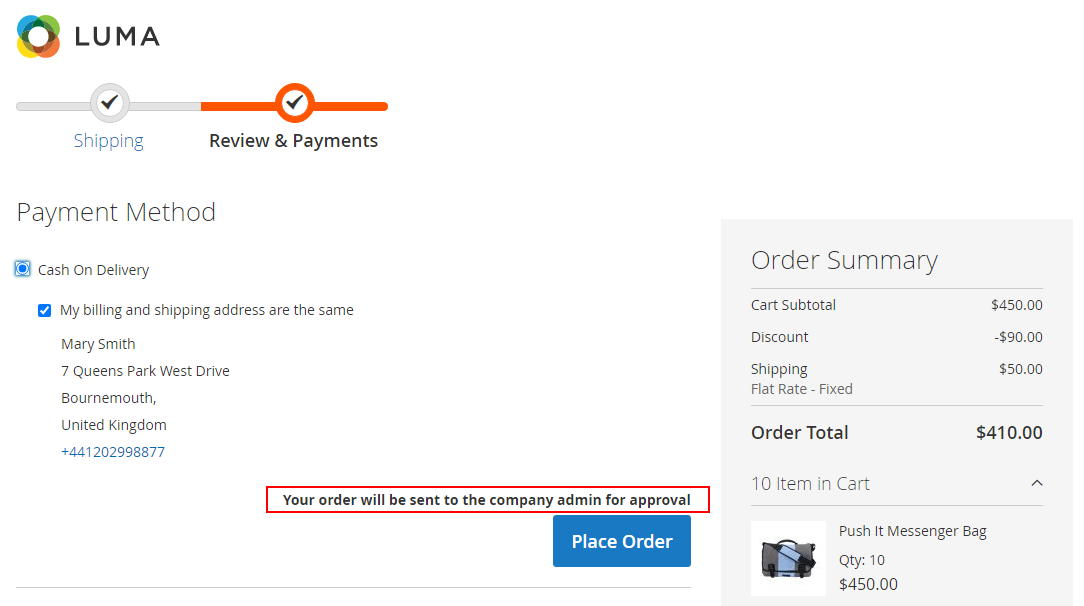
From Frontend
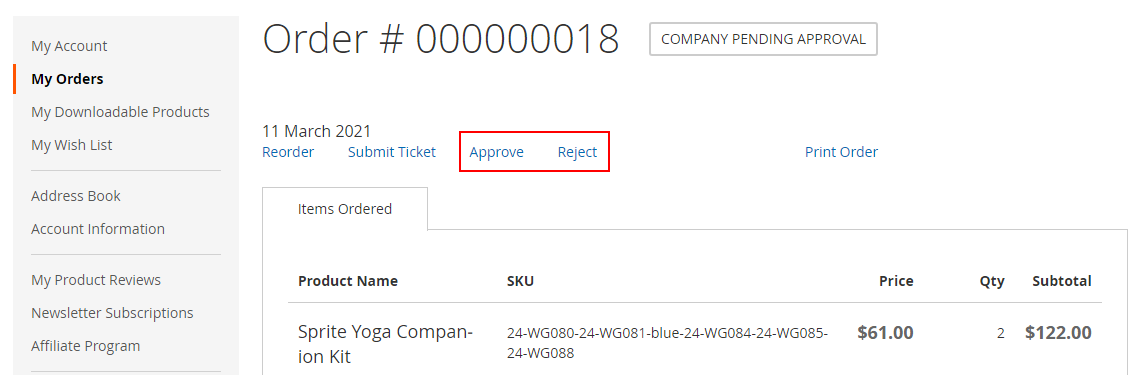
When the Company User places an order which subtotal exceeds the Order Limit per Role value, the Checkout page features the following note above Place Order button: “Your order will be sent to the company admin for approval“. On clicking on the Place Order button, a success page is opened saying “Your order was successfully sent for approval to company admin”. The order receives status "Company Pending Approval".
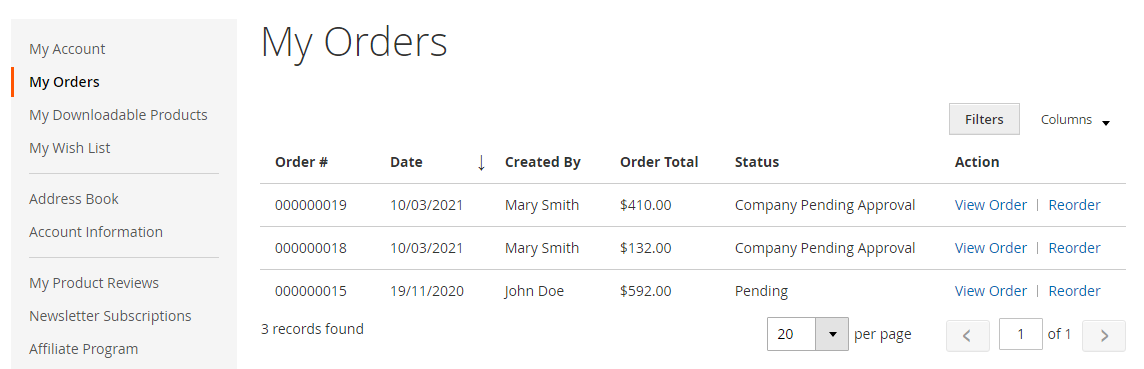
To approve or reject orders, the Customer Admin goes to My Account → My Orders.
The native Magento 2 My Orders grid is enhanced with the Created By field, featuring the name of the Company User who created the order.
The Company Admin can approve/reject orders with status Company Pending Approval only. To do so, the Company Admin clicks on the View Order active link in the Action column and proceeds to the Order # ___ page.
|
Customers can sort the My Orders grid by clicking on the name of the column. Customers can filter the My Orders grid with the help of the Filters button above the grid. |
The Order # ___ page displays the following active links to approve or reject orders: Approve and Reject, correspondingly. These links are only displayed to the Company Admin.
When the Company Admin clicks on "Approve", the following takes place:
- The confirmation message is displayed: "The order has been successfully approved"
- The order receives the default status like any new order
- The links "Approve" or “Reject” disappear from the Order # ____ page
|
When Authorize and Capture is set for Payment Action in Authorize.Net settings, and Authorize.Net was used as a payment method for the given order waiting for the Company Admin's approval, the payment as per the order will be processed even without the approval from the Company Admin. The Store Admin will be able to capture the payment. When Authorize Only is selected for Payment Action, orders waiting for approval from the Company Admin will not have their payments processed until the approval is given. Stores → Configuration → Sales → Payment Methods → Authorize.Net → Basic Authorize.Net Settings |
When the Company Admin clicks on "Reject", the following takes place:
- The confirmation message is displayed "The order has been rejected"
- The order receives status “Rejected by Company Admin”
- The links "Approve" or “Reject” disappear from the Order # ____ page
- The order remains in the My Orders grid
From backend
Status column features a new status - "Company Pending Approval" for orders which are subject to the approval of the Company Admin.
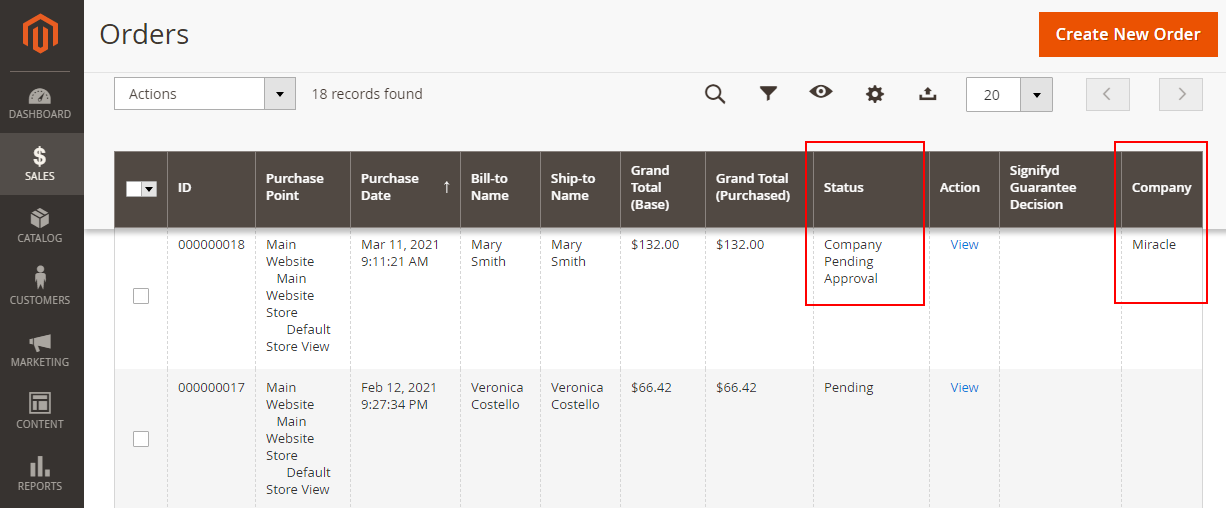
When M2 Company Accounts is installed on the store, the Orders grid is enhanced with the Company column. The column features the name of the company, the Company User of which has placed the order.
Furthermore, the Status column features "Company Pending Approval" for orders which are subject to the approval of the Company Admin.
|
Authorize.Net particulars When a native action, except Print Invoices (see the Actions dropbox above the grid), is applied to orders with status Company Pending Approval or Rejected by Company Admin, an error is displayed, the action is not performed. When Authorize and Capture is set for Payment Action in Authorize.net settings †, action Print Invoices is available for orders with the above statuses. When Authorize Only, the Print Invoices action is not available for orders with the above statuses † Stores → Configuration → Sales → Payment Methods → Authorize.Net → Basic Authorize.Net Settings |
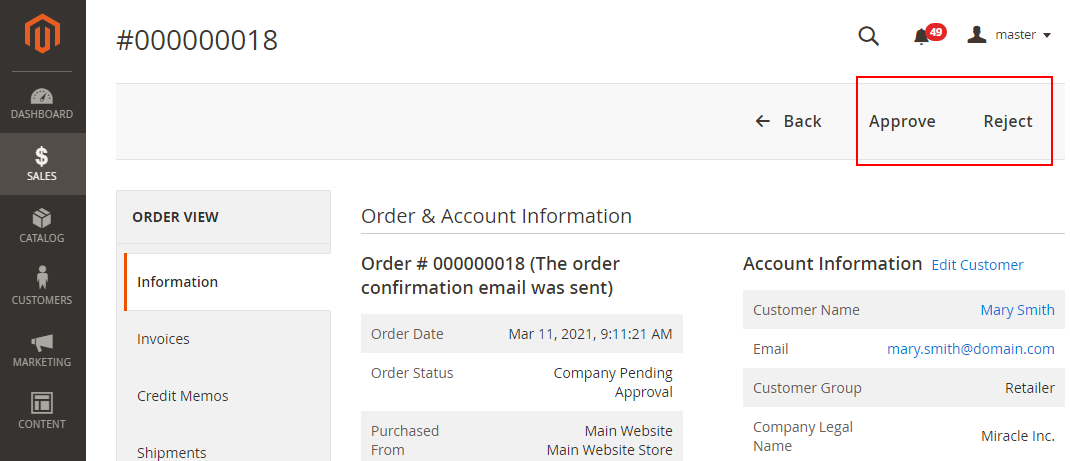
The Store Admin can approve/reject orders instead of the Company Admin. This is only possible for orders with status Company Pending Approval.
To approve/reject an order, go to Backend → Sales → Order # ____ page and refer to the Approve and Reject buttons in the top right. Mind, for orders with status Company Pending Approval buttons Approve and Reject substitute native Magento 2 CTA buttons.
The following takes place when the Store Admin clicks on the Approve button:
- The order receives the default status like any new order
- Actions "Approve" or “Reject” are not displayed
- Native Magento 2 CTA buttons are displayed
The following takes place when the Store Admin clicks on the Reject button:
- The order receives status “Rejected by Company Admin”
- Other CTA buttons are not available (including Reorder)
Integrations
Integration Options
The Company Accounts module is integrated with Aheadworks Reward Points, Store Credit & Refund, Cart to Quote, Payment & Shipping Restrictions, Advanced Subscription Products and Sales Representative. These modules make up an essential bundle for business-to-business model of eCommerce. There are no particulars in setting or operating that integration, but for that of the Sales Representative, which is explained below. Such an approach further makes the use of Company Accounts similar to the B2C experience, easy and flawless.
You may learn more on the extensions and the embodiment of the integrations from the manuals below:
|
A note on compatibility with Reward Points
|
Advanced Subscription Products for Magento 2
When M2 Advanced Subscription Products is installed on the store alongside M2 Company Accounts, the Admin gets able to manage Roles and Permissions for subscriptions and supervise the actions with items/subscriptions from the frontend.
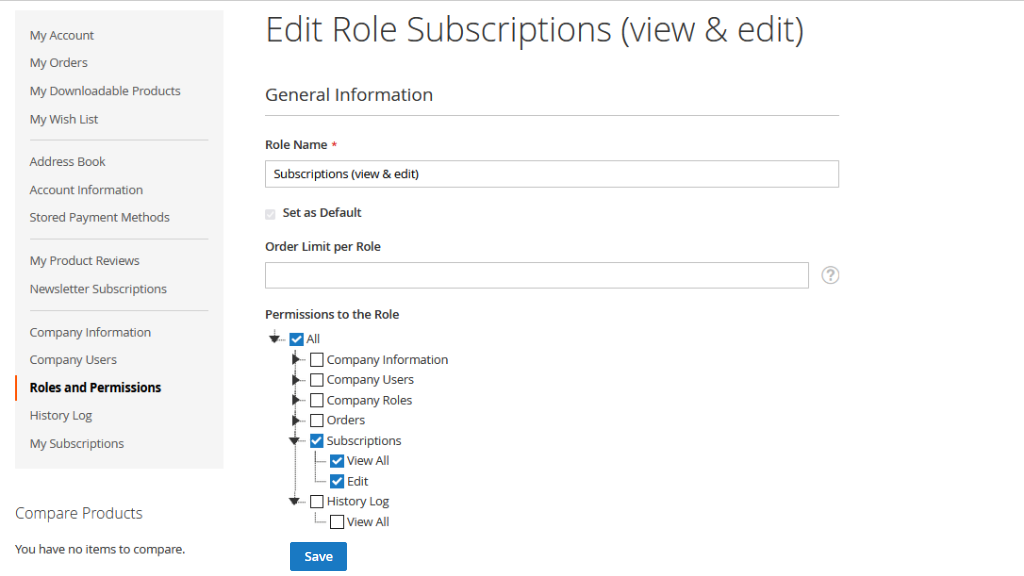
To get access to the Roles and Permissions, proceed to My Account > Roles and Permissions tab.
The General information block prompts the following:
- Role Name - the Company Admin/User suggests the name for the role (required field).
- Order Limit per Role (visible only to the Company Admin) - the Company Admin/User indicates the threshold for the subtotals of orders when the Company User of the given role is not able to complete an order without the approval of the Company Admin.
- Permissions to the Role - the Company Admin/User decides the access the role has to: all account information, company information, company users, roles, orders, subscriptions, history log. Set how much of the access is allowed to the role: viewing, and/or adding, and/or editing.
If a company’s user doesn’t have access to the company's subscriptions, he can view and edit only his own subscriptions.
|
Note: If a company’s user with active subscriptions has been deactivated by a company’s admin, all subscriptions will be available for viewing and editing by the admin or user with adequate permissions. However, the subsequent payments will be unprocessed, and subscriptions will have the “Suspended“ status. It is the expected behavior at this version, because all the orders and subscriptions always belong to the customer. |
|
Note: If a company’s admin or a user with adequate permissions tries to change the shipping address, he cannot add his own address or select the address of another user. He can select only saved addresses of the customer, who purchased a subscription. |
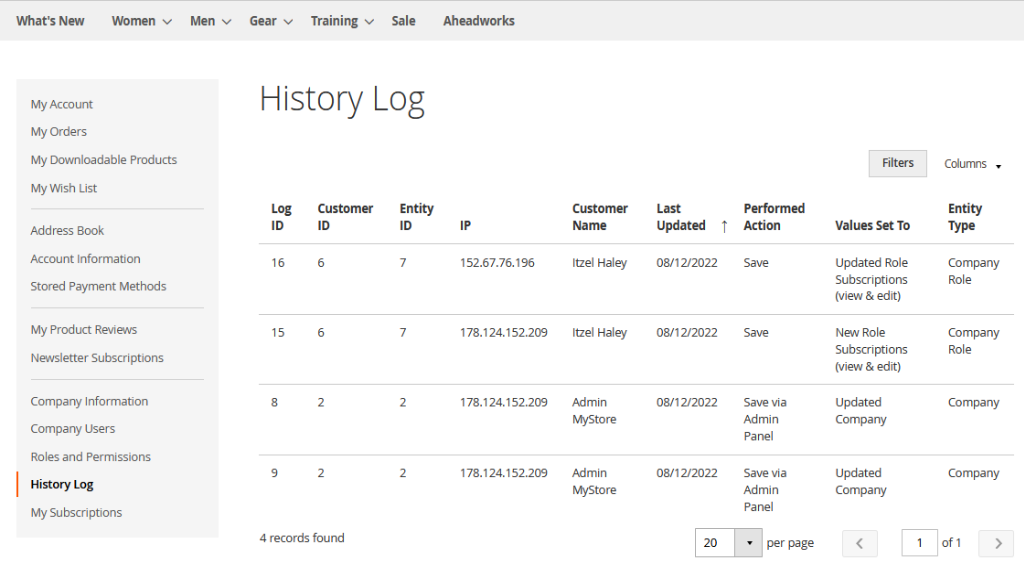
History log
History log tab allows to supervise the actions with items/subscriptions. History log is available for a company’s admin or a user with adequate permissions. All records are sorted by “Last Updated“ column in descending order (by default).
Logs will be cleaned after running cron (frequency is set in Configuration - Daily, Weekly, Monthly). If History Log is disabled, records are not cleared even if cron has been run.
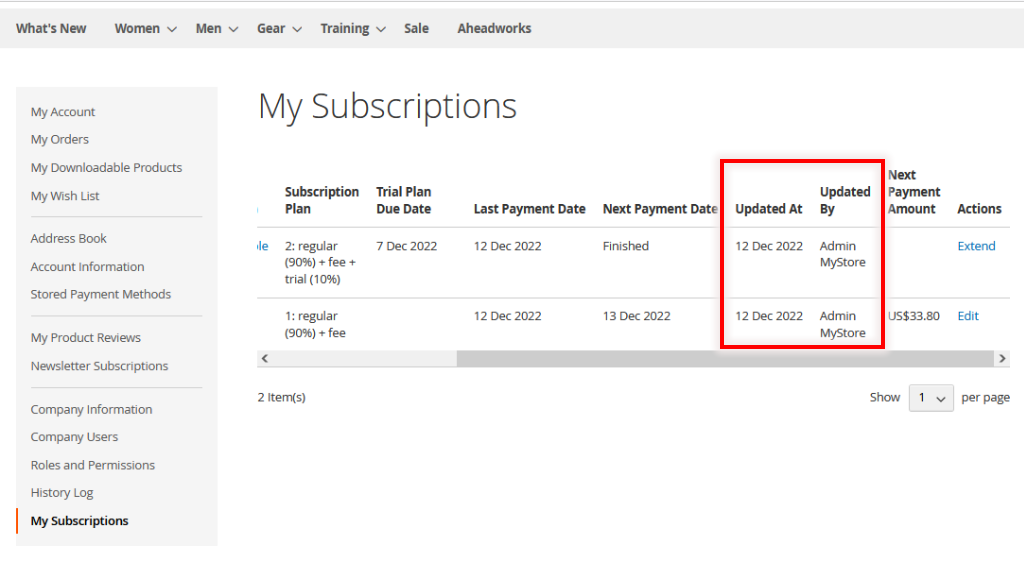
When History log is enabled, new columns are added to the My Subscriptions grid - Updated At, Updated By:
Sales Representative for Magento 2
When M2 Sales Representative is installed on the store alongside M2 Company Accounts, the Admin gets able to appoint Sales Representatives to companies. Sales representatives can be appointed to companies automatically in compliance with the company users' belonging to a customer group, or manually and individually to each company. By appointing sales representatives to companies, that is users created with the help of M2 Sales Representative, the Admin can demarcate access for these users to the data on the companies.
M2 Company Accounts, when used on its own, has an option of assigning sales representatives to companies. With regard to this fact, M2 Sales Representative is meant to enhance M2 Company Accounts as follows:
-
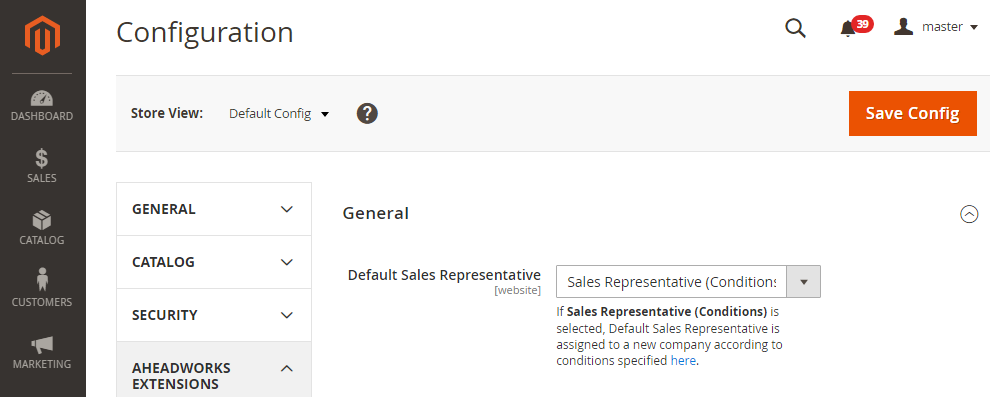
Sales Representative (Conditions) is added as an option to the dropdown Default Sales Representative at Stores → Configuration → Aheadworks Extensions → Company Accounts
-
A hint is added to explain the use of Sales Representative (Conditions) and to give quick access to Stores → Configuration → Aheadworks Extensions → Sales Representatives → Conditions: “If Sales Representative (Conditions) is selected, Default Sales Representative is assigned to a new company according to conditions specified here {link to SR conditions}”
- Sales Representative (Conditions) is the default value of Default Sales Representative when M2 Company Accounts and M2 Sales Representative are installed one after another for the first time on the store. Otherwise, if M2 Company Accounts has already been in use, and M2 Sales Representatives is added to the store, the default value of Default Sales Representative remains unchanged. The latter aspect allows companies which have been created before the installation of M2 Sales Representative to keep on working with the appointed to them earlier sales representatives.
Store Credit And Refund for magento 2
Integration features are following:
- The entire balance of Store Credits are assigned to the Company Admin (this is the overall balance of the company);
- Store Credits that are added to the Company User balance (not the Admin) through the backend or when the conditions are met (invoice/refund order) go to the Company Admin account;
- Permissions View, and Use on Checkout: if Limit Per Order is not specified, the customer can use all Store Credits when creating an order; if Limit Per Order is specified, then the customer will be able to apply only that specified number of Store Credits;
- Permission View All Transactions: all Company Users can see the history of all transactions, even those that were created by other users. If this permission is not specified, then users cannot see the transaction log;
- When adding a new user to the company and he had a positive balance of Store Credits, after adding his balance will transfer to the company balance (the Company Admin balance);
- Notifications about Store Credits come only to the Company Admin email, these notifications are not available to the Company Users;
Reward Points for Magento 2
The Reward Points integration into Company Accounts centralizes reward points handling, giving the Company Admin clear authority while enabling Company Users to utilize points within defined limits.
To configure the extension go to Store -> Settings -> Configuration -> Aheadworks Extensions -> Reward points
| To learn how to customize the extension use the Reward Points user manual |
To manage who can view and set reward point limits on the storefront, the Company Admin must go to their account’s Roles and Permissions tab. From there, they can select the specific role by clicking the active Edit link.
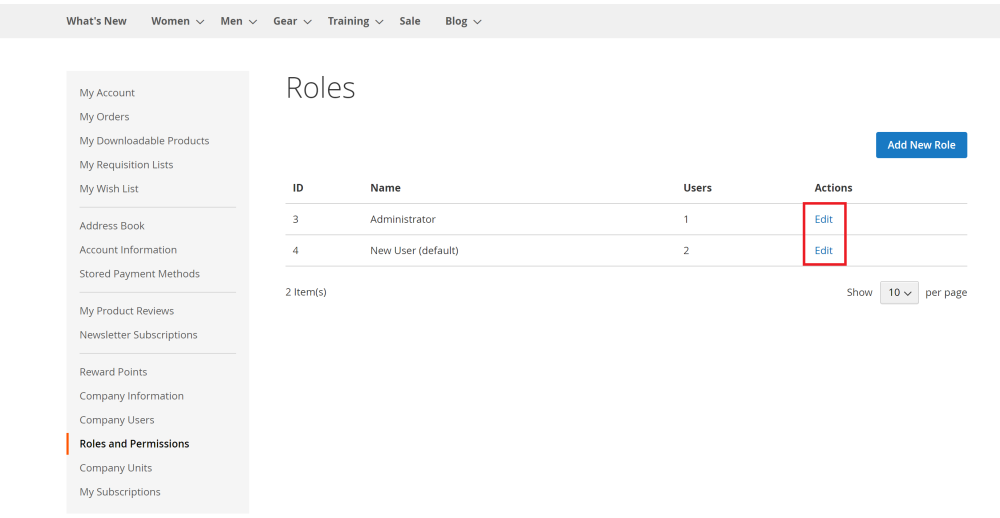
The Edit Role page allows the Company Admin to control whether a user can see and use reward points at checkout, as well as whether they can view the entire transaction history. The admin also has the option to specify a maximum number of reward points per order, with 0 enabling unlimited use.
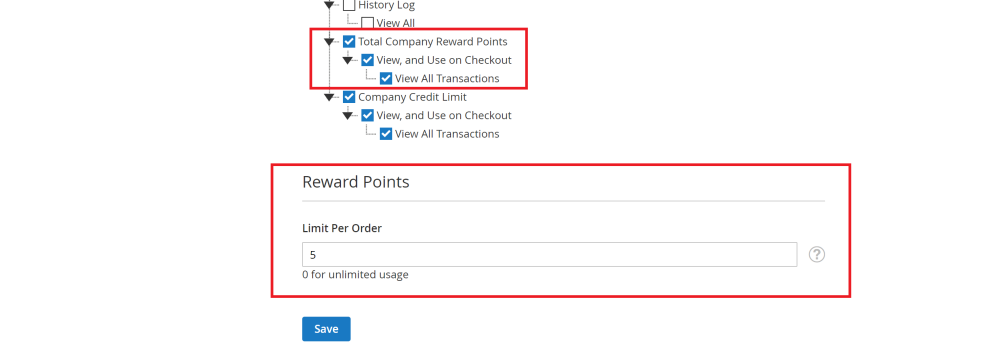
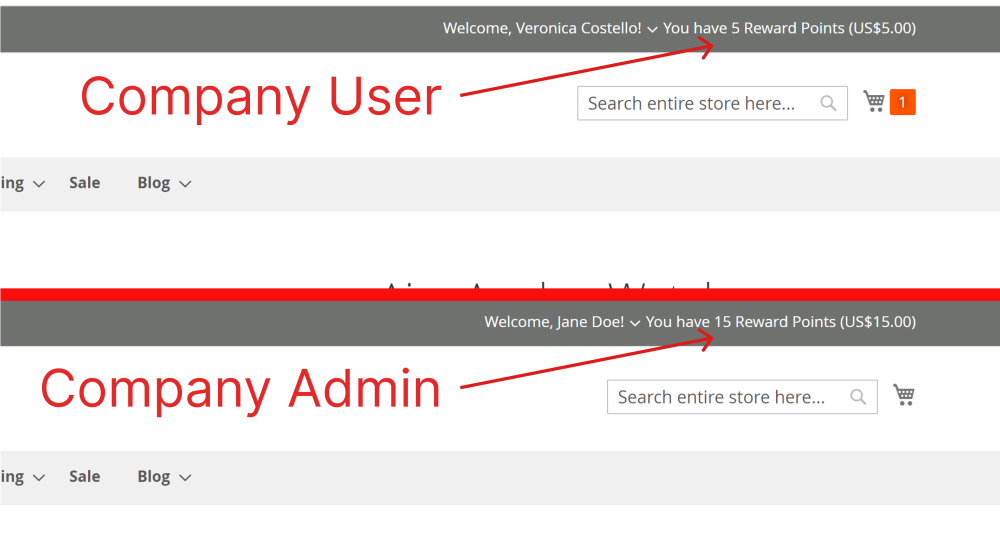
When a limit is set, the user will only be shown the reward points they can use, while the Company Admin will continue to see the total balance.
In the Reward Points tab within their accounts, the Company Admin, along with users who have been granted permission, can access the balance and full transaction log.
| The entire balance of Reward Points is assigned to the Company Admin, representing the overall balance of the company. |
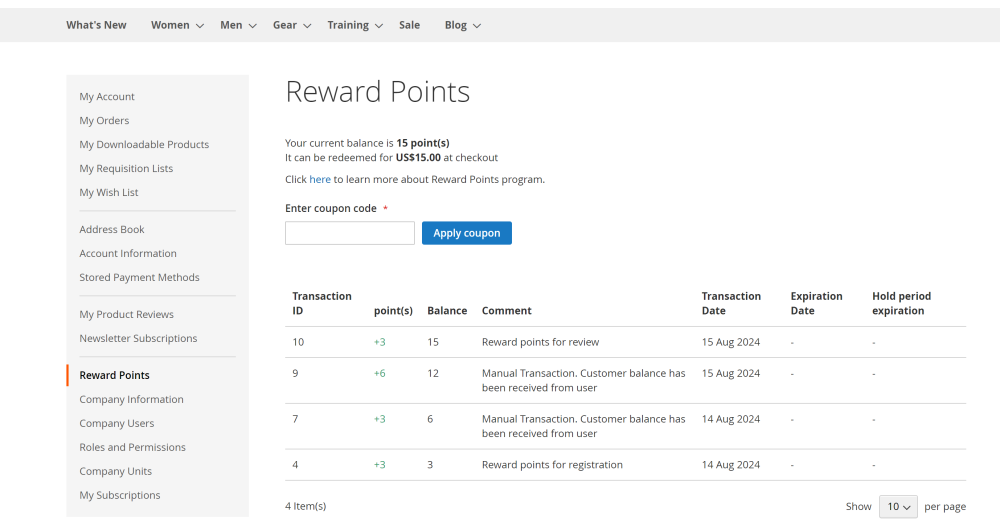
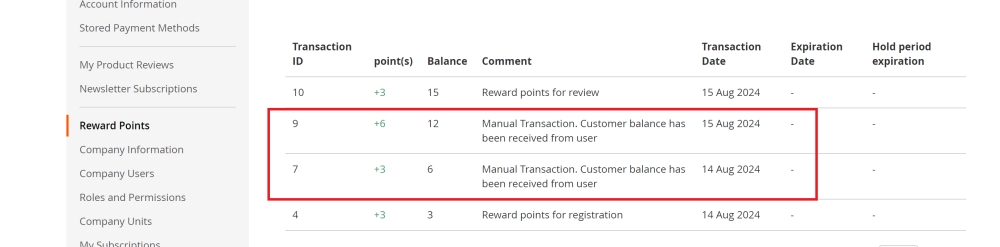
Upon adding a new user with a positive Reward Points balance to the company, their points are automatically added to the company's overall balance, which is overseen by the Company Admin.
| Note: Notifications related to Reward Points are exclusively sent to the Company Admin's email, ensuring that only the Admin is kept informed, while Company Users do not receive them. |
Reward Points settings features
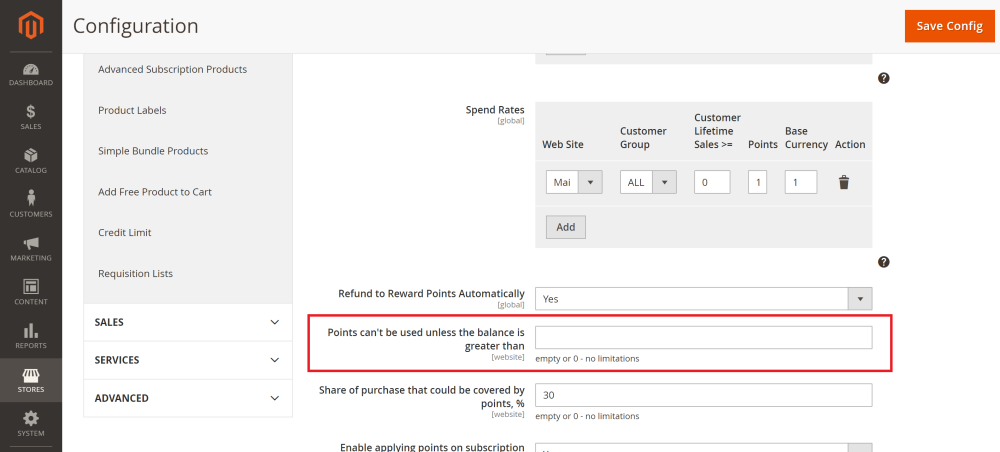
- Lifetime Sales takes into account only the orders of the Company Admin;
- Points can't be used unless the balance is greater than takes into account the general balance of the company (the Company Admin balance).
Requisition List for Magento 2
Integration of Company Accounts and Requisition Lists enables seamless sharing and tracking of requisition lists among company users.
To enable the Requisition list extension navigate to Store -> Settings -> Configuration -> Aheadworks Extensions -> Requisition list
To learn more about the requisition list configuration use the Requisition List user manual.
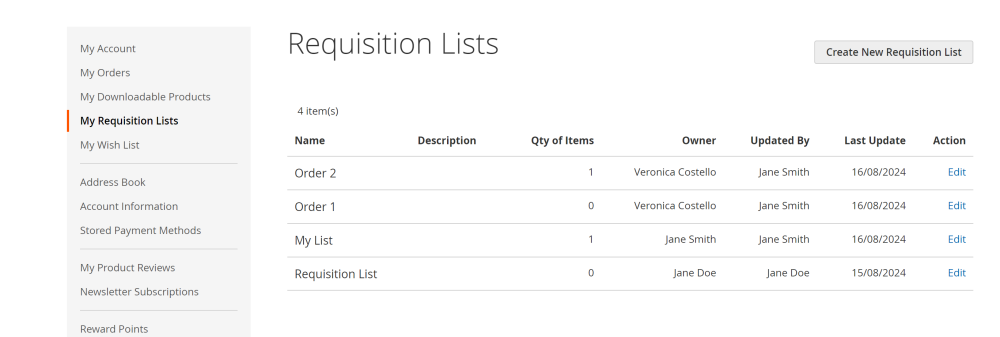
Once the Requisition List extension is enabled, a new tab will appear in My Account. This tab displays a grid with the following details for each requisition list:
- Name - the name given to the list;
- Description - brief overview of the list (if provided);
- Owner - the user who created the list;
- Updated By - the user who last edited the list;
- Action - An active Edit link for customizing the list.
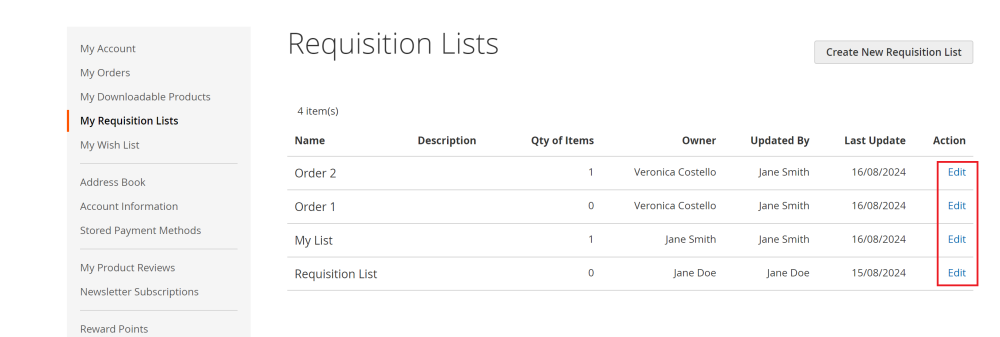
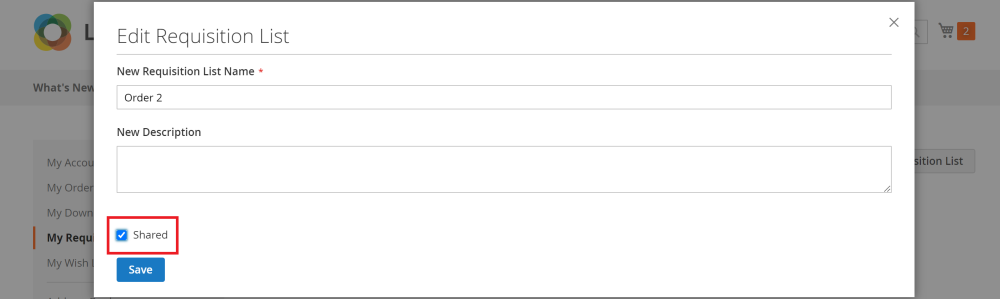
While editing a requisition list, users can choose to share the list with other company members or keep it private.
To share a list within the company, select the desired list by clicking the Edit link in the grid.
Then at a Requisition List page click the Edit link next to the name.
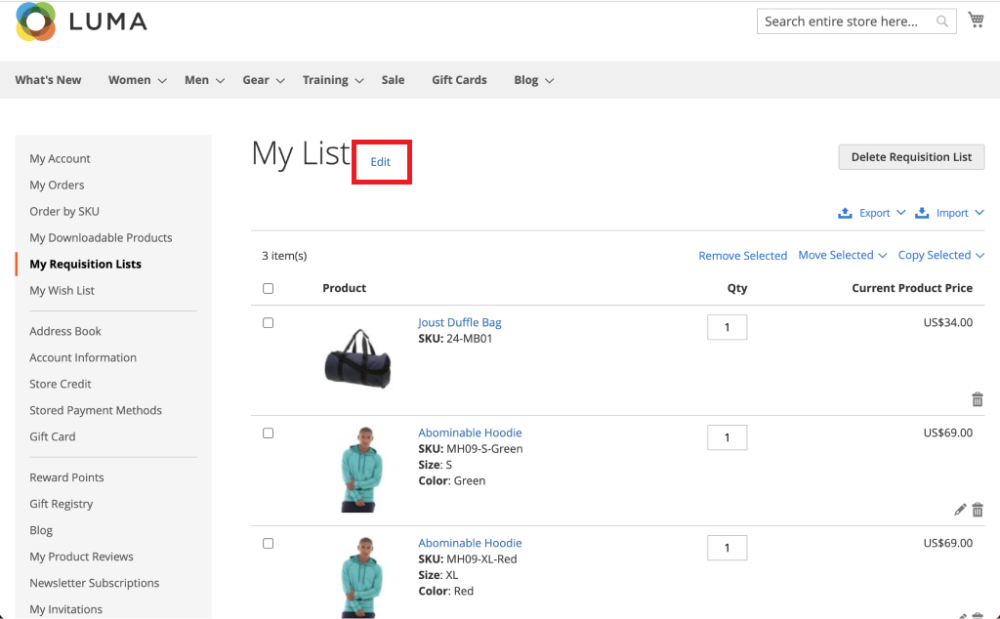
In the pop-up that appears, check the box to share the list with other company users.
|
Note: The Company Account Admin has full control over requisition lists created by company members, regardless of whether they shared it or not. This includes:
|
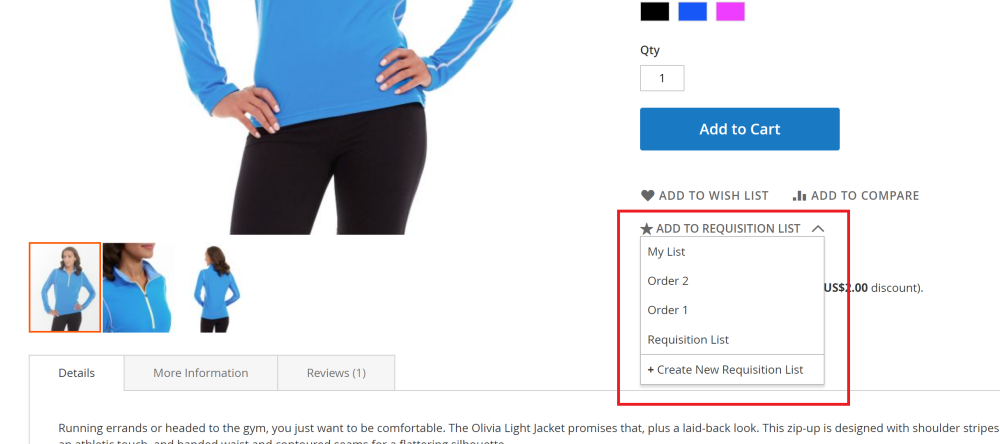
When shopping, company users can add items to their private requisition lists or any company lists that have been shared with them.
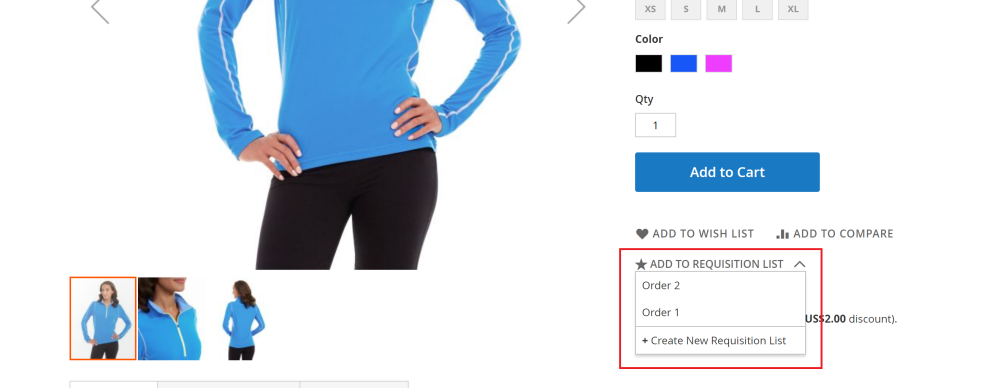
For the Company Admin, the Add to Requisition List option will show all lists created by company users, along with the Admin’s private lists, which will appear at the top of the Add to Requisition List drop-down.
Company Credit for Magento 2
Company Account and Company Credit integration allows to establish and monitor credit limits for company accounts.
| To learn more about the credit limit configuration use the Company Credit user manual. |
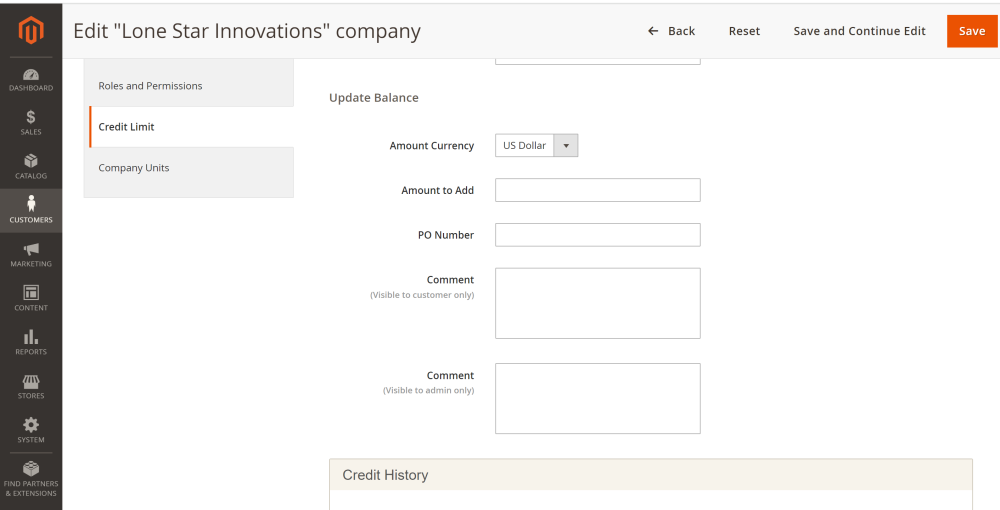
Company Credit on the backend
The company credit can be set from the backend at the Credit Limit tab on the Edit a Company account page. This page also displays current credit details.
Here, you can:
- Set the Company Credit Limit;
- Set the Credit Period - the number of days after which the credit limit usage will be restricted;
| Note: Leave empty for no limitations. The countdown starts from the date the first purchase was made with the Company Credit. |
- Allow Exceeding Credit Limit using yes/no toggle;
- Leave a comment that will be visible to the admin only;
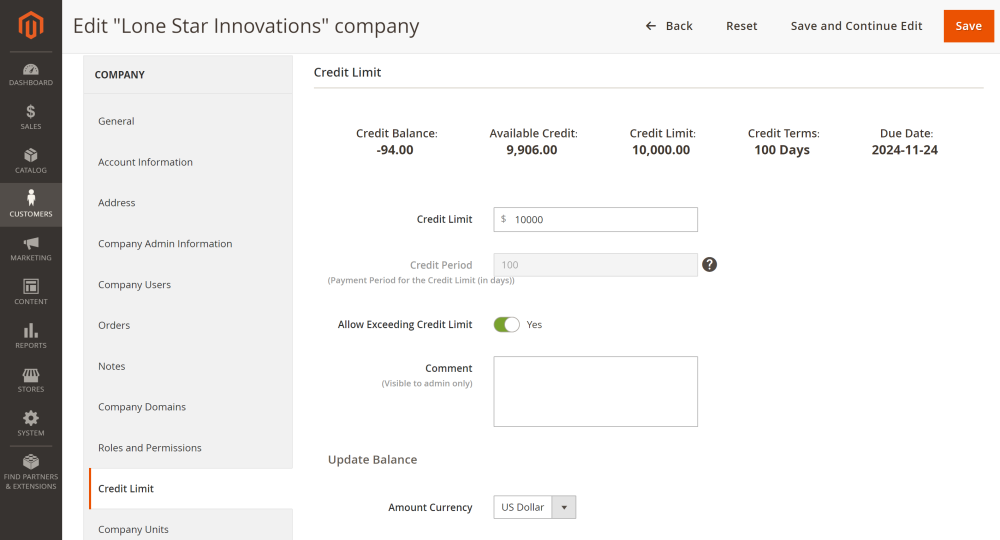
- Set the Amount Currency -a dropdown menu to select the company’s currency with no need for recalculations or conversions;
- Decide the Amount to Add - a sum of money to add to the existing credit balance;
- Set the PO Number - the order number associated with this credit transaction.
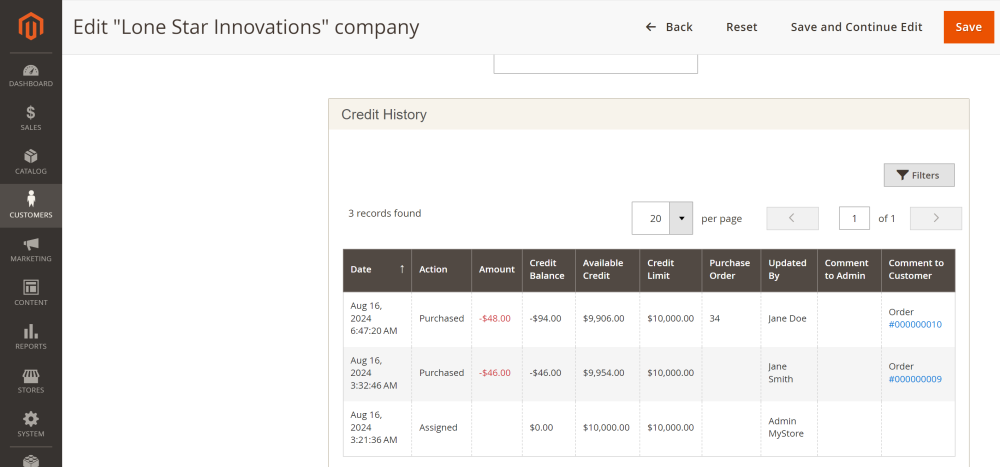
The Credit History is displayed on the same page and organized in a grid with filtering options. The grid includes:
The grid contains the following columns:
- Date - the specific date and time of each transaction;
- Action - the transaction type (e.g., Assigned, Changed, Purchased, Updated);
- Amount - the value added or deducted from your account during the credit transaction;
- Credit Balance - the current credit balance;
- Available Credit - the credit amount that the customer can currently use;
- Credit Limit - the maximum credit allowed;
- Purchase Order - the ID of the purchase order;
- Updated By - the name of the user who performed transaction;
- Comment to Admin - notes for the admin, viewable only on the backend;
- Comment to Customer - notes for the customer, visible on the storefront as well.
Once the configuration is completed, click the Save button.
Company Credit on the storefront
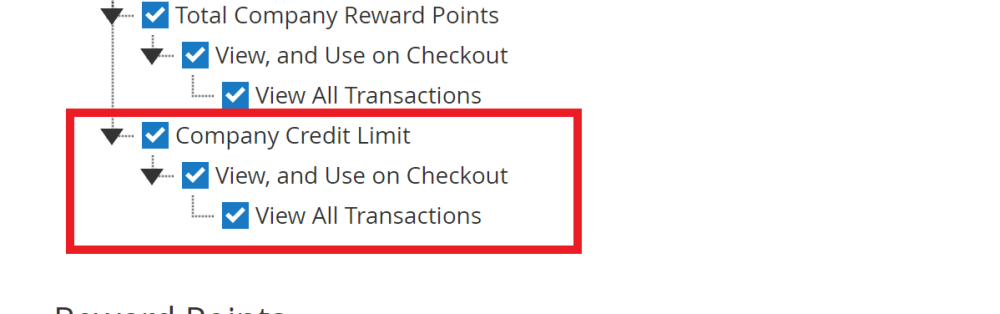
On the Edit Role page, the Company Admin can manage user permissions for viewing and using the credit limit at checkout, as well as for accessing the full transaction history.
When Company Credit extension is enabled, the Credit Limit tab will be available in My Account.
Here the company admin and company users (if permission is granted) can see the current credit details as well as credit transactions history, using the same grid layout as seen in the backend.
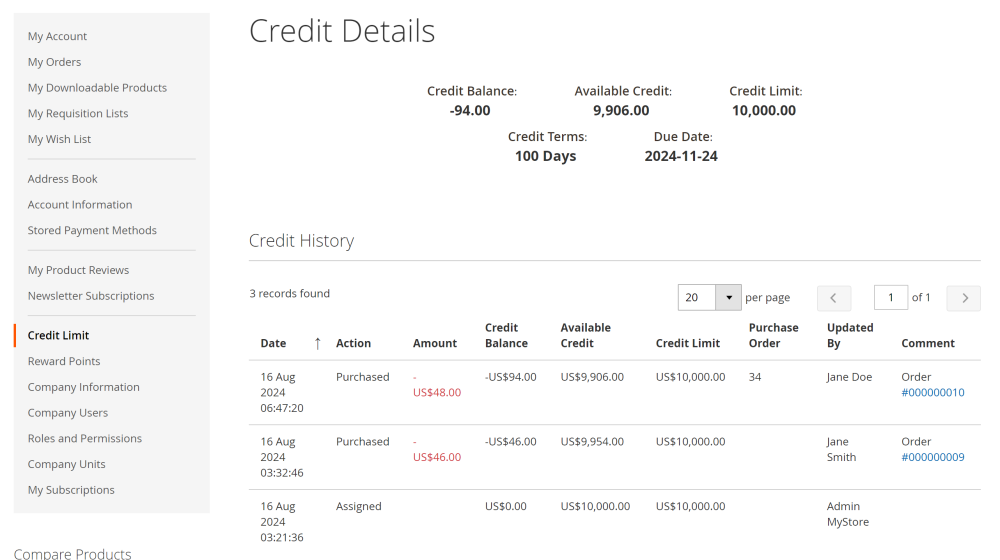
On the checkout the company admin and users (if permission is granted) can choose Credit Limit as a payment method. Here, users can also set a Purchase Order Number that will be displayed in the credit history grid on both the frontend and backend.
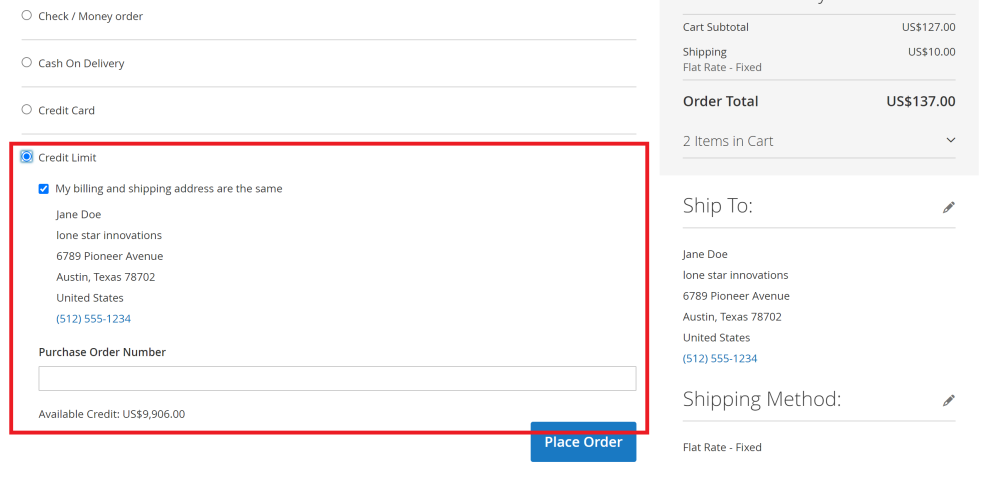
![]()
Already used our product?
We would appreciate your feedback. Please, leave a review.